
Popular categories
Looking for a yarn?


Comments / Questions (61)
![]() Deborah wrote:
Deborah wrote:
Grazie mille, ci proverò. Gentilissimi!
24.01.2017 - 21:52
![]() Deborah wrote:
Deborah wrote:
Buonasera. Vorrei provare a fare il poncho ma mi chiedevo se fosse possibile farne un maglione....se gli aumenti per le raglan fossero ogni due ferri e lavorassi tutto insieme fino al raggiungimento degli scalfi (misurandolo addosso) poi sospenderei le maglie per le maniche e continuassi col corpo, secondo voi farei in modo corretto? Finora top down ho lavorato solo golfini per bambini quindi per adulto sarebbe la prima volta...grazie per la disponibilità e i bellissimi modelli!
24.01.2017 - 21:21DROPS Design answered:
Buonasera Deborah, purtroppo non possiamo modificare i modelli a seguito delle vostre richieste, l'unico consiglio che possiamo darle è quello di provare il capo e adattarlo durante il lavoro mentre lo lavora. Può anche rivolgersi al suo rivenditore DROPS di fiducia per un consiglio più personalizzato. Buon lavoro!
24.01.2017 - 21:26
![]() Jojo wrote:
Jojo wrote:
Bonjour Je fait actuellement votre modèle je le trouve magnifique! Seulement je me pause une petite question.. voilà la j'en suis au 8eme rangs d'augmentation... Donc en tout à 21rangs après les côtes ai-je bon? Je fait 1 rg daug 2rg simple 1rg daug 2rangs simple svp dites moi que c'est bon... Si pas qu'est ce que je peut faire sans devoir tour détricoter... J'arrête l'ouvrage en attendant votre réponse
07.01.2017 - 14:01DROPS Design answered:
Bonjour Jojo, c'est exact, vous tricotez 1 tour avec 8 augmentations et 2 tours sans augmentations, vous répétez ces 3 tours 16-17 fois au total (cf taille), après 8 tours d'augmentations x 8 augmentations, vous avez augmenté 64 mailles au total. Bon tricot!
09.01.2017 - 13:29
![]() Johanna wrote:
Johanna wrote:
Merci beaucoup de votre réponse aussi rapide ! J'ai oublié de faire mon rang envers je vais donc rectifier... Pour vos aug sa fonctionne comment ? On l'est fait quel moment dans le rang (la ou je fait les 9m ?) Parce que je ne comprend pas se que vous voulez dire part section ... Je vous remercie de votre aide
05.01.2017 - 13:41DROPS Design answered:
Bonjour Johanna, les augmentations après la côte mousse (à 10 cm), se font sur toutes les mailles du tour - voir ici comment les répartir. Augmentez ensuite avant et après chacune des 4 sections tricotées (1 m env, 3 m end, 1 m env) = 8 augmentations. Bon tricot!
05.01.2017 - 14:45
![]() Johanna wrote:
Johanna wrote:
Bonjour ! J'ai vue votre modèle il m'intéresse beaucoup mais je ne comprends pas trop... Après les 10cm de côte on fait un rang point mousse avec les 18 aug Et ensuite sa marche comment ?! Parce que je ne comprend rien enfaite je sais pas si c'est sur un rang complet ou si c'est de moitié en faite je suis perdu j'ai vraiment besoin d'aide pouvez vous m'expliquer le rang et se que je doit faire svp ?
04.01.2017 - 21:37DROPS Design answered:
Bonjour Johanna, à 10 cm on tricote 1 côte mousse, soit 1 tour end et 1 tour env. Vous tricotez ainsi 1 tour end en augmentant 18 m à intervalles réguliers sur ce tour, et tricotez ensuite 1 tour env. Vous continuez ensuite comme indiqué pour votre taille. Bon tricot!
05.01.2017 - 08:25
![]() Sophie wrote:
Sophie wrote:
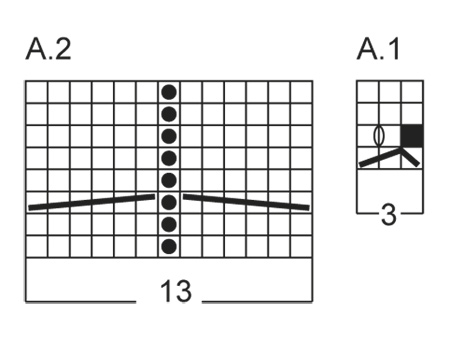
I'm trying to make the headband, and I find myself very confused by the a1 diagram. Particularly the two rows at he bottom. Yarn over between two stitches, no problem. What I don't understand is the bound stitch. Do I bind it off? And afterwards the slip on knit two and pass the slipped stitch over the knits, I am left with one less stitch to work with no? I've been trying to work this since yesterday and can't seem to understand it. Thanks!
28.08.2016 - 17:32DROPS Design answered:
Dear Sophie, A.1 is worked over 3 sts, on 1st row work: slip 1 st as if to K, K 2, psso the 2 K sts (= 2 sts remain) - on next row, make a YO between the 2 remaining sts (= 3 sts again), then work the last 2 rows in stocking st - and repeat these 4 rows. Happy knitting!
29.08.2016 - 12:18
![]() Simona wrote:
Simona wrote:
Buongiorno, per una taglia 42/44 che misura devo fare? La S/M ? Grazie mille Simona
04.05.2016 - 16:42DROPS Design answered:
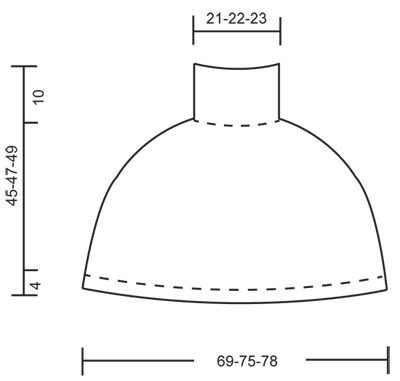
Buonasera Simona. In fondo alla pagina, dopo le spiegazioni, trova un grafico con le misure espresse in cm. Confrontando queste misure con un suo indumento analogo e che la soddisfa, riuscirà a trovare la misura corretta da seguire. Tenga presente che le taglie Drops vestono comodo. Buon lavoro!
04.05.2016 - 17:00
![]() Camilla Rasmussen wrote:
Camilla Rasmussen wrote:
Er det ikke alt for mange masker at starte med? Jeg synes omkring 130 masker er mange til en krave.
03.12.2015 - 21:43DROPS Design answered:
Hej Camilla, Husk at ribstrik trækker sig meget sammen. God fornøjelse!
04.12.2015 - 08:15
![]() Nannie wrote:
Nannie wrote:
Bonjour, J'ai un gros problème pour la gestion des augmentations de la section 1 m env, 3 m end, 1 m env au fil des rangs. - Où dois-je placer le jeté d'augmentation dans la section et comment gérer la répartition mailles endroit et envers du fait de l'augmentation les rangs suivants. Merci pour votre aide ; J'espère avoir été claire ... Bien cordialement
24.08.2015 - 16:37DROPS Design answered:
Bonjour Nannie, les augmentations se font de chaque côté des sections (1 m env, 3 m end, 1 m env), c'est-à-dire qu'on augmente 1 m avant + 1 m après avoir tricoté (1 m env, 3 m end, 1 m env), 4 fois au total (soit 8 augm par tour). les mailles avant et après ces sections se tricotent à l'end, les jetés se tricoteront torse à l'end au rang suivant (pour éviter les trous). Bon tricot!
25.08.2015 - 09:22
![]() Inge Munch wrote:
Inge Munch wrote:
Ved diagram A1 er der skrevet at der er en indtagning på den pind med omslag? Skal 2 masker strikkes sammen ??eller hvordan undgår man at der kommer 4 masker på pinden ??? Mvh Inge Munch
26.03.2015 - 21:16DROPS Design answered:
Hej Inge, det er den indtagning du lavede pinden under. 1.p tag 1 m løst af p som om den skulle strikke ret, 2 m ret, tag den løse m over. Nu har du kun 2 masker. 2.p 1r, 1 omslag, 1 ret. Nu har du igen 3 masker. God fornøjelse!
15.05.2015 - 14:25
|
||||||||||||||||||||||
Cold Springs#coldspringsset |
||||||||||||||||||||||
|
|
||||||||||||||||||||||
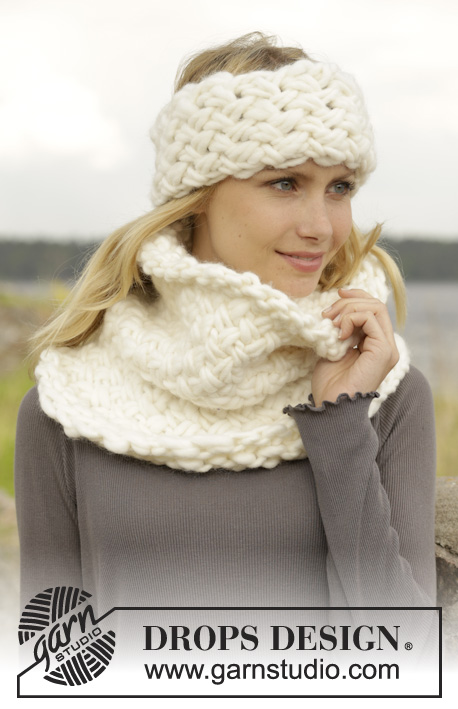
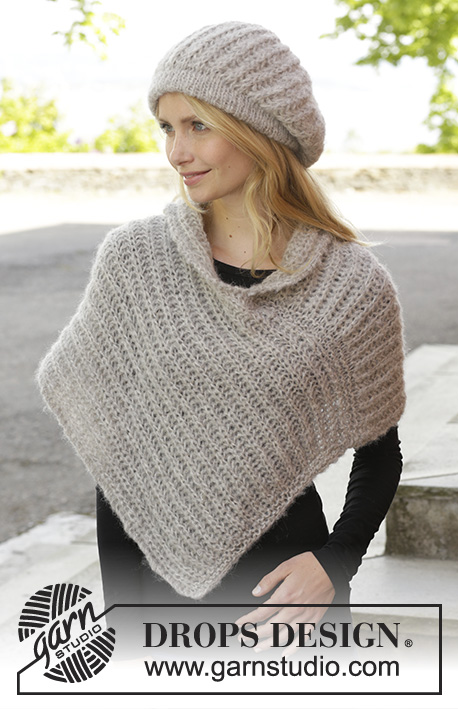
Knitted DROPS poncho and head band with cables, worked top down in ”Alaska”. Size S-XXXL.
DROPS 157-15 |
||||||||||||||||||||||
|
PATTERN: See diagrams A.1-A.2. The diagrams show all rows in pattern seen from RS. GARTER ST (in the round on circular needle): * K 1 round and P 1 round *, repeat from *-*. 1 ridge = 2 rounds. GARTER ST (back and forth on needle): K all rows. 1 ridge = K2 rows. INCREASE TIP: Inc 1 st by making a YO. On next round K YO twisted (i.e. work in back loop of st instead of front) to avoid holes. ---------------------------------------------------------- PONCHO: Worked in the round on circular needle, top down. Cast on 132-138-144 sts on circular needle size 4 mm / US 6 with Alaska. K 1 round. Then work rib (= K 3/P 3). When piece measures 10 cm / 4'', work 1 ridge in GARTER ST - see explanation above AT THE SAME TIME on 1st row inc 18-24-28 sts evenly = 150-162-172 sts. Switch to circular needle size 5 mm / US 8. REMEMBER THE GAUGE! Round now beg in one side of piece. * K 9-11-11, P 1, K 3, P 1, K 1-2-2, P 1, A.1 (= 3 sts), P 2, A.2 (= 13 sts), ** P 2, A.1 **, repeat from **-** 0-0 1 more time, P 2, A.2, P 2, A.1, P 1, K 1-2-2, P 1, K 3, P 1, K 9-11-11 *, repeat from *-* 1 more time. AT THE SAME TIME inc on each side of all P 1, K 3, P 1 – SEE INCREASE TIP = 8 sts inc. K inc sts. Repeat inc every 3rd round 16-17-17 times in total = 278-298-308 sts. Continue pattern. When piece measures 41-43-45 cm / 16"-17"-17 3/4", switch to circular needle size 4 mm / US 6 and work 1 ridge over all sts AT THE SAME TIME inc 4-2-4 sts evenly = 282-300-312 sts. Then work rib = K 3/P 3 until piece measures 45-47-49 cm / 17 3/4"-18½"-19 1/4". Bind off sts with K over K and P over P. ---------------------------------------------------------- HEAD BAND: Worked back and forth on needle. Cast on 23 sts on needle size 5 mm / US 8 with Alaska. Work 1 ridge in GARTER ST - see explanation above AT THE SAME TIME on last row inc 6 sts evenly = 29 sts. Then work as follows from RS: K 2, P 1, A.1 (= 3 sts), P 2, A.2 (= 13 sts), P 2, A.1, P 1, K 2. Continue pattern like this. REMEMBER THE GAUGE! When piece measures 47 cm / 18½'', work 1 ridge over all sts AT THE SAME TIME on 1st row dec 6 sts evenly = 23 sts. Bind off. Sew head band tog mid back. |
||||||||||||||||||||||
Diagram explanations |
||||||||||||||||||||||
|
||||||||||||||||||||||
 |
||||||||||||||||||||||
 |
||||||||||||||||||||||
Have you finished this pattern?Tag your pictures with #dropspattern #coldspringsset or submit them to the #dropsfan gallery. Do you need help with this pattern?You'll find 15 tutorial videos, a Comments/Questions area and more by visiting the pattern on garnstudio.com. © 1982-2026 DROPS Design A/S. We reserve all rights. This document, including all its sub-sections, has copyrights. Read more about what you can do with our patterns at the bottom of each pattern on our site. |
||||||||||||||||||||||


With over 40 years in knitting and crochet design, DROPS Design offers one of the most extensive collections of free patterns on the internet - translated to 17 languages. As of today we count 324 catalogs and 12290 patterns - 12280 of which are translated into English (US/in).
We work hard to bring you the best knitting and crochet have to offer, inspiration and advice as well as great quality yarns at incredible prices! Would you like to use our patterns for other than personal use? You can read what you are allowed to do in the Copyright text at the bottom of all our patterns. Happy crafting!
Post a comment to pattern DROPS 157-15
We would love to hear what you have to say about this pattern!
If you want to leave a question, please make sure you select the correct category in the form below, to speed up the answering process. Required fields are marked *.