
Popular categories
Looking for a yarn?


Comments / Questions (275)
![]() Cf32000 wrote:
Cf32000 wrote:
Bonjour, Au début des manches, pourquoi faire un tour tout à l'endroit alors que presque toutes les mailles (sauf torsades) sont à l'envers ? Cela va créer une démarcation dans le motif.
22.04.2026 - 18:58DROPS Design answered:
Bonjour, Vous avez tout à fait raison, on doit tricoter 1 tour comme avant et pas 1 tour en mailles endroit, une correction va être faite, merci pour votre retour. Bonne continuation!
23.04.2026 - 10:32
![]() Margaret wrote:
Margaret wrote:
Drops 15619 do you begin this pattern in the round and after 6 rows change to bachband forward. I have used several of your patterns byput this seems too difficult . Is there a split in the back?
11.04.2026 - 17:38DROPS Design answered:
Hi Margaret, The jumper is worked in the round all the way through, apart from the short rows which give you an elevation at the back of the neck. While working the short rows, the stitches which are not being worked stay on the needle, then are worked afterwards in the round again when the short rows are finished. If you click on "Videoes" at the top of the page, one of the bottom videos explains further how to work short rows in garter stitch. Regards, Drops Team.
13.04.2026 - 07:40
![]() Caroline wrote:
Caroline wrote:
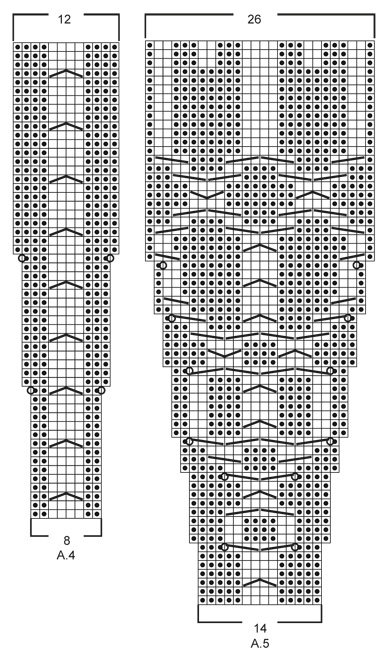
Bonjour il semble y avoir une erreur sur le diagramme A5 au rang 17 : en effet, si on fait au rang précédent ce qui est indiqué, on se retrouve au rang 17 avec 3m env, 2 m. end, 8m env, 2m end, 3m env. Et non 3m env, 4m end, 4m env, 4m end, 3m env.
22.02.2026 - 12:31DROPS Design answered:
Bonjour Caroline, vous devez en fait avoir 18 m au 16ème rang (vous avez augmenté 2 m au 15ème rang) et vous avez donc: 5 m env, 2 m end, 4 m env, 2 m end, 5 m env. Au 17ème rang tricotez: 3 m env, torsade (2 m env derrière, 2 m end, puis les 2 m env), 4 m env, torsade (2 m end devant, 2 m env, puis les 2 m end), et 3 m env. Bon tricot!
23.02.2026 - 08:48
![]() Cf wrote:
Cf wrote:
Dernière question j\'espère : on commence A4 et A5 en même temps, mais A4 ne se tricote que sur 54 rangs alors qu\'A5 continue. Dois-je poursuivre la torsade où dois-je tricoter A4 comme des côtes ensuite ?
18.02.2026 - 18:53DROPS Design answered:
Bonjour Cf., quand A.4 est terminé, continuez les torsades comme avant (tous les 6 rangs), mais vous n'augmentez plus dans A.4. Bon tricot!
19.02.2026 - 08:42
![]() Caroline wrote:
Caroline wrote:
En taille S, je ne comprends pas à quoi correspondent les 6+7mailles au début du tour puis les 7+1 mailles à la fin, sachant qu'on a monté 12 mailles sous chaque manche ?
16.02.2026 - 21:34DROPS Design answered:
Bonjour Caroline, le début du tour se trouve avant les 12 mailles montées sous la manche, vous avez ainsi: 12 nouvelles mailles, 1 m envers (dernière augmentation du raglan = soit 13 mailles envers avant le 1er A.2 en taille S - de même à la fin du tour: vous terminez par les 6 m de A.1 + 1 m envers (juste avant les 12 mailles montées sous la manche). Bon tricot!
18.02.2026 - 09:35
![]() Caroline wrote:
Caroline wrote:
Pour les diminutions dans chaque section envers, j\'essaie de comprendre mais ça n\'est vraiment pas simple : si j\'en crois la place des sections envers et des marqueurs indiquées, il me semble qu\'on doit diminuer AVANT les deux premiers marqueurs et APRÈS les marqueurs 3 et 4, puis Avant les marqueurs 5 et 6 et après les marqueurs 7 et 8. Pourriez-vous me confirmer que mon interprétation est la bonne ?
16.02.2026 - 21:32DROPS Design answered:
Bonjour Caroline, vous devez diminuer le nombre de mailles envers dans les sections avec un marqueur, donc effectivement comme vous l'avez indiqué, vous avez tout juste. Bon tricot!
18.02.2026 - 09:33
![]() Kristel wrote:
Kristel wrote:
Goeie dag. Waar moet ik nu meerderen voor de raglan? Net voor en achter de markeerder?
01.02.2026 - 15:49DROPS Design answered:
Dag Kristel,
Helemaal bovenaan bij de instructies voor het patroon staat precies beschreven hoe je meerdert voor de raglan.
03.02.2026 - 21:59
![]() Júlia wrote:
Júlia wrote:
Meine Maschenprobe mit Dropslima ist 1,5 cm kleiner als angegeben (21 M = 10cm, bei mir 21 M= 8,5 cm) Wie kommt so ein großer Unterschied zustande? ^^
31.01.2026 - 07:15DROPS Design answered:
Liebe Júlia, das kann sein, wenn Sie sehr fest stricken. Nehmen Sie eine dickere Nadel und messen Sie erneut. Achten Sie außerdem darauf, die Maschenprobe korrekt anzufertigen (ansonsten kann das zu Messfehlern führen), Tipps dazu finden Sie bei uns unter "Tipps & Hilfe" =>Lektionen => Anleitungsgrundlagen, dort finden Sie eine Lektion zum Messen der Maschenprobe. Viel Spaß beim Stricken!
31.01.2026 - 12:31
![]() Cf32 wrote:
Cf32 wrote:
Bonjour Que voulez-vous dire par "Ajuster les premières torsades de A.4 et A.5 pour avoir une jolie transition entre les diagrammes. " ?
27.01.2026 - 17:32DROPS Design answered:
Bonjour Cf32, lorsque vous commencez à tricoter A.4 et A.5, faites en sorte de croiser les mailles de A.4 et de A.5 sur le même tour que pour A.2. Bon tricot!
28.01.2026 - 08:53
![]() Marianne wrote:
Marianne wrote:
Hi do you increase in every purl section in the rib? Thats a lot of increases
23.01.2026 - 14:42DROPS Design answered:
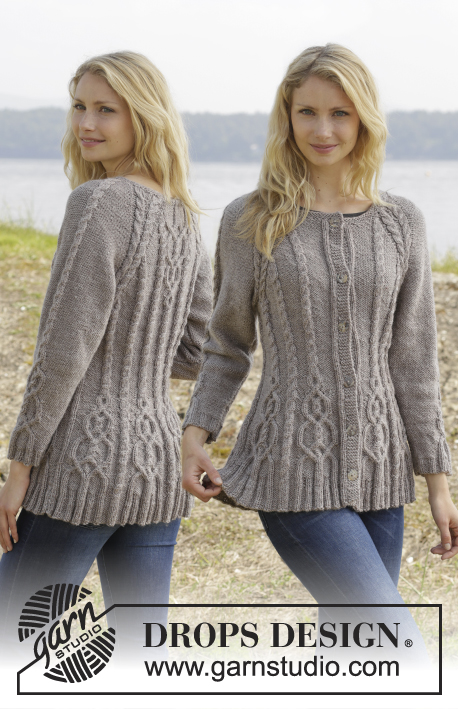
Dear Marianne, yes, at the very end of the pattern, you will increase in every purl section. You can see in the photo that the final rib section is quite wide, because of the high amount of increases. Happy knitting!
25.01.2026 - 17:21
|
||||||||||||||||||||||||||||
Alana#alanasweater |
||||||||||||||||||||||||||||
 |
 |
|||||||||||||||||||||||||||
Knitted DROPS jumper with cables and raglan, worked top down in ”Karisma”. Size S-XXL
DROPS 156-19 |
||||||||||||||||||||||||||||
|
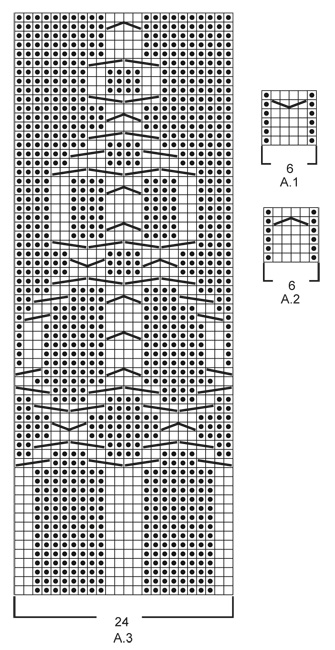
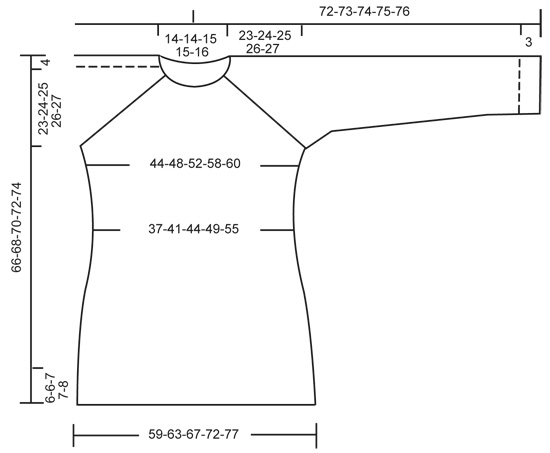
GARTER ST (in the round on circular needle): * K 1 round and P 1 round *, repeat from *-*. 1 ridge = 2 rounds. GARTER ST (back and forth on needle): K all rows. 1 ridge = K2 rows. PATTERN: See diagrams A.1 - A.5. The diagrams show all rows in pattern seen from RS. RAGLAN: Inc on each side of raglan sts (A.1/A.2, marker, A.2/A.1) by making 1 YO = 8 inc on round. On next round K the YOs twisted to avoid holes. Then P the new sts on sleeves, and on front and back piece work the new sts in pattern as explained below. DECREASE TIP (applies to sleeves): Dec on each side of marker as follows: Work until 3 sts remain before marker, P 2 tog, P 2, P 2 tog = 2 sts dec. INCREASE TIP: Inc 1 st by making a YO. On next round P YOs twisted, i.e. work in the back loop of st instead of front to avoid holes. P the new sts. ---------------------------------------------------------- JUMPER: Worked top down in the round on circular needle. Work sleeve in the round on circular needle/double pointed needles. YOKE: Cast on 92-92-97-97-101 sts on circular needle size 4 mm / US 6 with Karisma. Work 3 ridges in GARTER ST in the round on circular needle - see explanation above. Continue to work an elevation in GARTER ST back and forth -see explanation above, from mid back as follows (1st row = RS): Now work 5-5-7-7-9 sts, turn, work 10-10-14-14-18 sts, turn, work 15-15-19-19-23 sts, turn, work 20-20-24-24-28 sts, turn, work 25-25-29-29-33 sts, turn, work 30-30-34-34-38 sts, turn, work 35-35-39-39-43 sts, turn, work 40-40-43-43-48 sts, turn, work back to beg of round. Now K 1 round AT THE SAME TIME inc 24-24-23-23-27 sts evenly = 116-116-120-120-128 sts. P 18-18-19-19-21, insert 1st marker here (= this is now beg of round), A.2, P 2, A.2, P 2, A.1, insert 2nd marker here, A.2, P 0-0-1-1-3, A.3, P 0-0-1-1-3, A.1, insert 3rd marker here, A.2, P 2, A.2, P 2, A.1, insert 4th marker here, A.2, P 0-0-1-1-3, A.3, P 0-0-1-1-3, A.1. READ THE NEXT 2 SECTIONS BEFORE CONTINUING! REMEMBER THE GAUGE! On next round beg inc for RAGLAN – see explanation above, AT THE SAME TIME work pattern as follows: RAGLAN: Repeat inc every round 0-2-10-20-20 times in total. Then inc every other round 23-32-30-26-27 times and every 3rd round 6-0-0-0-0 times = 348-388-440-488-504 sts. PATTERN: Work pattern on body as follows (P the inc sts on sleeves): Work the first 6 sts inc in A.2, then P next 8-9-7-8-8 inc sts, work the next 6 inc sts in A.2, P the next 8-9-7-8-8 inc sts. NOTE: (Size M-L-XL-XXL): When A.3 has been worked 1 time vertically, continue with A.2 over cable and P the remaining sts from A.3 until start of body. S/M: Then inc as before on sleeve and inc inside A.1/A.2 (i.e. between A.1 and A.2, towards marker for raglan) on front and back piece 1-4 more times. P the new sts. L/XL/XXL: Continue with A.2 over the next 6 inc sts, P the next 7-8-8 inc sts, then inc as before on sleeve and inc inside A.1/A.2 (i.e. between A.1 and A.2, towards marker for raglan) on front and back piece 1-4-5 more times. P the last 1-4-5 inc sts. Piece now measures 27-28-29-30-31 cm / 10½"-11"-11½"-11¾"-12¼" from shoulder. Now work as follows: Slip the first 80-90-102-114-116 sts on a stitch holder for sleeve, cast on 12 new sts under sleeve, insert a blue marker in the middle of these new sts, work the next 94-104-118-130-136 sts (= front piece), slip the next 80-90-102-114-116 sts on a stitch holder for sleeve, cast on 12 new sts under sleeve, insert a blue marker in the middle of these new sts, work the remaining 94-104-118-130-136 sts on round (= back piece). NOW MEASURE THE PIECE FROM HERE. BODY: There are now 212-232-260-284-296 sts for body. Then continue pattern as follows: S/M: P 6-3, * A.2 0-1 time in width, P 7-7, A.2, P 8-9, insert a marker, A.2, P 8-9, insert a marker, A.2, P 9-9, A.2, P 9-9, A.2, insert a marker, P 8-9, A.2, insert a marker, P 8-9, A.1*, P 7-7, repeat from *-* 1 more time, P 1-4 L/XL/XXL: P 3-3-0, * A.2 1-1-2 times in width, P 4-6-5, A.2, P 7-8-8, insert a marker, A.2, P 7-8-8, insert a marker, A.2, P 7-8-8, insert a marker, A.2, P 10-11-12, A.2, P 10-11-12, A.2, insert a marker, P 7-8-8, A.2, insert a marker, P 7-8-8, A.2, insert a marker, P 7-8-8, A.1 *, P 4-6-5, repeat from *-* 1 more time, P 1-3-5. READ THE NEXT 2 SECTIONS BEFORE CONTINUING! Now dec and inc at the same time as follows: DECREASE: Dec differently as follows - READ DECREASE TIP: Dec 1 st on each side of the middle cable on front and back piece. Repeat dec every 2-2-1½-1½-1½ cm / ½"-½"-½"-¾"-¾" 3-3-4-4-6 more times. AT THE SAME TIME dec 1 st towards cable in every section with P sts with marker in (= 8-8-12-12-12 markers). Repeat dec every 3-2½-5-4-4 cm / 1⅛"-⅞"-2"-1½"-1½" 2-3-1-2-2 more times. INCREASE (towards the sides): When piece measures 3 cm / 1", inc along the cable towards the sleeve (i.e. cable from raglan) in P section towards the sides – READ INCREASE TIP! Inc 4 sts on round. Repeat inc every 1½-1½-2½-1½-1 cm / ½"-½"-⅞"-½"-⅜" 3-4-2-4-10 more times. When all dec and inc are done, 188-204-228-248-276 sts remain. When piece measures 11-12-12-13-14 cm / 4½"-4¾"-4¾"-5"-5½", work pattern as follows: P 6-3-6-6-0, A.2 0-1-1-1-2 times in width, P 7-8-6-11-15, A.4 0-0-1-1-1 time in width, * A.5, A.4 *, repeat from *-* 2-2-3-3-3 more times in width, A.5 1-1-0-0-0 times in width, P 7-8-6-11-15, A.2 0-1-1-1-2 times in width, P 7-8-6-11-15, A.4 0-0-1-1-1 time in width, * A.5, A.4 *, repeat from *-* 2-2-3-3-3 more times in width, A.5 1-1-0-0-0 times in width, P 1-5-0-5-15. NOTE: Adjust the first cable in A.4 and A.5 to get a nice transition between diagrams. Continue with pattern and inc according to diagram. When A.4 and A.5 have been worked vertically and piece measures approx. 33-34-34-35-35 cm / 13"-13½"-13½"-13¾"-13¾", there are 308-324-364-384-412 sts on round. Insert a marker here. NOW MEASURE THE PIECE FROM HERE. Now work rib as follows: S/M: * Work K over K and P over P until 7-11 sts remain before the blue marker in the side, P 2, K 2, P 3-4 *, repeat from *-* 1 more time and continue with K over K and P over P the rest of round. L/XL/XXL: * Work K over K and P over P until 8-14-21 sts remain before the blue marker in the side, K 2-2-2, P 3-4-3, K 0-2-2, P 0-3-3, K 0-0-2, P 0-0-3 *, repeat from *-* 1 more time and continue with K over K and P over P the rest of round. When rib has been worked for 2 cm / ¾" from marker, inc by making 1 YO before first P st in every P section - remember INCREASE TIP. When rib has been worked for 5-5-6-6-6 cm / 2"-2"-2½"-2½"-2½", bind off with K over K and P over P. SLEEVES: Slip the 80-90-102-114-116 sts from stitch holder back on circular needle. Work 1 row over all sts and cast on 12 new sts at the end of row = 92-102-114-126-128 sts. Insert a marker in the middle of the new sts (i.e. 6 sts on each side of marker). NOW MEASURE THE PIECE FROM HERE. Then work sleeve in the round on circular needle/double pointed needles. Continue the middle cable on sleeve as before but work P over cables in raglan. On 2nd round beg dec on each side of marker - READ DECREASE TIP. Repeat dec in every other round 6 more times = 78-88-100-112-114 sts. Then dec 1 st on each side of marker every 2-1½-1-1-1 cm / ¾"-½"-⅜"-⅜"-⅜" 13-17-22-27-27 times = 52-54-56-58-60 sts. AT THE SAME TIME when piece measures 15 cm / 6", work A.5 over cable in the middle of sleeve - adjust the first cable in A.5 to get a nice transition between diagrams. NOTE: Do not inc in A.5 on sleeve, i.e. do not work YOs in diagram. When A.5 is finished and sleeve measures 37 cm / 14½", work rib as follows from marker at beg of round: P 0-0-1-2-3, K 1-2-2-2-2, P 3, K 2, P 3, K 2, P 2, continue rib as on last row in A.5 (= 26 sts), P 2, K 2, P 3, K 2, P 3, K 1-2-2-2-2, P 0-0-1-2-3. Continue like this for 3 cm / 1", bind off with K over K and P over P. ASSEMBLY: Sew the holes under the sleeves. |
||||||||||||||||||||||||||||
Diagram explanations |
||||||||||||||||||||||||||||
|
||||||||||||||||||||||||||||
 |
||||||||||||||||||||||||||||
 |
||||||||||||||||||||||||||||
 |
||||||||||||||||||||||||||||
Have you finished this pattern?Tag your pictures with #dropspattern #alanasweater or submit them to the #dropsfan gallery. Do you need help with this pattern?You'll find 23 tutorial videos, a Comments/Questions area and more by visiting the pattern on garnstudio.com. © 1982-2026 DROPS Design A/S. We reserve all rights. This document, including all its sub-sections, has copyrights. Read more about what you can do with our patterns at the bottom of each pattern on our site. |
||||||||||||||||||||||||||||


With over 40 years in knitting and crochet design, DROPS Design offers one of the most extensive collections of free patterns on the internet - translated to 17 languages. As of today we count 324 catalogs and 12290 patterns - 12280 of which are translated into English (US/in).
We work hard to bring you the best knitting and crochet have to offer, inspiration and advice as well as great quality yarns at incredible prices! Would you like to use our patterns for other than personal use? You can read what you are allowed to do in the Copyright text at the bottom of all our patterns. Happy crafting!
Post a comment to pattern DROPS 156-19
We would love to hear what you have to say about this pattern!
If you want to leave a question, please make sure you select the correct category in the form below, to speed up the answering process. Required fields are marked *.