
Popular categories
Looking for a yarn?


Comments / Questions (121)
![]() Konni wrote:
Konni wrote:
Teil 2 Vor der ersten Markierung ist das Vorderteil 1M nach der ersten Markierung ärmel dann wieder vor ist wieder der ärmel dann nach kommt das rückenteil habe jetzt schon 1M am Vorderteil 2 M am Ärmel und eine M rückenteil abgenommen (die raglanschrägung sind für mich 8 M die ich komplett in jeder hinreihe abnehme) klar denke ich das ich da bestimmt einen denkfehler habe nur wo :-(
03.02.2017 - 07:56DROPS Design answered:
Liebe Konni, Sie werden an den Ärmeln/am Rückenteil und an den Vorderteilen in unterschiedlichem Rhythmus abnehmen, dh in der 1. Größ nehmen Sie 1 M vor/nach der Markierung 21 x in jeder Hin-R und an beiden Vorderteilen nehmen Sie 1 M in jeder Hin-R 19 x dann 2 M in jeder Hin-R 2x. Bei den ersten 19. Abnahmen werden Sie überall 1 M abnehmen, dann aber 2 M bei den Vorderteilen und immer 1 wie zuvor an den Ärmelnd und am Rückenteil. Viel Spaß beim stricken!
03.02.2017 - 09:50
![]() Konni wrote:
Konni wrote:
Sie schreiben an den ärmel /rücken/Vorderteil 1 m abnehmen ? NUR STEHT DOCH in dem abmahme tipp vor der makierung nach der markierung würde für mich ergeben Im zweiten Teil geht es weiter
03.02.2017 - 07:54DROPS Design answered:
Liebe Konni, am rechten Vorderteil werden Sie vor der Markierung abnehmen, bei den Ärmel werden Sie nach der Markierung am Anfang der Ärmel + vor der Markierung am Ende der Ärmel abnehmen, am Rücken werden Sie nach der Markierung am Anfang Rückenteil + vor der Markierung am Ende Rückenteil abnehmen, und am linken Vorderteil werden Sie nach der Markierung abnehmen. Viel Spaß beim stricken!
03.02.2017 - 09:45
![]() Konni wrote:
Konni wrote:
O.k. Ich denke das habe ich jetzt soweit verstanden nur bin ich mir noch nicht genau sicher wie ich der Reihe nach vor gehen soll immer im Wechsel in den hin runden erst 3 Maschen verschränkt zusammen stricken und dann 4 Maschen verschränkt zusammen stricken ???????
01.02.2017 - 20:27DROPS Design answered:
Liebe Konni, an den Ärmel/am Rückenteil werden Sie 1 M (= 3 M re zs/re verschränkt zs) 21-27 x (siehe Größe) abnehmen und an beiden Vorderteilen werden Sie 1 M 19-13 x dann 2 M (= 4 M re zs/re verschränkt zs) abnehmen (siehe unter PASSE). Viel Spaß beim stricken!
02.02.2017 - 10:09
![]() Konni wrote:
Konni wrote:
Hilfeeeeeee wie gehe ich denn nur hier vor den ersten abschnitt szricken oder den zweiten da wo 2 abnahmen sind bin ein wenig überfordert mit der anleitung ABNAHMETIPP-1 (gilt für die Raglanabnahmen): 1 M vor A.2 wie folgt abnehmen: Stricken bis noch 3 M vor A.2 übrig sind, 3 M re zusammenstricken (d.h. nun wurde 1 M als ...... 2 M vor A.2 wie folgt abnehmen: Stricken bis noch 4 M vor A.2 übrig sind, 4 M re zusammenstricken (d.h. nun wurden 2 M als .....
31.01.2017 - 20:24DROPS Design answered:
Liebe Konni, um 1 M für Raglan vor und nach A.2 abzunehmen, stricken Sie bis 3 M vor A.2 übrig sind, 3 M re zs stricken (= 2 M abgenommen davon 1 wird dann 1. Umschlag im A.2 ausgleichen), dann A.2 stricken, dann nach A.2 3 M re verschränkt zs stricken (= 2 M abgenommen: 1 für Raglan, 1 als Ausgleich für den Umschlag in A.2). So macht man auch wenn man 2 M abnehmen soll, dh 4 M re/re verschränkt zs stricken: 2 M für Raglan und 1 M als Ausgleich für den Umschlag in A.2. Viel Spaß beim stricken!
01.02.2017 - 09:13
![]() Elisa wrote:
Elisa wrote:
Grazie mille, adesso posso cominciare!! grande drops!!!
26.03.2016 - 17:48
![]() Elisa wrote:
Elisa wrote:
Salve!! aiuto!!, vorrei tanto fare questo modello, ma nn ariesco a capire questa parte del diagramma = ""trasferire 2 m su un f ausiliario sul dietro del lavoro, 2 m dir, 1 m rov, dal f ausiliario"" se ho trasferito due maglie sul ferro ausiliario, perch'e mi dice di lavorare una sola? scusate, ma se qualcuno ha già fatto questo modello, potrebbe gentilmente aiutarmi. grazie mille!!!
21.03.2016 - 12:49DROPS Design answered:
Buongiorno Elisa. Abbiamo corretto la descrizione del simbolo. Bisogna trasferire una sola m sul ferro ausiliario. La ringraziamo per la segnalazione. Buon lavoro!
21.03.2016 - 13:10Ria Janson wrote:
Begonnen met nr 157 -12 Vind het jammer dat het ajourpatroon op het rugpand niet helemaal weer gegeven is en er staat ook niet beschreven hoe je moet beginnen Moet het zelf eigenlijk uit gaan tekenen hoe ik ermee moet beginnen Jammer, het is wel een heel mooi patroon
11.03.2016 - 17:50
![]() Doudan Elisabeth wrote:
Doudan Elisabeth wrote:
Bonjour, Je suis actuellement sur les manches j'ai bien fait les 10 premières augmentations sans soucis . Mais j'ai un doute sur les 13 suivantes. Il faut bien augmenter à tous les ronds ou ts les deux ronds (ce qui reviendrait à un aller retour en jersey normal) car là je trouve que ca fait une espèce d'échelle pas très joli au niveau des augmentations. merci d'avance !!!
11.10.2015 - 22:56DROPS Design answered:
Bonjour Mme Doudan, après avoir augmenté 10 fois au total tous les 2 tours, on augmente 13 fois tous les tours = à chaque tour, on augmente 1 m de chaque côté du marqueur - voir augmentations 2. Bon tricot!
12.10.2015 - 10:14
![]() Lise wrote:
Lise wrote:
På 6. p i raglanen skal det felles til hals. 6. p er det etter å ha strikket 6 omganger (3 vr og 3 r) etter å ha satt sammen til bærestykket? Eller er det etter å ha felt 6 ganger i raglanen?
02.08.2015 - 12:50DROPS Design answered:
Hej Lise, Det er på 6.p (= 3. raglanfelling) og så igen efter 6.p en gang til. God fornøjelse!
03.08.2015 - 10:43
![]() Maya wrote:
Maya wrote:
Bonjour. j'ai un petit souci avec le diagramme a2,voila ce que je comprends,un jeté2 mailles endroit et un autre jeté,c'est ça ou je me trompe?
31.03.2015 - 16:18DROPS Design answered:
Bonjour Maya, c'est exact, au 2ème rang de A.2, on tricote bien 1 jeté, 2 m end, 1 jeté. Bon tricot!
01.04.2015 - 09:11
|
||||||||||||||||||||||||||||||||||
Diamonds And Pearls#diamondsandpearlscardigan |
||||||||||||||||||||||||||||||||||
 |
 |
|||||||||||||||||||||||||||||||||
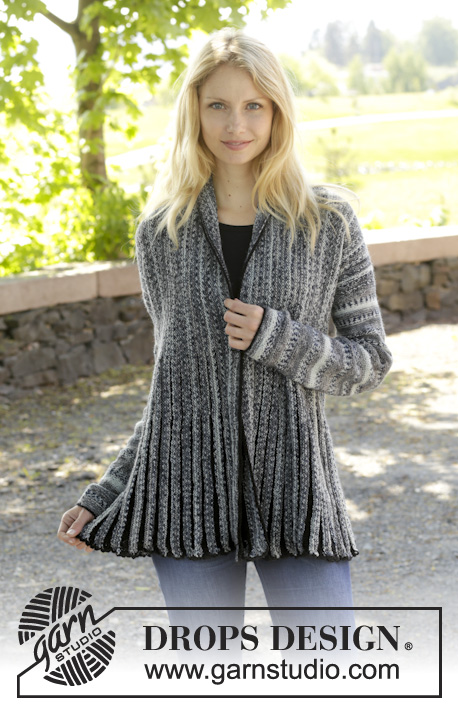
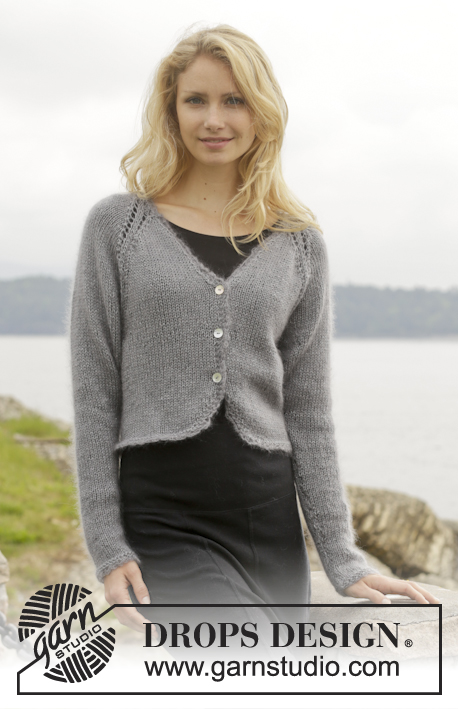
Knitted DROPS bolero with lace pattern and raglan "BabyAlpaca Silk", "Kid-Silk" and "Glitter". Size: S - XXXL.
DROPS 157-12 |
||||||||||||||||||||||||||||||||||
|
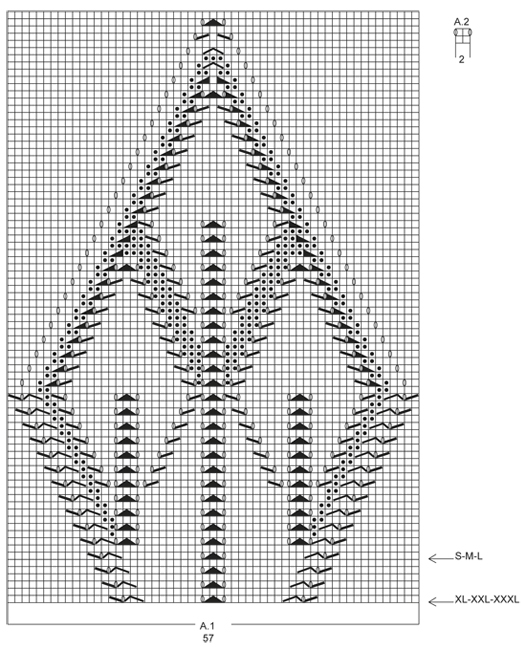
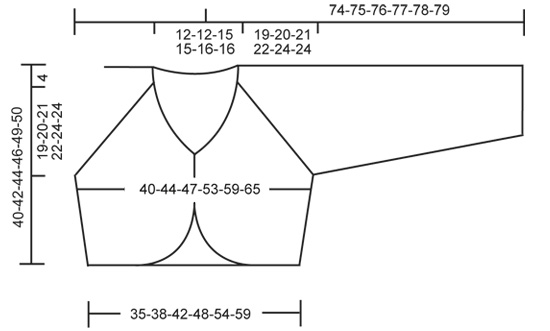
GARTER ST (back and forth on needle): K all rows. 1 ridge = K2 rows. GARTER ST (in the round on double pointed needles): * K 1 round and P 1 round *, repeat from *-*. 1 ridge = 2 rounds. PATTERN: See diagrams A.1-A.2. The diagrams show all rows in pattern seen from RS. When dec for raglan, dec in sts in pattern A.1. NOTE: Do not work YOs twisted, they should make holes. INCREASE TIP 1 (applies to mid front) All inc are done from RS. Inc 1 st by making 1 YO, on next row P YO twisted (i.e. work in back loop of st instead front) to avoid holes. INCREASE TIP 2 (applies to inc in the sides + sleeves) All inc are done from RS. Inc 1 st by making 1 YO before marker, K 1, 1 YO (= 1 st inc on each side of marker). On next row/round K/P YOs twisted to avoid holes. DECREASE TIP 1 (applies to raglan dec): Dec 1 st before A.2 as follows: Work until 3 sts remain before A.2, K 3 tog (i.e. 1 st for raglan and 1 st for YO in A.2 has been dec). Dec 1 st after A.2 as follows: K 3 twisted tog (i.e. 1 st for raglan and 1 st for YO in A.2 has been dec). Dec 2 sts before A.2 as follows: Work until 4 sts remain before A.2, K 4 tog (i.e. 2 sts for raglan and 1 st for YO in A.2 have been dec). Dec 2 st after A.2 as follows: K 4 twisted tog (i.e. 2 st for raglan and 1 st for YO in A.2 has been dec). DECREASE TIP 2 (applies to neck dec): Dec inside 2 band sts in each side. All dec are done from RS! Dec after 2 band sts as follows: Slip 1 st as if to K, K 1, psso. Dec as follows before 2 band sts: K 2 tog. BUTTONHOLES: Dec for buttonholes on right band. 1 buttonhole = K tog third and fourth st from edge and make 1 YO. Dec for buttonholes when piece measures (measured from cast-on edge): SIZE S: 7, 13 and 19 cm / 2¾",5",7½" SIZE M: 8, 14 and 20 cm / 3",5½",8" SIZE L: 7, 14 and 21 cm / 2¾",5½",8¼" SIZE XL: 8, 15 and 22 cm / 3",6",8¾" SIZE XXL: 7, 15 and 23 cm / 2¾",6",9" SIZE XXXL: 8, 16 and 24 cm / 3",6¼",9½" ---------------------------------------------------------- BODY: Worked back and forth on circular needle to make room for all the sts. Cast on 105-117-129-149-169-189 sts on circular needle size 5 mm / US 8 with 1 strand of each yarn (= 3 strands). Work 1 ridge in GARTER ST - see explanation above. P 1 row from WS with 2 edge sts in garter st in each side of piece. Then work as follows from RS: 2 sts in garter st (= band sts), 21-24-27-32-37-42 sts in stockinette st (= right front piece), insert 1 marker, 1-4-7-12-17-22 sts in stockinette st, A.1 (= 57), 1-4-7-12-17-22 sts in stockinette st (= back piece), insert 1 marker, 21-24-27-32-37-42 in stockinette st, finish with 2 sts in garter st (= band sts). Work band sts in garter st until finished measurements. Work 2 rows in garter st, stockinette st and A.1. REMEMBER THE GAUGE! READ ALL OF THE FOLLOWING SECTION BEFORE CONTINUING! INC MID FRONT AND IN THE SIDES AT THE SAME TIME AS FOLLOWS: INC MID FRONT: Inc 1 st in each side of piece inside 2 band sts - READ INCREASE TIP 1. Repeat inc every row from RS 7 more times. Work inc sts in stockinette st. Remember BUTTONHOLES - see explanation above. INC IN THE SIDES: When piece measures 3-3-4-4-5-5 cm / 1⅛"-1⅛"-1½"-1½"-2"-2", inc 1 st on each side of markers (= 4 sts inc) – see INCREASE TIP 2. Repeat inc every 3 cm / 1" 4 more times. Work inc sts in stockinette st. When all inc are done there are 141-153-165-185-205-225 sts. Continue in garter st, stockinette st and A.1 until piece measures 17-18-19-20-21-22 cm / 6¾"-7"-7½"-8"-8¼"-8¾". Then bind off 3 sts on each side of each marker for sleeve = 129-141-153-173-193-213 sts (= 33-36-39-44-49-54 sts on each front piece and 63-69-75-85-95-105 sts on back piece). Insert 1 marker in each side of piece in band sts mid front. Work an edge in garter st later between markers. Put piece aside and knit the sleeves. SLEEVE: Worked in the round on double pointed needles. Cast on 32-34-36-38-40-42 sts on double pointed needles size 5 mm / US 8 with 1 strand of each yarn (= 3 strands). Work 1 ridge in GARTER ST - see explanation above. Insert 1 marker at the beg of the round. Then work piece in stockinette st. When piece measures 11 cm / 4½", inc 1 st on each side of marker - remember INCREASE TIP 2! Repeat inc every 4-4-3½-3-2½-2½ cm / 1½"-1½"-1¼"-1"-⅞"-⅞" 6-6-7-8-9-9 more times. Switch to circular needle when needed. Then inc 1 st on each side of marker every round 13 times in total = 72-74-78-82-86-88 sts. Work until piece measures 45-45-44½-44½-44-44 cm / 17¾"-17¾"-17½"-17½"-17¼"-17¼". Then bind off 6 sts mid under sleeve (i.e. Bind off 3 sts on each side of marker) = 66-68-72-76-80-82 sts. Put piece aside and make another sleeve. YOKE: Slip sleeves on to same circular needle as body where armholes were bind off = 261-277-297-325-353-377 sts. Work as follows from WS: Work 2 sts in garter st (= band sts), 31-34-37-42-47-52 sts in stockinette st (= left front piece), A.2 (= 2 sts), 62-64-68-72-76-78 sts in stockinette st, A.2 (= left sleeve), stockinette st and A.1 as before over back piece (= 63-69-75-85-95-105 sts), A.2, 62-64-68-72-76-78 sts in stockinette st, A.2 (= right sleeve), 31-34-37-42-47-52 stockinette st, finish with 2 sts in garter st (= band sts). Continue as before in garter st, stockinette st, A.1 and A.2 AT THE SAME TIME dec for raglan – read DECREASE TIP 1. Dec is different on sleeves/back piece and front piece. ON SLEEVE/BACK PIECE: Dec 1 st on every row from RS 21-22-23-24-26-27 times = 24-24-26-28-28-28 sts on each sleeve and 21-25-29-37-43-51 sts on back piece. ON FRONT PIECE: Dec 1 st on every row from RS 19-19-19-16-16-13 times, then 2 sts on every row from RS 2-3-4-8-10-14 times, i.e. on last dec, dec 1 band st. AT THE SAME TIME on 6th row in raglan dec 1 st for neck inside the 2 band sts in garter st in each side of piece – READ DECREASE TIP 2, repeat after 6th row 1 more time, then dec every 4th row 7-7-7-8-9-10 times, then every other row 0-1-2-1-1-0 times. After all dec on front piece 1 band st remains on front piece. On the next 2 rows, bind off the 1 band st and A.2 (= 2 sts) in each side of piece. After all bind off and dec are done, 65-69-77-89-95-103 sts remain on needle. Now work an elevation in the neck as follows: Size S-M-L: Now continue piece in stockinette. Work 1 row over all sts AT THE SAME TIME dec 12-14-18 sts evenly = 53-55-59 sts. Work 26-27-29 sts (= mid back), turn piece. Work 15-16-20 sts, turn piece and work 30-32-40 sts, turn piece. Work 24-26-32 sts, turn piece and work 18-20-24 sts, turn piece. Work 14-15-17 sts, turn piece and work 10 sts. Cut the yarn and slip sts on a stitch holder. Size XL-XXL-XXXL: Continue raglan dec until sts have been slipped on a stitch holder (i.e. dec 1 st on each side of A.2 where it is possible). AT THE SAME TIME work an elevation as follows: * Work the first 6 sts, then slip them on a stitch holder and work the rest of the row. Do the same in the opposite side of the piece *, repeat from *-* 2 more times. Cut the yarn and slip the remaining sts on a stitch holder. Then pick up approx. 60-90 sts (includes sts from stitch holder) between markers on body. Work 1 ridge AT THE SAME TIME on 1st row adjust no of sts to 60-62-70-74-82-82. Bind off. EDGE: Crochet edge around front piece, the neck and in bottom edge of back piece and in sleeve edge on hook size 5 mm / H/8 with 1 strand Kid-Silk. Work 1 sc, * ch 3, skip 1 st/row, 1 sc in outer loop of outermost next st/row *, repeat from *-* around opening. Finish with 1 sl st in first sc. Fasten off. ASSEMBLY: Sew tog under sleeves. Sew the buttons on to left front piece. |
||||||||||||||||||||||||||||||||||
Diagram explanations |
||||||||||||||||||||||||||||||||||
|
||||||||||||||||||||||||||||||||||
 |
||||||||||||||||||||||||||||||||||
 |
||||||||||||||||||||||||||||||||||
Have you finished this pattern?Tag your pictures with #dropspattern #diamondsandpearlscardigan or submit them to the #dropsfan gallery. Do you need help with this pattern?You'll find 33 tutorial videos, a Comments/Questions area and more by visiting the pattern on garnstudio.com. © 1982-2026 DROPS Design A/S. We reserve all rights. This document, including all its sub-sections, has copyrights. Read more about what you can do with our patterns at the bottom of each pattern on our site. |
||||||||||||||||||||||||||||||||||


With over 40 years in knitting and crochet design, DROPS Design offers one of the most extensive collections of free patterns on the internet - translated to 17 languages. As of today we count 324 catalogs and 12290 patterns - 12280 of which are translated into English (US/in).
We work hard to bring you the best knitting and crochet have to offer, inspiration and advice as well as great quality yarns at incredible prices! Would you like to use our patterns for other than personal use? You can read what you are allowed to do in the Copyright text at the bottom of all our patterns. Happy crafting!
Post a comment to pattern DROPS 157-12
We would love to hear what you have to say about this pattern!
If you want to leave a question, please make sure you select the correct category in the form below, to speed up the answering process. Required fields are marked *.