
Popular categories
Looking for a yarn?


Comments / Questions (68)
![]() Gaetane wrote:
Gaetane wrote:
Bonjour une autre question , quand vous dites diminuez à tous les 2 tours , ça veut tu dire je tricote un rang end ,un rang env , et après je fait diminution sur end , et je retricote encore un rang end,un rang env sans diminution etc... ? Ou autrement ? Merci 🙏
12.06.2023 - 15:33DROPS Design answered:
Bonjour Gaetane, quand on doit diminuer tous les 2 tours, on tricote ainsi: *1 tour avec diminutions, 1 tour sans diminutions*, et on répète de *-*. Bon tricot!
12.06.2023 - 15:55
![]() Gaetane wrote:
Gaetane wrote:
Bonjour je vient de tout relire et si je comprends bien je tricote mon 4 cm pour le début de jambe après je fait la bordure de la jambe et après je tricote le pied c est ça ? Merci 🙏
12.06.2023 - 02:50DROPS Design answered:
Bonjour Gaetane, vous tricotez d'abord la jambe en rond pendant 4 cm, puis tricotez les 10 mailles centrales en laissant les autres mailles en attente. Cette vidéo devrait pouvoir vous aider à visualiser ce qu'il faut faire. Bon tricot!
12.06.2023 - 09:09
![]() Gaetane wrote:
Gaetane wrote:
Bonjour, lorsque rendu à tricoter le pied après mes 4 cm. De jambe, combien de cm en aller retour au point mousse dois je tricoter, avant de garder les 10 1ères mailles ? Merci 🙏
11.06.2023 - 20:58DROPS Design answered:
Bonjour Gaetane, la division se fait tout de suite, vous pouvez couper le fil et tricoter les 10 mailles centrales pendant 7-8½-10 cm (n'oubliez pas de monter 1 m à la fin des 2 premiers rangs). Bon tricot!
12.06.2023 - 09:05
![]() Gaetane wrote:
Gaetane wrote:
Bonjour , j ai finalement compris ma 1ère question grâce à vos vidéos ! Merci 🙏 Mais je comprends pas , j ai 71 mailles ,alors comment puis-je avoir 35 m. De chaque côté entre mes 2 marqueurs ? Et puis comment puis-je repartir mes mailles sur combien d aiguilles? Voilà merci 🙏
06.12.2022 - 02:39DROPS Design answered:
Bonjour Gaetane, le 1er marqueur est situé entre 2 mailles (au milieu des 10 mailles du devant), le 2ème marqueur est placé dans la maille du milieu dos, ainsi vous avez: 1 m avec le marqueur(milieu dos), 35 m, 2ème marqueur, 35 m = 71 m. Bon tricot!
06.12.2022 - 11:11
![]() Gaetane wrote:
Gaetane wrote:
H– EN MÊME TEMPS, à la fin des 2 rangs suivants monter 1 m lis (tricoter les m lis au POINT MOUSSE - voir ci-dessus) = 12 m. Quand la partie centrale mesure 7-8½-10 cm, diminuer 1 m lis de chaque côté = 10 m. Je saisi pas ça ! Comment fait on pour monter 1 maille lis ? Et est ce de chaque côté? Merci 🙏
06.12.2022 - 00:09DROPS Design answered:
Bonjour Gaetane, cette vidéo montre comment tricoter ces chaussons en commençant par cette partie, cela devrait pouvoir vous être utile (les mailles envers sont ici tricotées de cette façon). Bon tricot!
06.12.2022 - 11:09
![]() Gaetane wrote:
Gaetane wrote:
Peut on faire ce modèle avec des aiguilles circulaires? Svp 🙏 merci pour votre réponse 😉
29.10.2022 - 22:10DROPS Design answered:
Bonjour Gaetane, vous pouvez tricoter la partie "jambe" en rond sur aiguille circulaire, mais il vous faudra utiliser la technique du magic loop- le pied et la bordure autour de la jambe se tricotent en allers et retours (donc tout à fait réalisable sur circulaire). Bon tricot!
31.10.2022 - 09:48
![]() Gaetane wrote:
Gaetane wrote:
Peut on faire ce modèle avec des aiguilles circulaires svp merci 🙏 de votre réponse
29.10.2022 - 22:09
![]() Avana wrote:
Avana wrote:
Avanafil 200 buy avanafil canada
07.03.2021 - 16:56
![]() Combigan wrote:
Combigan wrote:
Brimonidine tartrate ophthalmic brimonidine side effects
07.03.2021 - 15:12
![]() Cyclosporine wrote:
Cyclosporine wrote:
Cyclomune eye drop cyclosporine 100 mg
06.03.2021 - 03:05
|
|||||||
One Step Ahead#onestepaheadslippers |
|||||||
 |
 |
||||||
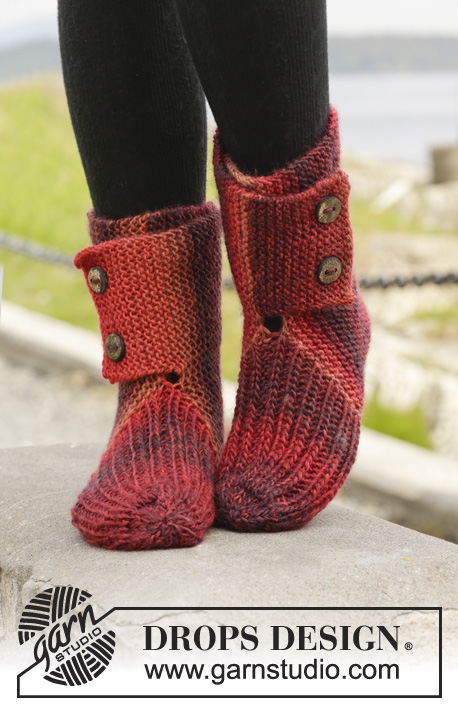
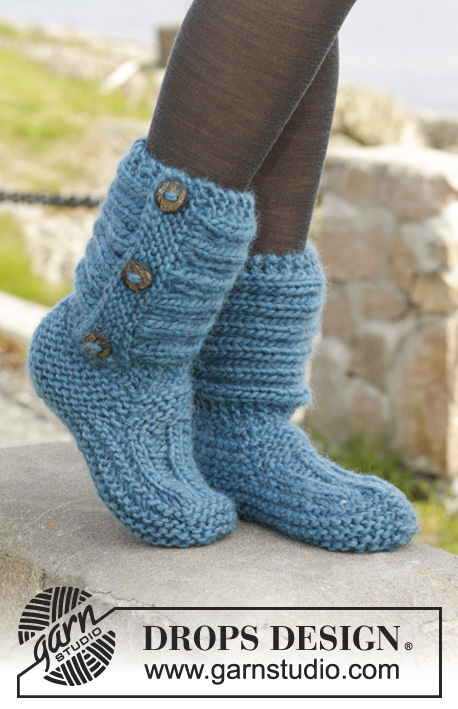
Knitted DROPS slippers in garter st with rib in "Andes".
DROPS 158-47 |
|||||||
|
GARTER ST (in the round on double pointed needles): * K 1 round and P 1 round *, repeat from *-*. 1 ridge = 2 rounds. GARTER ST (back and forth on needle): K all rows. 1 ridge = K2 rows. PATTERN: See diagram A.1. PATTERN 2: Row 1 (= RS): * K 2, P 2 *, repeat from *-* until 2 sts remain, K 2. Row 2 (= WS): K over K and P over P. Repeat 2nd row ---------------------------------------------------------- SLIPPER: First work an edge at the bottom of leg, then work the foot. Then work a loose leg across. LEG: Cast on 37-37-39 sts on double pointed needles size 6 mm / US 10 with Andes. Work in GARTER ST in the round - see explanation above - until piece measures approx. 4 cm / 1½'', finish after 1 round P. REMEMBER THE GAUGE! FOOT: Now work piece back and forth. Now keep the first 10 sts on the needle, slip the remaining 27-27-29 sts on 1 stitch holder. Now work a middle part according to PATTERN 2 – see explanation above, over the 10 sts – AT THE SAME TIME at the end of the next 2 rows cast on 1 new edge st (work edge st in GARTER ST - see explanation above) = 12 sts. When middle part measures 7-8½-10 cm / 2 3/4"-3 1/4"-4'', dec 1 edge st in each side = 10 sts. Then slip the sts from stitch holder back on needle and pick up 12-14-16 sts on each side of middle part (inside 1 edge st) = 61-65-71 sts on needle. NOW MEASURE PIECE FROM HERE! Insert 1 marker in the middle of the 10 sts on middle part (= mid front on toe) and 1 marker in st at the back of heel, there are 30-32-35 sts between markers in each side. Now continue piece in the round in garter st. When piece measures 2 cm / 3/4'', K 2 sts tog on each side of every marker on every other round (= 4 sts less per round). Continue dec until piece measures 5-5-6 cm / 2"-2"-2½". Bind off the remaining sts. Sew seams under foot in outer loops of edge sts to avoid a chunky seam. LOOSE LEG WORKED ACROSS: Worked back and forth on needle. Cast on 22 sts on needle size 6 mm / US 10 with Andes. Work 4 ridges AT THE SAME TIME on last row inc 6 sts evenly = 28 sts. Work according to A.1 (= 28 sts) until piece measures approx. 35-36-38 cm / 13 3/4"-14 1/4"-15". Work 4 ridges AT THE SAME TIME on 1st row dec 6 sts evenly = 22 sts. Bind off. Place bind-off edge over cast-on edge and sew on 3 buttons for decoration through ridges on the leg. ASSEMBLY: Sew the loose leg worked across to cast-on edge on leg (i.e. cast-on edge for leg at beg of pattern). Sew the loose leg so that buttons are placed on the outside of slipper with opening faced backwards towards the heel – sew from WS so that seam is invisble. Knit another slipper the same way, make sure that the leg opening is in the opposite side. |
|||||||
Diagram explanations |
|||||||
|
|||||||
 |
|||||||
Have you finished this pattern?Tag your pictures with #dropspattern #onestepaheadslippers or submit them to the #dropsfan gallery. Do you need help with this pattern?You'll find 17 tutorial videos, a Comments/Questions area and more by visiting the pattern on garnstudio.com. © 1982-2026 DROPS Design A/S. We reserve all rights. This document, including all its sub-sections, has copyrights. Read more about what you can do with our patterns at the bottom of each pattern on our site. |
|||||||


With over 40 years in knitting and crochet design, DROPS Design offers one of the most extensive collections of free patterns on the internet - translated to 17 languages. As of today we count 325 catalogs and 12298 patterns - 12288 of which are translated into English (US/in).
We work hard to bring you the best knitting and crochet have to offer, inspiration and advice as well as great quality yarns at incredible prices! Would you like to use our patterns for other than personal use? You can read what you are allowed to do in the Copyright text at the bottom of all our patterns. Happy crafting!
Post a comment to pattern DROPS 158-47
We would love to hear what you have to say about this pattern!
If you want to leave a question, please make sure you select the correct category in the form below, to speed up the answering process. Required fields are marked *.