
Popular categories
Looking for a yarn?


Comments / Questions (78)
![]() GARATTI wrote:
GARATTI wrote:
Bonjour, Je ne comprends pas comment assembler les deux côtés en rond avant le premier motif A2. Pour moi il faut joindre un niveau de la fente au milieu devant et donc le début du tour se situe entre les 6 mailles point mousse et non avant A2. Pouvez vous m'expliquer?
09.04.2015 - 07:39DROPS Design answered:
Bonjour Mme Garatti, pour fermer la fente d'encolure on continue en rond sur l'endroit en décalant le début du tour à partir du 1er motif A.2: on tricote comme avant jusqu'au 1er A2 puis on continue en rond en tricotant au point mousse les 3 m de la fin des rangs et les 3 m du début des rangs, on évite ainsi un décalage dans le point mousse au niveau de la fente d'encolure. Bon tricot!
09.04.2015 - 09:54
![]() Sabina wrote:
Sabina wrote:
Jeg synes ikk jeg kan undgå at få huller i når jeg tager ud? Jeg synes jeg har prøvet mange ting
09.03.2015 - 12:04DROPS Design answered:
Hej Sabina. Strikker du omslaget drejet? Der kan nogle gange stadig vaere et lille hul - men det forsvinder höjst sandsynligt naar du har vasket den förste gang.
11.03.2015 - 15:44
![]() Anna Rita wrote:
Anna Rita wrote:
Buonasera, ho fatto le 4 coste a legaccio Lavorando avanti e indietro sui ferri circolari e nel frattempo ho fatto l'asola. Cosa significa "proseguire dal centro? Io le 3 maglie a punto legaccio per il bordo le ho fatte all'inizio del 9 ferro (diritto del lavoro) ; è giusto? Ancora non devo lavorare in tondo. .. inoltre gli aumenti ogni quanto vanno fatti? E quali? In contemporanea tutti quelli indicati rispetto ai segnapunti? Grazie
11.02.2015 - 23:16DROPS Design answered:
Buongiorno Anna Rita. Sta lavorando correttamente. Le 3 m a legaccio sono le m dei bordi (le prime e ultime 3 m sui ferri); la fotografia dovrebbe aiutarla ad individuarle facilmente. Gli aumenti vanno lavorati contemporaneamente. Cambia il numero di volte che deve ripetere gli aumenti, a seconda del segno. Inoltre, quando il lavoro misura 11 cm (gli aumenti non saranno ancora finiti), avrà completato l’apertura sul davanti e inizierà a lavorare in tondo. Ci riscriva se ha ancora difficoltà. Buon lavoro!
12.02.2015 - 09:30
![]() Hyun wrote:
Hyun wrote:
Hi, I am making a small size and I have a difficulty on the step of the beginning of round. I understand that the round should begin from the A.2 but I don't get it how the round is started from A.2 not from 3 sts band. and "work until first repetition of A2" is right side? I'm so confused. Help me please~!
31.01.2015 - 03:15DROPS Design answered:
Dear Mrs Hyun, the new beg of round will be the first repeat of A.2, continue working all sts (from RS), and join at the end of the row to work then in the round - remember to work 2 ridges in garter sts over the 6 sts under vent. Happy knitting!
02.02.2015 - 09:15Ika wrote:
Hi! I asked questions in August but had time to start in November. And ... done!!! It's not as difficult as it's read on pattern :). For the increasing part, I just followed my intuision by imagining the shape to be. Et voilà! It turns to be a cute ponch. Thanks.
11.12.2014 - 01:26
![]() Marie Barot wrote:
Marie Barot wrote:
Merci pour ce modèle, seyant et facile à porter. Je l'ai réalisé en violet mix et le rendu est très joli. Il a été rapide et agréable à tricoter. Un grand merci également pour avoir répondu aussi rapidement à ma question.
27.11.2014 - 09:50
![]() Katherine Smith wrote:
Katherine Smith wrote:
About the increases from 122 sts up to 252 sts. The pattern says inc 1 on either side of A2 but then says only do 1st 5th & 4th and 8th every other row. I know inc only occur on the RS so does that count as the every other round? Or does this mean every other round on the right side? Do that for 5 rounds then switch to the 3rd 7th & 2nd and 6th for 7 rounds, or are these meant to be alternating inc steps? Then the notes on the 4th and 6th rounds really confused me. Help me please!
11.11.2014 - 02:03DROPS Design answered:
Dear Mrs Smith, you inc either side of A2 for raglan a different way, ie you inc for raglan on body (markers 1-5 + 4-8) every 2 row a total of 5 times, every 4th row a total of 4 times... And inc for sleeves (markers 3-7 + 2-6) every other row 7 times, every 4th row 9 times... These inc start all from the beg of the raglan, so that you will inc sometimes either side of all A.2 and sometimes only on sleeves/body. Happy kniting!
11.11.2014 - 09:23
![]() Marie Barot wrote:
Marie Barot wrote:
Pour la fin de la partie devant (ou dos) en aller retour, faut-il augmenter une seule fois une maille (taille S-M) au premier rang ou augmenter une maille à chaque rang ?
30.10.2014 - 15:32DROPS Design answered:
Bonjour Mme Barot, on augmente 1 m au 1er rang, dans les m jersey on a ainsi 127 m (en taille S/M) et on continue sur ces 127 m. Bon tricot!
30.10.2014 - 17:25
![]() Tineke wrote:
Tineke wrote:
Bij een hoogte van 11cm heb ik 254 steken, bij een hoogte van 36 cm zou ik incl meerderingen 252 steken moeten hebben? Wat doe ik fout?
05.10.2014 - 22:39DROPS Design answered:
Hoi Tineke. Volgens mij gaat er iets fout bij de meerderingen. Meerder je misschien te veel te snel?
06.10.2014 - 16:41
![]() Ika wrote:
Ika wrote:
I make S size. All I understand is I suppose to work back and forth to finish the vent (first one), but on increasing part explanation (when the first time A.2 diagram explained), why it's said every 4th row/round 4-6-9 times? Are we doing back & forth work or round? Thx. (to be continued)
30.08.2014 - 17:17DROPS Design answered:
The poncho is worked back and forth until vent mid front is done, so that you will work in rows with inc until piece measures 11 cm in total, then work in the round and continue inc as before.
01.09.2014 - 09:47
|
|||||||
Autumn Stroll#autumnstrollponcho |
|||||||
|
|
|||||||
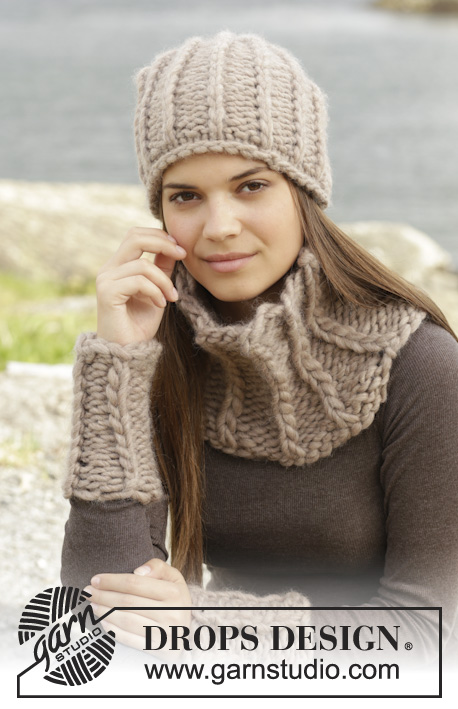
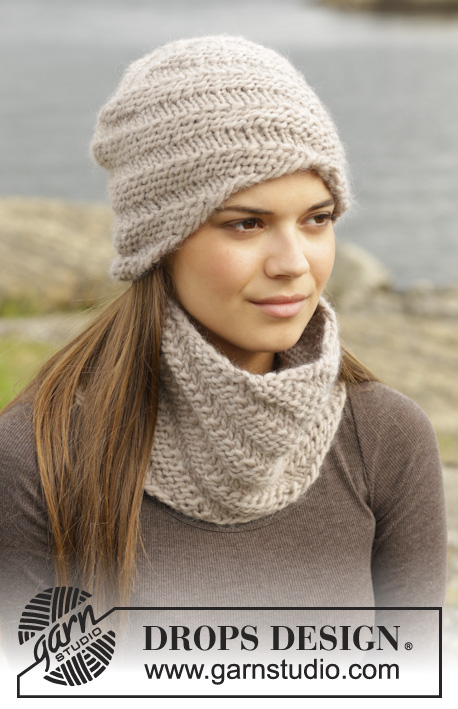
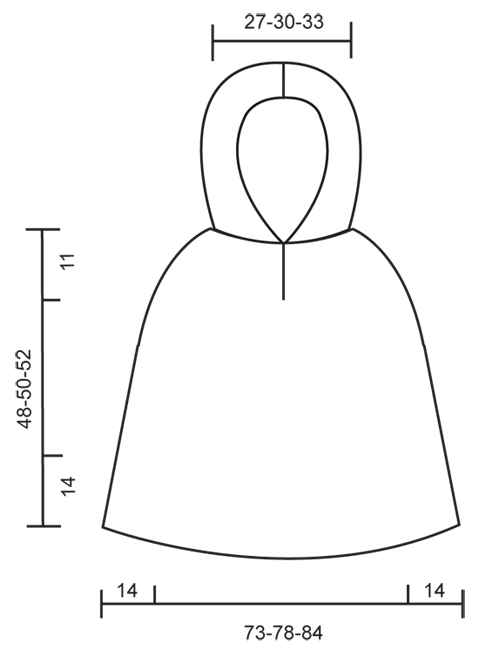
Knitted DROPS poncho with hood and vent, worked top down in ”Alaska”. Size: S -XXXL
DROPS 157-37 |
|||||||
|
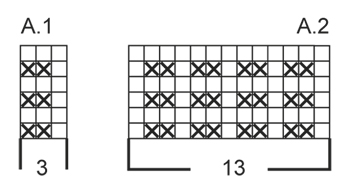
GARTER ST (back and forth on needle): K all rows. 1 ridge = K2 rows. GARTER ST (in the round on circular needle): * K 1 round and P 1 round *, repeat from *-*. 1 ridge = 2 rounds. PATTERN: See diagrams A.1 and A.2. The diagrams show all rows in pattern seen from RS. INCREASE TIP: All inc are done from RS. Inc 1 st by making a YO. On next row work YO twisted to avoid holes. Then work the new sts in stockinette st. BUTTONHOLES: Dec for buttonhole on right band. 1 buttonhole = K tog third and fourth st from edge and make 1 YO. Dec for buttonhole when piece measures approx. 2 cm / ¾" from cast-on edge. ---------------------------------------------------------- PONCHO: Poncho and hood are worked separately and sewn tog at the end. The poncho is worked top down. Work back and forth until vent mid front is done, then work in the round until vents in each side beg, then work front and back piece back and forth. Cast on 92-102-112 sts on circular needle size 5 mm / US 8 with Alaska. Work 4 ridges in GARTER ST - see explanation above, AT THE SAME TIME on 1st row in last ridge (= RS) inc 30-32-34 sts evenly = 122-134-146 sts. REMEMBER BUTTONHOLES! Then work as follows from mid front: 3 band sts in garter st, 8-10-12 sts in stockinette st, insert 1st marker here, A.2 (= 13 sts), insert 2nd marker here, 13-15-17 sts in stockinette st, insert 3rd marker here, A.2, insert 4th marker here, 22-26-30 sts in stockinette st, insert 5th marker here, A.2, insert 6th marker here, 13-15-17 sts in stockinette st, insert 7th marker here, A.2, insert 8th marker here, 8-10-12 sts in stockinette st, 3 band sts in garter st. READ ALL OF THE FOLLOWING SECTION BEFORE CONTINUING! REMEMBER THE GAUGE! Continue like this, AT THE SAME TIME on next row from RS inc on each side of every repetition of A.2 – READ INCREASE TIP! NOTE: Inc differently on front and back piece and on side pieces: Inc as follows before 1st and 5th marker and after 4th and 8th marker: Every other row 5-6-7 times, every 4th row/round 4-6-9 times and every 6th round 6-6-4 times. Inc as follows before 3rd and 7th marker and after 2nd and 6th marker: Every other row 7-8-9 times, every 4th row/round 9-10-11 times and every 6th round 2-2-2 times. When inc are done, there are 254-286-314 sts on round. AT THE SAME TIME when piece measures 11 cm / 4½" in total, the vent mid front is done and work in the round as follows: Work until first repetition of A.2 (= beg of round), work the round in the round as before with pattern and inc until the 3 sts in garter st before vent mid front, then work 6 sts in GARTER ST in the round on circular needle – see explanation above, over the 3 sts in garter st on each side of vent. Continue like this until there are 2 ridges under vent. Then continue with stockinette st, inc and A.2 until piece measures 34-36-38 cm / 13½"-14¼"-15" in total. Now work as follows from beg of round: * A.2, 21-24-27 sts in stockinette st, 7 sts in garter st, 21-24-27 sts in stockinette st *, A.2, stockinette st until next A.2, repeat from *-*, A.2, work the rest of round in stockinette st. Continue like this until there are 2 ridges on each side piece, AT THE SAME TIME on last round bind off the middle of the 7 sts in garter st in each side (= 6 sts in garter st remain), work until bind off st in the side = 252-284-312 sts on round. Then finish front and back piece separately. FRONT PIECE: Turn piece and work as follows from WS: 3 sts in garter st, stockinette st over the next 21-24-27 sts, A.2 as before, stockinette st over the next 52-62-70 sts, AT THE SAME TIME inc 1-0-1 st, work A.2, 21-24-27 sts in stockinette st, 3 sts in garter st = 127-142-157 sts. When piece measures 41-43-45 cm / 16"-17"-17¾", work as follows from RS: 3 sts in garter st, A.1 until 4 sts remain, K 1 (= 1st st in A.1), 3 sts in garter st. Continue like this back and forth until piece measures 48-50-52 cm / 19"-19¾"-20½" in total. Bind off. BACK PIECE: Work as front piece. Adjust length according to front piece. HOOD: Worked back and forth on needle. Cast on 92-102-112 sts on circular needle size 5 mm / US 8 with Alaska. Work 1 ridge AT THE SAME TIME inc 8-1-0 sts evenly on last row = 100-103-112 sts. Then work as follows: 3 edge sts in garter st, A.1 (= 3 sts) until 4 sts remain, K 1, 3 edge sts in garter st. Continue like this until piece measures 30 cm / 11¾". Work 1 ridge. Bind off. ASSEMBLY: Fold hood and sew bind-off edge neatly tog st by st. Sew hood to poncho st by st. Sew the button on to left band 2 cm in from edge. Cut and fasten the yarn. |
|||||||
Diagram explanations |
|||||||
|
|||||||
 |
|||||||
 |
|||||||
Have you finished this pattern?Tag your pictures with #dropspattern #autumnstrollponcho or submit them to the #dropsfan gallery. Do you need help with this pattern?You'll find 21 tutorial videos, a Comments/Questions area and more by visiting the pattern on garnstudio.com. © 1982-2026 DROPS Design A/S. We reserve all rights. This document, including all its sub-sections, has copyrights. Read more about what you can do with our patterns at the bottom of each pattern on our site. |
|||||||


With over 40 years in knitting and crochet design, DROPS Design offers one of the most extensive collections of free patterns on the internet - translated to 17 languages. As of today we count 324 catalogs and 12290 patterns - 12280 of which are translated into English (US/in).
We work hard to bring you the best knitting and crochet have to offer, inspiration and advice as well as great quality yarns at incredible prices! Would you like to use our patterns for other than personal use? You can read what you are allowed to do in the Copyright text at the bottom of all our patterns. Happy crafting!
Post a comment to pattern DROPS 157-37
We would love to hear what you have to say about this pattern!
If you want to leave a question, please make sure you select the correct category in the form below, to speed up the answering process. Required fields are marked *.