
Popular categories
Looking for a yarn?


Comments / Questions (44)
![]() Janne Jacobsen wrote:
Janne Jacobsen wrote:
Jeg har købt garn og printet opskrift til Mr Bunny fra Ritos hjemmeside, men jeg synes der mangler opskrift på bukserne.
28.02.2022 - 07:33DROPS Design answered:
Hej Janne, jo bukserne starter på benet, der hvor du skifter til lys gul :)
02.03.2022 - 11:57
![]() Lisa Crawshaw wrote:
Lisa Crawshaw wrote:
Hi, What do you do with the 14 bind off stitches in the leg? This is my first toy I’m knitting, I’m not sure what bind off means. Many thanks - Lisa
25.10.2021 - 08:20DROPS Design answered:
Hi Lisa, To bind off is, when you have finished a piece, work 2 stitches, then lift the first stitch over the second, work another stitch and pass the first stitch over the new stitch worked and so on. This gives a neat finish and will not unravel. When you are left with 1 stitch, you cut the strand and thread it through this stitch, pull tight and fasten the strand. Happy knitting!
25.10.2021 - 08:50
![]() Barbara Hosking wrote:
Barbara Hosking wrote:
Are the yellow pants underwear or his shorts? I want shorts turquoise. Do I just knit turquoise where your pattern says yellow?
29.09.2021 - 14:01DROPS Design answered:
See previous answer :)
30.09.2021 - 09:21
![]() Barbara Hosking wrote:
Barbara Hosking wrote:
I’m making the pants bright turquoise and the jumper striped turquoise and white. Are the pants that are knitted in the waist area down the bunny’s underwear or are they his pants? If pants, then I think I should knit them turquoise where the pattern says yellow. Is this right? Thank you for such a quick answer to my previous question.
29.09.2021 - 13:38DROPS Design answered:
Dear Mrs Hosking, yes you are right, if you are working the pants turquoise, then you should work turquoise when pattern says to change/work with yellow. Happy knitting!
30.09.2021 - 09:21
![]() Barbara Hosking wrote:
Barbara Hosking wrote:
I don’t understand why the chest of the bunny is yellow. My bunny is gray. I don’t want a yellow chest. Should I just continue in gray? I gave up on the 1 YO. I just increased the way I understand. So far, the head and ears look good, no holes. I love the bunny. I’m making it for the baby my grandniece is expecting in November.
29.09.2021 - 00:06DROPS Design answered:
Dear Mrs Hosking, body is worked top down, the top of body is worked with light beige (= bunny colour), but you then change to yellow for the pants, then the legs are worked bottom up first with light beige (bunny colour) and you switch to yellow (= pants legs). Hope this will help, happy knitting!
29.09.2021 - 07:43
![]() Nancy J Harris wrote:
Nancy J Harris wrote:
How can I print without that shield mark covering the words?
11.09.2021 - 18:10DROPS Design answered:
Dear Toni, you can print our instructions from the print button, below the pattern's photo. The shield seems to appear depending on the computer settings, but the print button should give you no problems. Happy knitting!
19.09.2021 - 22:20
![]() Trudie Harrison wrote:
Trudie Harrison wrote:
Hi, I am having trouble with the yoke part of the jumper, I have knitted the main part of the jumper and the sleeves in the round, now I am being asked to knit back and forth and somehow get all the stitches of the main part plus the 2 sleeves on one needle but as it has been knitted in the round it is impossible to get it all on one needle unless I am doing it wrong? The only way I can see this working is either knitting the front and back separately from now or continue in the round? Thanks
11.07.2021 - 20:56DROPS Design answered:
Dear Mrs Harrison, you continue the yoke in rows (to create a vent on mid back), you can use the double pointed needles and work alternately from right side and from wrong side to make knitting easier. Happy knitting!
12.07.2021 - 07:43
![]() Tereza wrote:
Tereza wrote:
Prosím, poradíte s přidáváním na hlavě? V návodu je napsáno, že se přidává mezi 2 značkami. Myslí se vnitřní nebo vnější část? Přidává se tak, že mezi značkami zůstane 6 ok nebo jich nakonec bude 12? Děkuji za radu. - Please, do I increase on the head so the 6 stchs remain between the two markers or should I increase so there are 12 stchs? in other words do I increase inside or outside the "marker area"? Thank you!
24.03.2021 - 21:38DROPS Design answered:
Dobrý den, Terezo! Přidáváme unvitř mezi značkami, díl se od čumáčku směrem k uším rozšiřuje - trojúhelníková výseč uvnitř mezi značkami bude tedy širší, ok bude přibývat. Hodně zdaru! Hana
25.03.2021 - 07:25
![]() Helena wrote:
Helena wrote:
Hei Miten aloitan korvan. 8silmukkaa 2puikolla suljettuna neuleena.
19.03.2021 - 08:27DROPS Design answered:
Korva neulotaan kolmella puikolla. Silmukat ovat kahdella puikolla ja neulominen tehdään kolmannella puikolla.
22.03.2021 - 16:44
![]() Sigrid wrote:
Sigrid wrote:
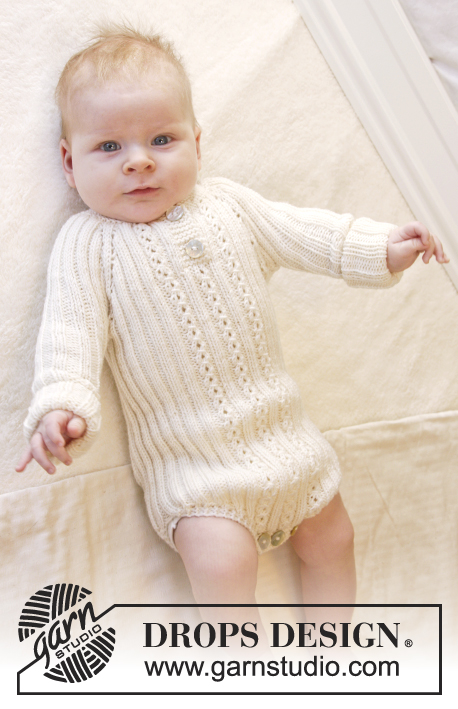
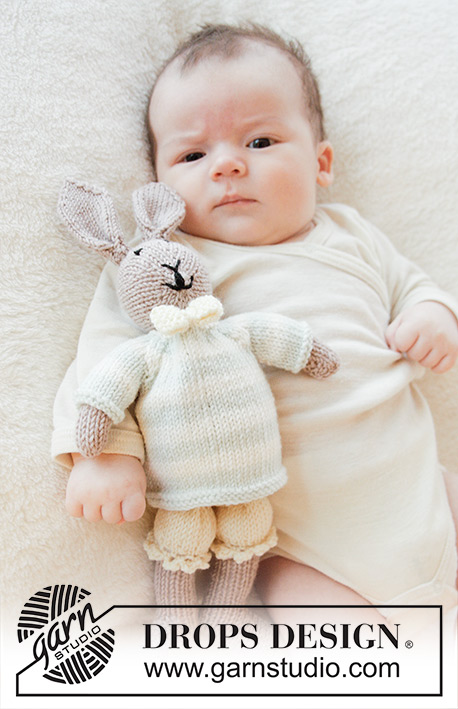
Hello! Would there be a photo of the bunny without the pullover to see how you have attached the arms and legs? Thank you very much!!!
27.02.2021 - 22:55DROPS Design answered:
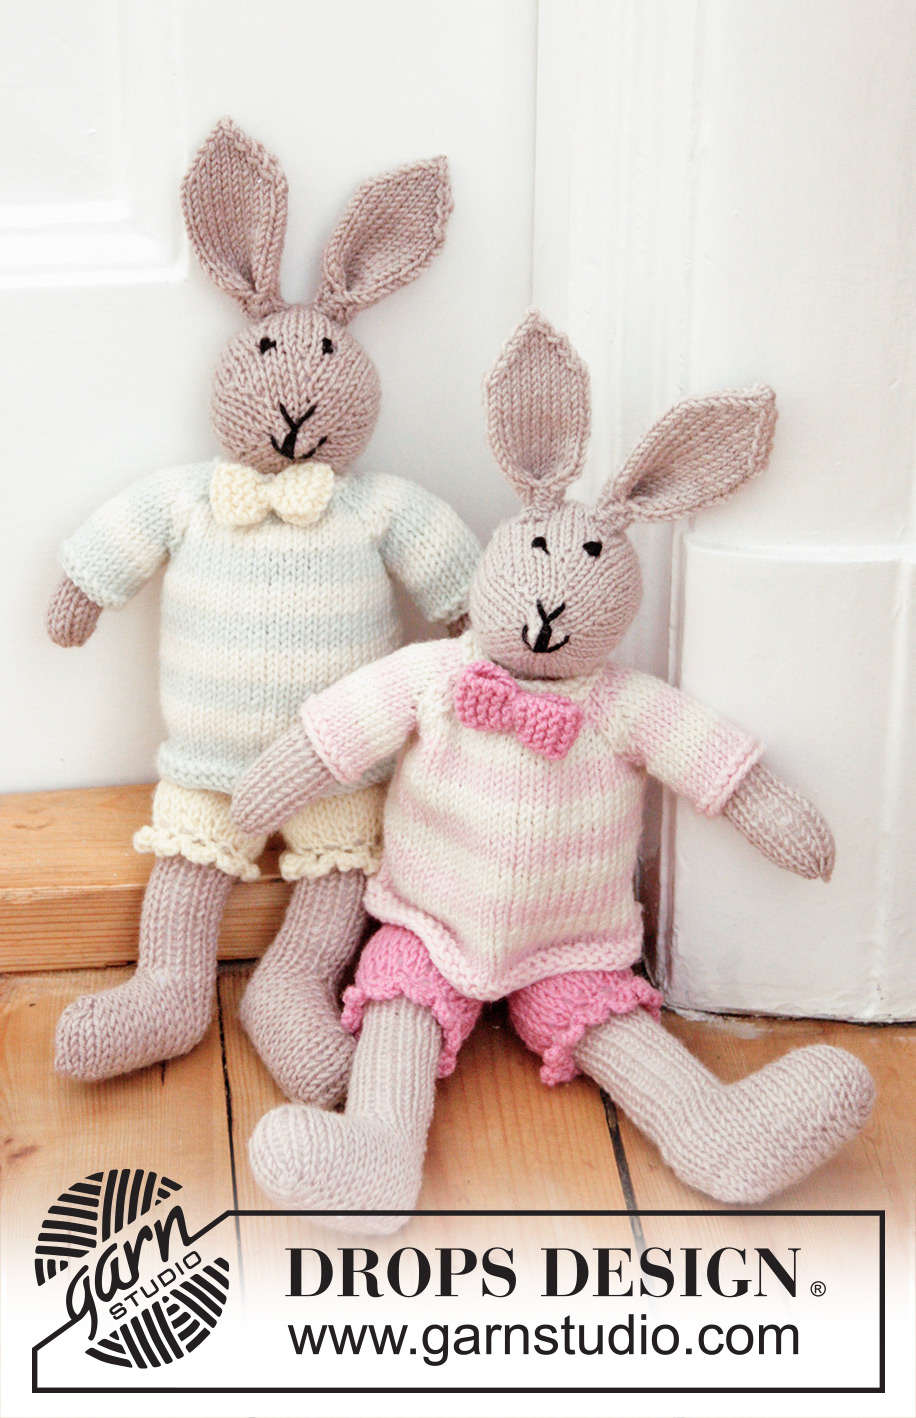
Dear Sigrid, we don not have pictures of the bunny without it's sweater, but if you look at the picture with the baby with the female bunny here, you can see the swether slightly pulled up, and the legs exposed. I hope this helps. Happy Knitting!
28.02.2021 - 11:11
|
|
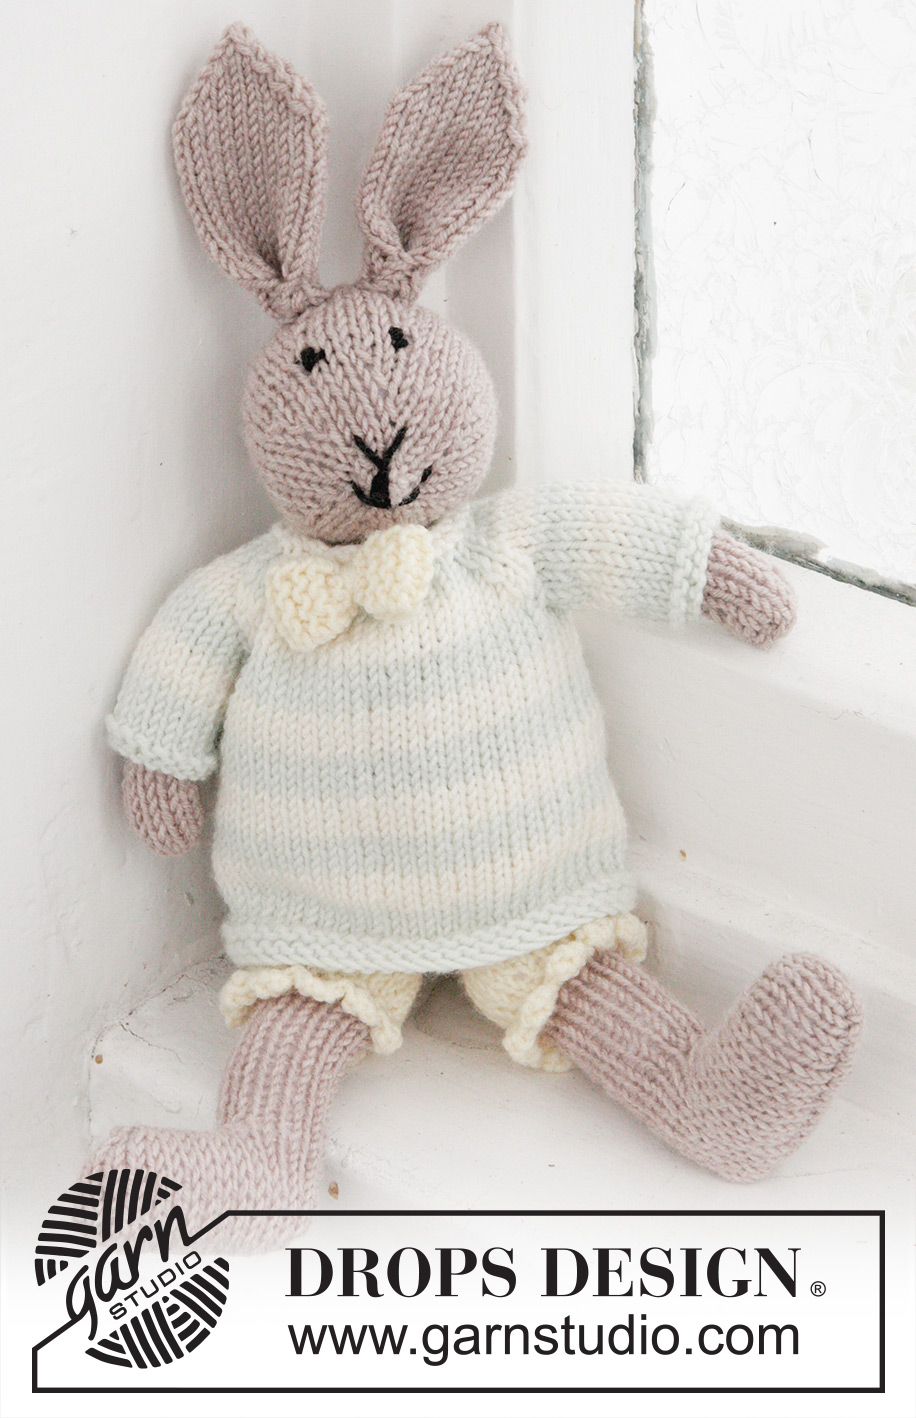
Mr. Bunny#dropsmrbunny |
|
 |
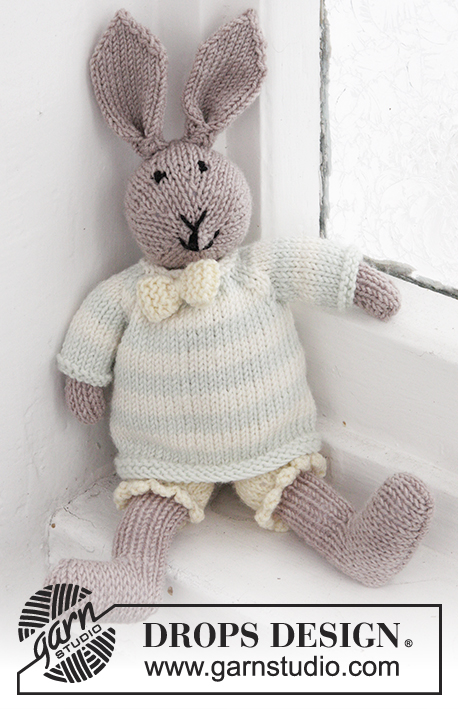 |
Knitted bunny toy with pants, jumper and bow in DROPS BabyMerino
DROPS Baby 25-8 |
|
|
MAGIC CIRCLE: To avoid hole in the middle beg with this technique: Hold yarn end in the left hand and make a loop around left index finger (from left to right). Hold the loop with left thumb and index finger. Insert needle through loop, get yarn from ball (i.e. place yarn 1 time over needle from you), pull yarn back through loop, 1 YO (now place yarn from the back and towards you) and pull YO through sts on needle, * insert needle through loop, 1 YO (place yarn from the back and towards you), pull YO through loop, 1 YO (from the back and towards you) and pull YO through outermost st on right needle (i.e. the last st made) *, repeat from *-* until there are 6 sts on needle. Then work as explained in pattern – AT THE SAME TIME pull yarn end so that loop is tighten tog and the hole disappears. INCREASE TIP: Inc 1 st by making 1 YO. On next round/row work YO twisted to avoid holes. GARTER ST (back and forth on needle): K all rows. 1 ridge = K2 rows. STRIPES: * 4 rounds/rows light mint, 4 rounds/rows off white *, repeat from *-*. ---------------------------------------------------------- HEAD: Worked in the round on double pointed needles from snout and back. Make a MAGIC CIRCLE with light beige - see explanation above = 6 sts on needle. Distribute sts on 3 double pointed needles size 3 mm / US 2.5 (work with fourth needle) and work in the round as follows: ROUND 1: K all sts. ROUND 2: * K 1, 1 YO *, repeat from *-* the entire round = 12 sts. ROUND 3: K all sts (always K YOs twisted to avoid holes). ROUND 4: * K 2, 1 YO *, repeat from *-* the entire round = 18 sts. ROUND 5: K all sts. ROUND 6: * K 3, 1 YO *, repeat from *-* the entire round = 24 sts. ROUND 7: K all sts. ROUND 8: * K 4, 1 YO *, repeat from *-* the entire round = 30 sts. ROUND 9: K all sts. ROUND 10: * K 5, 1 YO *, repeat from *-* the entire round = 36 sts. ROUND 11-12: K all sts = 36 sts. Insert 1 marker after the first 3 sts at beg of round and 1 marker after another 6 sts. Then inc 1 st inside the 2 markers - READ INCREASE TIP (= 2 sts inc). Repeat inc every other round 2 more times (= 3 inc in total in each side) = 42 sts. ROUND 18-19: K all sts = 42 sts. ROUND 20: * K 5, K 2 tog *, repeat from *-* the entire round = 36 sts. ROUND 21: K all sts. ROUND 22: * K 4, K 2 tog *, repeat from *-* the entire round = 30 sts. ROUND 23: K all sts. Continue dec like this on every other round (i.e. on every round with dec work 1 st less before working 2 sts tog = 6 sts dec per round) until 12 sts remain on needle, cut the yarn and pull it through sts on needle (without tightening). Embroider eyes, mouth and snout with black, fill the head with poly stuffing, tighten tog sts and fasten (= mid back of head). EAR: Worked in the round from bottom up. Cast on 8 sts with light beige and distribute sts on 2 double pointed needles (work with third needle). ROUND 1-2: K all sts. ROUND 3: * K 1, 1 YO, K 2, 1 YO, K 1 *, repeat from *-* 1 more time = 12 sts on needle. ROUND 4: K all sts (always K YOs twisted to avoid holes). ROUND 5: * K 1, 1 YO, K 4, 1 YO, K 1 *, repeat from *-* 1 more time = 16 sts on needle. ROUND 6: K all sts. ROUND 7: * K 1, 1 YO, K 6, 1 YO, K 1 *, repeat from *-* 1 more time = 20 sts on needle. Then work in stockinette st in the round until piece measures approx. 5½ cm / 2¼". Then dec as follows: ROUND 1: * Slip 1 st as if to K, K 1, psso, K 6, K 2 tog *, repeat from *-* 1 more time = 16 sts. ROUND 2: K all sts. ROUND 3: * Slip 1 st as if to K, K 1, psso, K 4, K 2 tog *, repeat from *-* 1 more time = 12 sts. ROUND 4: K all sts. Continue dec like this every other round until 4 sts remain on needle (i.e. on every round with dec work 2 sts less between dec in each side). On next round K2 tog around. Cut the yarn and pull it through sts, tighten tog and fasten. Fold each side at the bottom of ear towards the middle so that a pleat is formed in the mid of ear. Sew tog at the bottom with a couple of stitches and fasten ear on head. Work another ear the same way. BODY: Worked in the round, top down. Cast on 16 sts with light beige and distribute sts on 4 double pointed needles (work with fifth needle). ROUND 1-2: K all sts. ROUND 3: * K 2, 1 YO *, repeat from *-* the entire round = 24 sts. ROUND 4: K all sts (always K YOs twisted to avoid holes). ROUND 5: * K 2, 1 YO *, repeat from *-* the entire round = 36 sts. ROUND 6: K all sts. ROUND 7: * K 3, 1 YO *, repeat from *-* the entire round = 48 sts. Then work in stockinette st in the round until piece measures 5½ cm / 2¼". Switch to light yellow and K 1 round and P 1 round. Then work 8 rounds in stockinette st. Continue to dec as follows: ROUND 1: * K 6, K 2 tog *, repeat from *-* the entire round = 42 sts. ROUND 2: K all sts. ROUND 3: * K 5, K 2 tog *, repeat from *-* the entire round = 36 sts. ROUND 4: K all sts. Continue dec like this on every other round (i.e. on every round with dec work 1 st less before working 2 sts tog = 6 sts dec per round) until 12 sts remain on needle, cut the yarn and pull it through sts on needle (without tightening). Fill body with poly stuffing, tighten tog sts on yarn and fasten. Sew head to body (light yellow should be down (= pants)). LEG: Worked back and forth, bottom up. Cast on 30 sts on double pointed needles size 3 mm / US 2.5 with light beige. Work in stockinette st back and forth for 3 cm / 1". Then work as follows: ROW 1 (= RS): 1 edge st in GARTER ST – see explanation above, K 10, K2 tog 4 times, K 10 and 1 edge st in garter st = 26 sts. ROW 2 (= WS): 1 edge st in garter st, P 5, bind off the next 14 sts, P 5 and 1 edge st in garter st = 6 sts remain in each side. ROW 3 (= RS): Work the first 6 sts on needle and then the next 6 sts on needle (the 14 bind off sts form a hole in the mid of piece). Then work in stockinette st back and forth over the 12 sts with 1 edge st in garter st in each side until leg measures approx. 8 cm / 3". Switch to light yellow, K 1 row from RS and K 1 row from WS. Then work as follows: ROW 1 (= RS): * K 1, 1 YO *, repeat from *-* until 1 st remains and finish with K 1 = 23 sts. ROW 2 (= WS): P but K edge sts in each side and P YOs twisted to avoid holes. ROW 3: * K 2, 1 YO *, repeat from *-* until 1 st remains and finish with K 1 = 34 sts. Then work in stockinette st back and forth with 1 edge st in garter st in each side until leg measures approx. 12 cm / 4¾", bind off. Sew opening mid on top of foot with grafting/kitchener sts. Sew foot tog mid under and continue up along mid back - sew in front loop of outermost st. Fill leg with some poly stuffing. Baste a strand up and down through bind-off edge at the top of leg (on the yellow). Tighten tog to make it baggy. Work another leg the same way and fasten both legs on body. LACE EDGE Crochet a lace edge on hook size 3 mm / C with light yellow at the bottom around pants on each leg as follows (crochet in P sts): 1 sc in first st, * ch 4, 1 dc in 4th ch from hook, 1 sc in next P st on pants *, repeat from *-* the entire round and finish with 1 sl st in first sc from beg of round. Fasten off. ARM: Work back and forth on double pointed needles from top and down. Cast on 10 sts with light beige and work in stockinette st back and forth with 1 edge st in garter st in each side until arm measures 9 cm / 3½". Cut the yarn (make it long enough to use for sewing the arm tog), pull yarn through sts on needle (= at the bottom of arm), tighten tog and then sew arm tog in front loop of outermost st. Fill arm with poly stuffing and fasten at the top of body by neck (below the head). Work another arm the same way and fasten in the opposite side. JUMPER: Piece is worked in the round on double pointed needles up to armhole, then work back and forth on needle. BODY: Cast on 60 sts with light mint. P 1 round, K 1 round and P 1 round. Then work in stockinette st and STRIPES - see explanation above. When piece measures approx. 9 cm / 3½" – adjust so that last round in a stripe with light mint remains, work next round as follows: bind off 6 sts for armhole, work 24 sts, bind off the next 6 sts for armhole and work the last 24 sts. Put piece aside and knit the sleeves. SLEEVE: Worked in the round on double pointed needles. Cast on 20 sts with light mint. K 1 round and P 1 round. Then work in stockinette st and STRIPES in the round. When 11 rounds with stripes have been worked (i.e. last round in a stripe with light mint remains), work next round as follows: bind off 6 sts for armhole and work the remaining 14 sts. Cut the yarn, put piece aside and Make another sleeve. YOKE: Slip sleeves on to same needle as body where armholes were bound off (without working them first) = 76 sts on needle. Beg round from RS mid back on body and continue stripes as follows (1st round = off white): ROUND 1: 1 edge st in garter st, K 9, K 2 tog, K 2 twisted tog, K 10 (= sleeve), K 2 tog, K 2 twisted tog, K 20 (= front), K 2 tog, K 2 twisted tog, K 10 (= sleeve), K 2 tog, K 2 twisted tog, K 9 and 1 edge st in garter st = 68 sts. Then work back and forth from mid back. ROW 2 (= WS): P but work edge sts in garter st. ROW 3 (= RS): 1 edge st in garter st, K 8, K 2 tog, K 2 twisted tog, K 8 (= sleeve), K 2 tog, K 2 twisted tog, K 18 (= front), K 2 tog, K 2 twisted tog, K 8 (= sleeve), K 2 tog, K 2 twisted tog, K 8 and 1 edge st in garter st = 60 sts. ROW 4 (= WS): P but work edge sts in garter st. ROW 5 (= RS): Switch to light mint and work 1 edge st in garter st, K 7, K 2 tog, K 2 twisted tog, K 6 (= sleeve), K 2 tog, K 2 twisted tog, K 16 (= front), K 2 tog, K 2 twisted tog, K 6 (= sleeve), K 2 tog, K 2 twisted tog, K 7 and 1 edge st in garter st = 52 sts. ROW 6 (= WS): P but work edge sts in garter st. ROW 7 (= RS): 1 edge st in garter st, K 6, K 2 tog, K 2 twisted tog, K 4 (= sleeve), K 2 tog, K 2 twisted tog, K 14 (= front), K 2 tog, K 2 twisted tog, K 4 (= sleeve), K 2 tog, K 2 twisted tog, K 6 and 1 edge st in garter st = 44 sts. ROW 8 (= WS): P but work edge sts in garter st. Switch to off white and work next row as follows: 1 edge st in garter st, * K 1, K 2 tog *, repeat from *-* until 1 st remains and finish with 1 edge st in garter st = 30 sts. K 1 row from WS, K 1 row from RS and K 1 row from WS before binding off with K from RS. Fasten off. BOW: Cast on 5 sts on double pointed needles size 3 mm / US 2.5 with light yellow. Work in garter st back and forth for 8 cm / 3", bind off. Sew short sides tog in front loop of outermost st to form a ring. Fasten off. Find a new strand, wind it a couple of times around the middle of bow and fasten bow in the neck on jumper. Put the jumper on the bunny and fasten the button through both layers at the top of neck at the back. |
|
Have you finished this pattern?Tag your pictures with #dropspattern #dropsmrbunny or submit them to the #dropsfan gallery. Do you need help with this pattern?You'll find 28 tutorial videos, a Comments/Questions area and more by visiting the pattern on garnstudio.com. © 1982-2026 DROPS Design A/S. We reserve all rights. This document, including all its sub-sections, has copyrights. Read more about what you can do with our patterns at the bottom of each pattern on our site. |
|


With over 40 years in knitting and crochet design, DROPS Design offers one of the most extensive collections of free patterns on the internet - translated to 17 languages. As of today we count 325 catalogs and 12298 patterns - 12288 of which are translated into English (US/in).
We work hard to bring you the best knitting and crochet have to offer, inspiration and advice as well as great quality yarns at incredible prices! Would you like to use our patterns for other than personal use? You can read what you are allowed to do in the Copyright text at the bottom of all our patterns. Happy crafting!
Post a comment to pattern DROPS Baby 25-8
We would love to hear what you have to say about this pattern!
If you want to leave a question, please make sure you select the correct category in the form below, to speed up the answering process. Required fields are marked *.