
Popular categories
Looking for a yarn?


Comments / Questions (51)
![]() Elina wrote:
Elina wrote:
Moi! Kuinka työn yhdistäminen onnistuu käytännössä siten, että oikea reuna (jossa napinlävet) on vasemman päällä? Millaisella tekniikalla vasemman ja oikean puolen reunasilmukat (6s) siis neulotaan yhteen?
26.05.2025 - 14:26DROPS Design answered:
Hei, kun etureunat ovat päällekkäin (kahdella eri puikolla), voit neuloa silmukat yhteen kolmannella puikolla. Neulo aina 1 silmukka kummaltakin puikolta oikein yhteen. Tekniikasta löytyy video: Silmukoiden päättäminen 3 puikolla. Löydät seen klikkaamalla seuraavia linkkejä: Vinkkejä & apua - Videot - Neulominen - Silmukoiden päättäminen
27.05.2025 - 14:12
![]() Frustrert wrote:
Frustrert wrote:
Hvorfor kan dere ikke bare si hvor mange mellom hver merke i stedet for å si ganger? Jeg har null anelse hvor jeg setter merkene. Mønstrene deres er alltid så utydelige
12.01.2024 - 19:02
![]() Sol wrote:
Sol wrote:
Hei, Eg er ferdig med 12 økninger på kvar side av raglanøkningen, og har no 40m mellom kvart merke og 56m på for/bakstykke. Deretter står det: "Strikk 2 omg til som før". Eg forstår ikkje kva som er meint med dette? Om eg strikker 2 omg til med raglanøkning,får eg for mange masker. Og om det betyr at eg skal strikke uten å øke, skal eg fortsatt følge mønsteret? For då òg får eg for mange masker, før eg tar det over på ein tråd.
18.11.2023 - 10:29DROPS Design answered:
Hei Sol. Hvilken str. strikker du og hvor i diagrammet er du når du er ferdig med de 12 omgangene med raglan økninger? Når du er ferdig med raglanøkningne, strikkes det 2 omganger til uten raglansøkninger og om du da er på en omgang der A.1 består av 3 masker, strikk 1 omgang til der A.1 kun består av 2 masker (evnt. 2 masker+kast (kaster telles ikke som egen maske). Får du da riktig maskeantall? mvh DROPS Design
20.11.2023 - 09:44
![]() Mary wrote:
Mary wrote:
Hei, can you please explain the raglan yarn over increases , what does it mean P the first 2 st( before and after K stitches) from wrong and K ( which stitches are these)the next 2 st from W side.each wrong side stitches are going to change P to K and K to P?
07.11.2023 - 16:05DROPS Design answered:
Dear Mary, the new stitches increased on raglan will be worked in pattern, this means the first 2 times (1st + 2nd increase) you increase stitches you will purl (seen from RS, this means knit from WS) the new stitches, then the next 2 times (3rd + 4th increase) you will knit (seen from RS this means purl from WS) the new stitches, then the next 2 increases (5th + 6th increase) will be purled, the next 2 increases (7th + 8th increase) will be knitted and so on. That way, the ribbing will continue. Happy knitting!
08.11.2023 - 07:57
![]() Jennifer wrote:
Jennifer wrote:
Hello, I am stuck in the back piece here: K 1 row from RS while AT THE SAME TIME dec (8) 8-8-8-10 (10-12) sts evenly = (16) 16-16-16-18 (18-20) sts remain on needle. K 10 rows (= 5 ridges) and loosely cast off with K from WS. How am I supposed to decrease evenly while maintaining the 2*2 ribbing
20.04.2023 - 00:50DROPS Design answered:
Hi Jennifer, The ribbing is finished when you get this far (so it doesn't matter where you decrease, but neatest if you either P2 together in a purled section or K2 together in a knitted section). After decreasing, you continue with 10 rows of knit before casting off. Happy crafting!
20.04.2023 - 06:46
![]() Ana Alvarez wrote:
Ana Alvarez wrote:
Hola no entiendo cómo hay que hacer esta parte: Unir la labor con los pts de la cenefa derecha hacia arriba (de modo que las cenefas estén sobrepuestas y los ojales se encuentran en el borde). Trabajar 1 vta en redondo , AL MISMO TIEMPO tejer juntos de derecho los 6 pts de la cenefa derecha y la cenefa izquierda de 2 en 2
14.02.2023 - 16:04DROPS Design answered:
Hola Ana, tenemos que disminuir los pts de la cenefa de la parte izquierda del delantero trabajándolos juntos de derecho con los pts de la cenefa en la parte derecha del delantero. Pasamos los pts de la cenefa izquierda a una aguja auxiliar y los colocamos detrás de la labor. Trabajamos toda la vuelta como antes y, cuando llegamos al 1º punto de la cenefa derecha, trabajar juntos el punto de la cenefa derecha con el 6º punto de la cenefa izquierda, después el 2º pt de la cenefa derecha con el 5º pt de la cenefa izquierda, y así sucesivamente.
16.02.2023 - 23:03
![]() Ib wrote:
Ib wrote:
I have 5 raglan lines( meaning if i followed the pattern correctly where it sais to" continue pattern for all sizes"then i have 5 stitch markers) is this correct? because now i dont know where to start the inc on raglan lines bcz i have 5 st markers. also are the markers supposed to be unevenlly spaced? i am not beginner knitter but its my first time doing raglan. it would be very useful if drops patterns could include full video tutorials. thnx
06.02.2023 - 03:02DROPS Design answered:
Dear lb, you should have only 4 raglan lines in all sizes, one between front piece/sleeve, sleeve/back piece, back piece/sleeve and sleeve/front piece - make sure you divide stitches with markers as it says for the appropriate size. Happy knitting!
06.02.2023 - 10:21
![]() Mary wrote:
Mary wrote:
Ich verstehe die Abnahme bei dem Rückenteil leider nicht. Zuerst nehme ich beidseitig in Hin-und Rückreihe je 1 Masche ab, bis ich nur noch 13 M auf der Nadel habe? (Gr. 1/3 Monate.)\r\nDanach nur noch in den Hinreihen bis ich 8M auf der Nadel habe?\r\nWas danach nicht mehr mit der Anleitung übereinstimmen würde...
22.12.2022 - 21:48DROPS Design answered:
Liebe Mary, ja genau, es wird zuerst 2 Maschen (jeweils innerhalb die 3 ersten und die 3 letzten Maschen) in jeder Reihe (Hin- sowie Rückreihe) abgenommen, dann nehmen Sie 2 Maschen in jeder HinReihe = 24 M übrig in die 4 ersten Größen, dann stricken Sie 1 Hinreire nechts und gleichzeitig nehmen Sie 8 Maschen regelmäßig ab = 16 M übrig. Viel Spaß beim stricken!
23.12.2022 - 08:37
![]() Jannie wrote:
Jannie wrote:
Når jeg strikker str 1/3 mdr. passer maskeantallet ikke med raglan, hvis der udtages maskeantal som angivet i opskriften. Jeg har så læst i et svar til en anden, at der skal være 102 masker ved raglan start… det har jeg så prøvet at lave udtag til. Når der så er taget ud 8 gange som opskriften angiver er masketalle større end de 144 masker, som skulle være efter raglanudtag…. Jeg synes det er meget ærgerligt, da opskriften bliver meget vanskelig at følge
09.11.2022 - 16:37DROPS Design answered:
Hei Jannie. I str. 1/3 mnd legger du opp 60 masker og etter forhøyningen økes det med 42 masker = 102 masker. Du øker med 8 masker hver gang det økes til raglan, og det økes 8 ganger totalt = 8 x 8 = 64 økte masker + de 102 maskene du hadde før du startet = 166 masker, men SAMTIDIG når arbeidet måler 5 cm strikkes de 12 stolpemaskene sammen til 6 masker, slik at når alle raglansøkningene er strikker er det også minsket 6 masker over stolpen = 160 masker. Og det er det maskeantallet det står i oppskriften. Maskeantallet 144 tilhører str. (prematur) og str. 0/1 mnd. mvh DROPS Design
14.11.2022 - 10:33
![]() Linnea wrote:
Linnea wrote:
Jag stickar i storlek 1/3mån och är enligt instruktionen klar med raglanökningarna, men mina mått stämmer inte. Mitt arbete mäter ca 7 cm nu, men i instruktionen står det att det ska mäta 8cm "från axeln". Vad är det jag ska mäta som ska vara 8cm? På bilden längst ner ser mina mått ut att stämma ganska bra.
21.05.2022 - 23:27DROPS Design answered:
Hei Linnea. Stemmer din strikkefasthet i høyden som er oppgitt i oppskriften (32 p i høyden = 10 cm)? Husk også at det er strikket en fornøyning. På målskisse er målene til str. 1/3 mnd ca 6+2 cm. mvh DROPS Design
23.05.2022 - 09:45
|
||||||||||
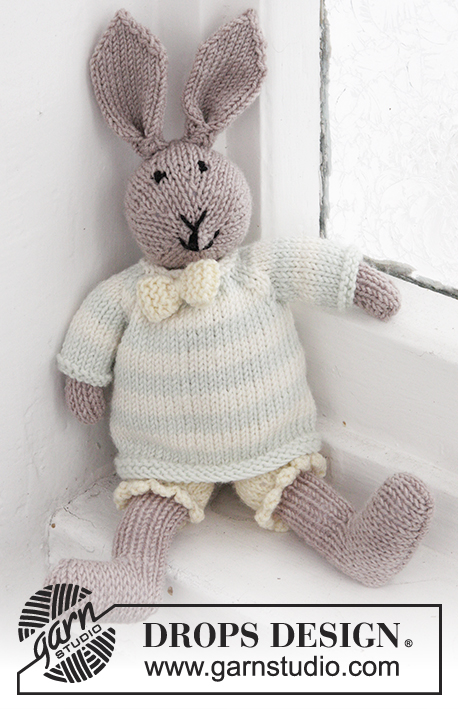
Simply Sweet#simplysweetonesie |
||||||||||
|
|
||||||||||
Knitted baby body in rib, worked top down in DROPS BabyMerino. Size premature – 4 years.
DROPS Baby 25-30 |
||||||||||
|
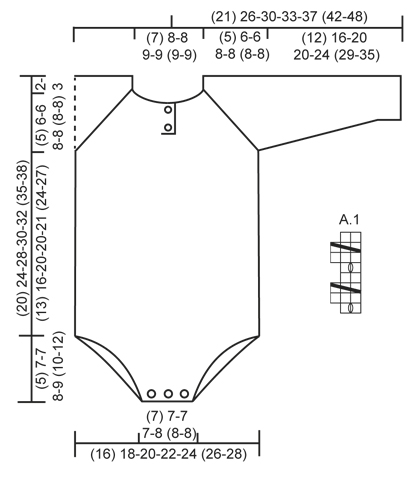
GARTER ST (back and forth on needle): K all rows. 1 ridge = 2 rows K. PATTERN: See diagram A.1. The diagram shows all rows in pattern seen from RS. RAGLAN: All inc are done from RS. Inc 1 st on each side of the 4 raglan lines by making 1 YO on each side of the 2 sts K in each raglan line (seen from RS). Work YOs into rib, i.e. P the first 2 sts from WS, K the next 2 sts from WS etc. – NOTE: Do not work YOs twisted (i.e. there should be holes on each side of the 2 K sts in raglan line). BUTTONHOLES: Dec for buttonholes on right band. 1 buttonhole = K tog third and fourth st from edge and make 1 YO (dec for buttonholes from WS). Dec for buttonholes when piece measures: SIZE (premature): 1 and 3 cm / ½" and 1". SIZE 0/1 month + 1/3 months: 1 and 4 cm/ ½" and 1½". SIZE 6/9 months + 12/18 months: 1 and 4½ cm / ½" and 1¾". SIZE (2 years + 3/4 years): 1 and 5 cm / ½" and 2". DECREASE TIP 1 (applies to leg opening): Dec inside 3 edge sts in garter st. FROM RS: Dec after 3 sts in garter st as follows: P 2 twisted tog. Dec as follows before 3 sts in garter st (beg when 5 sts remain on row): P 2 tog. FROM WS: Dec after 3 sts in garter st as follows: K 2 twisted tog. Dec as follows before 3 sts in garter st (beg when 5 sts remain on row): K 2 tog. DECREASE TIP 2 (applies to sleeves): Work until 3 sts remain before marker, work 2 sts tog (in rib), work 2 sts (marker is between these 2 sts) and then work 2 sts twisted tog (in rib). ---------------------------------------------------------- ONESIE: The piece is worked top down. Work back and forth on circular needle to after neck vent, then work piece in the round on double pointed needles/circular needles before dividing for leg openings. Work sleeves in the round on double pointed needles. YOKE: Cast on (54) 60-60-64-74 (74-74) sts (includes 6 band sts in each side towards mid front) on circular needle size 3.5 mm/US 4 with off white Baby Merino. K 4 rows (1st row = RS). Then work an elevation in the back of neck as follows (1st row = RS): K until (6) 8-8-8-10 (10-10) sts remain, turn, tighten yarn and work until (6) 8-8-8-10 (10-10) sts remain in the other side. Turn piece, tighten yarn and work until (12) 16-16-16-20 (20-20) sts remain, turn piece, tighten yarn and work back until (12) 16-16-16-20 (20-20) sts remain. Turn piece, tighten yarn and work until (18) 24-24-24-30 (30-30) sts remain, turn, tighten yarn and work until (18) 24-24-24-30 (30-30) sts remain in the other side. Turn piece, tighten yarn and work the rest of the row. Work next row as follows from WS: K 6 band sts, P the next (42) 48-48-52-62 (62-62) sts AT THE SAME TIME inc (32) 26-42-38-44 (60-60) sts evenly over these sts and finish with K 6 band sts (remember BUTTONHOLES on band – see explanation above) = (86) 86-102-102-118 (134-134) sts on needle. WORK NEXT ROW AS FOLLOWS FROM RS: SIZE (premature) + 0/1 month: 6 band sts in GARTER ST – see explanation above, K 2, P 2, A.1 (= 2 sts), P 2, K 2 (insert 1 marker in the middle of these 2 sts = raglan line), * P 2, K 2 *, repeat from *-* 3 times in total, P 2, K 2 (insert 1 marker in the middle of these 2 sts = raglan line), * P 2, K 2 *, repeat from *-* 5 times in total, P 2, K 2 (insert 1 marker in the middle of these 2 sts = raglan line), * P 2, K 2 *, repeat from *-* 3 times in total, P 2, K 2 (insert 1 marker in the middle of these 2 sts = raglan line), P 2, A.1 (= 2 sts), P 2, K 2 and 6 band sts in GARTER ST. SIZE 1/3 months + 6/9 months + 12/18 months: 6 band sts in GARTER ST – see explanation above, K 2, P 2, A.1 (= 2 sts), P 2, K 2, P 2, K 2 (insert 1 marker in the middle of these 2 sts = raglan line), * P 2, K 2 *, repeat from *-* 3-3-5 times in total, P 2, K 2 (insert 1 marker in the middle of these 2 sts = raglan line), * P 2, K 2 *, repeat from *-* 7 times in total, P 2, K 2 (insert 1 marker in the middle of these 2 sts = raglan line), * P 2, K 2 *, repeat from *-* 3-3-5 times in total, P 2, K 2 (insert 1 marker in the middle of these 2 sts = raglan line), P 2, K 2, P 2, A.1 (= 2 sts), P 2, K 2 and 6 band sts in GARTER ST. SIZE (2 years + 3/4 years): 6 band sts in GARTER ST – see explanation above, ** K 2, P 2, A.1 (= 2 sts), P 2 **, repeat from **-** 2 times in total, K 2 (insert 1 marker in the middle of these 2 sts = raglan line), * P 2, K 2 *, repeat from *-* 5 times in total, P 2, K 2 (insert 1 marker in the middle of these 2 sts = raglan line), * P 2, K 2 *, repeat from *-* 9 times in total, P 2, K 2 (insert 1 marker in the middle of these 2 sts = raglan line), * P 2, K 2 *, repeat from *-* 5 times in total, P 2, K 2 (insert 1 marker in the middle of these 2 sts = raglan line), ** P 2, A.1 (= 2 sts), P 2, K 2 **, repeat from **-** 2 times in total and finish with 6 band sts in GARTER ST. ALL SIZES: Continue pattern like this back and forth. AT THE SAME TIME on next row from RS inc for RAGLAN – see explanation above (= 8 sts inc). Repeat inc every other row/round (i.e. every row from RS) (7) 7-7-11-11 (11-11) more times (= (8) 8-8-12-12 (12-12) inc in total on each side of every raglan line). AT THE SAME TIME when piece measures (4) 5-5-6-6 (7-7) cm / (1½") 2"-2"-2½"-2½" (2¾"-2¾"), band ends and piece is worked in the round on needle as follows (make sure that next row is worked from RS): Place piece tog with sts from right band at the top (so that bands are on top of each other and buttonholes are at the edge). Work 1 round in the round AT THE SAME TIME K tog the 6 sts from right and left band 2 by 2, work the rest of round, cut the yarn and beg next round mid back. Continue rib and pattern in the round AT THE SAME TIME continue inc for raglan as before but work the 6 sts mid front as follows: P 2, A.1 (= 2 sts) and P 2. After last inc for raglan there are (144) 144-160-192-208 (224-224) sts on needle. Work (0) 2-2-2-2 (2-2) more rounds as before, piece measures approx. (7) 8-8-10-11 (11-11) cm/ (2¾") 3"-3"-4"-4½" (4½"-4½") from shoulder. On next round slip the (32) 32-32-40-48 (48-48) sts between each marker over sleeve on stitch holders (work sts before slipping them on stitch holder) = (40) 40-48-56-56 (64-64) sts remain on front and back piece. BODY: = (80) 80-96-112-112 (128-128) sts. On next round cast on (8) 16-12-12-16 (16-20) LOOSE sts under each sleeve = (96) 112-120-136-144 (160-168) sts on body – NOW MEASURES PIECE FROM HERE. Place a marker each side. Continue rib in the round as before (= K 2/P 2) with A.1 at the front as before. When piece measures (13) 16-20-20-21 (24-27) cm/ (5") 6¼"-8"-8"-8¼" (9½"-10½") from armhole, divide at the markers in each side and finish front and back piece separately. BACK PIECE: = (48) 56-60-68-72 (80-84) sts. Work rib back and forth as before but work the outermost 3 sts in each side in garter st. AT THE SAME TIME dec 1 st inside the 3 edge sts in each side – READ DECREASE TIP 1 (= 2 sts dec). Repeat dec on every row (i.e. from both RS and WS) (6) 10-12-16-14 (18-14) more times (= (7) 11-13-17-15 (19-15) times in total) and then every other row (i.e. every row from RS) (5) 5-5-5-7 (7-11) times in total = (24) 24-24-24-28 (28-32) sts remain on needle. K 1 row from RS while AT THE SAME TIME dec (8) 8-8-8-10 (10-12) sts evenly = (16) 16-16-16-18 (18-20) sts remain on needle. K 10 rows (= 5 ridges) and loosely bind off with K from WS. FRONT PIECE: = (48) 56-60-68-72 (80-84) sts. Work rib back and forth as before but work the outermost 3 sts in each side in garter st. AT THE SAME TIME dec 1 st inside the 3 edge sts in each side – READ DECREASE TIP 1 (= 2 sts dec). Repeat dec on every row (i.e. from both RS and WS) (11) 13-17-21-19 (23-17) more times (= (12) 14-18-22-20 (24-18) times in total) and then every other row (i.e. every row from RS) (0) 2-0-0-2 (2-8) times in total = (24) 24-24-24-28 (28-32) sts remain on needle. K 1 row from RS while AT THE SAME TIME dec (8) 8-8-8-10 (10-12) sts evenly = (16) 16-16-16-18 (18-20) sts on needle. K 1 row from WS. On next row (= RS), dec for 3 buttonholes as follows: K (3) 3-3-3-3 (3-4), * 1 YO, K 2 tog, K (2) 2-2-2-3 (3-3) *, repeat from *-* 1 more time, K 2 tog, 1 YO and K (3) 3-3-3-3 (3-4). K 4 rows (= 2 ridges) and loosely bind off with K from WS. SLEEVE: = (32) 32-32-40-48 (48-48) sts. Cast on (8) 16-12-12-16 (16-20) LOOSE sts under sleeve = (40) 48-44-52-64 (64-68) sts on needle (work in the round on double pointed needles). Insert 1 marker at beg of round (= mid under sleeve) - NOW MEASURE PIECE FROM HERE. Continue rib in the round as before (= K 2/P 2). AT THE SAME TIME when sleeve measures 1 cm/½", dec 1 st on each side of marker - READ DECREASE TIP 2. Repeat dec every (4) 4-6-6-6 (8-8) rows (3) 7-3-7-7 (7-7) more times (= (4) 8-4-8-8 (8-8) times in total) = (32) 32-36-36-48 (48-52) sts remain on needle. When sleeve measures (12) 16-20-20-24 (29-35) cm/ (4¾") 6¼"-8"-8"-9½" (11½"-13¾"), loosely bind off with K over K and P over P. Work the other sleeve the same way. ASSEMBLY: Sew the openings under the sleeves. Sew 2 buttons on to left button band in the neck and 3 buttons at the bottom of body. |
||||||||||
Diagram explanations |
||||||||||
|
||||||||||
|
||||||||||
Have you finished this pattern?Tag your pictures with #dropspattern #simplysweetonesie or submit them to the #dropsfan gallery. Do you need help with this pattern?You'll find 26 tutorial videos, a Comments/Questions area and more by visiting the pattern on garnstudio.com. © 1982-2025 DROPS Design A/S. We reserve all rights. This document, including all its sub-sections, has copyrights. Read more about what you can do with our patterns at the bottom of each pattern on our site. |
||||||||||


With over 40 years in knitting and crochet design, DROPS Design offers one of the most extensive collections of free patterns on the internet - translated to 17 languages. As of today we count 314 catalogs and 11822 patterns - 11812 of which are translated into English (US/in).
We work hard to bring you the best knitting and crochet have to offer, inspiration and advice as well as great quality yarns at incredible prices! Would you like to use our patterns for other than personal use? You can read what you are allowed to do in the Copyright text at the bottom of all our patterns. Happy crafting!
Post a comment to pattern DROPS Baby 25-30
We would love to hear what you have to say about this pattern!
If you want to leave a question, please make sure you select the correct category in the form below, to speed up the answering process. Required fields are marked *.