
Popular categories
Looking for a yarn?


Comments / Questions (56)
![]() Susanne Hauser wrote:
Susanne Hauser wrote:
Hallo Habe nun das rechte Vorderteil bis zu einer Höhe von 37 cm gestrickt. Nun soll ich weiter stricken bis zu einer Höhe von 56 cm und dann für die Schulter 28 M. abketten. Stimmt das wirklich mit der Höhe von 58 cm? Danke für eine schnelle Antwort. LG Susanne
11.02.2015 - 18:22DROPS Design answered:
Liebe Susanne, in Größe M müssen Sie bis zu einer Länge von 56 cm an der kürzeren Seite stricken, bevor Sie die M für die Schulter abketten. Sie können das in der unteren Maßskizze ganz gut sehen: 19 cm ab dem Anschlag bis zum Beginn des Muster A.1, dann weitere 18 cm bis zum Ende des Auffassens der M und noch mal 19 cm bis zum Abketten der Schulter-M = 56 cm insgesamt.
12.02.2015 - 10:06Maria Noe wrote:
Buen dia! He comenzado con el frente derecho y cuando debo unirlo a la espalda, no comprendo a que se refiere cuando dice "tejer 1 surco". No encuentro el sinonimo de surco. Muchas gracias
07.02.2015 - 16:51DROPS Design answered:
Hola Maria. En la parte de arriba del patrón tienes la explicación: 1 surco = 2 hileras tejidas de derecho.
08.02.2015 - 12:12
![]() S. Klammer wrote:
S. Klammer wrote:
Werden die Armnähte offen gelassen oder geschlossen?
30.01.2015 - 12:28DROPS Design answered:
Sie machen die Nähte wie unter Fertigstellen beschrieben. Die Armöffnungen ergeben sich dadurch. Eine Ärmelnaht ist darüber hinaus nicht vorhanden.
30.01.2015 - 20:13
![]() Jule wrote:
Jule wrote:
Ich muss jetzt doch nochmal nachfragen...A1 besteht doch aus 4 Reihen. Wenn ich den mustersatz zuerst 3x stricke und dann wende um bei der nächsten Hin-R den Mustersatz 4x zu stricken bin ich doch folglich bei den ersten 3 Mustersätzen in der 3. Musterreihe und bei dem 4. erst in der 1. Reihe...?
03.09.2014 - 18:50DROPS Design answered:
Liebe Jule, Sie müssen das Muster immer mustergemäß weiterstricken, auch wenn sich die Reihen dann verschieben, denn ansonsten stimmt ja irgendwann die Maschenzahl nicht mehr. Sie müssen also immer schauen, welche Reihe in dem entsprechenden Mustersatz gerade dran ist. Das Muster wird dann etwas versetzt, was aber erwünscht ist, da es ja an dieser Stelle enger werden soll, um die Biegung zu bilden.
09.09.2014 - 21:38
![]() Jule wrote:
Jule wrote:
Hi, ich hab nochmal eine Fage bzgl der verkürzten Reihen beim Muster, wenn ich erst die ersten 34, dann die ersten 43 und dann über alle M stricke kommt das Muster nicht hin weil jeder "Abschnitt" in einer anderen Musterreihe ist, oder hab ich da einen Denkfehler?
31.08.2014 - 08:11DROPS Design answered:
Liebe Jule, das Muster sollte eigentlich passen, denn Sie stricken den Mustersatz ja zuerst 3x komplett und wenden dann, dann stricken Sie ihn 4x komplett und zuletzt 5x komplett, da dürfte sich nichts verschieben. 34 M = 7 M kraus re + 3x 9 M A.1, 43 M = 7 M kraus re + 4x 9 M A.1 und zuletzt 56 M = 7 M kraus re + 5x 9 M A.1 + 4 M kraus re. Sie stricken beim 2. und 3. Mal also A.1 jeweils 1x mehr.
01.09.2014 - 12:50
![]() Jule wrote:
Jule wrote:
Hallo, bei den verkürzten Reihen sind mit den 2 R über die ersten X Maschen 2 Hinreihen oder 1 Hin- und 1 Rückreihe gemeint?
29.08.2014 - 17:53DROPS Design answered:
Es sind 1 Hin- und 1 Rück-R gemeint.
30.08.2014 - 15:17
![]() Elske wrote:
Elske wrote:
Na het breien van het achterpand, vol enthousiasme begonnen aan het rechterzijpand. Maar in het patroon hebben ze het over breien tot 37 cm. Vanaf waar is dit gemeten? Als ik de (voor mij) logische korte kant meet kom ik maar op 15 cm.(de rand van het achterpand) Maar langer doorbreien kan niet, dan kom ik ver boven het armsgat uit.
26.08.2014 - 15:37DROPS Design answered:
Dit staat uitgelegd boven bij Tip voor het meten, waar in het patroon naar verwezen wordt. Dus in de hoogte aan de korte kant.
01.09.2014 - 17:13
![]() Birgit wrote:
Birgit wrote:
Hallo. Ich komme mit der Anleitung nicht ganz zurecht. Sind es wirklich 4 Umschläge in der Reihe 1 (dann kriege ich jedoch trotzdem nur 8 M) oder wie muss ich das verstehen. Danke für Die Hilfe
30.07.2014 - 01:07DROPS Design answered:
Liebe Birgit, habe ich richtig verstanden, dass es um das Muster A.1 geht? Sie machen in der 1. R 4 Umschläge, gleichzeitig stricken Sie aber 2 x 2 M zusammen, d.h. 2 Abnahmen - also sind es dann noch 2 Zunahmen, die in der 2. R von A.1 hinzugekommen sind, wie Sie im Diagramm sehen. In der 3. R nehmen Sie diese beiden M dann wieder ab. Der Mustersatz beginnt mit 9 M, nachdem Sie die 1. R gestrickt haben, haben Sie dann 11 M.
31.07.2014 - 11:53
![]() Thea wrote:
Thea wrote:
Hallo, ik ben met het rugpand bezig en moet nu eigenlijk gaan afkanten omdat ik op 31 cm zit maar dan wordt het wel een heel kort pandje en sluit dan volgens mij niet op de afmetingen van de zijpanden aan.
07.07.2014 - 20:21DROPS Design answered:
De maten kloppen, het wordt waarschijnlijk duidelijker als u alle delen met elkaar bevestigt aan het einde.
01.09.2014 - 16:54
![]() Gerd wrote:
Gerd wrote:
När arb mäter 14-13-13-12 och 15-14-14-13 cm. Varför är det två mått?
14.06.2014 - 13:03
|
|||||||||||||||||||||||||||||||||||||
Evangeline#evangelinecardigan |
|||||||||||||||||||||||||||||||||||||
 |
 |
||||||||||||||||||||||||||||||||||||
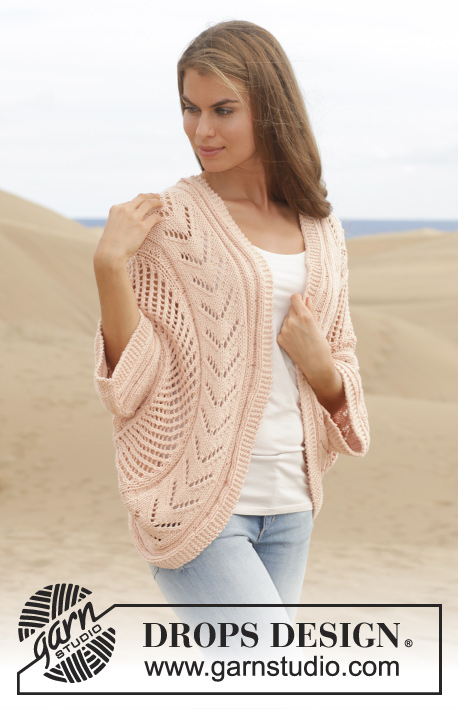
Knitted DROPS vest in garter st worked in a circle with lace pattern in "Paris". Size: S - XXXL.
DROPS 154-35 |
|||||||||||||||||||||||||||||||||||||
|
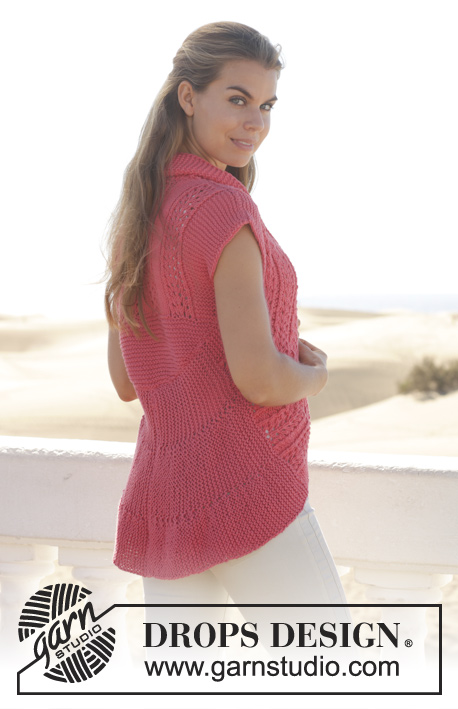
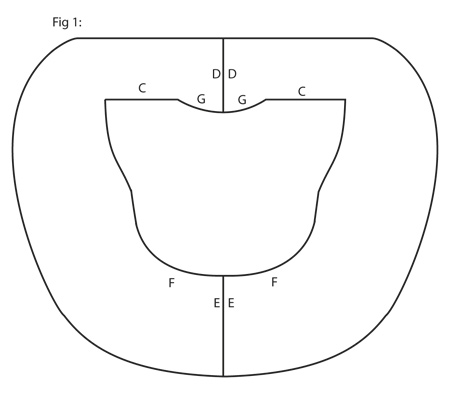
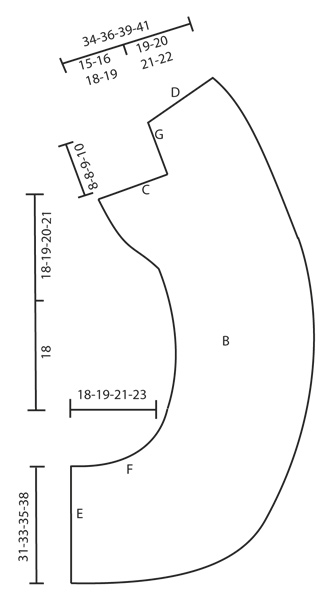
GARTER ST (back and forth on needle): K all rows. 1 ridge = K2 rows. PATTERN: See diagram A.1 (= 9 sts). The diagram shows all rows in pattern seen from RS. MEASURING TIP: All length measurements are done along the shorter side. INCREASE TIP: All inc are done from RS. Inc inside first st in garter st towards the side and work the inc sts in garter st. Inc by making 1 YO, on next row K YO twisted (i.e. work in back loop of st instead front) to avoid holes. PICK UP TIP: Right edge piece: * Pick up 1 st in outer loop of next st/row on back piece at the end of row from RS with left needle, slip the new st on to right needle and pass the st last worked over the new st, work 1 ridge *, repeat from *-* on every row from RS (i.e. edge piece is now worked tog with back piece). NOTE: To make the pattern fit on back piece there is 1 more ridge on right edge piece than on left edge piece. Left edge piece: Pick up as on right but beg at beg of every row from RS. ---------------------------------------------------------- VEST: The vest is worked in 3 parts: 1 back piece (A) + 2 edge pieces (B) are worked from mid back of back and end mid back of neck. These are worked tog with back piece and then sewn tog into a ring - see fig.1. BACK PIECE: Worked back and forth on needle. Cast on 29-33-39-47 sts on circular needle size 5 mm / US 8 with Paris. Insert 1 marker after 15-17-20-24 sts. Fasten right and left edge piece tog with back piece on each side of marker. Work in GARTER ST – see explanation above AT THE SAME TIME cast on 2 sts in each side of piece at the end of the next two rows, repeat inc in each side 2 more times, then cast on 1 st in each side of piece at the end of the next two rows, repeat inc 9 more times = 61-65-71-79 sts on needle. Then work as follows on next row from RS: 5-7-3-7 sts in garter st, A.1 (= 9 sts), * 5 sts in stockinette st, A.1 *, repeat from *-* 3-3-4-4 times in total, finish with 5-7-3-7 sts in garter st. Continue pattern vertically. When piece measures 14-13-13-12 cm/5½"-5"-5"-4¾" and 15-14-14-13 cm / 6"-5½"-5½"-5", inc 1 st in each side = 65-69-75-83 sts on needle (= on 1st or 4th row in A.1) – work the inc sts in garter st. When piece measures 16-15-15-14 cm / 6¼"-6"-6"-5½", inc 1 st for sleeve in each side – READ INCREASE TIP! Repeat inc every 2 rows a total of 6 times. When all inc are done, there are 77-81-87-95 sts on needle (= on 1st or 4th row in A.1). When piece measures 30-30-31-31 cm / 11¾"-11¾"-12¼"-12 1/" - adjust after 1 repetition of A.1 vertically - bind off the middle 21-23-25-27 sts for neck and finish each shoulder separately. Continue to bind off 1 st on next row towards the neck = 27-28-30-33 sts remain on each shoulder. Continue with pattern over the remaining sts. Bind off when piece measures 32-32-33-33 cm / 12½"-12½"-13"-13", adjust after 1 repetition vertically. RIGHT EDGE PIECE: Worked back and forth on needle. Cast on 52-56-60-64 sts on circular needle size 5 mm / US 8 with Paris. Cast-on edge is marked with E on chart. Work in garter st AT THE SAME TIME work edge piece tog with back piece from marker – SEE PICK UP TIP - AT THE SAME TIME work short rows, beg from RS as follows: * Work 2 rows over all sts, then work 2 rows over the first 34-36-40-42 sts, then 2 rows over the first 17-18-20-21 sts *, repeat from *-* until piece measures 18-19-21-23 cm / 7"-7½"-8¼"-9" at the shortest – READ MEASURING TIP. READ ALL OF THE FOLLOWING SECTION BEFORE CONTINUING! Continue the pick up AT THE SAME TIME work as follows on next row from RS: 7 sts in garter st (= band), A.1 4-5-5-6 times in total, finish with 9-4-8-3 sts in garter st AT THE SAME TIME when piece measures 19-20-22-24 cm / 7½"-8"-8¾"-9½", work as follows from RS: * 2 rows over the first 25-34-34-43 sts (7 sts in garter st, A.1 2-3-3-4 times in total), 2 rows over the first 34-43-43-52 sts (7 sts in garter st, A.1 3-4-4-5 times in total), 2 rows over all sts *, repeat from *-* until piece measures 36-37-39-41 cm / 14¼"-14½"-15¼"-16" - Remember MEASURING TIP. The short rows are done. Pick up is finished when sts have been picked up until 1st inc st for sleeve on back piece. Continue with pattern. When pick up is done, inc for sleeve in the side as on back piece (= 6 sts inc) = 58-62-66-70 sts on needle (= on 1st or 4th row in A.1). Then work pattern and in garter st over all sts. When piece measures 54-56-59-62 cm / 21¼"-22"-23¼"-24½", bind off the outermost 27-28-30-33 sts in the left side for shoulder - adjust after 1 repetition of A.1 vertically = 31-34-36-37 sts remain for shawl collar. Work the rest of row. Now measure piece from here. Now continue piece in garter st. Work as follows from RS: * 2 rows over the first 23-26-28-29 sts, 2 rows over all sts *, repeat from *-* until finished measurements. Bind off when piece measures 7-8-8-9 cm / 2¾"-3"-3"-3½" (measured on the shortest side). LEFT EDGE PIECE: Cast on and work as right but reversed. ASSEMBLY: - See chart. Sew in outer loops of edge sts, and make sure to avoid a tight edge. Sew the edge pieces tog in bottom edge (E to E) and in neck (D to D). Fasten edge piece to back piece by sewing shoulder seams (C) and edge piece up to back piece (G) in the back of neck. |
|||||||||||||||||||||||||||||||||||||
Diagram explanations |
|||||||||||||||||||||||||||||||||||||
|
|||||||||||||||||||||||||||||||||||||
 |
|||||||||||||||||||||||||||||||||||||
 |
|||||||||||||||||||||||||||||||||||||
 |
|||||||||||||||||||||||||||||||||||||
Have you finished this pattern?Tag your pictures with #dropspattern #evangelinecardigan or submit them to the #dropsfan gallery. Do you need help with this pattern?You'll find 19 tutorial videos, a Comments/Questions area and more by visiting the pattern on garnstudio.com. © 1982-2026 DROPS Design A/S. We reserve all rights. This document, including all its sub-sections, has copyrights. Read more about what you can do with our patterns at the bottom of each pattern on our site. |
|||||||||||||||||||||||||||||||||||||


With over 40 years in knitting and crochet design, DROPS Design offers one of the most extensive collections of free patterns on the internet - translated to 17 languages. As of today we count 324 catalogs and 12290 patterns - 12280 of which are translated into English (US/in).
We work hard to bring you the best knitting and crochet have to offer, inspiration and advice as well as great quality yarns at incredible prices! Would you like to use our patterns for other than personal use? You can read what you are allowed to do in the Copyright text at the bottom of all our patterns. Happy crafting!
Post a comment to pattern DROPS 154-35
We would love to hear what you have to say about this pattern!
If you want to leave a question, please make sure you select the correct category in the form below, to speed up the answering process. Required fields are marked *.