
Popular categories
Looking for a yarn?


Comments / Questions (56)
![]() Elsy wrote:
Elsy wrote:
Förklara: Bakstycket "Sticka RÄTST... SAMTIDIGT som det läggs upp 2 m i varje sida av arb i slutet på de två nästa varven, upprepa ökningen i varje sida 2 ggr till." Hur många varv ska jag ha stickat? Hur många maskor ska nu finnas på stickan?
06.03.2019 - 17:19DROPS Design answered:
Hei Elsy. Du skal øke 2 masker på slutten av de 2 neste pinnene (2 masker økt i hver side = totalt 4 masker økt). Dette skal du gjenta 2 ganger til, altså toatlt 3 ganger. Det vil si: Du skal ha strikket totalt 6 pinner, med økning i slutten av hver pinne = 12 masker økt. Videre skal du øke 1 maske på slutten av hver pinne i hver side (= 2 pinner strikket), dette skal du gjenta 9 ganger til. God fornøyelse
12.03.2019 - 14:09
![]() Tina Tolias wrote:
Tina Tolias wrote:
Totally confused with the measurements, can you please tell me what size I need to knit for someone with a total measurement around the bust of 109cm. Thank you
16.04.2018 - 11:07DROPS Design answered:
Dear Mrs Tolias, you will find all measurements for each size in the measurement chart. Compare these measurements to a similar garment the lady has and likes the shape (eg A = back piece, find bottom measurement of back piece at the bottom of chart and top measurements (shoulders) at the top). Read more about sizing here. Happy knitting!
16.04.2018 - 13:19
![]() Vibeke Nyrop wrote:
Vibeke Nyrop wrote:
Modellen er strikke i en størrelse M - og bagstykket ser fint ud, men forsiden er blevet for stor. Stykket med mønster hænger og er meget løst, både i længden og i bredden. Vi mener at have fulgt opskriften fuldt ud, og vil være meget glad for at få hjælp til at få lavet vesten færdig.
19.01.2018 - 14:04DROPS Design answered:
Hej, Du ser målene på forstykket nederst i opskriften. Det lyder til at selve mønsteret kan være strikket lidt for løst, det er muligt du skulle have brugt et pinde nummer mindre. Hvis du er næsten færdig går det så ikke at forkorte det lidt istedet for at trevle op?
30.01.2018 - 11:00
![]() Conny Fox wrote:
Conny Fox wrote:
How do I knit the A1 pattern for the left edge? If I start on the wrong side for the short rows the A1 pattern faces the wrong side. Thanks
23.05.2017 - 05:59DROPS Design answered:
Dear Conny, instead of the first row, start the pattern at the second row, so the pattern will face the roght side. Since the pattern is simmetric it does not matter if you read the chart from left to right, or from right to left. I hope this helps. Happy Knitting!
23.05.2017 - 07:09
![]() Conny Fox wrote:
Conny Fox wrote:
Vest left side: cast on 52, connect to back piece knit 2 rows .knit again 52 (RS), turn and now (WS) knit the first 34, turn (RS) knit 2nd row of 34, turn (WS) knit 17, turn, which brings me to the RS, turn, now I am on WS, knit 52, turn, connect to back, knit the 2nd row of 52. Which is now the RS row. Correct? So instead of starting the first 34,17 and again the 52 st on the RS, this time it is starting on the WS (the wrong side = the first row). Will this work with the pattern? Thank you
19.05.2017 - 22:56DROPS Design answered:
Hi Conny, As long as you begin with WS instead of RS, you can follow the instructions for Right Edge Piece. So you repeat from *-* until the piece measures 18cm at the shortest point. I hope this helps. Kind regards, Deirdre
21.05.2017 - 10:32
![]() Conny Fox wrote:
Conny Fox wrote:
I have trouble with the measurements. especially when it comes to the sides. I knitted the pattern with the short rows but i am so confused on how to measure the lenght. I need to stop at 36 cm to do the next step. From where to where do I measure? Especially when the piece curves up. The diagrams doesn't help me. Thank you
12.05.2017 - 21:37DROPS Design answered:
Dear Connie, first you should measure the piece from the cast on row, then, after you separated the body and the sleeves, you should measure from the point the stitches were separated. I hope this helped. Happy Knitting!
13.05.2017 - 01:50María Noé wrote:
Hola! Si, eso es lo que hice en el punto musgo (comenzar las vueltas acortadas por el LR). Cuando comienzo con el patrón debo realizar unas vueltas (4 vueltas según mi frente derecho) hasta que la pieza mida 19 cm y luego comenzar con las vueltas cortas, es ahí donde tengo el problema, porque si doy una vuelta (larga) mas para quedar del lado correcto para la vueltas cortas, me cambia el dibujo del patrón, es así?? Muchas gracias
06.03.2016 - 19:31DROPS Design answered:
Hola María, cuando alcanzamos la medida para comenzar el dibujo, trabajamos la sig fila por el LD (lado derecho) como sigue: 9-4-8-3 pts en pt musgo, A.1 4-5-5-6 vcs en total, 7 pts en pt musgo (= borde). En la sig fila (LR) comenzaríamos las filas acortadas.
09.03.2016 - 13:35María Noé wrote:
Hola! Si he te tejido la orilla derecha sin problemas. De la orilla izquierda he hecho la parte de punto musgo y he comenzado con el patrón, pero cuando debo comenzar con las vueltas cortas, quedo en la parte opuesta de donde debería realizarlas. No puedo comprender como trabajar a la inversa y que el patrón me quede del lado derecho, he probado de muchas maneras y no lo logro. Muchas gracias!!
02.03.2016 - 11:49DROPS Design answered:
Hola María Noé, en la orillla izquierda las vueltas acortadas se comienzan a trabajar por el LR (lado revés). ¿puede ser ese el error?
06.03.2016 - 10:57María Noé wrote:
Hola! Estoy haciendo la orilla de frente izquierdo, logre realizar el punto musgo, pero cuando debo comenzar con las vueltas cortas del patrón no logro que me quede el dibujo correctamente. Podrías explicarme como debo hacer? Muchas gracias!!
01.03.2016 - 16:34DROPS Design answered:
Hola María Noé, entiendo que has tejido ya la orilla derecha y no has tenido problemas. En la orilla izquierda, podrías concretar en que parte está el problema? es en la parte de A.1 o al principio? es por trabajar a la inversa?
02.03.2016 - 10:28
![]() FAIX wrote:
FAIX wrote:
Je ne comprends pas les explications (astuce pour relever les mailles)ainsi que dans le paragraphe (lire attentivement la suite continuer à relever les mailles. Mais où ? Merci
18.10.2015 - 17:26DROPS Design answered:
Bonjour Mme Faix, la bordure devant droit est assemblée au fur et à mesure au dos: relevez 1 m du dos en fin de rang sur l'endroit (devant droit), et passez la dernière m du devant par-dessus la m relevée. On tricote ensuite 7 m point mousse, 4-6 fois A.1 (cf taille) et 9-3 m point mousse, et, en même temps, on tricote des rangs raccourcis comme indiqué pour former l'arrondi du devant. Bon tricot!
19.10.2015 - 09:45
|
|||||||||||||||||||||||||||||||||||||
Evangeline#evangelinecardigan |
|||||||||||||||||||||||||||||||||||||
 |
 |
||||||||||||||||||||||||||||||||||||
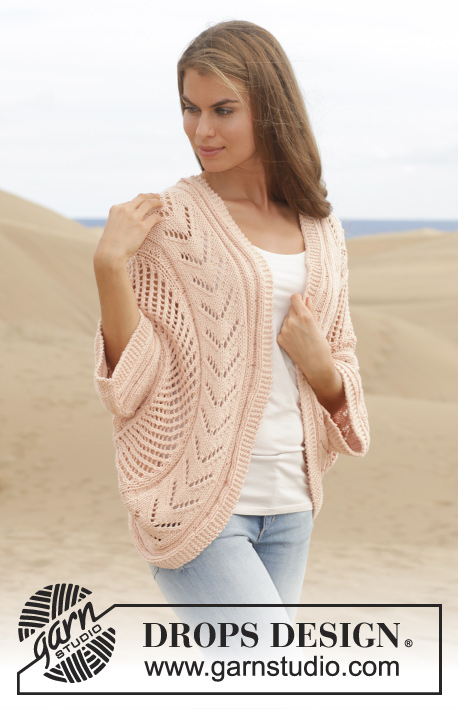
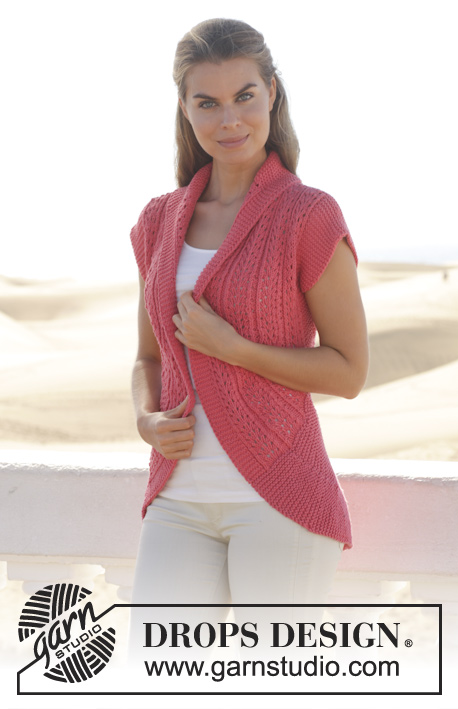
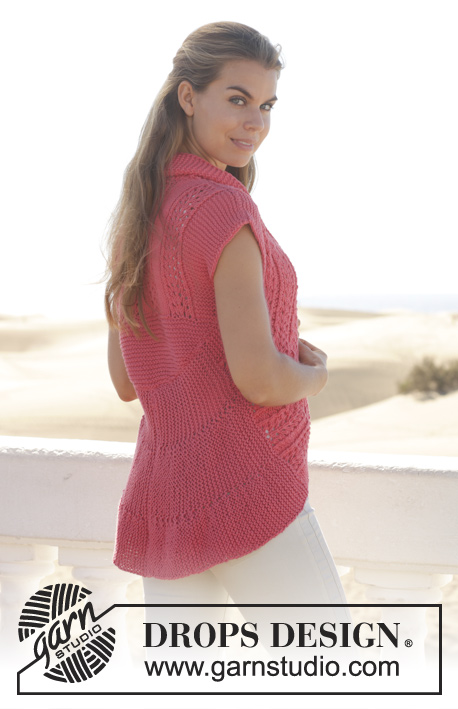
Knitted DROPS vest in garter st worked in a circle with lace pattern in "Paris". Size: S - XXXL.
DROPS 154-35 |
|||||||||||||||||||||||||||||||||||||
|
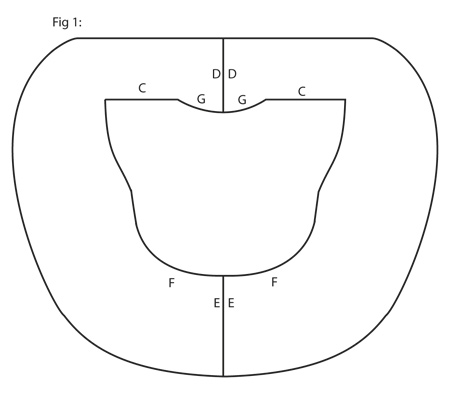
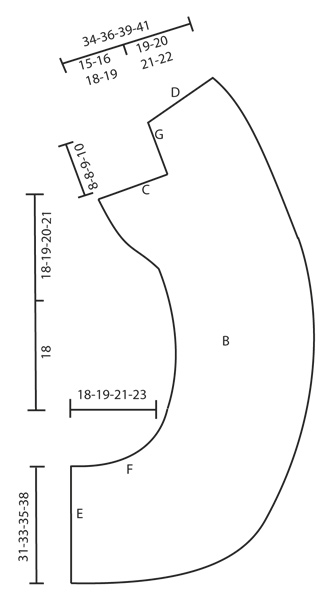
GARTER ST (back and forth on needle): K all rows. 1 ridge = K2 rows. PATTERN: See diagram A.1 (= 9 sts). The diagram shows all rows in pattern seen from RS. MEASURING TIP: All length measurements are done along the shorter side. INCREASE TIP: All inc are done from RS. Inc inside first st in garter st towards the side and work the inc sts in garter st. Inc by making 1 YO, on next row K YO twisted (i.e. work in back loop of st instead front) to avoid holes. PICK UP TIP: Right edge piece: * Pick up 1 st in outer loop of next st/row on back piece at the end of row from RS with left needle, slip the new st on to right needle and pass the st last worked over the new st, work 1 ridge *, repeat from *-* on every row from RS (i.e. edge piece is now worked tog with back piece). NOTE: To make the pattern fit on back piece there is 1 more ridge on right edge piece than on left edge piece. Left edge piece: Pick up as on right but beg at beg of every row from RS. ---------------------------------------------------------- VEST: The vest is worked in 3 parts: 1 back piece (A) + 2 edge pieces (B) are worked from mid back of back and end mid back of neck. These are worked tog with back piece and then sewn tog into a ring - see fig.1. BACK PIECE: Worked back and forth on needle. Cast on 29-33-39-47 sts on circular needle size 5 mm / US 8 with Paris. Insert 1 marker after 15-17-20-24 sts. Fasten right and left edge piece tog with back piece on each side of marker. Work in GARTER ST – see explanation above AT THE SAME TIME cast on 2 sts in each side of piece at the end of the next two rows, repeat inc in each side 2 more times, then cast on 1 st in each side of piece at the end of the next two rows, repeat inc 9 more times = 61-65-71-79 sts on needle. Then work as follows on next row from RS: 5-7-3-7 sts in garter st, A.1 (= 9 sts), * 5 sts in stockinette st, A.1 *, repeat from *-* 3-3-4-4 times in total, finish with 5-7-3-7 sts in garter st. Continue pattern vertically. When piece measures 14-13-13-12 cm/5½"-5"-5"-4¾" and 15-14-14-13 cm / 6"-5½"-5½"-5", inc 1 st in each side = 65-69-75-83 sts on needle (= on 1st or 4th row in A.1) – work the inc sts in garter st. When piece measures 16-15-15-14 cm / 6¼"-6"-6"-5½", inc 1 st for sleeve in each side – READ INCREASE TIP! Repeat inc every 2 rows a total of 6 times. When all inc are done, there are 77-81-87-95 sts on needle (= on 1st or 4th row in A.1). When piece measures 30-30-31-31 cm / 11¾"-11¾"-12¼"-12 1/" - adjust after 1 repetition of A.1 vertically - bind off the middle 21-23-25-27 sts for neck and finish each shoulder separately. Continue to bind off 1 st on next row towards the neck = 27-28-30-33 sts remain on each shoulder. Continue with pattern over the remaining sts. Bind off when piece measures 32-32-33-33 cm / 12½"-12½"-13"-13", adjust after 1 repetition vertically. RIGHT EDGE PIECE: Worked back and forth on needle. Cast on 52-56-60-64 sts on circular needle size 5 mm / US 8 with Paris. Cast-on edge is marked with E on chart. Work in garter st AT THE SAME TIME work edge piece tog with back piece from marker – SEE PICK UP TIP - AT THE SAME TIME work short rows, beg from RS as follows: * Work 2 rows over all sts, then work 2 rows over the first 34-36-40-42 sts, then 2 rows over the first 17-18-20-21 sts *, repeat from *-* until piece measures 18-19-21-23 cm / 7"-7½"-8¼"-9" at the shortest – READ MEASURING TIP. READ ALL OF THE FOLLOWING SECTION BEFORE CONTINUING! Continue the pick up AT THE SAME TIME work as follows on next row from RS: 7 sts in garter st (= band), A.1 4-5-5-6 times in total, finish with 9-4-8-3 sts in garter st AT THE SAME TIME when piece measures 19-20-22-24 cm / 7½"-8"-8¾"-9½", work as follows from RS: * 2 rows over the first 25-34-34-43 sts (7 sts in garter st, A.1 2-3-3-4 times in total), 2 rows over the first 34-43-43-52 sts (7 sts in garter st, A.1 3-4-4-5 times in total), 2 rows over all sts *, repeat from *-* until piece measures 36-37-39-41 cm / 14¼"-14½"-15¼"-16" - Remember MEASURING TIP. The short rows are done. Pick up is finished when sts have been picked up until 1st inc st for sleeve on back piece. Continue with pattern. When pick up is done, inc for sleeve in the side as on back piece (= 6 sts inc) = 58-62-66-70 sts on needle (= on 1st or 4th row in A.1). Then work pattern and in garter st over all sts. When piece measures 54-56-59-62 cm / 21¼"-22"-23¼"-24½", bind off the outermost 27-28-30-33 sts in the left side for shoulder - adjust after 1 repetition of A.1 vertically = 31-34-36-37 sts remain for shawl collar. Work the rest of row. Now measure piece from here. Now continue piece in garter st. Work as follows from RS: * 2 rows over the first 23-26-28-29 sts, 2 rows over all sts *, repeat from *-* until finished measurements. Bind off when piece measures 7-8-8-9 cm / 2¾"-3"-3"-3½" (measured on the shortest side). LEFT EDGE PIECE: Cast on and work as right but reversed. ASSEMBLY: - See chart. Sew in outer loops of edge sts, and make sure to avoid a tight edge. Sew the edge pieces tog in bottom edge (E to E) and in neck (D to D). Fasten edge piece to back piece by sewing shoulder seams (C) and edge piece up to back piece (G) in the back of neck. |
|||||||||||||||||||||||||||||||||||||
Diagram explanations |
|||||||||||||||||||||||||||||||||||||
|
|||||||||||||||||||||||||||||||||||||
 |
|||||||||||||||||||||||||||||||||||||
 |
|||||||||||||||||||||||||||||||||||||
 |
|||||||||||||||||||||||||||||||||||||
Have you finished this pattern?Tag your pictures with #dropspattern #evangelinecardigan or submit them to the #dropsfan gallery. Do you need help with this pattern?You'll find 19 tutorial videos, a Comments/Questions area and more by visiting the pattern on garnstudio.com. © 1982-2026 DROPS Design A/S. We reserve all rights. This document, including all its sub-sections, has copyrights. Read more about what you can do with our patterns at the bottom of each pattern on our site. |
|||||||||||||||||||||||||||||||||||||


With over 40 years in knitting and crochet design, DROPS Design offers one of the most extensive collections of free patterns on the internet - translated to 17 languages. As of today we count 324 catalogs and 12290 patterns - 12280 of which are translated into English (US/in).
We work hard to bring you the best knitting and crochet have to offer, inspiration and advice as well as great quality yarns at incredible prices! Would you like to use our patterns for other than personal use? You can read what you are allowed to do in the Copyright text at the bottom of all our patterns. Happy crafting!
Post a comment to pattern DROPS 154-35
We would love to hear what you have to say about this pattern!
If you want to leave a question, please make sure you select the correct category in the form below, to speed up the answering process. Required fields are marked *.