
Popular categories
Looking for a yarn?


Comments / Questions (37)
![]() Marianne Karlsson wrote:
Marianne Karlsson wrote:
Vad kan man ersätta baby alpaca silk med. Kan man ta tex. Air?
15.10.2024 - 18:28DROPS Design answered:
Hej Marianne, ja du kan med fordel strikke den i DROPS Air på samme strikkefasthed som står i opskriften :)
16.10.2024 - 12:14
![]() Ilka wrote:
Ilka wrote:
Wie finde ich die schmalste Stelle innen und die breiteste Stelle außen am Kragen für das rechte Vorderteil? Danke!
18.03.2024 - 20:00DROPS Design answered:
Liebe Ilka, die schmalste Stelle innen beim Kragen ist die linke Seite, von der Vorderseite gesehen, dh die Seite wo man weniger Reihen strickt, und die am Halsausschnitt vom Rückenteil angenäht wird. Viel Spaß beim stricken!
19.03.2024 - 11:02
![]() Christine Weidgang wrote:
Christine Weidgang wrote:
Is the complete garment knitted with the two different wools? If so, why do I need 250g for one and only 100g for the other? Thank you in advance
09.05.2021 - 17:15DROPS Design answered:
Dear Christine, yes, the whole piece is knitted with two different yarns held together. You need diffenet amounts because the Kid Silk yarn is much lighter, much thinner, and thud there are more meters in 100 gramms than in Baby Alpaca Silk. Happy Knitting!
09.05.2021 - 17:52Hina wrote:
Hi I have reached the last part which is left front pice and it says (work as right but reversed) could you tell me please how can I reverse it.
06.07.2018 - 21:10DROPS Design answered:
Dear Hina, it is very simple, you just mirror what you have done on the first /right side. If you cast on at the end of a WS row, now you have to cas on at the end of a RS row, do the decreases on the opposite side, etc. Happy Knitting!
08.07.2018 - 12:49Hina wrote:
Hi I’m knitting this pattern and I have reached at the right front collar, it says until collar measures 8 cm (I am knitting for the fourth size) inside on the MOST NARROW and 16cm at the EDGE ON The WIDEST. Could you tell me where are these most narrow and edge on the widest?
26.04.2018 - 23:32DROPS Design answered:
Deear Hina, after you have cast off the sts for shoulder, work remaining st on row starting next row from mid front, then work short rows in garter st over the remaining sts for collar: 1 ridge over all sts, 1 ridge over the 18 sts. You will now work the double number of row over the first 18 sts, that's how the collar will be double high = 16 cm and half high towards the cast off sts for shoulder = 8 cm. Happy knitting!
27.04.2018 - 09:00
![]() Nicole wrote:
Nicole wrote:
Guten morgen, ich fange gerade mit den Muster an. Bin nun bei der ersten Rückreihe und stoße auf eine Frage. Wie soll ich in der Rückreihe die Umschläge abstricken. Lg Nicole
02.01.2017 - 06:15DROPS Design answered:
Liebe Nicole, in A.1 sollen die Umschläge von der Rückseite links gestrickt werden (= loch). Hier lesen Sie mehr über die Diagramme. Viel Spaß beim stricken!
02.01.2017 - 09:11
![]() Angelika wrote:
Angelika wrote:
Hallo, wie ist das mit der Abnahme gemeint? Da steht in jeder 6. Reihe die Abnahme 0-1-0-2-0-1 wiederholen. Bedeutet das: die 1. M zus. stricken dann eine normal 1 M zus, 1 M normal, 2 M zus. stricken, 1 M normal u. nochmal 1 M zusammen und dann normal weiter?
09.11.2014 - 18:35DROPS Design answered:
Nein, diese Angabe bezieht sich auf die verschiedenen Größen: die Abnahme (an beiden Vorderteilen je 1 M wie unter Abnahmentipp beschrieben) wird in Größe S 0x wiederholt (also nach dem einen Mal nicht mehr gearbeitet), in Größe M 1x (d.h. in der 6. R nach der 1. Abnahme werden die Abnahmen noch einmal gearbeitet), in Größe L 0x, in Größe XL 2x, in Größe XXL 0x und in Größe XXXL 1x.
09.11.2014 - 22:16
![]() Nicole wrote:
Nicole wrote:
Danke für Ihre Mühe. Ja, ich habe das so verstanden u alle linken Bereiche zusammen gestrickt. Mist. Dann eben doch wieder rückwärts stricken :-( Trotzdem ein herzliches Dankeschön!
29.10.2014 - 20:51
![]() Nicole wrote:
Nicole wrote:
Hallo nochmal. Also bei mir sind es nur 14 glatt rechts gestrickte Bereiche da ich (wie in der Anleitung) bis auf die erste u letzte 3er links alle links zusammen gestrickt habe. Das waren dann 41 Mal. Ich moechte jetzt aber auch nicht mehr aufziehen. Komme ich oben dann trotzdem mit dem Muster hin?
27.10.2014 - 21:53DROPS Design answered:
Haben Sie fortlaufend immer 2 M li zus.gestrickt oder dazwischen die 3 M li gelassen? * 2 M re, 3 M li, 2 M re, 2 M li zusammen, 1 M li, 2 M re, 2 M li zusammen, 1 M li * lautet die Anleitung, Sie lassen also zwischendurch immer 3 M li bestehen. Das Problem ist, dass Sie für die von Ihnen gewählte Größe zu wenig Maschen haben. Wenn der Fehler in o.g. Stelle begründet liegt, sollten Sie sich die Mühe machen und noch einmal beginnen, ansonsten ärgern Sie sich hinterher über ein "zusammengebasteltes" Ergebnis.
28.10.2014 - 06:00
![]() Nicole wrote:
Nicole wrote:
Hallo nochmal. Also bei mir sind es nur 14 glatt rechts gestrickte Bereiche da ich (wie in der Anleitung) bis auf die erste u letzte 3er links alle links zusammen gestrickt habe. Das waren dann 41 Mal. Ich moechte jetzt aber auch nicht mehr aufziehen. Komme ich oben dann trotzdem mit dem Muster hin?
27.10.2014 - 21:48DROPS Design answered:
Liebe Nicole, Antwort siehe oben!
28.10.2014 - 06:03
|
||||||||||||||||||||||
Spring Rising#springrisingcardigan |
||||||||||||||||||||||
|
|
||||||||||||||||||||||
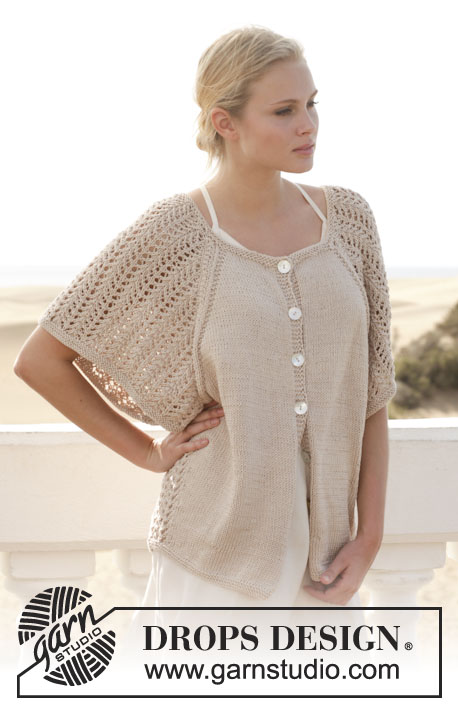
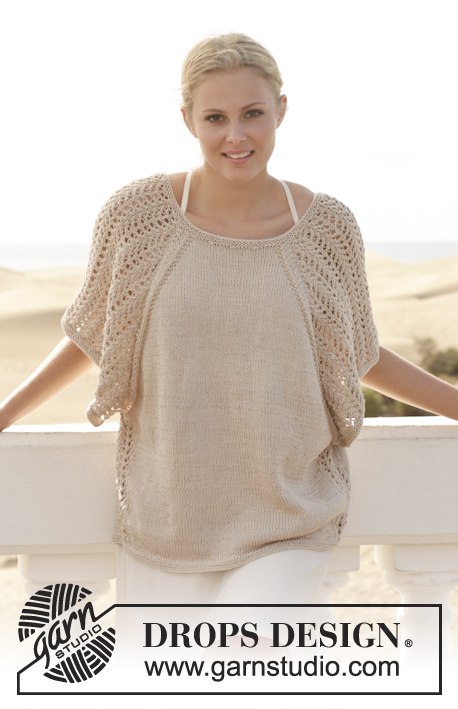
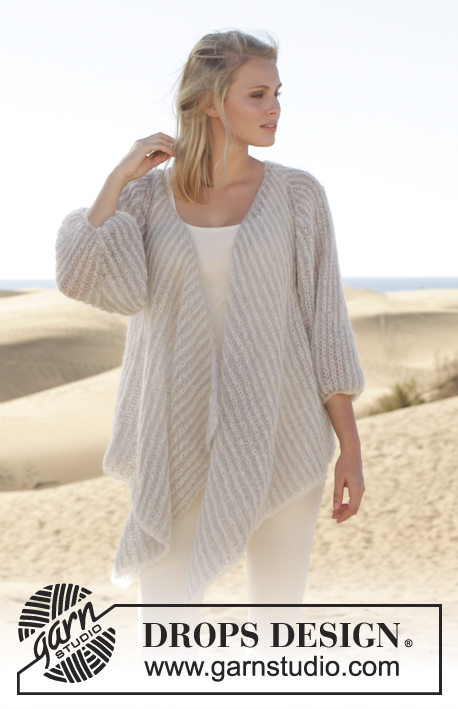
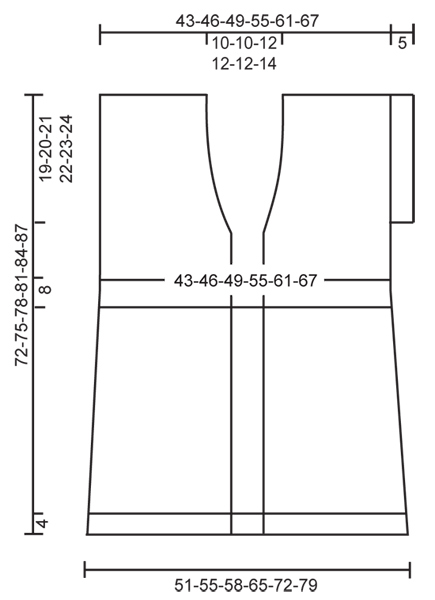
Knitted DROPS jacket in stockinette st with lace pattern in "BabyAlpaca Silk" and "Kid-Silk". Size: S - XXXL.
DROPS 152-11 |
||||||||||||||||||||||
|
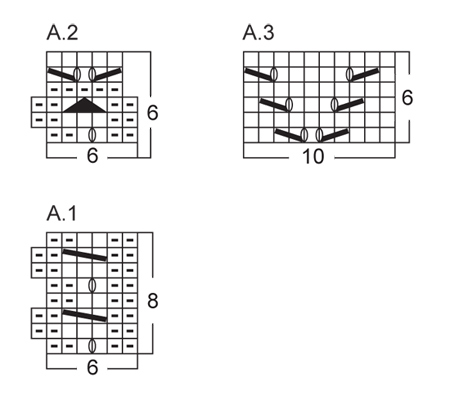
GARTER ST (back and forth on needle): K all rows. 1 ridge = K2 rows. KNITTING TIP (applies to band): To keep the band from contracting work short rows over bands every 10th row as follows: * Beg from RS on right front piece (= mid front) and K 1 row over the outermost 16 sts (= band – do not work the other sts on row), turn piece, tighten yarn and K 1 row, turn piece and work 1 row as before (with garter st and pattern) over all sts, turn piece, K 1 row over the outermost 16 sts (= band on left front piece – the other sts on row are not worked), turn piece, tighten yarn and K the rest of row *, repeat from *-* on every 10th row. PATTERN: See diagrams A.1 to A.3. The diagrams show all rows in pattern seen from RS. 1st row = RS. INCREASE TIP: Inc 1 st by making 1 YO inside the outermost st. On next row K YO twisted to avoid holes. DECREASE TIP (applies to neckline): Dec for neck inside all sts in garter st (i.e. band + inc sts for collar). All dec are done from RS! Dec as follows AFTER sts in garter st: Slip 1 st as if to K, K 1, psso. Dec as follows BEFORE sts in garter st: K 2 tog. BUTTONHOLES: Dec for buttonholes on right band. 1 buttonhole = K tog third and fourth st from edge and make 1 YO. Dec for buttonholes when piece measures: SIZE S: 35 and 43 cm / 13¾" and 17" SIZE M: 36 and 44 cm / 14¼" and 17¼" SIZE L: 37 and 45 cm / 14½" and 17¾" SIZE XL: 38 and 46 cm / 15" and 18" SIZE XXL: 39 and 47 cm / 15¼" and 18½" SIZE XXXL: 40 and 48 cm / 15¾" and 19" ---------------------------------------------------------- JACKET: BODY: Worked back and forth on circular needle from mid front. Cast on 234-249-264-294-324-354 sts (includes 16 band sts in each side towards mid front) on circular needle size 4.5 mm / US 7 with 1 strand of each yarn (= 2 strands). P 1 row from WS, then work next row as follows from RS: 16 band sts in GARTER ST - see explanation above - * K 2, P 3 *, repeat from *-* until 18 sts remain and finish with K 2 and 16 band sts in garter st. Continue rib like this. When piece measures 4 cm / 1½", work next row as follows from RS: 16 band sts as before, * K 2, P 3, K 2, P 2 tog, P 1, K 2, P 2 tog, P 1 *, repeat from *-* until 23 sts remain, K 2, P 3, K 2 and 16 band sts as before = 208-221-234-260-286-312 sts. Work 1 row with K over K and P over P and bands in garter st. Switch to circular needle size 5 mm / US 8 and work pattern as follows from RS: 16 band sts, * 7 sts in stockinette st, diagram A.1 (= 6 sts) *, repeat from *-* until 23 sts remain and finish with 7 sts in stockinette st and 16 band sts (= 14-15-16-18-20-22 sections in stockinette st and 13-14-15-17-19-21 of A.1). Continue pattern like this. REMEMBER KNITTING GAUGE AND READ KNITTING TIP. When piece measures 7-8-9-10-11-12 cm / 2¾"-3⅛"-3½"-4"-4⅜"-4¾", dec in 1st section in stockinette st, then dec in every other section in stockinette st from 7 K sts to 6 K sts by working the first 2 sts in every other K section K twisted tog (from RS) = 201-213-226-251-276-301 sts on needle on 1st row in A.1 (i.e. 7-8-8-9-10-11 sts dec). NOTE! Sts depends on where you are in A.1. When piece measures 15-16-17-18-19-20 cm / 6"-6¼"-6¾"-7"-7½"-8", dec the remaining 7 K sts to 6 K sts by working the last 2 sts in the remaining K sections K tog (from RS) = 194-206-218-242-266-290 sts on 1st row in A.1 (i.e. 7-7-8-9-10-11 sts dec). NOTE! Sts depends on where you are in A.1. Repeat dec in every other section when piece measures 23-24-25-26-27-28 and 31-32-33-34-35-36 cm / 12¼"-12½"-13"-13⅜"-13¾"-14¼" = 180-191-202-224-246-268 sts on 1st row in A.1. Continue the pattern (there are now 5 sts in stockinette st between every repetition with A.1). When piece measures 32-33-34-35-36-37 cm / 12½"-13½"-13⅜"-13¾"-14¼"-14½", work A.2 instead of A.1 (work the other sts as before). When piece measures 35-36-37-38-39-40 cm / 13¾"-14¼"-14½"-15"-15¼"-15¾", beg BUTTONHOLES - see explanation above. When A.2 has been worked 1 time vertically, there are 167-177-187-207-227-247 sts on needle. Work next row as follows from RS: 16 band sts, 2 sts in stockinette st, work pattern according to diagram A.3 until 19 sts remain and finish with 3 sts in stockinette st and 16 band sts. Continue pattern like this until A.3 has been worked 3 times in total vertically. Insert 1 markers 46-49-50-56-60-65 sts in from each side (= 75-79-87-95-107-117 sts between markers on back piece) and work in stockinette st (continue bands in garter st as before). AT THE SAME TIME when piece measures 48-50-52-54-56-58 cm / 19"-19¾"-20½"-21¼"-22"-22¾", inc 1 st in the side towards mid front for collar - SEE INCREASE TIP. Repeat inc every 2½ cm / ⅞" 7-7-9-9-11-11 more times = 8-8-10-10-12-12 inc sts for collar and = 24-24-26-26-28-28 sts in garter st in total. AT THE SAME TIME 2 cm / ¾" after inc for collar beg, dec 1 st for neck on front piece – SEE DECREASE TIP. Repeat dec every 6th row 0-1-0-2-0-1 more time. When piece measures 53-55-57-59-61-63 cm / 21"-21⅝"-22½"-23¼"-24"-24¾", finish each part separately. Divide piece at the markers. RIGHT FRONT PIECE: Cast on 7 sts for sleeve at the end of row. Work the new sts in garter st until finished measurements. Work in stockinette st with 7 edge sts in garter st for sleeve AT THE SAME TIME continue inc for collar and dec for neck as before. When piece measures 72-75-78-81-84-87 cm / 28½"-29½"-30¾"-32"-33"-34¼", bind off the outermost 36-38-40-44-50-54 sts on shoulder on next row from WS = 24-24-26-26-28-28 collar sts remain on needle. Work the rest of row. Then work in garter st over these sts, beg from RS as follows: * 1 ridge over all sts, 1 ridge over only the outermost 16-16-18-18-20-20 sts *, repeat from *-* until collar measures approx. 7-7-8-8-8-9 cm / 2¾"-2¾"-3⅛"-3⅛"-3⅛"-3½" inside on the most narrow and 14-14-16-16-16-18 cm / 5½"-5½"-6¼"-6¼"-6¼"-7" at the edge on the widest. Bind off. BACK PIECE: Cast on 7 sts at the end of the next two rows = 89-93-101-109-121-131 sts. Work in stockinette st with 7 edge sts in garter st in each side. When piece measures 70-73-76-79-82-85 cm / 27½"-28¾"-30"-31"-32¼"-33½", bind off the middle 15-15-19-19-19-21 sts for neck and finish each shoulder separately. Continue to bind off 1 st on next row from neck = 36-38-40-44-50-54 sts remain on the shoulder. Continue until piece measures 72-75-78-81-84-87 cm / 28½"-29½"-30¾"-32"-33"-34¼" and bind off. Repeat on the other shoulder. LEFT FRONT PIECE: Work as right but reversed. Bind off shoulder sts from RS and beg short rows on collar from WS. ASSEMBLY: Sew the shoulder seams. Sew the collar tog mid back and sew it to the neckline. Sew tog under sleeves. Sew the buttons on to left band. |
||||||||||||||||||||||
Diagram explanations |
||||||||||||||||||||||
|
||||||||||||||||||||||
 |
||||||||||||||||||||||
 |
||||||||||||||||||||||
Have you finished this pattern?Tag your pictures with #dropspattern #springrisingcardigan or submit them to the #dropsfan gallery. Do you need help with this pattern?You'll find 24 tutorial videos, a Comments/Questions area and more by visiting the pattern on garnstudio.com. © 1982-2026 DROPS Design A/S. We reserve all rights. This document, including all its sub-sections, has copyrights. Read more about what you can do with our patterns at the bottom of each pattern on our site. |
||||||||||||||||||||||


With over 40 years in knitting and crochet design, DROPS Design offers one of the most extensive collections of free patterns on the internet - translated to 17 languages. As of today we count 324 catalogs and 12290 patterns - 12280 of which are translated into English (US/in).
We work hard to bring you the best knitting and crochet have to offer, inspiration and advice as well as great quality yarns at incredible prices! Would you like to use our patterns for other than personal use? You can read what you are allowed to do in the Copyright text at the bottom of all our patterns. Happy crafting!
Post a comment to pattern DROPS 152-11
We would love to hear what you have to say about this pattern!
If you want to leave a question, please make sure you select the correct category in the form below, to speed up the answering process. Required fields are marked *.