
Popular categories
Looking for a yarn?


Comments / Questions (67)
![]() Claudia wrote:
Claudia wrote:
Guten Abend, kann es sein, dass in der Anleitung für XXL ein Fehler ist? Och habe 56 Maschen abzüglich den Randmaschen sowie 12 Maschen Rippen = 42 Maschen. Ich soll insgesamt 4 x A1 mit je 6 Maschen = 24Maschen arbeiten. Und die restlichen Maschen? Wie werden die gearbeitet? Danke für eine Antwort.
18.02.2026 - 21:20DROPS Design answered:
Liebe Claudia, Sie wiederholen nicht nur A.1 4 x, sondern * 2 M li, 2 M re, 2 M li, A.1 *, also sind es 12 M, die Sie insgesamt 4 x arbeiten, = 48 M, am Ende der Reihe dann noch mal 2 M li, 2 M re, 2 M li = 54 M, plus die 2 Rand-M = 56 M. Viel Spaß beim Stricken!
18.02.2026 - 21:30
![]() Eija Vättö wrote:
Eija Vättö wrote:
Miten esim. A1 kuvio neulotaan? Tähän tullaan 2n2o2n. Onko sitten langan kierto, 1o, kavennukset , 1o, langankierto/ vielä kuvio 2 kertaa
26.10.2024 - 11:30DROPS Design answered:
Kyllä, neulot juuri tähän tapaan.
29.10.2024 - 16:37
![]() JESSICA J MONTGOMERY wrote:
JESSICA J MONTGOMERY wrote:
What exactly does it mean: Work rib back the same way"? To purl the knit stitches, knit the purl?
03.12.2021 - 07:44DROPS Design answered:
Hi Jessica, Yes, to continue the rib when working back and forth you purl the knitted stitches and knit the purled stitches, although from the wrong side it looks like you are purling purled stitches and knitting knitted stitches. Happy crafting!
03.12.2021 - 08:04
![]() Cheryl Clark wrote:
Cheryl Clark wrote:
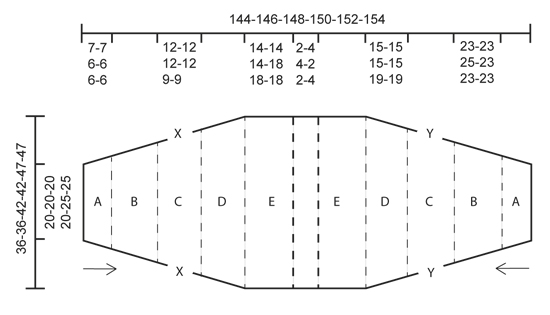
I am a bit confused. The pattern is knit sleeve to sleeve and yet diagram shoepws top to bottom. And no section f. So am I knitting then abcedef? Also would you be able to start the sleeves in the round then knit flat for back? I bought the yarn from you, and it is still sitting because the pattern doesn’t make sense and I have been knitting for close to 20 years.
15.11.2021 - 10:13DROPS Design answered:
Dear Mrs Clark, pattern is worked in 2 pieces from sleeve edge towards mid back with a seam on mid back. Work the different sections as explained, all diagrams (including F.1) is mentionned in the written pattern. You have to read the written pattern and work the diagrams when explained. (F.1 will be worked after piece measures 7or 6 cm depending on the size). Maybe tell your size if you need more help or simply contact your DROPS store, it might be easier for them to assist you, even per mail or telephone. Happy knitting!
15.11.2021 - 12:56
![]() Nathalie Acquenin wrote:
Nathalie Acquenin wrote:
Bonjour j aimerais avoir de l aide car je voudrais faire ce modèle qui me plaît beaucoup mais je ne comprends pas les explications c est la première fois que je réalise un modèle de drops merci
01.02.2021 - 11:45DROPS Design answered:
Bonjour Mme Acquenin, vous pouvez volontiers poser votre question dans cette rubrique, en expliquant bien ce que vous ne comprenez pas. Juste après les explications, vous pourrez trouver une liste de ressources qui pourront vous être utiles: vidéos, leçons sur les techniques utilisées. Et bien sûr, cette rubrique pour toute question et votre magasin DROPS pour toute assistance personnalisée. Bon tricot!
01.02.2021 - 14:50
![]() Nicole wrote:
Nicole wrote:
Mit welcher Technik würdet ihr empfehlen die Rückennaht zu schließen? Gibt es dazu ein Video? Ich habe kein entsprechendes gefunden.
05.01.2021 - 20:33DROPS Design answered:
Liebe Nicole, dieses Video zeigt, wie man die abgekettenen Maschen von beiden Teilen zusammennäht. Viel Spaß beim stricken!
06.01.2021 - 07:26
![]() Terhi wrote:
Terhi wrote:
Olen tehnyt a ja b osan, miksi työni on vain 18 cm, vaikka pitäisi olla 29 cm?!? Kuvioita on oikea määrä.
08.10.2020 - 10:26DROPS Design answered:
Oletko tarkistanut, että neuletiheytesi täsmää? Sen tulee olla 20 s x 26 krs sileää neuletta per 10 x 10 cm.
19.11.2020 - 17:19
![]() Milhem Lola wrote:
Milhem Lola wrote:
Bonjour, j'en suis à l'assemblage et jusque là tout va bien. Les côtés X et Y font-ils toute la longueur du biais des manches, ou bien s'arrêtent-ils après les diagrammes C2 ? Autre formulation, dois-je fermer les manches jusqu'à la partie droite du dos ? Je n'ai jamais tricoté de boléro et suis un peu perdue Merci d'avance
24.09.2020 - 11:37DROPS Design answered:
Bonjour Mme Milhem, vous faites la couture en commençant au bord de la manche et en remontant tout le long des côtés jusqu'aux diagrammes C/D= côtés X d'un côté /Y de l'autre- ajustez la longueur de la couture si besoin en essayant le boléro avant de relever les mailles de la bordure. Bon tricot!
24.09.2020 - 14:26
![]() Barbara wrote:
Barbara wrote:
Na opzetten moet je de boordsteek breien. De naald terug staat als brei de boordsteek terug op dezelfde manier. Betekent dat dan dat waar recht staat, je terug averecht moet breien en waar averecht staat, je recht moet breien? Ik hoor t graag
14.04.2020 - 21:05DROPS Design answered:
Dag Barbara,
Ja dat klopt, dus zoals je gewend bent een boordsteek te breien. Waar je recht breit op de goede kant brei je averecht op de verkeerde kant en vice verca.
16.04.2020 - 12:34
![]() Alicia wrote:
Alicia wrote:
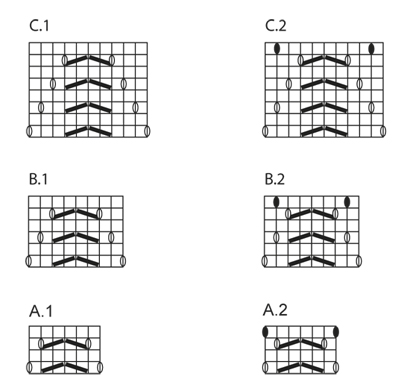
Buenas tardes. ¿Hay algún video para ver cómo se hace la lazada en la hilera revés? En este patrón deben hacerse en los diagramas A2,B 2 , C2 y D2. Mi pregunta se debe a que en esa lazada me queda un agujero un poco más grande que los otros. Muchas gracias . Saludos.
07.02.2020 - 00:04DROPS Design answered:
Hola Alicia. Todos los vídeos relacionados con el patrón puedes encontrarlos bajo los diagramas. Las lazadas por el lado derecho y por el lado revés se trabajan de la misma manera. Es posible que algunos puntos trabajados retorcidos queden más abiertos que otros. Puedes probar a sustituir las lazadas por levantar la hebra entre los puntos. En este caso el tejido quedaría más cerrado.
01.03.2020 - 00:02
|
|||||||||||||||||||||||||
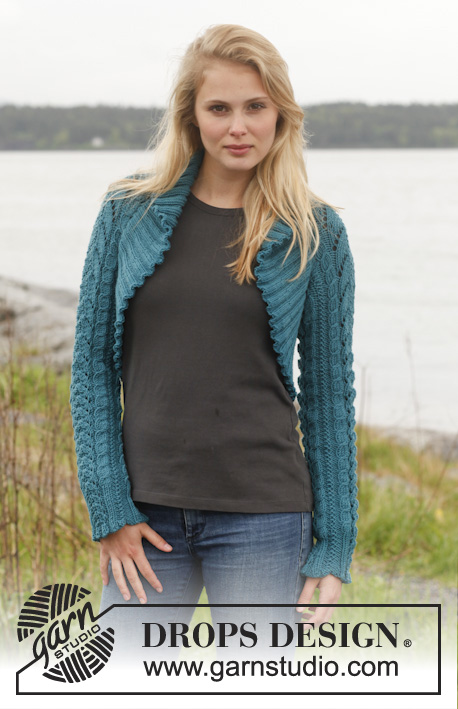
Valkyrie#valkyriebolero |
|||||||||||||||||||||||||
 |
 |
||||||||||||||||||||||||
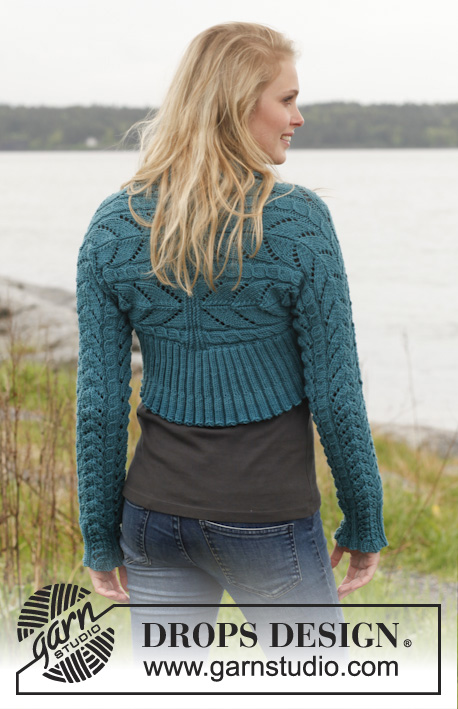
Knitted DROPS bolero with cables and lace pattern in ”Merino Extra Fine”. Size: S - XXXL.
DROPS 149-12 |
|||||||||||||||||||||||||
|
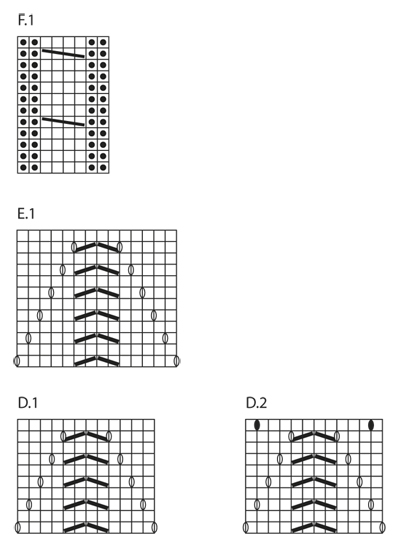
GARTER ST (back and forth on needle): K all rows. 1 ridge = K 2 rows. PATTERN: See diagram A, B, C, D, E and F. The diagrams show all rows in pattern seen from RS. INCREASE TIP 1: Inc on last row (= WS) in every repetition (A.2), and inc as follows in every P-section (from WS): * K 2, 1 YO, P 2, 1 YO, K 2 *. On next row (i.e. 1st row = RS in F.1) K YOs twisted to avoid holes. INCREASE TIP 2: Inc 1 st by making a YO before first P st in every section with P sts in rib. P this twisted on next round. INCREASE TIP 3: Inc 1 st by making a YO before first K st in every section with K sts in rib. K this twisted on next round. ---------------------------------------------------------- BOLERO: Piece is worked in 2 parts from sleeve and over shoulder and sewn tog mid back. Worked back and forth on circular needle. Cast on 55-55-55-55-70-70 sts (includes 1 edge st in garter st in each side) on circular needle size 4.5 mm / US 7 with Merino Extra Fine. Work RIB as follows from RS: 1 edge st in GARTER ST – see explanation above, * P 3, K 2 *, repeat from *-* over the next 50-50-50-50-65-65 sts, P 3, 1 edge st in garter st. Work rib back the same way (= WS). On next row from RS work as follows: 1 edge st in garter st, * P 2 tog, P 1, K 2 *, repeat from *-* until 4 sts remain and finish with P 2 tog, P 1, 1 edge st in garter st = 44-44-44-44-56-56 sts on row. Work 1 row rib back the same way. Then work as follows from RS: 1 edge st in garter st, * P 2, K 2, P 2, PATTERN according to diagram A.1 (= 6 sts)*, repeat from *-* 2-2-2-2-3-3 more times (= 3-3-3-3-4-4 times in total), P 2, K 2, P 2, 1 edge st in garter st. Continue back and forth the same way with 1 edge st in garter st, rib and A.1 until A.1 has been worked 3-3-2-2-2-2 times vertically. Then work as follows from RS: 1 edge st in garter st, * P 2, K 2, P 2, PATTERN according to diagram A.2 (= 6 sts)*, repeat from *-* 2-2-2-2-3-3 more times (= 3-3-3-3-4-4 times in total), P 2, K 2, P 2, 1 edge st in garter st. Continue back and forth the same way with 1 edge st in garter st, rib and A.2 until A.2 has been worked 1-1-1-1-1-1 time vertically, AT THE SAME TIME on last row inc 2 sts in every rib section – see INCREASE TIP 1! There are now 58-58-58-58-74-74 sts on row and piece measures approx. 7-7-6-6-6-6 cm / 2¾"-2¾"-2½"-2½"-2½"-2½". Then work as follows: 1 edge st in garter st, * F.1 (= 8 sts), B.1 (= 8 sts) *, repeat from *-* 2-2-2-2-3-3 more times (= 3-3-3-3-4-4 times in total), F.1, 1 edge st in garter st. Continue the same way until B.1 has been worked 8-8-9-8-8-8 times vertically. Then work the same way but with B.2 instead of B.1. Work B.2 a total of 1-1-1-1-1-1 times vertically. Piece now measures approx. 30-30-31-29-29-29 cm / 11¾"-11¾"-12¼"-11½"-11½"-11½" and there are 64-64-64-64-82-82 sts on needle. Then work as follows: 1 edge st in garter st, * F.1 (= 8 sts), C.1 (= 10 sts) *, repeat from *-* 2-2-2-2-3-3 more times (= 3-3-3-3-4-4 times in total), F.1, 1 edge st in garter st. Continue the same way until C.1 has been worked 2-2-2-2-1-1 times vertically. Then work the same way but with C.2 instead of C.1. Work C.2 1-1-1-1-1-1 time vertically, AT THE SAME TIME on last row inc 0-0-1-1-0-0 P sts on each side of every repetition of F.1 by picking up a st from row below = 70-70-78-78-90-90 sts on needle. NOTE! These new sts on each side of F.1 are worked P until cast-off. Piece now measures 42-42-43-41-38-38 cm / 16½"-16½"-17"-16"-15"-15". Then work as follows: 1 edge st in garter st, * P 0-0-1-1-0-0, F.1 (= 8 sts), P 0-0-1-1-0-0, D.1 (= 12 sts) *, repeat from *-* 2-2-2-2-3-3 more times (= 3-3-3-3-4-4 times in total), P 0-0-1-1-0-0, F.1, P 0-0-1-1-0-0, 1 edge st in garter st. Continue the same way until D.1 has been worked 3-3-3-3-4-4 times vertically. Then work the same way but with D.2 instead of D.1. Work D.2 1-1-1-1-1-1 time vertically = 76-76-84-84-98-98 sts on needle. Piece now measures 57-57-58-56-57-57 cm / 22½"-22½"-22¾"-22"-22½"-22½". Then work as follows: 1 edge st in garter st, * P 0-0-1-1-0-0, F.1 (= 8 sts), P 0-0-1-1-0-0, E.1 (= 14 sts) *, repeat from *-* 2-2-2-2-3-3 more times (= 3-3-3-3-4-4 times in total), P 0-0-1-1-0-0, F.1, P 0-0-1-1-0-0, 1 edge st in garter st. Continue the same way until E.1 has been worked 3-3-3-4-4-4 times vertically. Work 2-4-4-2-2-4 ridges in garter st. Loosely bind off. Piece now measures 72-73-74-75-76-77 cm / 28½"-28¾"-29"-29½"-30"-30½". Knit another part. ASSEMBLY: Sew the 2 parts tog mid back. Sew sleeve seam in the outermost edge st as follows: Sew edge X and X tog, sew edge Y and Y tog – see diagram. EDGE: Pick up 280-288-312-336-360-368 sts evenly from RS along the opening on bolero - i.e. up along right front piece, back of neck, down along left front piece and then along back piece on circular needle size 4 mm / US 6 with Merino Extra Fine. Work rib in the round on circular needle as follows: K 2/P 2. When edge measures 5 cm / 2", inc 1 st in every P section = K 2/P 3 - Read INCREASE TIP 2. When edge measures 10-10-11-11-12-12 cm / 4"-4"-4½"-4½"-4¾"-4¾", inc 1 st in every K section = K 3/P 3 - Read INCREASE TIP 3. Continue with K 3/P 3 until edge measures 15-15-16-16-17-17 cm / 6"-6"-6¼"-6¼"-6¾"-6¾". Loosely bind off sts with K over K and P over P. NOTE: To avoid a tight cast-off edge make 1 YO before every P section. Bind off YO as st. |
|||||||||||||||||||||||||
Diagram explanations |
|||||||||||||||||||||||||
|
|||||||||||||||||||||||||
 |
|||||||||||||||||||||||||
 |
|||||||||||||||||||||||||
 |
|||||||||||||||||||||||||
Have you finished this pattern?Tag your pictures with #dropspattern #valkyriebolero or submit them to the #dropsfan gallery. Do you need help with this pattern?You'll find 18 tutorial videos, a Comments/Questions area and more by visiting the pattern on garnstudio.com. © 1982-2026 DROPS Design A/S. We reserve all rights. This document, including all its sub-sections, has copyrights. Read more about what you can do with our patterns at the bottom of each pattern on our site. |
|||||||||||||||||||||||||


With over 40 years in knitting and crochet design, DROPS Design offers one of the most extensive collections of free patterns on the internet - translated to 17 languages. As of today we count 324 catalogs and 12290 patterns - 12280 of which are translated into English (US/in).
We work hard to bring you the best knitting and crochet have to offer, inspiration and advice as well as great quality yarns at incredible prices! Would you like to use our patterns for other than personal use? You can read what you are allowed to do in the Copyright text at the bottom of all our patterns. Happy crafting!
Post a comment to pattern DROPS 149-12
We would love to hear what you have to say about this pattern!
If you want to leave a question, please make sure you select the correct category in the form below, to speed up the answering process. Required fields are marked *.