
Popular categories
Looking for a yarn?


Comments / Questions (145)
![]() Stina wrote:
Stina wrote:
There are 2 different symbols with different explanations.
18.08.2014 - 12:38
![]() Jutta Berger wrote:
Jutta Berger wrote:
Hallo, ich verstehe in der Anleitung nicht, wie ich das am Vorderteil mit den Maschen machen soll, die auf die Hilfsnadel kommen?
16.07.2014 - 21:15DROPS Design answered:
Liebe Jutta, Sie legen die M still (auf einer Hilfsnadel, einem Maschenhalter oder einem Faden) und tun einfach so, als würde es diese M nicht mehr geben oder als wären sie abgekettet. :-) Sie stricken die R dann einfach mit den M weiter, die noch auf der Arbeitsnadel sind, und ketten wie beschrieben in Richtung Halsausschnitt ab. Die betreffenden M werden stillgelegt und nicht abgekettet, damit man hinterher beim Stricken der Halsblende keinen Übergang an diesen M sieht.
21.07.2014 - 10:40
![]() Stine wrote:
Stine wrote:
Hallo, wurde diese Strickjacke tatsächlich mit der Farbe 7120 von Alpaca gestrickt und nicht mit der Farbe 7139!?!?
26.03.2014 - 19:41DROPS Design answered:
Liebe Stine, die Farben können auf dem Bildschirm nie ganz genau wiedergegeben werden. Zum einen sind sie von den Bildschirmeinstellungen abhängig, zum anderen aber auch vom Foto und den herrschenden Lichtverhältnissen beim Fotografieren (hier eine Innenaufnahme bei Tageslicht). Orientieren Sie sich für den Farbeindruck besser bei den Garnen, aber auch hier gilt, dass der Farbeindruck von der realen Farbe abweichen kann.
26.03.2014 - 22:45
![]() Stine wrote:
Stine wrote:
Besteht die Möglichkeit die Anleitung für diese Strickjacke für die Größe 74/80 zu erhalten?
20.03.2014 - 21:33DROPS Design answered:
Liebe Stine, leider können wir Ihnen keine anderen Größen als die angegebenen anbieten. Um die Jacke wunschgemäß anzupassen und umzurechnen, wenden Sie sich am besten an Ihr Wollfachgeschäft, dort kann man Ihnen Hilfestellungen geben.
21.03.2014 - 09:24
![]() Belly wrote:
Belly wrote:
Rätt på rundsticka = 1 v rätt; 1 v. AVIGT
17.02.2014 - 13:05
![]() C. Boom wrote:
C. Boom wrote:
Dit patroon heeft stekenverhouding 24 st is 10 cm, maar opzet 226 st geeft 94 cm ipv 90. Wat moet ik aanhouden?
31.12.2013 - 12:07DROPS Design answered:
Hoi C. Boom. De stekenverhouding is aangegeven in tricotst, maar je breit eerst 6 nld ribbelst - ze trekken het werk wat samen en op deze manier kom je uit op ongeveer de aangegeven afmeting op de tekening. Hetzelfde geldt voor het smockpatroon.
23.01.2014 - 11:47
![]() Moureau wrote:
Moureau wrote:
Bonjour, j'ai fait ce modèle pour enfant, malheureusement les dimentions ne sont pas excates:manches beaucoup trop longues, tout est trop grand!!!suis très décue.Marie
13.10.2013 - 11:10
![]() Brittinger wrote:
Brittinger wrote:
Ärmarna blir för smala. Har ökat med 12 maskor på minsta storleken. Ökade då snabbare i cm räknat.
12.07.2013 - 16:08
![]() Christina Olsen wrote:
Christina Olsen wrote:
Ærmer ! Jeg kan ikke få str. 9/10 til at passe med antallet af masker, udtagning eller ærmet længde.... SOm jeg læser det skal jeg tage ud for hver 4,5 cm og første udtagning er på 5 cm. Når så ærmet er 39 cm skal jeg begynde på at lukke masker af - men hvis jeg skal tage ud 8 gange, er jeg ikke færdig med udtagning før jeg lukker masker af??
07.06.2013 - 12:42Edit answered:
Öka ärmen vid: 5-9,5-14-18,5-23-27,5-32-36-5 cm
07.06.2013 - 13:29
![]() Kristine wrote:
Kristine wrote:
Hej jeg strikker den i et lidt tykkere garn, så jeg skal starte med kun 152 masker i str. 3/4 for at jakken bliver 80 cm rundt om bagdelen (i stedet for 202 masker). Hvordan regner jeg ud hvor mange masker jeg skal starte med i de andre stykker og ærmer? Nu passer ind-og udtagningerne jo så heller ikke. Har brug for hjælp. På forhånd tusind tak.
14.05.2013 - 12:31DROPS Design answered:
Hej Kristine. Du kan altid regne ud hvor mange masker du skal have fra strikkefastheden paa dit garn (antal masker per 10 cm) i forhold til maalene paa jakken her. Desvaerre kan jeg ikke hjaelpe dig videre med at tilpasse mönstret til andre str. Pröv at ta' ind til din butik og bed om raad. God fornöjelse.
16.05.2013 - 12:38
|
||||||||||
My honey#myhoneycardigan |
||||||||||
 |
 |
|||||||||
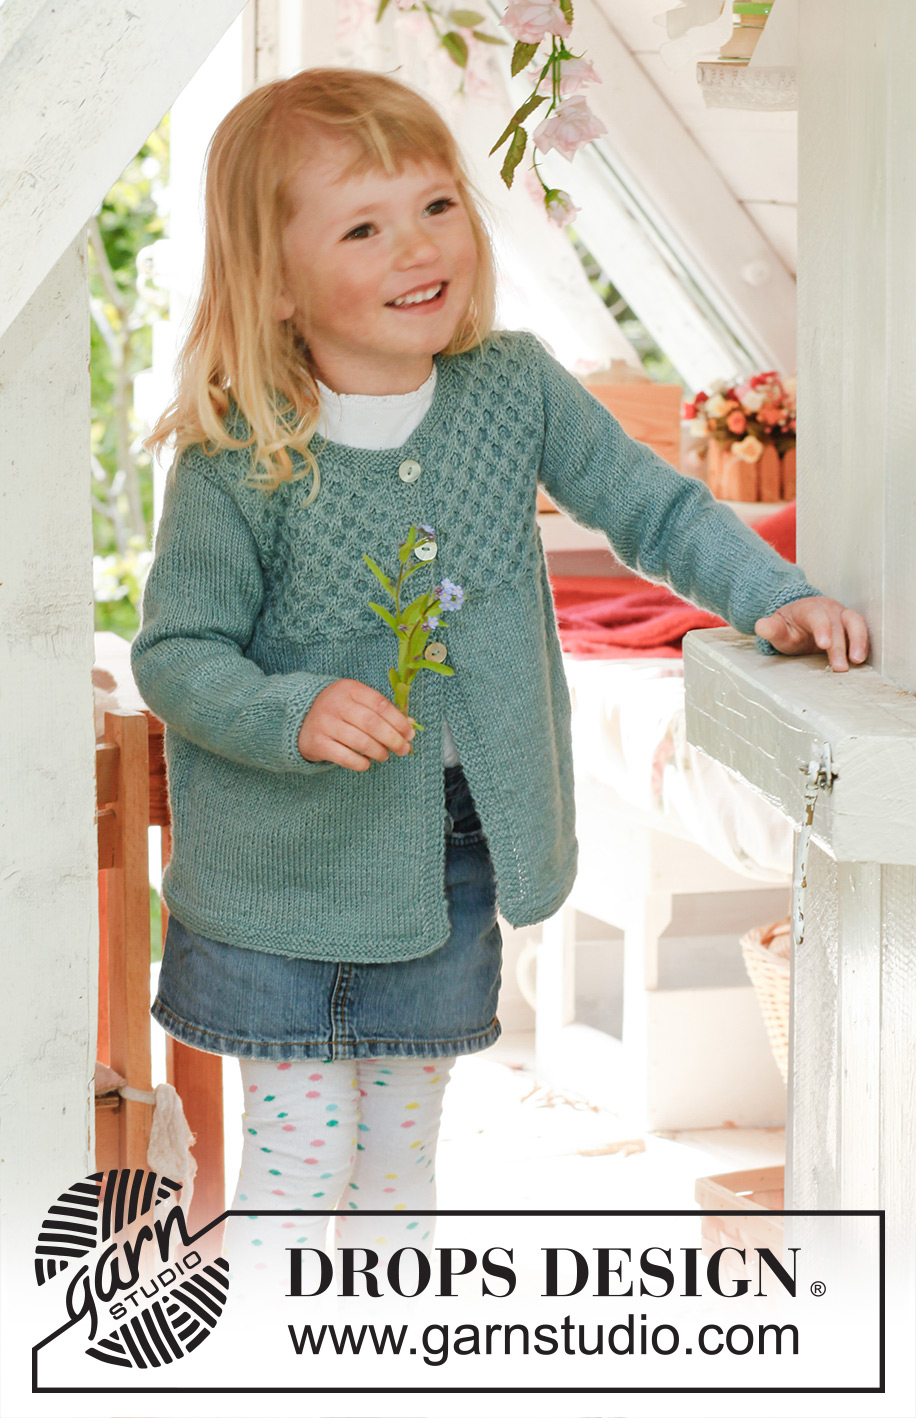
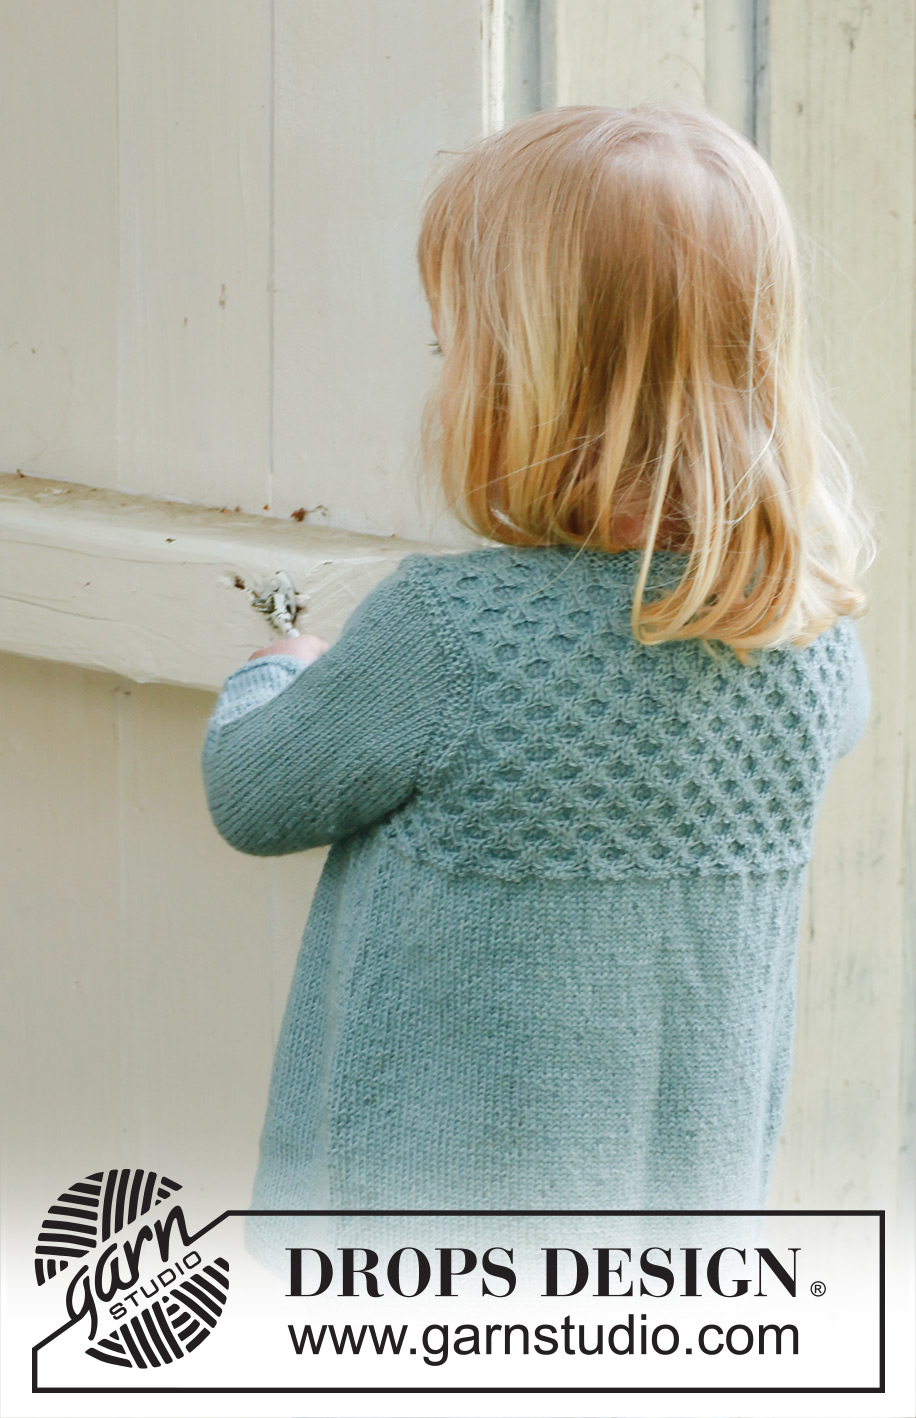
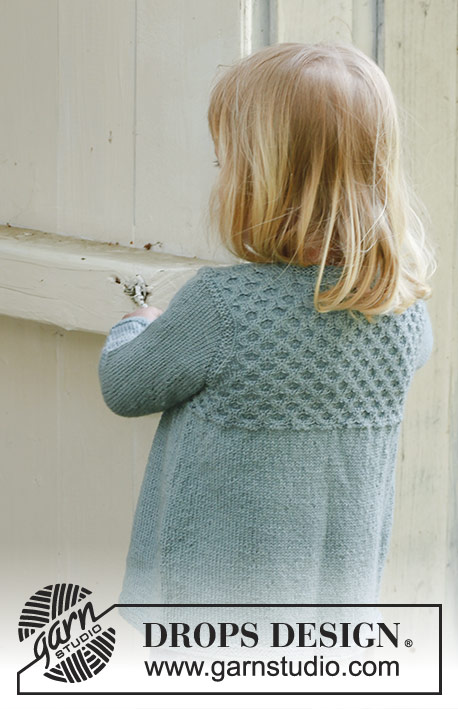
Knitted jacket with honeycomb pattern in DROPS Alpaca. Size children 3 to 12 years.
DROPS Children 23-19 |
||||||||||
|
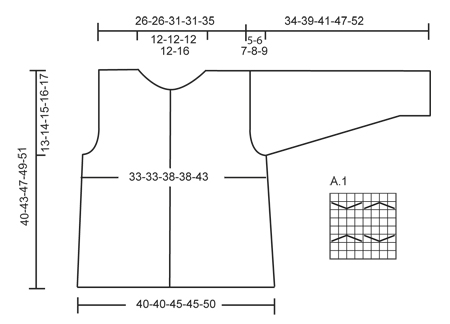
GARTER ST (back and forth on needle): K all rows. GARTER ST (in the round): * K 1 round and P 1 round *, repeat from *-*. PATTERN: See diagram A.1. Diagram shows the pattern from RS. BUTTON HOLES: Bind off for button holes on right band. 1 button hole = bind off 3rd st from mid front. On next row cast on 1 new st over the bound off st. Bind off for button holes when piece measures: Size 3/4: 21, 27 and 33 cm / 8¼", 10⅝" and 13" Size 5/6: 24, 30 and 36 cm / 9½", 11¾" and 14¼" Size 7/8: 25, 30, 35 and 40 cm / 9¾",11¾",13¾" and 15¾" Size 9/10: 27, 32, 37 and 42 cm / 10⅝",12½",14½" and 16½" Size 11/12: 29, 34, 39 and 44 cm / 11⅜",13⅜",15¼" and 17¼". DECREASE TIP (applies to armholes): All dec are done from RS. Dec inside 3 sts in garter st. Work sts that do not fit A.1 in stockinette st. Dec after 3 sts in garter st as follows: Slip 1 st as if to K, K 1, psso. Dec before 3 sts in garter st as follows: K 2 tog. --------------------------------------------------------- JACKET: Worked back and forth on circular needle. Cast on 202-202-226-226-250 sts on circular needle size 3 mm / US 2.5 with Alpaca. P 1 row from WS. Then work 6 rows in garter st - see explanation above. REMEMBER THE GAUGE! Then work in stockinette st but work the 5 outermost sts (= band) in each side in garter st until finished measurements. When piece measures 24-26-28-29-30 cm / 9½"-10¼"-11"-11⅜"-11¾", K1 row from RS and AT THE SAME TIME inc 34-34-42-42-50 sts evenly = 236-236-268-268-300 sts on needle. K1 row on WS. Work next row from RS as follows: 5 sts in garter st, K 1, diagram A.1 over the next 224-224-256-256-288 sts, finish with K 1 (i.e stockinette st) and 5 sts in garter st. Continue like this and remember to bind off for button holes - see explanation above. Insert 2 markers in the piece; 62-62-70-70-78 sts in from each side (back piece = 112-112-128-128-144 sts). When piece measures 27-29-32-33-34 cm / 10⅝"-11⅜"-12½"-13"-13⅜", work 2 rows in garter st over 8 sts on each side of markers, work the other sts as before. On next row bind off 4 sts on each side of every marker and finish each piece separately. BACK PIECE: = 104-104-120-120-136 sts. Work as follows seen from RS: 3 sts in garter st, K 1, diagram A.1 over the next 96-96-112-112-128 sts, finish with K 1 and 3 sts in garter st. At the same time dec for armholes in each side every other row as follows - read DECREASE TIP: 1 st 8 times = 88-88-104-104-120 sts. When piece measures 38-41-45-47-49 cm / 15"-16⅛"-17¾"-18½"-19¼", bind off the middle 40-40-40-40-56 sts for neck = 24-24-32-32-32 sts remain on each shoulder. Finish each part separately. Bind off when piece measures 40-43-47-49-51 cm / 15¾"-17"-18½"-19¼"-20". RIGHT FRONT PIECE: = 58-58-66-66-74 sts. Work as follows seen from RS: 5 sts in garter st, K 1, A.1 over the next 48-48-56-56-64 sts, finish with K 1 and 3 sts in garter st. Dec for armhole in the side as on back piece. Remember to bind off for button holes. AT THE SAME TIME when piece measures 34-37-41-43-45 cm / 13⅜"-14½"-16⅛"-17"-17¾", put 14-14-14-14-22 sts towards mid front on a stitch holder. Then bind off for neck in beg of every row from neck side: 2 sts 4 times, and 1 st 4 times – work the sts that do not fit A.1 in stockinette st. After all bind offs, 24-24-32-32-32 sts remain on shoulder. Bind off when piece measures 40-43-47-49-51 cm / 15¾"-17"-18½"-19¼"-20". LEFT FRONT PIECE: Work as right front piece but reversed. SLEEVE: Worked in the round on double pointed needles. Cast on 44-48-48-52-52 sts on double pointed needles size 3 mm / US 2.5 with Alpaca. Insert a marker at the beg of round. Work 6 rounds in garter st, then work in stockinette st until finished measurements. When piece measures 5 cm / 2", inc 1 st on each side of marker, repeat every 3½-4-3½-4½-4 cm / 1¼"-1½"-1¼"-1¾"-1½" a total of 7-7-8-8-9 times = 58-62-64-68-70 sts. When piece measures 29-33-34-39-43 cm / 11⅜"-13"-13⅜"-15¼"-17", bind off 3 sts on each side of marker, now work piece back and forth. Then bind off for sleeve cap at beg of every row, in each side as follows: 2 sts 3 times and 1 st 0-1-3-5-6 times, then bind off 2 sts in each side until piece measures 33-38-40-46-51 cm / 13"-15"-15¾"-18"-20", bind off 3 sts 1 time in each side. Bind off the remaining sts, piece measures approx. 34-39-41-47-52 cm / 13⅜"-15¼"-16⅛"-18½"-20½". ASSEMBLY: Sew the shoulder seams. Sew in sleeves. Sew the buttons on to left front piece. NECK EDGE: Pick up 74 to 94 sts (including sts on stitch holders) around the neck on circular needle size 3 mm / US 2.5. Work 6 rows in garter st. Bind off. |
||||||||||
Diagram explanations |
||||||||||
|
||||||||||
 |
||||||||||
Have you finished this pattern?Tag your pictures with #dropspattern #myhoneycardigan or submit them to the #dropsfan gallery. Do you need help with this pattern?You'll find 16 tutorial videos, a Comments/Questions area and more by visiting the pattern on garnstudio.com. © 1982-2026 DROPS Design A/S. We reserve all rights. This document, including all its sub-sections, has copyrights. Read more about what you can do with our patterns at the bottom of each pattern on our site. |
||||||||||


With over 40 years in knitting and crochet design, DROPS Design offers one of the most extensive collections of free patterns on the internet - translated to 17 languages. As of today we count 325 catalogs and 12298 patterns - 12288 of which are translated into English (US/in).
We work hard to bring you the best knitting and crochet have to offer, inspiration and advice as well as great quality yarns at incredible prices! Would you like to use our patterns for other than personal use? You can read what you are allowed to do in the Copyright text at the bottom of all our patterns. Happy crafting!
Post a comment to pattern DROPS Children 23-19
We would love to hear what you have to say about this pattern!
If you want to leave a question, please make sure you select the correct category in the form below, to speed up the answering process. Required fields are marked *.