
Popular categories
Looking for a yarn?


Comments / Questions (86)
![]() Magali Rigaudias wrote:
Magali Rigaudias wrote:
Bonjour, Je viens de terminer le corps du pull et je commence une manche. Il est noté 'ne pas relever de mailles au-dessus des mailles rabattues pour l'emmanchure' ... il y a donc un trou au dessous du bras, est-ce normal ? je ne comprends pas a quel moment on 'bouche' le trou. C'est la première fois que je tricote donc ça n'est pas évident de comprendre. Merci Magali
15.04.2015 - 11:39DROPS Design answered:
Bonjour Mme Rigaudias, le "trou" sera fermé par la couture des manches, les premiers cm de la manche tricotés sans diminutions seront cousus aux mailles rabattues de l'emmanchure. Bon tricot!
15.04.2015 - 12:09
![]() Magali wrote:
Magali wrote:
Has anyone made this yet? The sample I made following the number of stiches and rows didn't measure 10x10 cm so I decided to follow the instructions for the L model (I'm usually an M) so far it looks ok but I haven't started the split. Also, I'm not sure I understand how to split the sweater to knit the front right and front left :( anyone could explain this differently please? Cheers Magali
03.04.2015 - 15:26DROPS Design answered:
Dear Magali, before the split, you will P the mid 8 sts on front piece, then work only 44 sts on left front piece, turn and work next row from WS over all sts to right front piece and continue back and forth as stated. Happy knitting!
03.04.2015 - 17:52
![]() Charlotte wrote:
Charlotte wrote:
Hei. Noen som kan hjelpe med denne oppskriften til en 2 åring? Syns gensern er så fin og vil ha en til min datter 😊 charlotte
10.03.2015 - 21:11Dana wrote:
Siehe telpatroon!
31.08.2014 - 18:56
![]() Edith Volkering wrote:
Edith Volkering wrote:
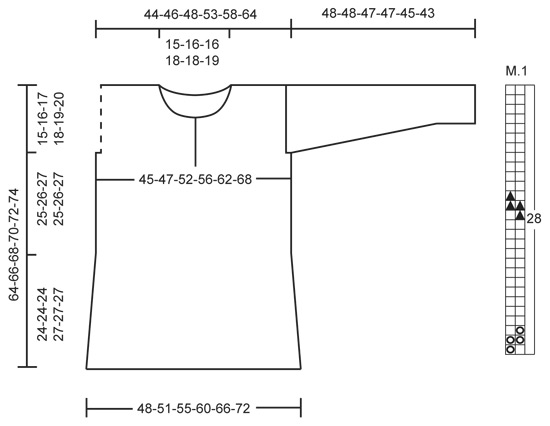
Kan ik ergens de afmetingen van de maten vinden? Zoals borstwijdte, ruglengte, armlengte?
31.08.2014 - 18:09DROPS Design answered:
Als u naar beneden scrollt, vindt u een schematische tekening van de trui met alle maten per kledingmaat.
01.09.2014 - 17:51
![]() Lily wrote:
Lily wrote:
Was bedeutet M1 stricken?
25.02.2014 - 14:29DROPS Design answered:
Liebe Lily, ganz unten, unter der Anleitung, sehen Sie neben der Schnittzeichnung das Diagramm (Strickschrift) M1. Demgemäß stricken Sie. Sie wiederholen M1 fortlaufend über die ganze Runde. Die Erklärung der verschiedenen Symbole finden Sie links über der Schnittzeichnung. Das gesamte Diagramm wird glatt re gestrickt. Viel Spaß beim Stricken!
25.02.2014 - 14:38
![]() Dania Martinez wrote:
Dania Martinez wrote:
Hola :) emm para que rem 2 puntos en la sisa?
06.02.2014 - 20:11DROPS Design answered:
Hola Dania. En este modelo el patrón precisa cerrar 2 pts para la sisa para que la manga se ajuste mejor.
08.02.2014 - 09:52
![]() Merith Smals wrote:
Merith Smals wrote:
Hoe kan ik de doorlopende schouders maken? Ik kan in het patroon alleen maar de gewone schouders vinden, kan dit kloppen?
20.08.2013 - 23:56DROPS Design answered:
Hoi Merith. Het patroon klopt. Brei je volgens deze beschrijving krijg je die hangende schouders. Het armgat is zeer ondiep. Zie ook onderaan op de maattekening. Hier kan je zien hoe breed hij boven moet worden en vergelijken met je eigen afmetingen. Veel breiplezier.
21.08.2013 - 15:38
![]() Jenny wrote:
Jenny wrote:
Fel i mönstret? Jag har stickat två tröjor, och ärmhålet blir för kort, både i S och i M . Jag har fått lägga till åtminstone 3 cm på höjden på axel både på framstycke och bakstycke. Ärmen blir också för smal med de maskor som ska läggas upp. Jag ser att det är flera som har kommenterat detta här.
14.08.2013 - 18:09
![]() Gloria wrote:
Gloria wrote:
Hola de nuevo, ya he empezado el jersey con agujas rectas y hasta ahora todo boen, pero una vez hechos los 44cm. no se cómo dividir la labor para hacer el escote. ¿Pueden ayudarme de nuevo? Gracias
06.07.2013 - 17:28DROPS Design answered:
Hola Gloria Ahora una vez terminado el cuerpo tienes que seguir según el patrón del delantero derecho, es decir comenzar con esos 37-39.....pts desde la sisa hasta el centro. Los 2 delanteros quedan separados por la abertura.
07.07.2013 - 23:58
|
||||||||||
Emilia#emiliasweater |
||||||||||
 |
 |
|||||||||
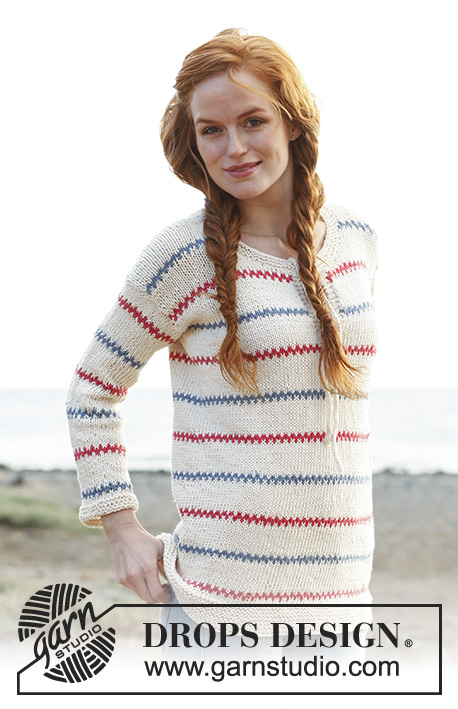
Knitted DROPS Pippi jumper in "Paris". Size: S - XXXL.
DROPS 137-17 |
||||||||||
|
GARTER ST (in the round on circular needle): * K 1 round and P 1 round *, repeat from *-*. GARTER ST (back and forth on needle): K all rows. PATTERN: See diagram M.1 - diagram is worked in stockinette st. DECREASE TIP: Dec 1 st in each side as follows: 1 edge st in garter st, slip 1 st as if to K, K 1, psso, work until 3 sts remain, K the next 2 sts tog, 1 edge st in garter st. TUBE KNITTING: * K 1, place yarn in front of piece (towards you), slip 1 st as if to P, place yarn behind piece (from you) *, repeat from *-* on all rows. -------------------------------------------------------- BODY: Worked in the round on circular needle. Cast on 164-172-188-204-224-244 sts on circular needle size 5 mm / US 8 with off white. Work in garter st - Read explanation above - for 5 cm / 2", then work in stockinette st for 1 cm / ⅜". Then work diagram M.1. Insert a marker at beg of round (= left side) and a marker after 82-86-94-102-112-122 sts (= right side), move the markers upwards when working. REMEMBER THE GAUGE! When diagram M.1 has been worked for 40-40-40-46-46-46 rows (piece measures approx. 24-24-24-27-27-27 cm / 9½"-9½"-9½"-10½"-10½"-10½"), dec 1 st on each side of every marker = 4 sts dec on round. Repeat dec when diagram M.1 has been worked for 60-60-60-66-66-66 rows (piece measures approx. 33-33-33-36-36-36 cm / 13"-13"-13"-14¼"-14¼"-14¼"), and when diagram M.1 has been worked for 76-76-76-82-82-82 rows (piece measures approx. 41-41-41-43-43-43 cm / 16"-16"-16"-17"-17"-17") = 152-160-176-192-212-232 sts. Continue with diagram M.1 until piece measures 43-44-46-47-49-50 cm / 17"-17¼"-18"-18½"-19¼"-19¾". Work next round as follows: Work 34-36-40-44-49-54 sts, P the next 8 sts (= beg of neck vent mid front), work the rest of round in stockinette st. On next row divide the piece for neck vent mid front and work back and forth as follows: K 38-40-44-48-53-58 sts (= left front piece), turn piece. Work 1 row from WS over all sts on needle - but work the first 4 and the last 4 sts in garter st - Read explanation above (= neck vent mid front). Continue back and forth with diagram M.1 and 4 sts in garter st in each side. When piece measures 49-50-51-52-53-54 cm / 19¼"-19¾"-20"-20½"-21"-21¼", bind off for armholes on next row from RS as follows: Work 37-39-42-45-49-54 sts (= right front piece), bind off the next 2-2-4-6-8-8 sts (= 1-1-2-3-4-4 sts on each side of marker), work 74-78-84-90-98-108 sts (= back piece), bind off the next 2-2-4-6-8-8 sts (= 1-1-2-3-4-4 sts on each side of marker), work the remaining 37-39-42-45-49-54 sts (= left front piece). Now divide the piece and finish each part separately. BACK PIECE: = 74-78-84-90-98-108 sts. Insert a marker at beg and end of row (where to knit up sleeves later). Continue back and forth with diagram M.1 until piece measures 62-64-66-68-70-72 cm / 24⅜"-25¼"-26"-26¾"-27½"-28⅜". On next row from RS, bind off the middle 24-26-26-28-28-30 sts for neck and finish each shoulder separately. Bind off 1 st on next row from neck = 24-25-28-30-34-38 sts remain on shoulder. Loosely bind off all sts when piece measures 64-66-68-70-72-74 cm / 25¼"-26"-26¾"-27½"-28⅜"-29⅛". RIGHT FRONT PIECE: = 37-39-42-45-49-54 sts. Insert a marker at beg and end of row (where to knit up sleeve later). Continue back and forth with diagram M.1 and 4 sts in garter st towards mid front until piece measures 54-56-57-59-60-62 cm / 21¼"-22"-22½"-23¼"-23⅝"-24⅜". Then bind off for neck at beg of every row from RS as follows: bind off 6-6-7-7-8-8 sts 1 time, 2 sts 2 times, and 1 st 1 time. Then bind off at beg of every other row from RS as follows: bind off 1 st 2-3-2-3-2-3 times = 24-25-28-30-34-38 sts remain on shoulder. Loosely bind off all sts when piece measures 64-66-68-70-72-74 cm / 25¼"-26"-26¾"-27½"-28⅜"-29⅛". LEFT FRONT PIECE: Work as right front piece but reversed. ASSEMBLY: Sew shoulder seams from RS with neat stitches. SLEEVE: Worked back and forth on needle. Pick up with off white from RS approx. 50 to 70 sts between markers along one armhole (NOTE: Do not knit up over the bind off sts for armhole). P next round - while at the same time adjusting no of sts to 52-54-58-62-66-68. Work in stockinette st for 2-2-2-3-3-3 cm / ¾"-¾"-¾"-1⅛"-1⅛"-1⅛", then work rounds 1 to 4 in diagram M.1. On 5th round in diagram M.1 dec 1 st in each side - Read DECREASE TIP above. Repeat dec every 7-7-6-5-4-3½ cm / 2¾"-2¾"-2⅜"-2"-1½"-1¼" a total of 6-6-7-8-9-10 times = 40-42-44-46-48-48 sts. Continue with diagram M.1 until piece measures approx. 46-46-45-45-43-41 cm / 18"-18"-17¾"-17¾"-17"-16⅛" (shorter measurements in the larger sizes because of wider shoulders), then work in garter st for 2 cm / ¾". Loosely bind off all sts, piece now measures 48-48-47-47-45-43 cm / 19"-19"-18½"-18½"-17¾"-17". Knit another sleeve. ASSEMBLY: Sew sleeve and side seams in one inside 1 edge st. NECK EDGE: Worked back and forth on circular needle. Beg on right front piece mid front, pick up from RS approx. 80 to 90 sts along the entire neck edge. K next row from WS - while at the same time adjusting no of sts to 74-76-80-82-84-86. Work in garter st until edge measures 2 cm / ¾", loosely bind off all sts. TIES: Cast on 2 sts on double pointed needles size 5 mm / US 8. Work TUBE KNITTING - Read explanation above. Bind off when tie measures approx. 36 cm / 14¼". Make a similar tie. Sew one tie to each tip of vent in each side. |
||||||||||
Diagram explanations |
||||||||||
|
||||||||||
 |
||||||||||
Have you finished this pattern?Tag your pictures with #dropspattern #emiliasweater or submit them to the #dropsfan gallery. Do you need help with this pattern?You'll find 16 tutorial videos, a Comments/Questions area and more by visiting the pattern on garnstudio.com. © 1982-2026 DROPS Design A/S. We reserve all rights. This document, including all its sub-sections, has copyrights. Read more about what you can do with our patterns at the bottom of each pattern on our site. |
||||||||||


With over 40 years in knitting and crochet design, DROPS Design offers one of the most extensive collections of free patterns on the internet - translated to 17 languages. As of today we count 324 catalogs and 12290 patterns - 12280 of which are translated into English (US/in).
We work hard to bring you the best knitting and crochet have to offer, inspiration and advice as well as great quality yarns at incredible prices! Would you like to use our patterns for other than personal use? You can read what you are allowed to do in the Copyright text at the bottom of all our patterns. Happy crafting!
Post a comment to pattern DROPS 137-17
We would love to hear what you have to say about this pattern!
If you want to leave a question, please make sure you select the correct category in the form below, to speed up the answering process. Required fields are marked *.