
Popular categories
Looking for a yarn?


Comments / Questions (86)
![]() Clawur wrote:
Clawur wrote:
Hallo! Ich bräuchte mal wieder Hilfe. Ich hänge gerade bei: bei der nächsten Reihe das Vorderteil in der Mitte diese 8M. teilen. Weiter 40 Maschen re (linkes Vorderteil), Arbeit drehen. Von der Rückseite.... Ich verstehe nicht wie das mit dem teilen und drehen gemeint ist! Danke im Voraus!
21.02.2016 - 01:19DROPS Design answered:
Das Teilen bezieht sich auf den Halsausschnitt. Sie stricken einfach wie folgt: 38-40-44-48-53-58 M stricken ab Rd-Beginn (d.h. bis zur Mitte der 8 li gestrickten M), dann wenden Sie und stricken über alle M zurück, d.h. wieder bis zur Mitte der 8 li gestrickten M. Sie stricken also nun in Hin- und Rück-R weiter, dabei stricken Sie beidseitig je 4 M kraus re (also die M über den 8 M li), das ist für die Ränder am Schlitz.
21.02.2016 - 15:01
![]() Paula Trautzold wrote:
Paula Trautzold wrote:
Hallo & lieben Dank für das schöne Strickmuster :). Ich möchte gern wissen, ob Sie ggf. auch eine Variante Emilia mit Kapuze haben bzw. eine Anleitung ergänzen könnten, in der man diesem Modell noch eine Kapuze "anstrickt"? Ich finde das Modell Emilia einfach super schick, liebe aber generell meine Pullover mit Kapuze. Vielen Dank, Paula
28.10.2015 - 16:56DROPS Design answered:
Leider haben wir hier keine Variante mit Kapuze. Eine einfach Art, eine Kapuze anzustricken, ist das Auffassen von M aus dem gesamten Halsausschnitt und dann so weit gerade hochstricken, bis das gestrickte Stück als Kapuze über den Kopf passt, die Abkettkante wird dann doppelt genommen und zusammengenäht. Bei diesem Modell haben Sie allerdings einen sehr weiten Halsausschnitt, wodurch sich das Anstricken einer Kapuze nicht so gut eignet. Ich werde Ihren Vorschlag aber gerne einmal als Anregung an die Designerinnen weitergeben.
30.10.2015 - 13:13
![]() Ellen Karoline Grønli wrote:
Ellen Karoline Grønli wrote:
Hei. Hvordan sy sammen ermene, hva skjer med de 4 maskene som er felt av på bolen, hvor/hvordan skal de sys sammen? De skulle ikke strikkes, ei heller plukkes opp når en plukket opp masker til ermene.
06.09.2015 - 14:31DROPS Design answered:
Hej Ellen, Det ser du når du har alle dele klar til at sy sammen. De 4 m indgår i hele ærmegabet og gør at ærmet passer ind. God fornøjelse!
24.09.2015 - 12:30
![]() Annika Rundström wrote:
Annika Rundström wrote:
Håller på med tröjan. Har stickat bålen, och sytt ihop axeln. Då syns tydligt att ärmhålet är mycket litet. Detta måste väl vara fel i beskrivningen? Jag behöver således ta upp axelsömmen och sticka på cirka 3- 4 cm. Men hur gör jag då med ärmarna? Då stämmer ju inte ett ända mått?
09.06.2015 - 08:20DROPS Design answered:
Hej Annika, Om du stickar så ärmhålet blir större än måttet på måttskissen, så får du följa beskrivningen på ärmen i den str som har samma mått. Lycka till!
07.08.2015 - 14:24
![]() Magali Rigaudias wrote:
Magali Rigaudias wrote:
Merci de tous ces renseignements ... malheureusement une seule de ces adresses expédie en Australie, à un prix trop élevé pour une seule pelote :(
29.04.2015 - 12:21
![]() Magali Rigaudias wrote:
Magali Rigaudias wrote:
Pourriez vous m'indiquer un revendeur qui envois en Australie s'ils vous plait car après beaucoup de frustrations au fur et à mesure de l'élaboration de ce joli pull ... j'aimerais vraiment le terminer ! Merci d'avance.
27.04.2015 - 14:15DROPS Design answered:
Cliquez ici pour accéder à la liste des détaillants DROPS pratiquant la vente à l'international. Contactez-les directement pour plus d'informations. Bon tricot!
27.04.2015 - 14:26
![]() Magali Rigaudias wrote:
Magali Rigaudias wrote:
Avant de commencer ce pull j'avais bataillé pour commander la laine car je n'ai pas trouvé de revendeurs qui livraient en Australie (je vis à Sydney) même si on m'avait indiqué un site internet. J'ai du envoyer la laine chez ma mère en France qui me l'a renvoyée (ce qui élève le coût très nettement)
27.04.2015 - 14:15DROPS Design answered:
Nous n'avons effectivement pas de magasin DROPS en Australie actuellement, toutefois certaines boutiques en ligne font des envois internationaux, pensez à les contacter. Bon tricot!
27.04.2015 - 14:25
![]() Magali Rigaudias wrote:
Magali Rigaudias wrote:
Après plusieurs démarrages, j'ai fait la manche gauche (mal faite) et de là j'ai revisité le patron afin de faire la manche droite à mes dimensions. Malheureusement il me manque environ 2 mètres de laine rose afin de terminer ! C'est très rageant.
27.04.2015 - 14:14DROPS Design answered:
Ce modèle a été réalisé sur la base d'un échantillon de 17 m x 22 rangs, une tension différente affecte la quantité nécessaire indiquée dans la taille, d'où probablement votre manque de fil.
27.04.2015 - 14:23
![]() Magali Rigaudias wrote:
Magali Rigaudias wrote:
Suite à mes messages précédents, j'ai commencé à faire les manches et je dois dire que j'ai eu pas mal de difficultés. Les dimensions n'ont pas l'air correctes pour ma taille (je suis déjà le model L car je tricote beaucoup plus serré qu'indiqué et je suis une taille M et les dimensions des manches sont extrêmement petites)....
27.04.2015 - 14:13DROPS Design answered:
Bonjour Mme Rigaudias, en taille L, on commence les manches avec 58 m soit 34 cm (2 x 17 cm) de large comme indiqué dans le schéma. Pensez à toujours bien vérifier votre échantillon, et à ajuster si nécessaire. Bon tricot!
27.04.2015 - 14:22
![]() Magali Rigaudias wrote:
Magali Rigaudias wrote:
Merci de votre réponse si rapide! Auriez vous une vidéo expliquant comment coudre les manches ? Magali
15.04.2015 - 14:05DROPS Design answered:
Vous trouverez 2 vidéos pour l'assemblage/les coutures sous l'onglet vidéo, à droite de la photo. Bon tricot!
15.04.2015 - 14:51
|
||||||||||
Emilia#emiliasweater |
||||||||||
 |
 |
|||||||||
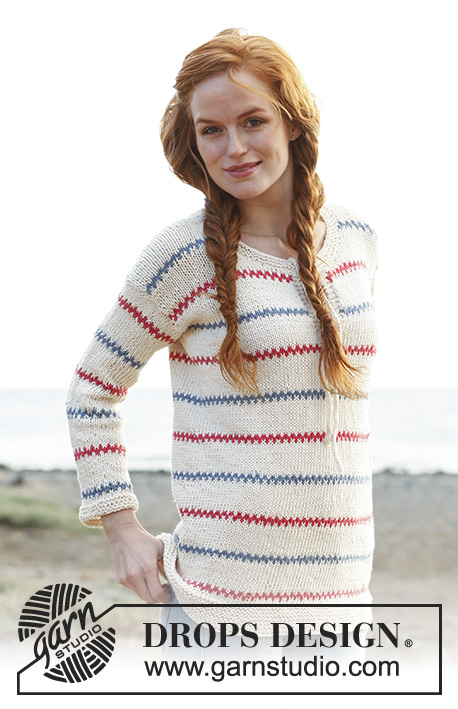
Knitted DROPS Pippi jumper in "Paris". Size: S - XXXL.
DROPS 137-17 |
||||||||||
|
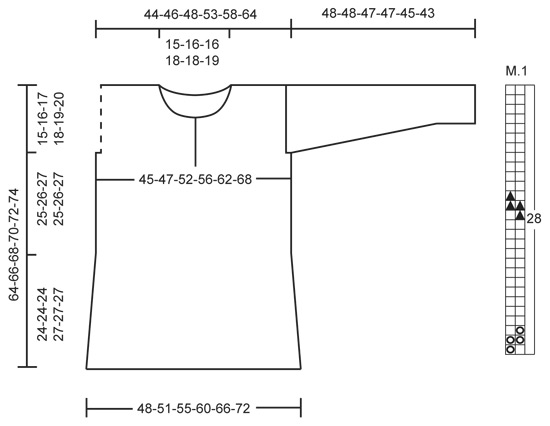
GARTER ST (in the round on circular needle): * K 1 round and P 1 round *, repeat from *-*. GARTER ST (back and forth on needle): K all rows. PATTERN: See diagram M.1 - diagram is worked in stockinette st. DECREASE TIP: Dec 1 st in each side as follows: 1 edge st in garter st, slip 1 st as if to K, K 1, psso, work until 3 sts remain, K the next 2 sts tog, 1 edge st in garter st. TUBE KNITTING: * K 1, place yarn in front of piece (towards you), slip 1 st as if to P, place yarn behind piece (from you) *, repeat from *-* on all rows. -------------------------------------------------------- BODY: Worked in the round on circular needle. Cast on 164-172-188-204-224-244 sts on circular needle size 5 mm / US 8 with off white. Work in garter st - Read explanation above - for 5 cm / 2", then work in stockinette st for 1 cm / ⅜". Then work diagram M.1. Insert a marker at beg of round (= left side) and a marker after 82-86-94-102-112-122 sts (= right side), move the markers upwards when working. REMEMBER THE GAUGE! When diagram M.1 has been worked for 40-40-40-46-46-46 rows (piece measures approx. 24-24-24-27-27-27 cm / 9½"-9½"-9½"-10½"-10½"-10½"), dec 1 st on each side of every marker = 4 sts dec on round. Repeat dec when diagram M.1 has been worked for 60-60-60-66-66-66 rows (piece measures approx. 33-33-33-36-36-36 cm / 13"-13"-13"-14¼"-14¼"-14¼"), and when diagram M.1 has been worked for 76-76-76-82-82-82 rows (piece measures approx. 41-41-41-43-43-43 cm / 16"-16"-16"-17"-17"-17") = 152-160-176-192-212-232 sts. Continue with diagram M.1 until piece measures 43-44-46-47-49-50 cm / 17"-17¼"-18"-18½"-19¼"-19¾". Work next round as follows: Work 34-36-40-44-49-54 sts, P the next 8 sts (= beg of neck vent mid front), work the rest of round in stockinette st. On next row divide the piece for neck vent mid front and work back and forth as follows: K 38-40-44-48-53-58 sts (= left front piece), turn piece. Work 1 row from WS over all sts on needle - but work the first 4 and the last 4 sts in garter st - Read explanation above (= neck vent mid front). Continue back and forth with diagram M.1 and 4 sts in garter st in each side. When piece measures 49-50-51-52-53-54 cm / 19¼"-19¾"-20"-20½"-21"-21¼", bind off for armholes on next row from RS as follows: Work 37-39-42-45-49-54 sts (= right front piece), bind off the next 2-2-4-6-8-8 sts (= 1-1-2-3-4-4 sts on each side of marker), work 74-78-84-90-98-108 sts (= back piece), bind off the next 2-2-4-6-8-8 sts (= 1-1-2-3-4-4 sts on each side of marker), work the remaining 37-39-42-45-49-54 sts (= left front piece). Now divide the piece and finish each part separately. BACK PIECE: = 74-78-84-90-98-108 sts. Insert a marker at beg and end of row (where to knit up sleeves later). Continue back and forth with diagram M.1 until piece measures 62-64-66-68-70-72 cm / 24⅜"-25¼"-26"-26¾"-27½"-28⅜". On next row from RS, bind off the middle 24-26-26-28-28-30 sts for neck and finish each shoulder separately. Bind off 1 st on next row from neck = 24-25-28-30-34-38 sts remain on shoulder. Loosely bind off all sts when piece measures 64-66-68-70-72-74 cm / 25¼"-26"-26¾"-27½"-28⅜"-29⅛". RIGHT FRONT PIECE: = 37-39-42-45-49-54 sts. Insert a marker at beg and end of row (where to knit up sleeve later). Continue back and forth with diagram M.1 and 4 sts in garter st towards mid front until piece measures 54-56-57-59-60-62 cm / 21¼"-22"-22½"-23¼"-23⅝"-24⅜". Then bind off for neck at beg of every row from RS as follows: bind off 6-6-7-7-8-8 sts 1 time, 2 sts 2 times, and 1 st 1 time. Then bind off at beg of every other row from RS as follows: bind off 1 st 2-3-2-3-2-3 times = 24-25-28-30-34-38 sts remain on shoulder. Loosely bind off all sts when piece measures 64-66-68-70-72-74 cm / 25¼"-26"-26¾"-27½"-28⅜"-29⅛". LEFT FRONT PIECE: Work as right front piece but reversed. ASSEMBLY: Sew shoulder seams from RS with neat stitches. SLEEVE: Worked back and forth on needle. Pick up with off white from RS approx. 50 to 70 sts between markers along one armhole (NOTE: Do not knit up over the bind off sts for armhole). P next round - while at the same time adjusting no of sts to 52-54-58-62-66-68. Work in stockinette st for 2-2-2-3-3-3 cm / ¾"-¾"-¾"-1⅛"-1⅛"-1⅛", then work rounds 1 to 4 in diagram M.1. On 5th round in diagram M.1 dec 1 st in each side - Read DECREASE TIP above. Repeat dec every 7-7-6-5-4-3½ cm / 2¾"-2¾"-2⅜"-2"-1½"-1¼" a total of 6-6-7-8-9-10 times = 40-42-44-46-48-48 sts. Continue with diagram M.1 until piece measures approx. 46-46-45-45-43-41 cm / 18"-18"-17¾"-17¾"-17"-16⅛" (shorter measurements in the larger sizes because of wider shoulders), then work in garter st for 2 cm / ¾". Loosely bind off all sts, piece now measures 48-48-47-47-45-43 cm / 19"-19"-18½"-18½"-17¾"-17". Knit another sleeve. ASSEMBLY: Sew sleeve and side seams in one inside 1 edge st. NECK EDGE: Worked back and forth on circular needle. Beg on right front piece mid front, pick up from RS approx. 80 to 90 sts along the entire neck edge. K next row from WS - while at the same time adjusting no of sts to 74-76-80-82-84-86. Work in garter st until edge measures 2 cm / ¾", loosely bind off all sts. TIES: Cast on 2 sts on double pointed needles size 5 mm / US 8. Work TUBE KNITTING - Read explanation above. Bind off when tie measures approx. 36 cm / 14¼". Make a similar tie. Sew one tie to each tip of vent in each side. |
||||||||||
Diagram explanations |
||||||||||
|
||||||||||
 |
||||||||||
Have you finished this pattern?Tag your pictures with #dropspattern #emiliasweater or submit them to the #dropsfan gallery. Do you need help with this pattern?You'll find 16 tutorial videos, a Comments/Questions area and more by visiting the pattern on garnstudio.com. © 1982-2026 DROPS Design A/S. We reserve all rights. This document, including all its sub-sections, has copyrights. Read more about what you can do with our patterns at the bottom of each pattern on our site. |
||||||||||


With over 40 years in knitting and crochet design, DROPS Design offers one of the most extensive collections of free patterns on the internet - translated to 17 languages. As of today we count 324 catalogs and 12290 patterns - 12280 of which are translated into English (US/in).
We work hard to bring you the best knitting and crochet have to offer, inspiration and advice as well as great quality yarns at incredible prices! Would you like to use our patterns for other than personal use? You can read what you are allowed to do in the Copyright text at the bottom of all our patterns. Happy crafting!
Post a comment to pattern DROPS 137-17
We would love to hear what you have to say about this pattern!
If you want to leave a question, please make sure you select the correct category in the form below, to speed up the answering process. Required fields are marked *.