
Popular categories
Looking for a yarn?


Comments / Questions (39)
![]() Marie H wrote:
Marie H wrote:
Struggling with the section “Yoke Without Buttons”. Making 12-18 months. My piece measures 11 3/8”. I completed the 12 rows of dec, but only 2 of the 4 every row dec I should do. I am knitting in the round. Do I place only FRONT 13 sts on a holder? And if so, would I then need to knit back and forth on remaining sts (sleeve, back and 2nd sleeve)? It sounds like I would bind off (2 sts once + 1 st twice) on each side of these front 13 sts. Correct?
28.04.2024 - 01:47DROPS Design answered:
Dear Marie H, you are right, after you have slipped the 13 sts on a thread for neckline on front piece, you continue back and forth binding off stitches at the beg of each row on each side for neck. and at the same time, continue decreasing for raglan as before. Happy knitting!
29.04.2024 - 10:19
![]() Sylvie Audet wrote:
Sylvie Audet wrote:
Je fait la grandeur 12/18 je suis rendu au 2 rang et a la fin sa ne marche pas
10.04.2024 - 20:52DROPS Design answered:
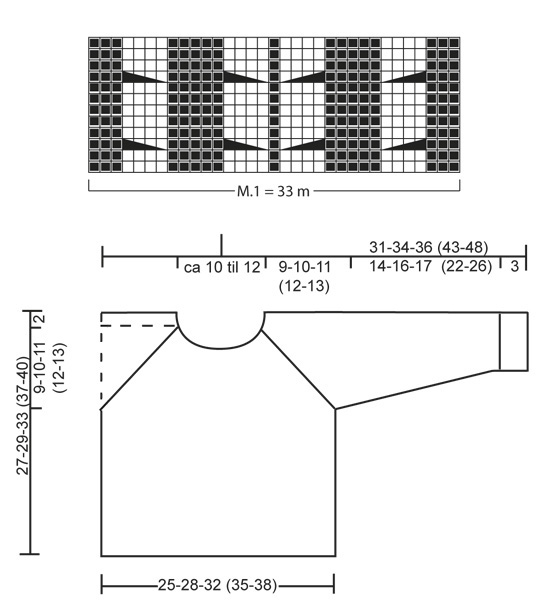
Bonjour Mme Audet, pouvez-vous nous en dire plus? Qu'est-ce qui ne marche pas à la fin? En 12/18 mois, vous avez 126 mailles que vous tricotez ainsi: 17 m jersey, les 33 m du diagramme M.1, 17 m jersey, et 59 m jersey soit: 17+33+17+59=126 mailles. Bon tricot!
11.04.2024 - 07:13
![]() Sara wrote:
Sara wrote:
Buonasera. Modello Micah. Devo fare il raglan ma non capisco come. Per prima cosa, da dove si parte? E poi, la diminuzione 2 insieme è sul davanti del lavoro o dopo il segnapunti sulle maglie della spalla? Mi potreste aiutare per favore? Grazie Sara
06.01.2024 - 16:25DROPS Design answered:
Buonasera Sara, il raglan si lavora sullo sprone seguendo le indicazioni riportate all'inizio delle spiegazioni, nei paragrafi dedicati al raglan. Buon lavoro!
09.01.2024 - 20:14
![]() Mejer wrote:
Mejer wrote:
Kan ikke få masketallet til at passe, hverken med rib kanten, eller mønstret?
25.12.2023 - 15:59
![]() M Radius wrote:
M Radius wrote:
Het minderen voor de raglan begint met: 2 steken samen. Zijn dit 1 steek voorpand en 1 steek mouw? dan komt de raglan bovenop de mouw. Waar begin je met de raglan instructie 2 steken samen, daarna krijg je de *tot* instructies. Er staat herhaal het bij de volgende markeerders. Is dat voor of na de markeerders of over de markeerders heen?
10.12.2023 - 20:43DROPS Design answered:
Nee de minderingen voor de raglan zitten naast de raglanlijnen welke uit 2 steken recht bestaan. Je breit tot er 3 steken over zijn voor de volgende markeerdraad, dan minder je en brei je 2 recht en dan minder je weer. Tussen die 2 steken recht zit de markeerdraad.
17.12.2023 - 17:53
![]() Trijs Schotema wrote:
Trijs Schotema wrote:
Minderen in het midden van de mouw doe je toch niet als je geen rondbreinaald gebruikt? De mindering of meerdering zit dan boven op de kop van de mouw. ( dit is dan niet onder de mouw) Dit geeft toch een gat bij het aan elkaar breien.
22.11.2023 - 08:06DROPS Design answered:
Dag Trijs,
Het werk wordt volgens patroon in de rondte gebreid, maar als je de mouwen op rechte naalden breit, dan doe je het minderen inderdaad aan elke kant van de naald.
25.11.2023 - 09:23
![]() Trijs Schotema wrote:
Trijs Schotema wrote:
Bij het breien van de mouw staat er : meerderen bij een hoogte van 6 cm 2 st. midden onder de mouw. Hoe moet ik dit lezen: 1 steek aan het begin van de naald, 1 steek aan het einde van de naald? Ook 5 steken afkanten midden onder de mouw, waar doe ik dat dan?
21.11.2023 - 20:59DROPS Design answered:
Dag Trijs,
Je kunt het meerderen onder de mouw aan beide kanten van het midden doen. Als je een markeerdraad plaatst tussen de steken om het midden aan te geven, dan kun je 1 steek ervoor en 1 steek erna meerderen. De 5 steken afkanten doe je ook midden onder de mouw. Het zit dan natuurlijk niet precies midden onder de mouw omdat je een oneven aantal steken afkant, maar dat is niet zo erg.
21.11.2023 - 22:39
![]() Jane B wrote:
Jane B wrote:
Should the neck be knitted on a 3.5mm circular needle? The pattern says to slip the stitches onto 4mm needle, but they’re already on that! Thanks.
28.12.2022 - 15:20DROPS Design answered:
Dear Jane, you need to work the neck with the 4 mm needles but you can pick up the stitches with either the 3.5 or the 4mm needles. That's why we indicate that you slip the stitches onto 4mm needles, because we are going to use those to work. If you picked up stitches with the 4mm needles, ignore this and continue working as explained. Happy knitting!
07.01.2023 - 19:15
![]() Catherine wrote:
Catherine wrote:
Il y a une erreur sur le placement du premier marqueur. S’il est fait tel qu’indiqué dans le patron, la diminution pour l’emmanchure se retrouve à être fait dans le motif avant.
07.12.2022 - 14:34DROPS Design answered:
Bonjour Catherine, on place le 1er marqueur dans la 1ère des 11-14-17 (20-23) m jersey et dans la dernière des 11-14-17 (20-23) m jersey après M.1, autrement dit, lorsque vous rabattrez les mailles des emmanchures vous rabattrez la maille avec le marqueur + 2 mailles avant + 2 mailles après. Vous ne rabattez pas les mailles des torsades, juste les mailles jersey. Bon tricot!
07.12.2022 - 16:42
![]() Fientje Broess wrote:
Fientje Broess wrote:
In het telpatroon M1 (voor de kabels) tel ik 35 steken, terwijl er in de beschrijving/instructie gerekend wordt met 33 steken. Hoe moet ik dit zien?
31.07.2022 - 12:37DROPS Design answered:
Dag Fientje,
Het zijn er toch echt 33 steken in patroon M.1 en geen 35 steken.
07.08.2022 - 13:52
|
|||||||||||||
Micah#micahsweater |
|||||||||||||
 |
 |
||||||||||||
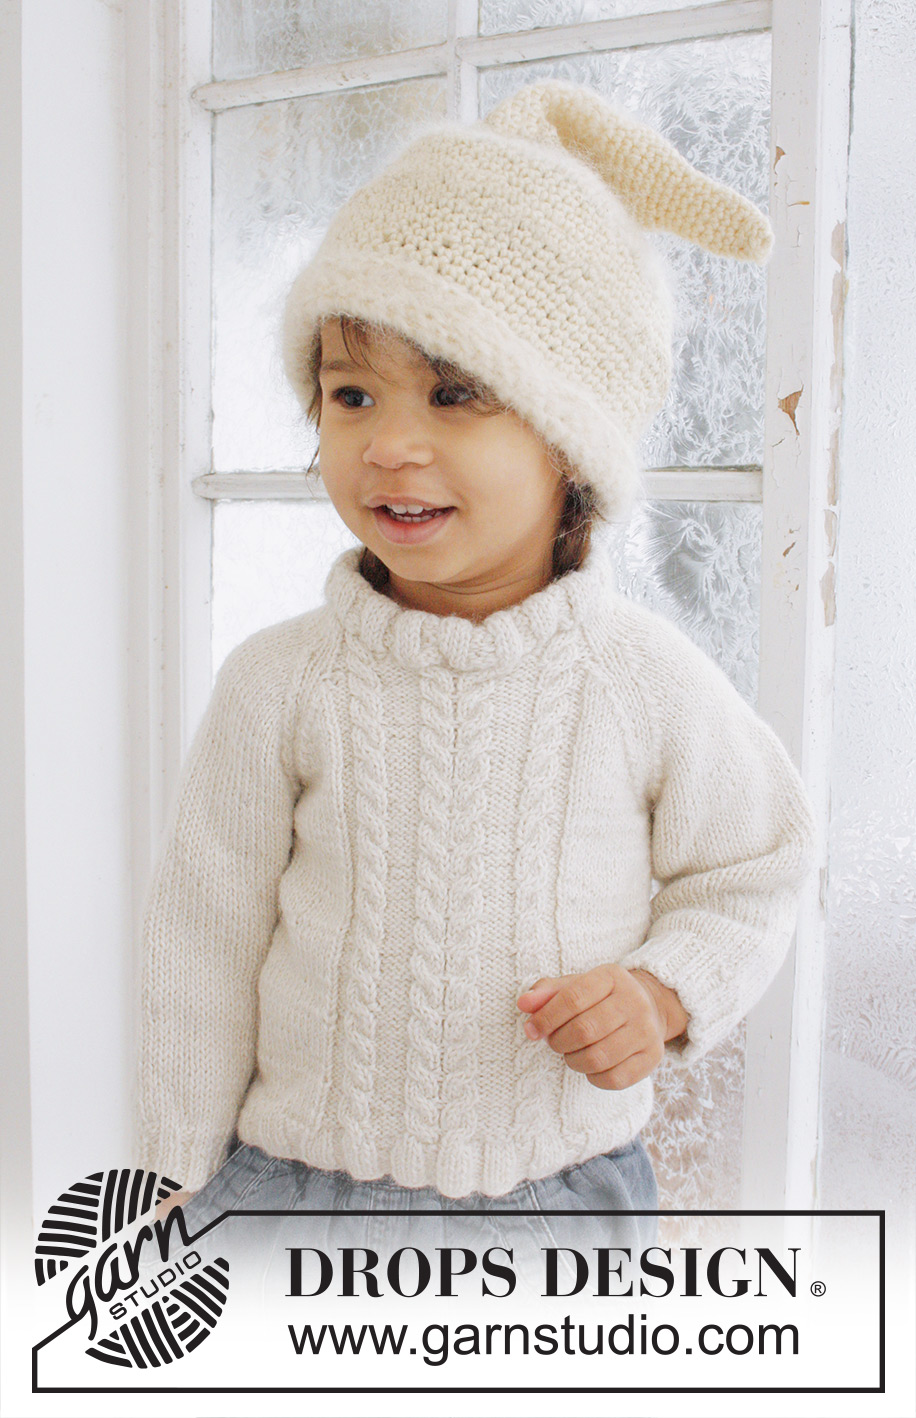
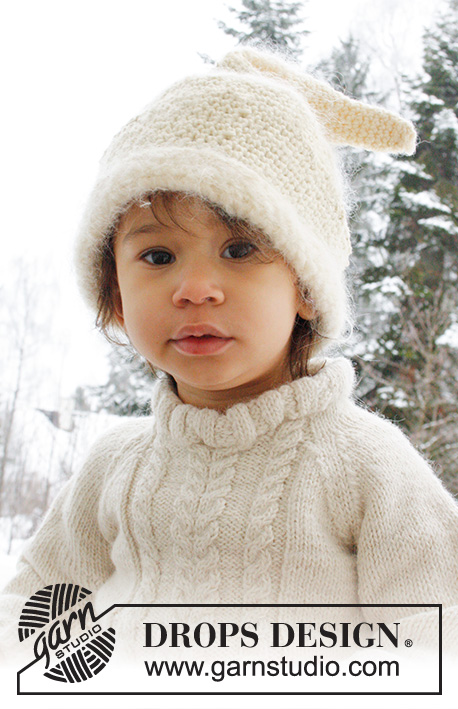
Set of knitted jumper with cables and raglan in 2 strands DROPS Alpaca.
DROPS Baby 21-40 |
|||||||||||||
|
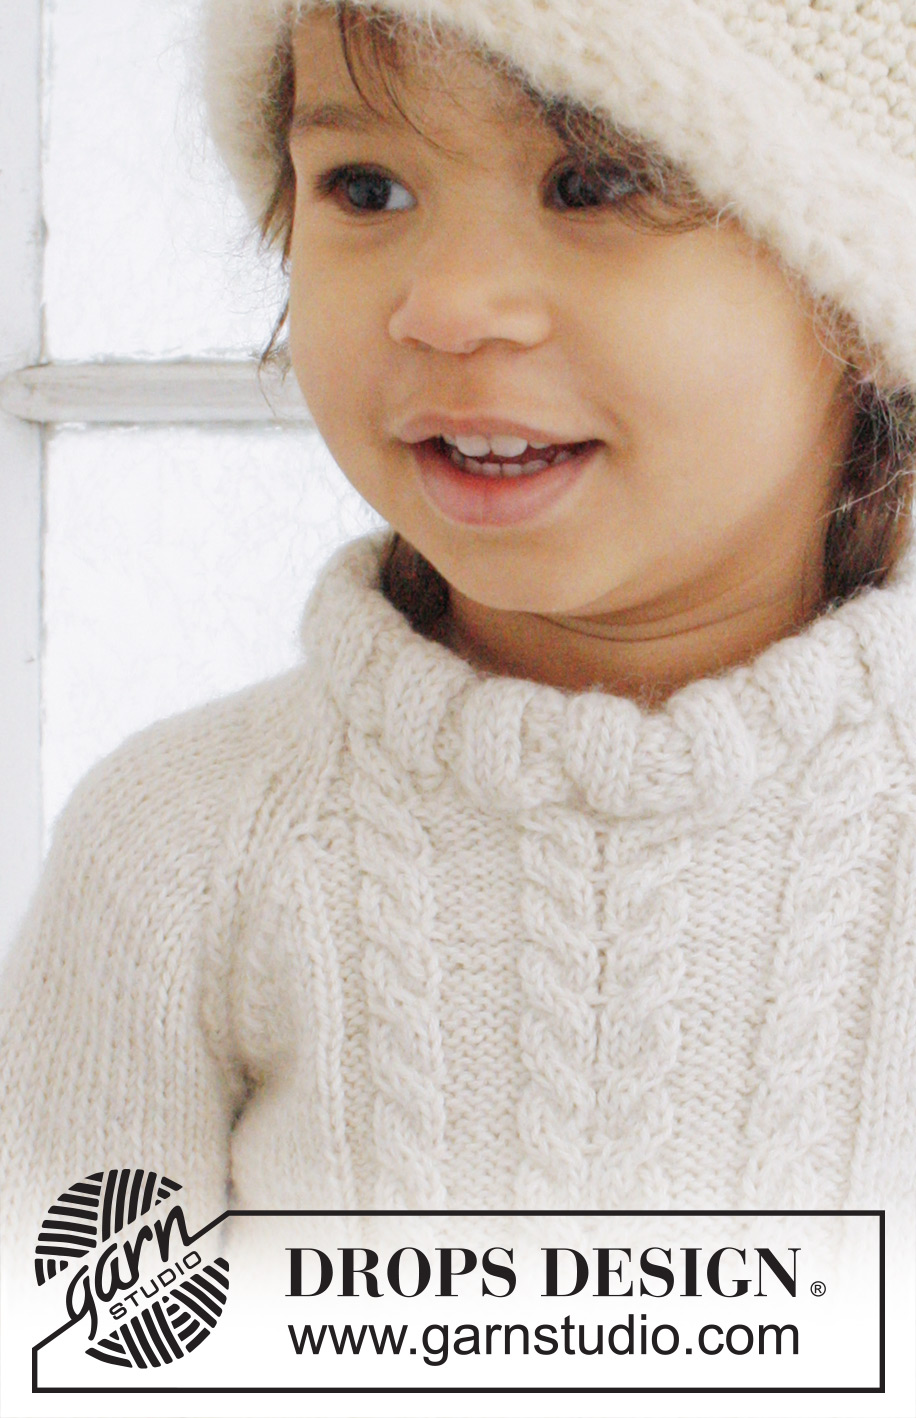
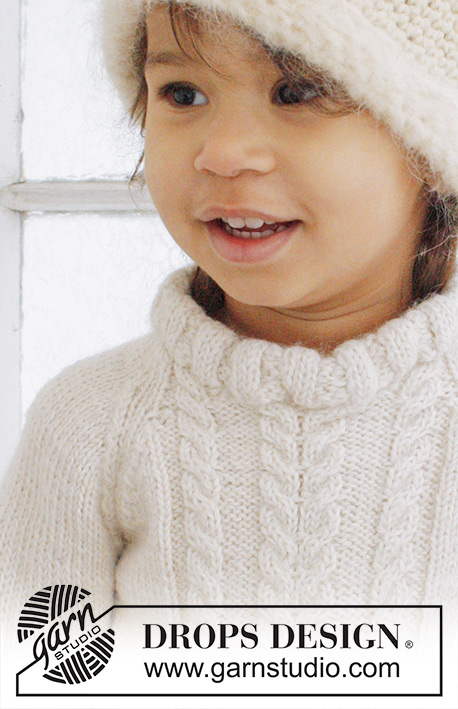
RIB: * K 3, P 3 *, repeat from *-*. PATTERN: See diagrams M.1 and M.2 - diagrams show pattern from RS and are repeated until finished measurements. DECREASE TIP FOR RAGLAN WITHOUT BUTTON BAND: K 2 tog. * Work until 3 sts remain before next marker, slip 1 st as if to K, K 1, psso, K 2, K 2 tog *, repeat from *-* at the next 2 markers, work until 4 sts remain on needle, slip 1 st as if to K, K 1, psso, K 2. DECREASE TIP FOR RAGLAN WITH BUTTON BAND: DEC AS FOLLOWS FROM RS: Work 4 band sts in garter st, K 2 tog. * Work until 3 sts remain before next marker, slip 1 st as if to K, K 1, psso, K 2, K 2 tog *, repeat from *-* at the next 2 markers, work until 6 sts remain on needle, slip 1 st as if to K, K 1, psso, work 4 band sts in garter st. DEC AS FOLLOWS FROM WS: Work 4 band sts in garter st, P 2 tog, * Work until 3 sts remain before next marker, P 2 twisted tog (i.e. work in back loop of st instead of front), P 2, P 2 tog *, repeat from *-* at the next 2 markers, work until 6 sts remain on needle, P 2 twisted tog, work 4 band sts in garter st. NOTE: Make sure that the sts lay in the correct direction from RS. BUTTON HOLES: bind off for button holes on the raglan band which is on the sleeve part – assess if this is needed in the larger sizes. Work as follows: K 1, K 2 tog, 1 YO, K 1. Bind off for button holes when band measures: Size 1/3 months: 2, 5 and 8 cm / ¾", 2" and 3⅛" Size 6/9 months: 3, 6 and 9 cm / 1⅛", 2⅜" and 3½" Size 12/18 months: 3, 7 and 10 cm / 1⅛", 2¾" and 4" Size 2 years: 3, 7 and 11 cm / 1⅛", 2¾" and 4⅜" Size 3/4 years: 4, 8 and 12 cm / 1½", 3⅛" and 4¾" -------------------------------------------------------- JUMPER: Worked in the round on circular needle. BODY: Cast on 102-114-126 (138-150) sts on circular needle size 3.5 mm / US 4 with 2 strands Alpaca. Work 1 round in stockinette st, then continue with RIB for 3 cm / 1⅛" - see explanation above. Switch to circular needle size 4 mm / US 6 and work 1 round in stockinette st. Work next round as follows: 11-14-17 (20-23) sts in stockinette st, insert a marker in the first of these sts (= the side), diagram M.1 (= 33 sts), work 11-14-17 (20-23) sts in stockinette st, insert a marker in the last of these sts (= the side), work 47-53-59 (65-71) sts in stockinette st. Continue to work like this until piece measures 16-17-20 (23-25) cm / 6¼"-6¾"-8" (9"-9¾"). Now bind off 5 sts in each side for armholes (= st with marker + 2 sts on each side of this st) = 49-55-61 (67-73) sts on front piece and 43-49-55 (61-67) sts on back piece. Put piece aside and knit the sleeves. SLEEVE: Cast on 30-30-36 (36-36) sts on double pointed needles size 3.5 mm / US 4 with 2 strands Alpaca. Work 1 round in stockinette st, continue with rib for 3 cm / 1⅛". Switch to double pointed needles size 4 mm / US 6, continue in stockinette st. At the same time when piece measures 6 cm / 2⅜", inc 2 sts mid under sleeve, repeat every 3-2-3 (2.5-2.5) cm / 1⅛"-¾"-1⅛" (7/8"-⅞") a total of 4-6-5 (7-9) times = 38-42-46 (50-54) sts. When piece measures 17-19-20 (25-29) cm / 6¾"-7½"-8" (9¾"-11⅜"), bind off 5 sts mid under sleeve = 33-37-41 (45-49) sts. Put piece aside and knit another sleeve. YOKE: Slip sleeves on to same circular needle as body where armholes were bind off = 158-178-198 (218-238) sts. Insert a marker in every transition between body and sleeves. Then continue the piece with or without button holes – see explanation below. YOKE WITH BUTTONS: Then the piece is worked back and forth from right "raglan seam" at the front. Cast on 4 extra sts on the front piece part (= button band) = 162-182-202 (222-242) sts. Read all of the following section before continuing! Continue in stockinette st and with cables mid front as well as 4 sts in garter st at beg and end of row (for button band). At the same time dec for raglan – see DECREASE TIP – dec on every other row: 11-11-12 (12-13) times and then on every row: 1-3-4 (6-7) times. NOTE: Also bind off for BUTTON HOLES - see explanation above. At the same time when piece measures 23-25-29 (32-35) cm / 9"-9¾"-11⅜" (12½"-13¾"), slip the middle 13-13-13 (15-15) sts on a stitch holder for neck. Continue to bind off towards the neck on every other row: 2 sts 1 time and 1 st 2-2-2 (3-3) times. After all dec for raglan and bind offs for neck, 45-49-53 (53-57) sts remain on needle. YOKE WITHOUT BUTTONS: Then work in the round. Continue in stockinette st and with cables. At the same time dec for raglan – see DECREASE TIP – dec on every other row: 11-11-12 (12-13) times and then on every row: 1-3-4 (6-7) times. At the same time when piece measures 23-25-29 (32-35) cm / 9"-9¾"-11⅜" (12½"-13¾"), slip the middle 13-13-13 (15-15) sts on a stitch holder for neck. Continue to bind off towards the neck on each side on every other row: 2 sts 1 time and 1 st 2-2-2 (3-3) times. After all dec for raglan and bind offs for neck, 41-45-49 (49-53) sts remain on needle. NECK: Knit up approx. 23 to 27 sts at the front of neck (including sts on stitch holder) = 68 to 84 sts. Slip all sts on circular needle size 3,5 mm / US 4 – work 1 round in stockinette st while at the same time dec/inc sts evenly to 64-76 sts. Work rib K 2/P 2 for 8 cm / 3⅛", loosely bind off – fold the edge double towards WS and fasten with neat stitches. ASSEMBLY: Sew tog the openings under the sleeves. If button band has been worked: Place button bands on top of each other with the button holes part at the top and fasten in the bottom edge from WS. Sew on buttons. |
|||||||||||||
Diagram explanations |
|||||||||||||
|
|||||||||||||
 |
|||||||||||||
Have you finished this pattern?Tag your pictures with #dropspattern #micahsweater or submit them to the #dropsfan gallery. Do you need help with this pattern?You'll find 23 tutorial videos, a Comments/Questions area and more by visiting the pattern on garnstudio.com. © 1982-2026 DROPS Design A/S. We reserve all rights. This document, including all its sub-sections, has copyrights. Read more about what you can do with our patterns at the bottom of each pattern on our site. |
|||||||||||||


With over 40 years in knitting and crochet design, DROPS Design offers one of the most extensive collections of free patterns on the internet - translated to 17 languages. As of today we count 324 catalogs and 12290 patterns - 12280 of which are translated into English (US/in).
We work hard to bring you the best knitting and crochet have to offer, inspiration and advice as well as great quality yarns at incredible prices! Would you like to use our patterns for other than personal use? You can read what you are allowed to do in the Copyright text at the bottom of all our patterns. Happy crafting!
Post a comment to pattern DROPS Baby 21-40
We would love to hear what you have to say about this pattern!
If you want to leave a question, please make sure you select the correct category in the form below, to speed up the answering process. Required fields are marked *.