
Popular categories
Looking for a yarn?


Comments / Questions (76)
![]() Brenda Mitchell wrote:
Brenda Mitchell wrote:
Where is the pattern for the skirt? Thank you
21.10.2020 - 19:59DROPS Design answered:
Dear Brenda! There is no separate skirt. On the picture there is a longer cardigan, that has a ruffle like edging on the hem. Happy Knitting!
21.10.2020 - 23:10
![]() Petra Homann-Uekötter wrote:
Petra Homann-Uekötter wrote:
Guten Tag! Sind 1 M Krausrippe und M 1 dasselbe? Mit freundlichen Grüßen Petra
25.03.2020 - 17:35DROPS Design answered:
Liebe Frau Homan-Uekötter, 1 Masche Krausrippe ist eine Masche die immer rechts gestrickt wird, dh bei den Hin- sowie bei den Rückreihen (= Kraus rechts). M.1 sowie M.2 sind die Diagramme zu den Mustern. Viel Spaß beim stricken!
26.03.2020 - 09:27
![]() Laura wrote:
Laura wrote:
I’m working on the Right Band, binding off for the buttonholes and I just can’t figure out how to bind off in 2 purls by purling 2 together and yarning over. I don’t see any previous threads that mention it, or tutorial videos. Thank you in advance ☺️
22.12.2019 - 00:00DROPS Design answered:
Fear Laura, the buttonholes are not as much "bound off", but more like doing a decrease then a yarnover, and in the next row, the yarnover is knitted (not twisted), this there willbe a small hole. There is one video, but it shows the buttonhole done with K2Tog stitches (instead of P2Tog) here. The principle is the same, but you should P2Tog the 2 stitches not knit them together. Happy Knitting!
24.12.2019 - 17:34
![]() Lilli Paraskevas wrote:
Lilli Paraskevas wrote:
Anette har 15.-07.-2019 skrevet at hun har bestilt 200g til den største størrelse, 3/4 år, som der står i opskriften. DET ER FOR LIDT. Jeg beskrev præcis samme problem, som jeg oplevede for 5 år siden Det undrer mig meget, at det stadig IKKE ER RETTET i opskriften Man ærgrer sig jo, når man mangler et ngl. garn - og som jeg oplevede - ikke kunne få samme indfarvning Jeg håber det bliver rettet, da det er en sød model
21.08.2019 - 20:11DROPS Design answered:
Hej Lilli, Nu er garnforbruget rettet i den største størrelse. Tak for information! :)
10.09.2019 - 10:42
![]() Anette wrote:
Anette wrote:
Jag stickar den största storleken av tröjan, jag beställde 200 gr som det står men det räcker inte jag har en halv ärm och framkanterna plus kragen kvar.
15.07.2019 - 20:50
![]() Silvia wrote:
Silvia wrote:
Per gli scalfi:" a ogni lato a ferri alterni" si intende che vengono fatti solo sul dritto del lavoro, corretto? Altrimenti la diminuzione della fine del ferro mi farebbe chiudere il lavoro.
06.04.2019 - 08:02DROPS Design answered:
Buongiorno Silvia. Chiude le maglie da ciascun lato, all’inizio del ferro. P.es sul diritto del lavoro, chiude 2 m all’inizio del ferro, lavora le altre maglie. Gira il lavoro e sul rovescio del lavoro, chiude le prime 2 m per il lato sinistro e lavora tutte le altre maglie sul ferro, e così via. Buon lavoro!
06.04.2019 - 09:54
![]() Silvia wrote:
Silvia wrote:
Problemi con la parte “ 10 dir., 4 rov. *, ripetere da *-* fino a quando rimangono 13 m” Se dir = filo dietro, rov =filo davanti non vengono coste con rasata davanti. Inoltre, se tutti i ferri sono così non vengono coste. Sul dietro si lavora tutto diritto?
29.03.2019 - 08:21DROPS Design answered:
Buongiorno Silvia. Sul diritto del lavoro, le coste sono 10 m dir, 4 m rov. Quando lavora il ferro di ritorno, lavora le maglie come si presentano, quindi: 10 m rov e 4 m dir. In questo modo si formano le coste nella parte inferiore del cardigan come da fotografia. Il dietro del cardigan ha lo stesso motivo del davanti. Buon lavoro!
29.03.2019 - 14:37
![]() JudiS wrote:
JudiS wrote:
Confused on sleeve- "continue to bind off .. at beg of every row in each side"- am I binding off on both edges of one row or just the beg of every row? "Then bind off 2 its in each side until piece measures..."- is that 4 stitches per row or 2 stitches for 2 rows? Finally, after the 2 sts per row, the piece measure 9 3/4", "bind of 3 sos 1 time in each side, now piece measures 10 1/4"- 2 rows does not equal 1/2". What's missing to bring piece to 10 1/4"? Thanks!
30.01.2019 - 20:52DROPS Design answered:
Dear JudiS, you will bind off 2 sts at the beginning of each row both from RS and from WS: work 1 RS row binding off the first 2 sts, turn and work 1 WS row binding off the first 2 sts = 2 sts have been bound off on each side. Repeat these 2 rows until sleeve measures 9 84" = 25 cm in 3rd size (the number of times will depend on your tension in height), then bind off 3 sts at the beg of next 2 rows (= 3 sts at the beg of next RS row + 3 sts at the beg of next WS row). Sleeve should now measure 26 cm /10.24" . Happy knitting!
31.01.2019 - 08:15
![]() Jenny wrote:
Jenny wrote:
😜har hittat svaret själv! Har aldrig stickat på detta sättet. Ser framemot att se resultatet.
07.05.2018 - 22:16
![]() Jenny Bansch wrote:
Jenny Bansch wrote:
När ska jag sticka knapphål?
07.05.2018 - 22:08DROPS Design answered:
Hej Jenny, det gör du när du stickar HÖGER FRAMKANT, efter monteringen. Lycka till :)
09.05.2018 - 13:36
|
|||||||
Lea#leajacket |
|||||||
|
|
|||||||
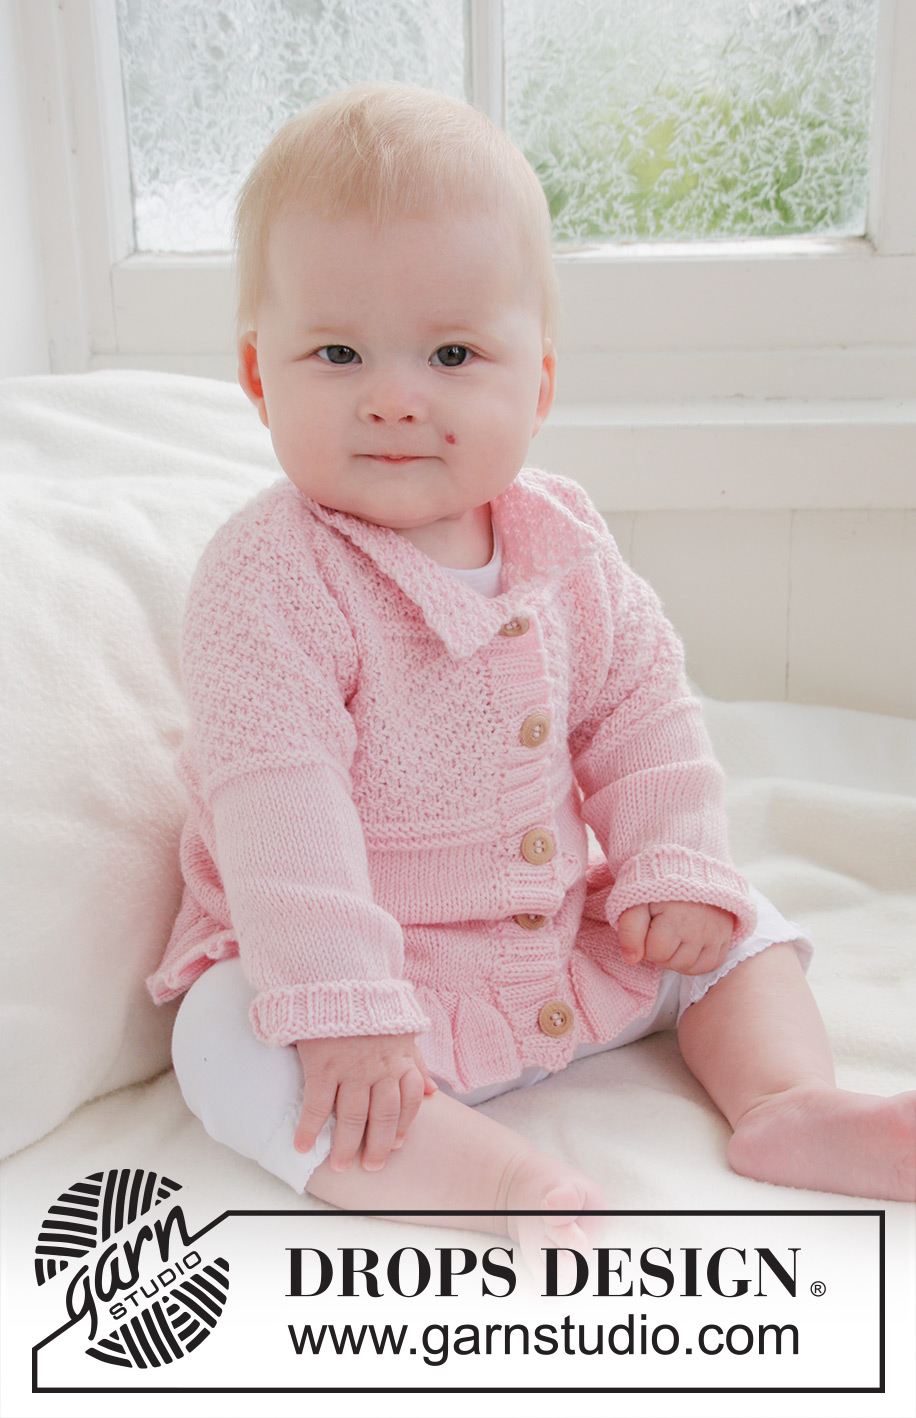
Knitted jacket with wavy edge and textured pattern for baby and children in DROPS BabyAlpaca Silk
DROPS Baby 21-14 |
|||||||
|
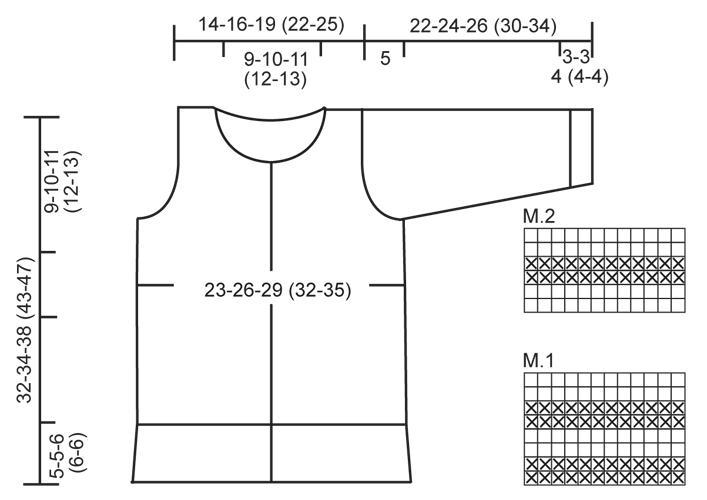
DOUBLE SEED ST: 1st row: * K 2, P 2 *, repeat from *-*. 2nd row: K over K and P over P. 3rd row: P over K and K over P. 4th row: As 2nd row. Repeat row 1 to 4. DECREASE TIP: Dec as follows before marker: Beg 2 sts before marker. Slip 1 st as if to K, K 1, psso. Dec as follows after marker: K 2 tog. GARTER ST (back and forth on needle): K all rows. PATTERN: See diagrams M.1 and M.2. The diagrams show the pattern from RS. -------------------------------------------------------- JACKET: Worked back and forth on circular needle. Cast on 366-394-422 (450-478) sts on circular needle size 2.5 mm / US 1or2 with Baby Alpaca Silk. Work rib as follows: 1 st in GARTER ST – see explanation above, P 2, * K 10, P 4 *, repeat from *-* until 13 sts remain and finish with K 10, P 2 and 1 st in GARTER ST. Continue like this until 8-8-12 (12-12) rows in rib have been worked. Now dec 1 st on each side of every K-section by working all K 10 sts as follows (P 4 as before): Slip 1 st as if to K, K 1, psso, K until 2 sts remain, K 2 tog. Repeat dec on every other row a total of 4 times = 158-170-182 (194-206) sts (= K 2/P 4). Work 1 row from WS with K over K and P over P. Switch to circular needle size 3 mm / US 2or3. Now K 1 row from RS while AT THE SAME TIME dec 44-44-40 (40-36) sts evenly = 114-126-142 (154-170) sts. Insert a marker after 29-32-36 (39-43) sts and a marker after 85-94-106 (115-127) sts (marks the mid of the sides). Back piece = 56-62-70 (76-84) sts. Now measure the piece from here. Continue in stockinette st and 1 st in Garter st in each side towards mid front until piece measures 10-11-12 (16-18) cm / 4"-4⅜"-4¾" (6¼"-7") from marker. Now work diagram M.1. When diagram M.1 has been worked 1 time vertically, continue in DOUBLE SEED ST - see explanation above. When piece measures 18-19-21 (25-28) cm / 7"-7½"-8¼" (9¾"-11") from marker, bind off 6 sts in each side (i.e. 3 sts on each side of every marker) for armholes. Then finish front and back piece separately. BACK PIECE: = 50-56-64 (70-78) sts. Continue back and forth in double seed st. AT THE SAME TIME bind off for armholes in beg of each row each side: 2 sts 1 time and 1 st 2 times = 42-48-56 (62-70) sts. When piece measures 21-22-24 (28-31) cm / 8 1"-8¾"-9½" (11"-12¼"), work diagram M.2 over all sts. When diagram M.2 has been worked 1 time vertically, continue in double seed st until piece measures 25-27-30 (35-39) cm / 9¾"-10⅝"-11¾" (13¾"-15¼"). Now bind off the middle 20-22-24 (26-28) sts for neck and finish each part separately. Continue to dec 1 st on the next row towards the neck = 10-12-15 (17-20) sts remain on each shoulder. Continue until piece measures 27-29-32 (37-41) cm / 10⅝"-11⅜"-12½" (14½"-16⅛") from marker. Loosely bind off. Piece measures 32-34-38 (43-47) cm / 12½"-13⅜"-15" (17"-18½") in total. LEFT FRONT PIECE: = 26-29-33 (36-40) sts. Continue back and forth in Double seed st. AT THE SAME TIME dec for armhole in the side as on back piece = 22-25-29 (32-36) sts. Then when piece measures 21-22-24 (28-31) cm / 8 1"-8¾"-9½" (11"-12¼"), work diagram M.2 over all sts. When diagram M.2 has been worked 1 time vertically, continue in double seed st. AT THE SAME TIME when piece measures 23-25-27 (31-34) cm / 9"-9¾"-10⅝" (12¼"-13⅜") from marker, slip the 6-7-7 (7-8) sts towards mid front on a stitch holder for neck. Continue to bind off for neck at beg of every row from neck: 2 sts 2 times and 1 st 2-2-3 (4-4) times = 10-12-15 (17-20) sts remain on shoulder. Continue until piece measures 27-29-32 (37-41) cm / 10⅝"-11⅜"-12½" (14½"-16⅛") from marker. Loosely bind off. Piece measures 32-34-38 (43-47) cm / 12½"-13⅜"-15" (17"-18½") in total. RIGHT FRONT PIECE: Work as left front piece but reversed. SLEEVE: Worked back and forth on needle. Cast on 44-44-44 (50-50) sts on needle size 2.5 mm / US 1or2 with Baby Alpaca Silk. P 1 row from WS. Then work rib (1st row = from RS) P 4/K 2 with 1 edge st in each side. When rib measures 3-3-4 (4-4) cm / 1⅛"-1⅛"-1½" (1½"-1½"), K 1 row from RS while AT THE SAME TIME dec 6-4-4 (8-6) sts evenly = 38-40-40 (42-44) sts. Switch to needle size 3 mm / US 2or3. Work back and forth in stockinette st with 1 edge st in garter st each side. AT THE SAME TIME when piece measures 5 cm / 2", inc 1 st in each side, repeat inc every 4-2½-2 (2-2) cm / 1½"-⅞"-¾" (3/4"-¾") a total of 3-5-7 (9-10) times = 44-50-54 (60-64) sts. AT THE SAME TIME when piece measures 11-13-14 (17-19) cm / 4⅜"-5⅛"-5½" (6¾"-7½"), work diagram M.2. When diagram M.2 has been worked 1 time vertically, continue in DOUBLE SEED ST. NOTE! Make sure that the double seed st is the same in each side when beg to work. Continue to inc in each side – work the inc sts in double seed st. Work until piece measures 17-19-21 (25-29) cm / 6¾"-7½"-8¼" (9¾"-11⅜"). Now bind off 3 sts in beg of next 2 rows for sleeve cap. Continue to bind off for sleeve cap at beg of every row in each side: 3 sts 0-0-0 (1-1) time, 2 sts 2-3-3 (3-3) times and 1 st 3-1-0 (0-0) times. Then bind off 2 sts in each side until piece measures 21-23-25 (29-33) cm / 8¼"-9"-9¾" (11⅜"-13"). Now bind off 3 sts 1 time in each side. Piece now measures approx. 22-24-26 (30-34) cm / 8¾"-9½"-10¼" (11¾"-13⅜"). Bind off the remaining sts. ASSEMBLY: Sew the shoulder seams. Sew sleeve seams inside 1 edge st and sew in sleeves. LEFT BAND: Beg at top of neck. Knit up 82-86-94 (106-118) sts on needle size 2.5 mm / US 1or2 from RS inside 1 edge st down along left front piece. K 1 row from WS. Then work rib as follows (from RS): * P 2, K 2 *, repeat from *-* and finish with 2 sts in GARTER ST. Continue to work like this until band measures approx. 2-2-2 (2½-2½) cm / ¾"-¾"-¾" (7/8"-⅞"). Loosely bind off sts with K over K and P over P. RIGHT BAND: Work as on left band but when rib measures approx. 1 cm / ⅜", bind off for 5-5-6 (6-7) button holes. Bind off for the upper button hole approx. 1 cm / ⅜" from neck, bind off for bottom button hole approx. 2 cm / ¾" from bottom edge. Bind off for the other button holes approx. 6-7-6 (7-6) cm / 2⅜"-2¾"-2⅜" (2¾"-2⅜") apart. All button holes are bind off in 2 P, by P 2 tog and making 1 YO. Then work rib as before until it measures approx. 2-2-2 (2½-2½) cm / ¾"-¾"-¾" (7/8"-⅞"). Loosely bind off sts with K over K and P over P. COLLAR: Knit up 68 to 96 sts from RS on needle size 3 mm / US 2or3 (including sts on stitch holders) and also knit up sts over front bands in each side (on bands knit up in front loop of outermost st). K 1 row from WS. K 1 row from RS while AT THE SAME TIME adjusting no of sts to 76-84-92 (100-108). K 1 row from WS. Continue in DOUBLE SEED ST over all sts until piece measures approx. 4 cm / 1½". Loosely bind off. |
|||||||
Diagram explanations |
|||||||
|
|||||||
 |
|||||||
Have you finished this pattern?Tag your pictures with #dropspattern #leajacket or submit them to the #dropsfan gallery. Do you need help with this pattern?You'll find 14 tutorial videos, a Comments/Questions area and more by visiting the pattern on garnstudio.com. © 1982-2026 DROPS Design A/S. We reserve all rights. This document, including all its sub-sections, has copyrights. Read more about what you can do with our patterns at the bottom of each pattern on our site. |
|||||||


With over 40 years in knitting and crochet design, DROPS Design offers one of the most extensive collections of free patterns on the internet - translated to 17 languages. As of today we count 325 catalogs and 12298 patterns - 12288 of which are translated into English (US/in).
We work hard to bring you the best knitting and crochet have to offer, inspiration and advice as well as great quality yarns at incredible prices! Would you like to use our patterns for other than personal use? You can read what you are allowed to do in the Copyright text at the bottom of all our patterns. Happy crafting!
Post a comment to pattern DROPS Baby 21-14
We would love to hear what you have to say about this pattern!
If you want to leave a question, please make sure you select the correct category in the form below, to speed up the answering process. Required fields are marked *.