
Popular categories
Looking for a yarn?


Comments / Questions (169)
![]() Claire wrote:
Claire wrote:
Je ne comprends pas bien la méthode pour les rangs raccourcis avec des torsades et aiguilles circulaires?
05.01.2013 - 14:48DROPS Design answered:
Bonjour Claire, les aiguilles circulaires s'utilisent pour l'empiècement en allers et retours (= comme des droites), placez bien vos marqueurs et tournez aux marqueurs quand il faut. Vous trouverez dans la vidéothèque comment faire les torsades et les rangs raccourcis (cf index). Bon tricot !
07.01.2013 - 09:14
![]() Lefebvre wrote:
Lefebvre wrote:
J 'ai des difficultés avec ce modèle pour les rangs raccourcis avec des torsades et en aiguilles circulaires
05.01.2013 - 14:46DROPS Design answered:
Bonjour Madame Lefebvre, les rangs raccourcis se tricotent sur l'empiècement, en allers et retours sur aiguille circulaire (= comme sur des aiguilles droites). Placez bien vos marqueurs comme indiqué pour bien les réussir. Dans l'index des vidéos, vous trouverez des vidéos sur les torsades et les rangs raccourcis pour vous aider. Bon tricot !
07.01.2013 - 09:11
![]() Rebekka Sieber wrote:
Rebekka Sieber wrote:
Hallo, ich verstehe das leider auch nicht ganz, in Größe S sind das ja praktisch 10M, dann kommen 24M aus dem Diagramm und dann nochmal 6M. Muss ich das 10-24-6 auch in den verkürzten Reihen so durchziehen und umdrehen auch wenn ich gerade irgendwo mitten im Diagramm bin?? Ich steig da leider echt nicht durch... Oder gilt das 10-24-6 nur für die Reihen die komplett über alle Maschen gestrickt werden?
30.12.2012 - 23:38DROPS Design answered:
Liebe Rebekka, 10-24-6 gilt für alle Reihen. Die Markierungen zum Wenden sitzen vor und nach den 8 Maschen rechts, die verzopft werden, es geht also mit dem Muster auf, die nie mitten im Zopfmuster gewendet wird. Gutes Gelingen!
02.01.2013 - 13:43
![]() Cindy wrote:
Cindy wrote:
Hallo. ich komme mit dem Muster nicht ganz klar. sind in dem Diagramm nur die Hinreihen oder auch die Rückreihen erklärt.
25.11.2012 - 20:59DROPS Design answered:
Liebe Cindy, das Muster zeigt Hin- und Rückreihen.
26.11.2012 - 11:31
![]() Judith wrote:
Judith wrote:
Ja vielen Dank für die Antwort. Nur noch eine kleine Frage die ich hätte. Ist ein Rapport der verkürzten Reihen genauso lang wie ein Rapport des Musters oder länger?
20.11.2012 - 16:20DROPS Design answered:
Hallo Judith, in der Passe werden ja gleichzeitig die verkürzten Reihen und das Muster gestrickt. Setzen Sie die Markeirungen für die verkürzten reihen so, wie in der Anleitung angegeben, dann erhalten Sie die richtige Länge/Breite. Gutes Gelingen!
23.11.2012 - 09:50
![]() Melanie wrote:
Melanie wrote:
Hallo,ich habe das gleiche Problem wie Judith, ich komme einfach nicht in das Muster rein mit den verkürzten Reihen..
08.11.2012 - 22:01
![]() Judith wrote:
Judith wrote:
Habe auch ein Problem mit den verkürzten Reihen. Ist gemeint 2 komplette Reihen stricken und in der 3. Reihe bis zur 2. Markierung oder in der 2. Reihe bis zur 2. Markierung? Dann komplett M1 und danach nochmal verkürzt? Anschließend weiter mit M1 bis es 120 cm hat?
06.11.2012 - 23:47DROPS Design answered:
Hallo Judith, es wird in der 3. R bis zur 2. Markierung gestrickt. Muster M1 und die verkürzten Reihen werden gleichzeitig gestrickt. Lassen Sie es mich wissen, wenn ich Ihre Frage nicht richtig verstanden habe.
12.11.2012 - 18:47
![]() Hilkka Pääkkölä wrote:
Hilkka Pääkkölä wrote:
Ohjeessa sanotaan että käytä molempia lankoja yhtäaikaa? Eikö lankojen menekki ole silloin sama? Ei ohjeen mukaan, Kid Silk lankaa menee huomattavasti vähemmän?
30.08.2012 - 17:00DROPS Design answered:
Kid-Silk -lanka on Delight-lankaa riittoisampi, joten keriä tarvitaan vähemmän.
03.09.2012 - 14:23
![]() Tina wrote:
Tina wrote:
Ich versuche gerade die verküzten Reihen zu stricken. Habe damit in der 3. Reihe nach Beginn von M1 begonnen. Ich bin mir jetzt nicht ganz sicher, die Arbeit wird gewendet, wenn der zweite "Zopf" gestrickt wurde. der Umschlag und die zusammengestrickten Maschen erst bei der nächsten Reihe? vielen Dank
13.04.2012 - 11:12DROPS Design answered:
Das erste Abdrehen gleich vor dem ersten Zopf und das zweite gleich nach dem 2. Zopf.
16.04.2012 - 09:53
![]() Beatrix Behm wrote:
Beatrix Behm wrote:
Leider ist keine Beschreibung für die Ärmel in Ihrer Anleitung,Oder ist das untendrunter ein Pully? MfG Beatrix
16.02.2012 - 13:43DROPS Design answered:
Ja, das ist ein Kleid mit kurzen Ärmeln.
17.02.2012 - 13:09
|
|||||||||||||||||||
Forest Nymph#forestnymphdress |
|||||||||||||||||||
|
|
|||||||||||||||||||
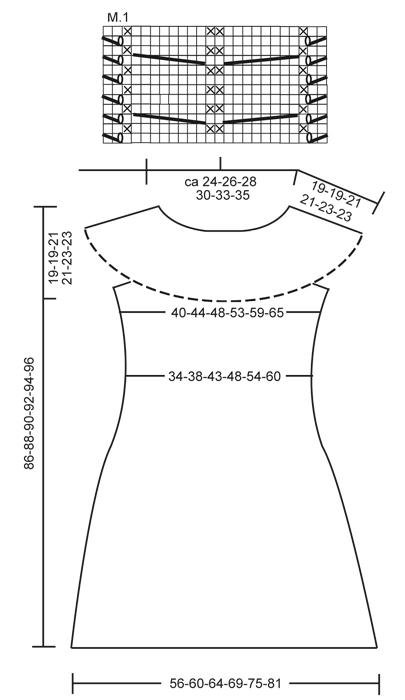
Knitted DROPS dress with yoke worked across with cables, short rows and crochet edge in ”Delight” and ”Kid-Silk”.
DROPS 132-1 |
|||||||||||||||||||
|
GARTER ST (back and forth on needle): K all rows. GARTER ST (in the round on circular needle): * K 1 round and P 1 round *, repeat from *-*. SHORT ROWS: To make the yoke wider at the bottom, work more rows over the bottom sts than the upper sts. This is done as follows: * Work 2 rows over all sts, work until 2nd marker, turn, tighten yarn and work back, work until 1st marker, turn, tighten yarn and work back, work 2 rows over all sts, work until 2nd marker, turn, tighten yarn and work back, work 2 rows over all sts, work until 1st marker, turn, tighten yarn and work back *, repeat from *-*, i.e. 1 repetition = 6 rows at the top and 14 rows at the bottom. PATTERN: See diagram M.1. Diagram shows 1 repetition of pattern in width (= 24 sts), the diagram shows pattern from RS. MEASURING TIP: Measure when piece is flat, it is important not to stretch the piece when measuring. DECREASE TIP: Work until 2 sts remain before marker, K 2 tog, marker, slip 1 st as if to K, K 1, psso. INCREASE TIP: Work until 1 st remains before marker, make 1 YO, work 2 sts (marker is between these 2 sts), make 1 more YO. On next round K YOs twisted (i.e. work in back loop of st instead of front) to avoid holes . -------------------------------------------------------- -------------------------------------------------------- YOKE: Worked back and forth on circular needle, worked sideways from mid back. LOOSELY cast on 32-32-36-36-40-40 sts on circular needle size 5 mm / US 8 with 1 strand Delight and 1 strand Kid-Silk. K 2 rows over all sts (1st row beg from bottom edge from RS). Work next row as follows (from RS): K 10-10-13-13-16-16, K 2 tog, 1 YO, K 1, K 2 sts in each of the next 4 sts (= K 8), K 2, K 2 in each of the next 4 sts (= K 8), K 1, 1 YO, slip 1 st as if to K, K 1, psso, K 6-6-7-7-8-8 = 40-40-44-44-48-48 sts. Work next row as follows (from WS): K 6-6-7-7-8-8, P 2, K 1, P 8, K 2, P 8, K 1, P 2 and K 10-10-13-13-16-16. Insert 2 markers in the piece as follows (from RS): 1st marker after 13-13-16-16-19-19 sts and 2nd marker after a total of 31-31-34-34-37-37 sts = 9-9-10-10-11-11 sts remain at the top after 2nd marker. Then work SHORT ROWS – see explanation above and PATTERN as follows: 10-10-13-13-16-16 sts in GARTER ST – see explanation above, diagram M.1 over the next 24 sts and 6-6-7-7-8-8 sts in garter st. Work until piece measures approx. 112-120-128-140-152-164 cm / 44"-47"-50½"-55"-60"-64½" measured along the bottom edge – SEE MEASURING TIP – finish after 2 rows have been worked on all sts. Work next row as follows (from RS): K 13-13-16-16-19-19, K the next 8 sts tog 2 by 2, K 2, K the next 8 sts tog 2 by 2, K 9-9-10-10-11-11 = 32-32-36-36-40-40 sts. K 1 row over all sts, then bind off all sts with K from RS. Piece measures approx. 114-122-130-142-154-166 cm / 45"-48"-51"-55¾"-60½"-65¼" at bottom edge. INSERTING MARKERS: Remove the markers in the piece and insert 4 new markers as follows: Place piece flat on a table and measure along the longest side. First find centre of piece – measure 18-20-21½-24-26½-29½ cm / 7"-8"-8½"-9½"-10½"-11½" from centre out to each side – insert a marker in each side (i.e. there are 36-40-43-48-53-59 cm / 14¼"-15¾"-17"-19"-21"-23¼" between markers on front piece), then measure 18-20-21½-24-26½-29½ cm / 7"-8"-8½"-9½"-10½"-11½" in from bind off edge and cast on edge (= back piece) – insert markers here. There are now approx. 21-21-22-23-24-24 cm / 8¼"-8¼"-8¾"-9"-9½"-9½" in each side between markers on front and back piece (= armholes). Sew yoke tog, sew edge to edge mid back to avoid a chunky seam. BODY: Worked in the round on circular needle. Knit up sts along bottom edge of yoke with 1 strand Delight and 1 strand Kid-Silk on circular needle size 5 mm / US 8 – start round at marker in transition between left sleeve and back piece. Knit up 1 st in front loop of st in every ridge (1 ridge = 2 rows in garter st) between markers on back piece (approx. 60 to 98 sts), cast on 6-6-8-8-10-10 new sts (= under sleeve), skip to first marker on front piece and knit up 1 st in front loop of sts in every ridge on front piece (= approx. 60 to 98 sts), cast on 6-6-8-8-10-10 new sts (= under the other sleeve). NOW MEASURE PIECE FROM HERE! P 1 round while at the same time adjusting the no of sts to 136-148-162-180-200-220. Remove markers and insert 4 new markers as follows: K 14-15-16-18-20-22 sts, insert a marker, K 34-38-41-46-50-56 sts, insert a marker (these 2 markers marks where waistline should be worked on back piece), K 34-36-40-44-50-54 sts, insert a marker, K 34-38-41-46-50-56 sts, insert a marker (these 2 markers marks where waistline should be worked on front piece), K rest of round (= 20-21-24-26-30-32 sts). On next round, P 10-10-12-12-14-14 sts under each sleeve, K the remaining sts. Continue in stockinette st over all sts. REMEMBER THE GAUGE! When piece measures 10 cm / 4", dec 1 st on each side of the 4 markers - READ DECREASE TIP! Repeat dec when piece measures 15 cm / 6" = 120-132-146-164-184-204 sts. When piece measures 20-21-21-22-22-23 cm / 8"-8¼"-8¼"-8¾"-8¾"-9", inc 1 st on each side of the 4 markers – see INCREASE TIP. Repeat inc every 8 rounds a total of 9 times = 192-204-218-236-256-276 sts. When piece measures 63-65-65-67-67-69 cm / 24¾"-25½"-25½"-26⅜"-26⅜"-27⅛", K 1 round while at the same time dec 12 sts evenly. Then work 4 cm / 1½" in garter st. LOOSELY bind off. CROCHET LACE EDGE: Crochet an edge in bottom st in garter st along yoke (i.e. in same st that was knit up on body). Hold piece with neck opening towards you, work with 1 strand Kid-Silk on hook size 3.5 mm/E/4 as follows – start mid back as follows: ROUND 1: 1 sc in first ridge (1 ridge = 2 rounds in garter st), * ch 3, 1 sc in next ridge *, repeat from *-* the entire round, finish with ch 3 and 1 sl st in first sc on round (adjust so that there is an even number of ch-spaces). ROUND 2: ch 2, 1 sc in first ch-space, * ch 5, 1 sc in next ch-space, ch 1, 1 sc in next ch-space*, repeat from *-*, finish with 1 sl st (instead of 1 sc) in first sc on round. ROUND 3: Work as follows in each of the large ch-space (= 5 ch): 1 sc, 5 dc, 1 sc and work 1 sc in each of the small ch-spaces (= 1 ch), finish with 1 sl st at beg of round, fasten off. Steam iron the lace edge well to make it fold nicely downwards. |
|||||||||||||||||||
Diagram explanations |
|||||||||||||||||||
|
|||||||||||||||||||
 |
|||||||||||||||||||
Have you finished this pattern?Tag your pictures with #dropspattern #forestnymphdress or submit them to the #dropsfan gallery. Do you need help with this pattern?You'll find 17 tutorial videos, a Comments/Questions area and more by visiting the pattern on garnstudio.com. © 1982-2026 DROPS Design A/S. We reserve all rights. This document, including all its sub-sections, has copyrights. Read more about what you can do with our patterns at the bottom of each pattern on our site. |
|||||||||||||||||||


With over 40 years in knitting and crochet design, DROPS Design offers one of the most extensive collections of free patterns on the internet - translated to 17 languages. As of today we count 325 catalogs and 12298 patterns - 12288 of which are translated into English (US/in).
We work hard to bring you the best knitting and crochet have to offer, inspiration and advice as well as great quality yarns at incredible prices! Would you like to use our patterns for other than personal use? You can read what you are allowed to do in the Copyright text at the bottom of all our patterns. Happy crafting!
Post a comment to pattern DROPS 132-1
We would love to hear what you have to say about this pattern!
If you want to leave a question, please make sure you select the correct category in the form below, to speed up the answering process. Required fields are marked *.