
Popular categories
Looking for a yarn?


Comments / Questions (169)
![]() Marita wrote:
Marita wrote:
Ja!
21.04.2013 - 19:50
![]() Gisela wrote:
Gisela wrote:
Wird das Kleid von oben nach unten gestrickt, und die Passe als Erstes?
20.04.2013 - 10:18DROPS Design answered:
Liebe Gisela, ja, es wird zunächst sie Passe quer gestrickt und dann das restliche Kleid nach unten.
22.04.2013 - 08:52
![]() J. Battes wrote:
J. Battes wrote:
Beste Drops, Vorige week heb ik u om hulp gevraagd bij de uitvoering van dit patroon. Er wordt bij de pas gesproken over een herhaling van 14 regels en telpatroon M.1 geeft een herhaling van 12 regels. Ik kom er niet uit en kan dus niet verder. Kunt u mij uitleggen hoe dit zit? Met vriendelijke groet, J. Battes
29.01.2013 - 12:18DROPS Design answered:
Wij proberen altijd zo snel mogelijk te reageren, maar in drukke perioden moet je wat wachttijd verwachten. Kan je echt niet wachten, dan kan je ook altijd contact opnemen met je DROPS verkooppunt of probeer één van de vele online forums voor breien en haken.
30.01.2013 - 14:15
![]() M.wels wrote:
M.wels wrote:
Sluit aan bij J. battes: Een herhaling van M1 omvat 12 naalden. Een herhaling van de verkorte toeren omvat 14 naalden. Tel ik voor het kabelpatroon de naalden tot de 1e markeerder bij de verkorte toeren niet mee, dan omvat een herhaling van de verkorte toeren 10 naalden. In beide gevallen lopen de herhalingen van het kabelpatroon (12) en van de verkorte toeren (14 of10) dus niet parallel. Klopt dit?
23.01.2013 - 12:29DROPS Design answered:
Zie mijn reactie hieronder.
30.01.2013 - 14:14
![]() J. Battes wrote:
J. Battes wrote:
Graag zou ik uitleg krijgen over het patroon van de kraag deze zou 14 naalden moeten zijn die telkens herhaald worden. Maar volgens het telpatroon M1 zijn het 12 naalden.Waar staan die 2 extra naalden vermeld? In afwachting van uw reactie, met vriendelijke groet, J. Battes
22.01.2013 - 10:53DROPS Design answered:
Het patroon is correct. 1 herhaling van het motief en een herhaling van de verkorte toeren staan apart van elkaar. Je moet dan dan gewoon de eerste 2 nld van het motief nog een keer breien om een volledige herhaling van de verkorte toeren te maken.
30.01.2013 - 14:13
![]() Karin Bell wrote:
Karin Bell wrote:
Ik ben uit mijn problemen en kan nu verder :)
17.01.2013 - 10:51
![]() Karin Bell wrote:
Karin Bell wrote:
Ik ben eventjes nog niet mee, de markeerders worden in een naald op de goede kant van het werk gezet, dan de verkorte naalden, is de eerste naald van het telpatroon de achterkant van het werk?
16.01.2013 - 20:36
![]() Karin Bell wrote:
Karin Bell wrote:
Beste, ik heb een probleem met het telpatroon. Als ik de uit volg zou mijn eerste rij in het telpatroon de achterzijde zijn en mijn kabels dus ook aan de achterzijde gebreid worden. Begint het telpatroon samen met de verkorte naalden? Als ik de twee markeerder plaats aan de goede kant, begint mijn telpatroon dus aan de averechtse kant ? Kan dit?
16.01.2013 - 10:45DROPS Design answered:
De kabels komen op de goede kant. Je breit de verkorte toeren EN het patroon. De eerste 2 nld verkorte zijn over alle nld, de volgende 2 tot de 1e markeerder en terug (dus hier geen M.1 breien). Dan naar markeerder 2 heen en weer - hier zou je dan M.1 breien. De kabels komen in nld 3 en 9 - beide op de goede kant.
16.01.2013 - 16:12
![]() Caroline wrote:
Caroline wrote:
Ok, Problem erkannt, Kidsilk hat nur 25g-Knäuel. Nicht drauf geachtet und muss wohl nachbestellen.
15.01.2013 - 23:06
![]() Caroline wrote:
Caroline wrote:
Hallo, wird das ganze Kleid doppelfädig, also mit je einem Faden Delight und Kidsilk gestrickt? Dann stimmt doch die Mengenangabe nicht, da man doch fast gleich viel braucht. So unterschiedlich ist die Lauflänge ja nicht. Oder irre ich mich jetzt völlig.
15.01.2013 - 22:57
|
|||||||||||||||||||
Forest Nymph#forestnymphdress |
|||||||||||||||||||
|
|
|||||||||||||||||||
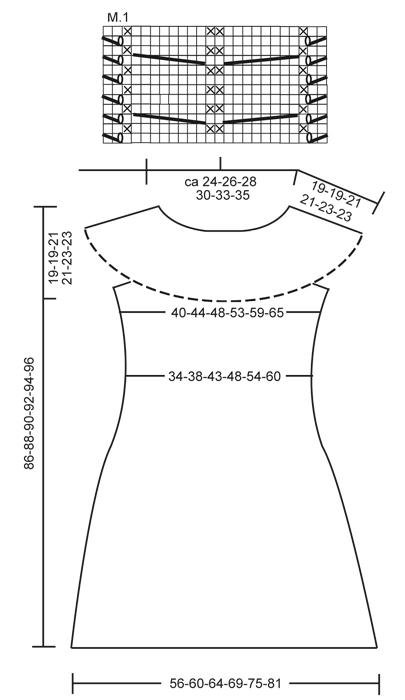
Knitted DROPS dress with yoke worked across with cables, short rows and crochet edge in ”Delight” and ”Kid-Silk”.
DROPS 132-1 |
|||||||||||||||||||
|
GARTER ST (back and forth on needle): K all rows. GARTER ST (in the round on circular needle): * K 1 round and P 1 round *, repeat from *-*. SHORT ROWS: To make the yoke wider at the bottom, work more rows over the bottom sts than the upper sts. This is done as follows: * Work 2 rows over all sts, work until 2nd marker, turn, tighten yarn and work back, work until 1st marker, turn, tighten yarn and work back, work 2 rows over all sts, work until 2nd marker, turn, tighten yarn and work back, work 2 rows over all sts, work until 1st marker, turn, tighten yarn and work back *, repeat from *-*, i.e. 1 repetition = 6 rows at the top and 14 rows at the bottom. PATTERN: See diagram M.1. Diagram shows 1 repetition of pattern in width (= 24 sts), the diagram shows pattern from RS. MEASURING TIP: Measure when piece is flat, it is important not to stretch the piece when measuring. DECREASE TIP: Work until 2 sts remain before marker, K 2 tog, marker, slip 1 st as if to K, K 1, psso. INCREASE TIP: Work until 1 st remains before marker, make 1 YO, work 2 sts (marker is between these 2 sts), make 1 more YO. On next round K YOs twisted (i.e. work in back loop of st instead of front) to avoid holes . -------------------------------------------------------- -------------------------------------------------------- YOKE: Worked back and forth on circular needle, worked sideways from mid back. LOOSELY cast on 32-32-36-36-40-40 sts on circular needle size 5 mm / US 8 with 1 strand Delight and 1 strand Kid-Silk. K 2 rows over all sts (1st row beg from bottom edge from RS). Work next row as follows (from RS): K 10-10-13-13-16-16, K 2 tog, 1 YO, K 1, K 2 sts in each of the next 4 sts (= K 8), K 2, K 2 in each of the next 4 sts (= K 8), K 1, 1 YO, slip 1 st as if to K, K 1, psso, K 6-6-7-7-8-8 = 40-40-44-44-48-48 sts. Work next row as follows (from WS): K 6-6-7-7-8-8, P 2, K 1, P 8, K 2, P 8, K 1, P 2 and K 10-10-13-13-16-16. Insert 2 markers in the piece as follows (from RS): 1st marker after 13-13-16-16-19-19 sts and 2nd marker after a total of 31-31-34-34-37-37 sts = 9-9-10-10-11-11 sts remain at the top after 2nd marker. Then work SHORT ROWS – see explanation above and PATTERN as follows: 10-10-13-13-16-16 sts in GARTER ST – see explanation above, diagram M.1 over the next 24 sts and 6-6-7-7-8-8 sts in garter st. Work until piece measures approx. 112-120-128-140-152-164 cm / 44"-47"-50½"-55"-60"-64½" measured along the bottom edge – SEE MEASURING TIP – finish after 2 rows have been worked on all sts. Work next row as follows (from RS): K 13-13-16-16-19-19, K the next 8 sts tog 2 by 2, K 2, K the next 8 sts tog 2 by 2, K 9-9-10-10-11-11 = 32-32-36-36-40-40 sts. K 1 row over all sts, then bind off all sts with K from RS. Piece measures approx. 114-122-130-142-154-166 cm / 45"-48"-51"-55¾"-60½"-65¼" at bottom edge. INSERTING MARKERS: Remove the markers in the piece and insert 4 new markers as follows: Place piece flat on a table and measure along the longest side. First find centre of piece – measure 18-20-21½-24-26½-29½ cm / 7"-8"-8½"-9½"-10½"-11½" from centre out to each side – insert a marker in each side (i.e. there are 36-40-43-48-53-59 cm / 14¼"-15¾"-17"-19"-21"-23¼" between markers on front piece), then measure 18-20-21½-24-26½-29½ cm / 7"-8"-8½"-9½"-10½"-11½" in from bind off edge and cast on edge (= back piece) – insert markers here. There are now approx. 21-21-22-23-24-24 cm / 8¼"-8¼"-8¾"-9"-9½"-9½" in each side between markers on front and back piece (= armholes). Sew yoke tog, sew edge to edge mid back to avoid a chunky seam. BODY: Worked in the round on circular needle. Knit up sts along bottom edge of yoke with 1 strand Delight and 1 strand Kid-Silk on circular needle size 5 mm / US 8 – start round at marker in transition between left sleeve and back piece. Knit up 1 st in front loop of st in every ridge (1 ridge = 2 rows in garter st) between markers on back piece (approx. 60 to 98 sts), cast on 6-6-8-8-10-10 new sts (= under sleeve), skip to first marker on front piece and knit up 1 st in front loop of sts in every ridge on front piece (= approx. 60 to 98 sts), cast on 6-6-8-8-10-10 new sts (= under the other sleeve). NOW MEASURE PIECE FROM HERE! P 1 round while at the same time adjusting the no of sts to 136-148-162-180-200-220. Remove markers and insert 4 new markers as follows: K 14-15-16-18-20-22 sts, insert a marker, K 34-38-41-46-50-56 sts, insert a marker (these 2 markers marks where waistline should be worked on back piece), K 34-36-40-44-50-54 sts, insert a marker, K 34-38-41-46-50-56 sts, insert a marker (these 2 markers marks where waistline should be worked on front piece), K rest of round (= 20-21-24-26-30-32 sts). On next round, P 10-10-12-12-14-14 sts under each sleeve, K the remaining sts. Continue in stockinette st over all sts. REMEMBER THE GAUGE! When piece measures 10 cm / 4", dec 1 st on each side of the 4 markers - READ DECREASE TIP! Repeat dec when piece measures 15 cm / 6" = 120-132-146-164-184-204 sts. When piece measures 20-21-21-22-22-23 cm / 8"-8¼"-8¼"-8¾"-8¾"-9", inc 1 st on each side of the 4 markers – see INCREASE TIP. Repeat inc every 8 rounds a total of 9 times = 192-204-218-236-256-276 sts. When piece measures 63-65-65-67-67-69 cm / 24¾"-25½"-25½"-26⅜"-26⅜"-27⅛", K 1 round while at the same time dec 12 sts evenly. Then work 4 cm / 1½" in garter st. LOOSELY bind off. CROCHET LACE EDGE: Crochet an edge in bottom st in garter st along yoke (i.e. in same st that was knit up on body). Hold piece with neck opening towards you, work with 1 strand Kid-Silk on hook size 3.5 mm/E/4 as follows – start mid back as follows: ROUND 1: 1 sc in first ridge (1 ridge = 2 rounds in garter st), * ch 3, 1 sc in next ridge *, repeat from *-* the entire round, finish with ch 3 and 1 sl st in first sc on round (adjust so that there is an even number of ch-spaces). ROUND 2: ch 2, 1 sc in first ch-space, * ch 5, 1 sc in next ch-space, ch 1, 1 sc in next ch-space*, repeat from *-*, finish with 1 sl st (instead of 1 sc) in first sc on round. ROUND 3: Work as follows in each of the large ch-space (= 5 ch): 1 sc, 5 dc, 1 sc and work 1 sc in each of the small ch-spaces (= 1 ch), finish with 1 sl st at beg of round, fasten off. Steam iron the lace edge well to make it fold nicely downwards. |
|||||||||||||||||||
Diagram explanations |
|||||||||||||||||||
|
|||||||||||||||||||
 |
|||||||||||||||||||
Have you finished this pattern?Tag your pictures with #dropspattern #forestnymphdress or submit them to the #dropsfan gallery. Do you need help with this pattern?You'll find 17 tutorial videos, a Comments/Questions area and more by visiting the pattern on garnstudio.com. © 1982-2026 DROPS Design A/S. We reserve all rights. This document, including all its sub-sections, has copyrights. Read more about what you can do with our patterns at the bottom of each pattern on our site. |
|||||||||||||||||||


With over 40 years in knitting and crochet design, DROPS Design offers one of the most extensive collections of free patterns on the internet - translated to 17 languages. As of today we count 325 catalogs and 12298 patterns - 12288 of which are translated into English (US/in).
We work hard to bring you the best knitting and crochet have to offer, inspiration and advice as well as great quality yarns at incredible prices! Would you like to use our patterns for other than personal use? You can read what you are allowed to do in the Copyright text at the bottom of all our patterns. Happy crafting!
Post a comment to pattern DROPS 132-1
We would love to hear what you have to say about this pattern!
If you want to leave a question, please make sure you select the correct category in the form below, to speed up the answering process. Required fields are marked *.