
Popular categories
Looking for a yarn?


Comments / Questions (169)
![]() Annamaria wrote:
Annamaria wrote:
Buongiorno,sono arrivata ai ferri accorciati,non ho capito quando iniziare il diagramma?dopo aver terminato i ferri accorciati grazie mille
04.04.2014 - 12:06DROPS Design answered:
Buonasera Annamaria, il diagramma M.1 va lavorato contemporaneamente ai ferri accorciati. Ci riscriva se ha altri dubbi. Buon lavoro!!
05.04.2014 - 05:20
![]() Diana wrote:
Diana wrote:
Hallo, ich bin grad bei der Passe bei reihe 27 und normalerweise würde jetzt der Zopf kommen, aber laut Anleitung soll ich jetzt nur bis zur 1 Reihe stricken und dann wenden, Dann fehlt mir doch aber der Zopf?was mache ich falsch?
22.03.2014 - 18:09DROPS Design answered:
Liebe Diana, Sie stricken immer in der angegebenen Musterfolge und dabei gleichzeitig verkürzte R, also immer so weit wie angegeben bis zu den Markierern. Wenn Sie nur bis zur 1. Markierung stricken und dann wenden, stricken Sie den Zopf nicht, aber in der Hin-R danach stricken Sie das Zopfmuster einfach wieder passend weiter, sodass innerhalb des Musters zwischen den Verzopfungen immer 5 R glatt re liegen.
23.03.2014 - 12:35
![]() Anonym wrote:
Anonym wrote:
Wie fallen die Größen aus? Gibt es auch Maschenangaben für Größe XS bzw. 34 (D)?
17.12.2013 - 10:39DROPS Design answered:
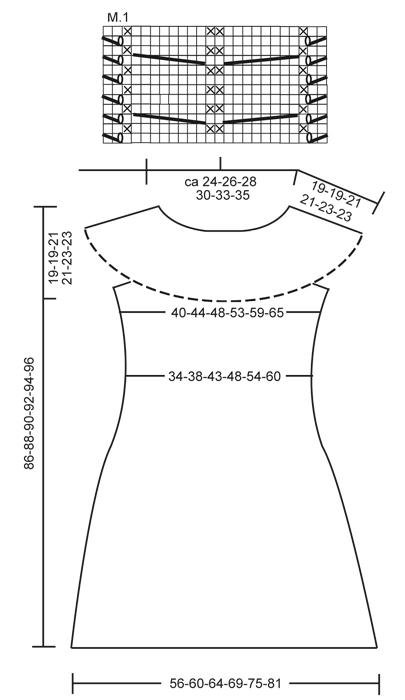
Die Masse mit genauen cm-Angaben sehen Sie unten im Diagramm. Dieses Modell gibt es erst ab Grösse S.
18.12.2013 - 10:05
![]() Lisch wrote:
Lisch wrote:
Bonjour, Afin de pouvoir choisir la taille de ce modèle pour ma fille, pourriez-vous m'indiquer les mesures correspondantes aux tailles inidquées : S,M,L,XL,.... ? Merci pour votre réponse, cordialement, Sylvie LISCH
23.11.2013 - 14:30DROPS Design answered:
Bonjour Mme Lisch, vous trouverez en bas de page à la fin des explications, le schéma avec toutes les mesures pour chaque taille. Comparez ces mesures avec un vêtement analogue de votre fille qui lui va et choisissez la taille en fonction. Bon tricot!
25.11.2013 - 09:19
![]() Alice wrote:
Alice wrote:
Da dies mein erstes Kleid wird, habe ich eine Frage zum Beginn. Was bedeutet bei der Passe 32-32-36-36-40-40 M. anschlagen? Soll ich dann 32 Maschen anschlagen wenn ich Größe S möchte? Oder wie? Ich nehme nur eine einzige Wolle.Und was bedeutet: "Die nächste R. von der Vorderseite (an der unteren Kante) wie folgt: 10-10-13-13-16-16 re"??? Die Zahlen verwirren mich. Entschuldigt bitte, aber ich habe Niemand den ich gerade Fragen kann. Vielen Dank für die Hilfe.
14.11.2013 - 11:48DROPS Design answered:
Liebe Alice, die Zahlen beziehen sich auf die verschiedenen Grössen. Wenn Sie Grösse S stricken, nehmen Sie immer die erste Zahl.
15.11.2013 - 10:47Catia Mendes wrote:
I’m going to try this pattern, but a friend drew my attention to the fiber with this observation: “I am wondering whether the silk in the yarn might make the whole thing grow vertically as you wear it, or whether the fibers in the mohair will serve to hold the silk in place.” Have you comments on this? I was considering making it a little bit longer.
09.10.2013 - 15:58DROPS Design answered:
Dear Mrs Mendes, silk in the Kid-Silk provides a subtle sheen and a surprising warmth and strength, the amount of mohair and wool will by far compensate and the dress will not grow whatsoever. Happy knitting!
09.10.2013 - 20:28
![]() Nilla wrote:
Nilla wrote:
Hejsan! Hur ska man gå tillväga att sticka förkortat varv och mönster när mönstret är två varv kortare än förkortat varv?
23.09.2013 - 12:51DROPS Design answered:
Du stickar förkortade varv, men du stickar bara mönser när du stickar hela varvet ut.
02.10.2013 - 12:20
![]() Karin wrote:
Karin wrote:
Ich habe eine Frage zu den verkürzten Reihen in der Passe. Mir ist nicht klar, wie das Muster zusammen mit den verkürzten Reihen gestrickt werden soll. Erst werden 2 Reihen über alle Maschen gestrickt, dann in Reihe 3 bis zur 2. Markierung. Direkt nach dem zweiten Zopf wird also gewendet. Stricke ich jetzt die 4. Reihe vom Musterdiagramm zurück? Und was mache ich in Reihne 5&6?
16.09.2013 - 12:42DROPS Design answered:
Liebe Karin, der restliche Musterrapport geht ja nur über 2 Reihen. Daher verschiebt sich das Muster nicht und Sie können nach der verkürzten R ganz normal in der Musterfolge weiterstricken.
17.09.2013 - 08:21
![]() Anette Kirk wrote:
Anette Kirk wrote:
Jeg forstår ikke hvor og hvor og hvor ofte i mønstret man lægger de forkortede pinde ind. Uanset hvor meget jeg tegner for jeg heller ikke forholdet 6/14 ?
19.05.2013 - 13:48DROPS Design answered:
Du strikker de forkortede pinde hele vejen rundt ifølge opskriften således. Forkortede Pinde: * Strik 2 p over alle m, strik til 2.mærke, vend, stram tråden og strik tilbage, strik til 1.mærke, vend, stram tråden og strik tilbage strik 2 p over alle m, strik til 2.mærke, vend, stram tråden og strik tilbage, strik 2 p over alle m, strik til 1.mærke, vend, stram tråden og strik tilbage *, gentag fra *-*, dvs at 1 rapport = 6 p øverst og 14 p nederst
20.05.2013 - 08:45
![]() Isa wrote:
Isa wrote:
Hallo! Wie ist dieser Teil beim Vorder und Rückenteil zu verstehen? "Zwischen den Markierungen am Rückenteil im äussersten Glied der äussersten Krausrippe ca. 60 bis 98 M. aufnehmen" Danke!
03.05.2013 - 10:41DROPS Design answered:
Liebe Isa, Entschuldigung, ich habe Ihre Frage erst etwas spät gesehen. Damit ist gemeint, dass Sie die Maschen aus dem bereits gestrickten Stück (Passe) seitlich aufnehmen/herausstricken.
22.05.2013 - 10:23
|
|||||||||||||||||||
Forest Nymph#forestnymphdress |
|||||||||||||||||||
|
|
|||||||||||||||||||
Knitted DROPS dress with yoke worked across with cables, short rows and crochet edge in ”Delight” and ”Kid-Silk”.
DROPS 132-1 |
|||||||||||||||||||
|
GARTER ST (back and forth on needle): K all rows. GARTER ST (in the round on circular needle): * K 1 round and P 1 round *, repeat from *-*. SHORT ROWS: To make the yoke wider at the bottom, work more rows over the bottom sts than the upper sts. This is done as follows: * Work 2 rows over all sts, work until 2nd marker, turn, tighten yarn and work back, work until 1st marker, turn, tighten yarn and work back, work 2 rows over all sts, work until 2nd marker, turn, tighten yarn and work back, work 2 rows over all sts, work until 1st marker, turn, tighten yarn and work back *, repeat from *-*, i.e. 1 repetition = 6 rows at the top and 14 rows at the bottom. PATTERN: See diagram M.1. Diagram shows 1 repetition of pattern in width (= 24 sts), the diagram shows pattern from RS. MEASURING TIP: Measure when piece is flat, it is important not to stretch the piece when measuring. DECREASE TIP: Work until 2 sts remain before marker, K 2 tog, marker, slip 1 st as if to K, K 1, psso. INCREASE TIP: Work until 1 st remains before marker, make 1 YO, work 2 sts (marker is between these 2 sts), make 1 more YO. On next round K YOs twisted (i.e. work in back loop of st instead of front) to avoid holes . -------------------------------------------------------- -------------------------------------------------------- YOKE: Worked back and forth on circular needle, worked sideways from mid back. LOOSELY cast on 32-32-36-36-40-40 sts on circular needle size 5 mm / US 8 with 1 strand Delight and 1 strand Kid-Silk. K 2 rows over all sts (1st row beg from bottom edge from RS). Work next row as follows (from RS): K 10-10-13-13-16-16, K 2 tog, 1 YO, K 1, K 2 sts in each of the next 4 sts (= K 8), K 2, K 2 in each of the next 4 sts (= K 8), K 1, 1 YO, slip 1 st as if to K, K 1, psso, K 6-6-7-7-8-8 = 40-40-44-44-48-48 sts. Work next row as follows (from WS): K 6-6-7-7-8-8, P 2, K 1, P 8, K 2, P 8, K 1, P 2 and K 10-10-13-13-16-16. Insert 2 markers in the piece as follows (from RS): 1st marker after 13-13-16-16-19-19 sts and 2nd marker after a total of 31-31-34-34-37-37 sts = 9-9-10-10-11-11 sts remain at the top after 2nd marker. Then work SHORT ROWS – see explanation above and PATTERN as follows: 10-10-13-13-16-16 sts in GARTER ST – see explanation above, diagram M.1 over the next 24 sts and 6-6-7-7-8-8 sts in garter st. Work until piece measures approx. 112-120-128-140-152-164 cm / 44"-47"-50½"-55"-60"-64½" measured along the bottom edge – SEE MEASURING TIP – finish after 2 rows have been worked on all sts. Work next row as follows (from RS): K 13-13-16-16-19-19, K the next 8 sts tog 2 by 2, K 2, K the next 8 sts tog 2 by 2, K 9-9-10-10-11-11 = 32-32-36-36-40-40 sts. K 1 row over all sts, then bind off all sts with K from RS. Piece measures approx. 114-122-130-142-154-166 cm / 45"-48"-51"-55¾"-60½"-65¼" at bottom edge. INSERTING MARKERS: Remove the markers in the piece and insert 4 new markers as follows: Place piece flat on a table and measure along the longest side. First find centre of piece – measure 18-20-21½-24-26½-29½ cm / 7"-8"-8½"-9½"-10½"-11½" from centre out to each side – insert a marker in each side (i.e. there are 36-40-43-48-53-59 cm / 14¼"-15¾"-17"-19"-21"-23¼" between markers on front piece), then measure 18-20-21½-24-26½-29½ cm / 7"-8"-8½"-9½"-10½"-11½" in from bind off edge and cast on edge (= back piece) – insert markers here. There are now approx. 21-21-22-23-24-24 cm / 8¼"-8¼"-8¾"-9"-9½"-9½" in each side between markers on front and back piece (= armholes). Sew yoke tog, sew edge to edge mid back to avoid a chunky seam. BODY: Worked in the round on circular needle. Knit up sts along bottom edge of yoke with 1 strand Delight and 1 strand Kid-Silk on circular needle size 5 mm / US 8 – start round at marker in transition between left sleeve and back piece. Knit up 1 st in front loop of st in every ridge (1 ridge = 2 rows in garter st) between markers on back piece (approx. 60 to 98 sts), cast on 6-6-8-8-10-10 new sts (= under sleeve), skip to first marker on front piece and knit up 1 st in front loop of sts in every ridge on front piece (= approx. 60 to 98 sts), cast on 6-6-8-8-10-10 new sts (= under the other sleeve). NOW MEASURE PIECE FROM HERE! P 1 round while at the same time adjusting the no of sts to 136-148-162-180-200-220. Remove markers and insert 4 new markers as follows: K 14-15-16-18-20-22 sts, insert a marker, K 34-38-41-46-50-56 sts, insert a marker (these 2 markers marks where waistline should be worked on back piece), K 34-36-40-44-50-54 sts, insert a marker, K 34-38-41-46-50-56 sts, insert a marker (these 2 markers marks where waistline should be worked on front piece), K rest of round (= 20-21-24-26-30-32 sts). On next round, P 10-10-12-12-14-14 sts under each sleeve, K the remaining sts. Continue in stockinette st over all sts. REMEMBER THE GAUGE! When piece measures 10 cm / 4", dec 1 st on each side of the 4 markers - READ DECREASE TIP! Repeat dec when piece measures 15 cm / 6" = 120-132-146-164-184-204 sts. When piece measures 20-21-21-22-22-23 cm / 8"-8¼"-8¼"-8¾"-8¾"-9", inc 1 st on each side of the 4 markers – see INCREASE TIP. Repeat inc every 8 rounds a total of 9 times = 192-204-218-236-256-276 sts. When piece measures 63-65-65-67-67-69 cm / 24¾"-25½"-25½"-26⅜"-26⅜"-27⅛", K 1 round while at the same time dec 12 sts evenly. Then work 4 cm / 1½" in garter st. LOOSELY bind off. CROCHET LACE EDGE: Crochet an edge in bottom st in garter st along yoke (i.e. in same st that was knit up on body). Hold piece with neck opening towards you, work with 1 strand Kid-Silk on hook size 3.5 mm/E/4 as follows – start mid back as follows: ROUND 1: 1 sc in first ridge (1 ridge = 2 rounds in garter st), * ch 3, 1 sc in next ridge *, repeat from *-* the entire round, finish with ch 3 and 1 sl st in first sc on round (adjust so that there is an even number of ch-spaces). ROUND 2: ch 2, 1 sc in first ch-space, * ch 5, 1 sc in next ch-space, ch 1, 1 sc in next ch-space*, repeat from *-*, finish with 1 sl st (instead of 1 sc) in first sc on round. ROUND 3: Work as follows in each of the large ch-space (= 5 ch): 1 sc, 5 dc, 1 sc and work 1 sc in each of the small ch-spaces (= 1 ch), finish with 1 sl st at beg of round, fasten off. Steam iron the lace edge well to make it fold nicely downwards. |
|||||||||||||||||||
Diagram explanations |
|||||||||||||||||||
|
|||||||||||||||||||
 |
|||||||||||||||||||
Have you finished this pattern?Tag your pictures with #dropspattern #forestnymphdress or submit them to the #dropsfan gallery. Do you need help with this pattern?You'll find 17 tutorial videos, a Comments/Questions area and more by visiting the pattern on garnstudio.com. © 1982-2026 DROPS Design A/S. We reserve all rights. This document, including all its sub-sections, has copyrights. Read more about what you can do with our patterns at the bottom of each pattern on our site. |
|||||||||||||||||||


With over 40 years in knitting and crochet design, DROPS Design offers one of the most extensive collections of free patterns on the internet - translated to 17 languages. As of today we count 325 catalogs and 12298 patterns - 12288 of which are translated into English (US/in).
We work hard to bring you the best knitting and crochet have to offer, inspiration and advice as well as great quality yarns at incredible prices! Would you like to use our patterns for other than personal use? You can read what you are allowed to do in the Copyright text at the bottom of all our patterns. Happy crafting!
Post a comment to pattern DROPS 132-1
We would love to hear what you have to say about this pattern!
If you want to leave a question, please make sure you select the correct category in the form below, to speed up the answering process. Required fields are marked *.