
Popular categories
Looking for a yarn?


Comments / Questions (169)
![]() Kerstin wrote:
Kerstin wrote:
Habe das Kleid fertig gestellt, es passt wunderbar und sieht sehr schick aus! Trotz kleinerer Verständnisprobleme mit der Anleitung hat es dann gut geklappt. Vielen Dank für die Anleitung für dieses tolle Kleid!
05.08.2021 - 07:44
![]() Kerstin wrote:
Kerstin wrote:
Hallo zusammen, wenn ich in Runden glatt rechts den Rock stricke, soll ich nach 10cm das erste Mal 8 Maschen abnehmen. Dann steht „nach 15cm wiederholen…“. Bezieht sich diese Angabe auf die Gesamtlänge des Rockes, also nach 10cm das erste Mal und 5cm später das zweite Mal, macht 15cm Gesamtlänge Rock? Oder kommt die zweite Abnahme erst 15cm nach der ersten, macht insgesamt 25cm Gesamtlänge Rock? Vielen Dank
21.05.2021 - 17:34DROPS Design answered:
Liebe Kerstin, die 15 cm werden wie bei den 10 cm gemessen, dh 5 cm nach den 1. Abnahmen. Viel Spaß beim stricken!
25.05.2021 - 07:19
![]() Charlotte Petersen wrote:
Charlotte Petersen wrote:
Hej Jeg vil gerne strikke lange ærmer, der lægger sig ind til kroppen, som resten af kjolen. Kan I give et bud på, hvor meget ekstra garn, jeg skal bruge til str small? 😁 Mvh Charlotte
16.04.2021 - 07:34DROPS Design answered:
Hej, du skal nok bruge omkring 3-4 nøgler mere af hver kvalitet... hellere et for meget end et for lidt ;)
16.04.2021 - 10:49
![]() Greta Lisk Pålsson wrote:
Greta Lisk Pålsson wrote:
Du har inte svarat på min fråga från 16-01-21 om minskningen av de 12m /Greta
22.01.2021 - 12:07DROPS Design answered:
Hej Greta, ja du skall fortfarande bara minska 12 maskor. Lycka till :)
27.01.2021 - 15:08
![]() Greta Lisk Pålsson wrote:
Greta Lisk Pålsson wrote:
Hej! Jag har ökat varje 8:e v totalt 17 ggr. för att få den önskade längden på klänningen. Ska jag fortfarande bara minska 12 m vid kanten eller ska jag minska det dubbla?
16.01.2021 - 13:26DROPS Design answered:
Hei Greta. Uten å vite hvilken størrelse eller hvor langt du har strikket, så er det skrevet fell 12 masker jevnt fordelt i alle størrelser i oppskriften. Så om du ikke har strikket veldig mye lengre enn hva det står i oppskriften blir nok 12 masker en penest avsluttning før de 4 cm rillestrikk. mvh DROPS design
27.01.2021 - 07:52
![]() Greta Lisk Pålsson wrote:
Greta Lisk Pålsson wrote:
Hej igen! Jag har nästan stickat klart min klänning men undrar lite på avslutet. Allt är stickat i slätstickning. Efter att ha minskat de 12m ska det stickas rätstickning!!! På rundsticka blir det ju samma sak. Menar du sticka 1 v avigt och sen 4cm rät( slät) för att lägga upp? Mvh/Greta
14.01.2021 - 16:31DROPS Design answered:
Hej Greta. Det stämmer att det ska vara rätstickning längst ner på klänningen. Vi har en förklaring på hur man stickar rätstickning längst upp på mönstret: "RÄTST (runt på rundst): *1 v rätt, 1 v avigt*, upprepa *_*." Mvh DROPS Design
20.01.2021 - 09:20
![]() Guenaele wrote:
Guenaele wrote:
J ai pris beaucoup de plaisir à tricoter cette robe.les explications sont très bien et la bordure en crochet ajoute une jolie touche à cette robe
09.11.2020 - 19:49
![]() Michèle wrote:
Michèle wrote:
Madame je pense avoir compris que c est bien tous les rangs.
05.11.2020 - 10:09
![]() Michèle wrote:
Michèle wrote:
Bonjour Madame Pour la mise en place de l'empiècement, si les marqueurs des rangs raccourcis sont dans le diagramme je tricote le diagramme que lorsque je ne fais pas de rangs raccourcis soit sur 3 fois par série? Merci pour votre aide
05.11.2020 - 07:59DROPS Design answered:
Bonjour Michèle, les rangs raccourcis se font soit avant le diagramme (= juste sur les mailles point mousse), soit avant les 3 dernières mailles de M.1 (= les torsades vont donc bien se tricoter au même rythme toutes les 2), les 3 dernières m de M.1 seront tricotées quand vous tricotez sur toutes les mailles. Veillez bien à croiser les mailles comme indiqué dans le diagramme (au 3ème rang tricoté sur ces mailles puis tous les 6 rangs tricotés sur ces mailles). Bon tricot!
05.11.2020 - 11:04
![]() Greta Lisk Pålsson wrote:
Greta Lisk Pålsson wrote:
Just det, glömde fråga! Jag vill gärna sticka klänningen längre: 25 cm. Kan jag bara fortsätta sticka utan att minska de 12 maskarna som ska fördelas på slutet, eller hur gör jag?
02.11.2020 - 12:46DROPS Design answered:
Hej Greta, ja du kan strikke så langt du vil inden du minsker de 12 masker før kanten. God fornøjelse!
04.11.2020 - 12:01
|
|||||||||||||||||||
Forest Nymph#forestnymphdress |
|||||||||||||||||||
|
|
|||||||||||||||||||
Knitted DROPS dress with yoke worked across with cables, short rows and crochet edge in ”Delight” and ”Kid-Silk”.
DROPS 132-1 |
|||||||||||||||||||
|
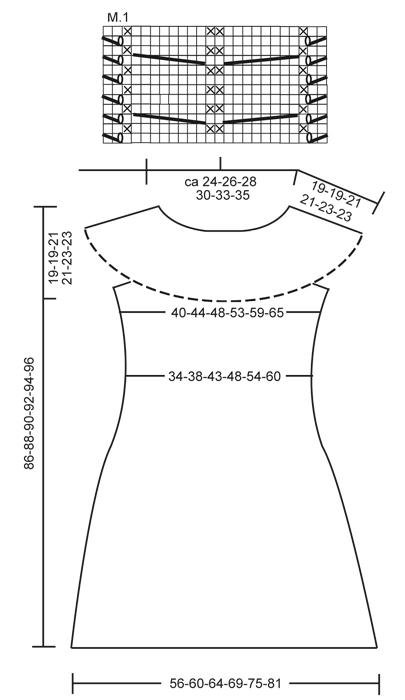
GARTER ST (back and forth on needle): K all rows. GARTER ST (in the round on circular needle): * K 1 round and P 1 round *, repeat from *-*. SHORT ROWS: To make the yoke wider at the bottom, work more rows over the bottom sts than the upper sts. This is done as follows: * Work 2 rows over all sts, work until 2nd marker, turn, tighten yarn and work back, work until 1st marker, turn, tighten yarn and work back, work 2 rows over all sts, work until 2nd marker, turn, tighten yarn and work back, work 2 rows over all sts, work until 1st marker, turn, tighten yarn and work back *, repeat from *-*, i.e. 1 repetition = 6 rows at the top and 14 rows at the bottom. PATTERN: See diagram M.1. Diagram shows 1 repetition of pattern in width (= 24 sts), the diagram shows pattern from RS. MEASURING TIP: Measure when piece is flat, it is important not to stretch the piece when measuring. DECREASE TIP: Work until 2 sts remain before marker, K 2 tog, marker, slip 1 st as if to K, K 1, psso. INCREASE TIP: Work until 1 st remains before marker, make 1 YO, work 2 sts (marker is between these 2 sts), make 1 more YO. On next round K YOs twisted (i.e. work in back loop of st instead of front) to avoid holes . -------------------------------------------------------- -------------------------------------------------------- YOKE: Worked back and forth on circular needle, worked sideways from mid back. LOOSELY cast on 32-32-36-36-40-40 sts on circular needle size 5 mm / US 8 with 1 strand Delight and 1 strand Kid-Silk. K 2 rows over all sts (1st row beg from bottom edge from RS). Work next row as follows (from RS): K 10-10-13-13-16-16, K 2 tog, 1 YO, K 1, K 2 sts in each of the next 4 sts (= K 8), K 2, K 2 in each of the next 4 sts (= K 8), K 1, 1 YO, slip 1 st as if to K, K 1, psso, K 6-6-7-7-8-8 = 40-40-44-44-48-48 sts. Work next row as follows (from WS): K 6-6-7-7-8-8, P 2, K 1, P 8, K 2, P 8, K 1, P 2 and K 10-10-13-13-16-16. Insert 2 markers in the piece as follows (from RS): 1st marker after 13-13-16-16-19-19 sts and 2nd marker after a total of 31-31-34-34-37-37 sts = 9-9-10-10-11-11 sts remain at the top after 2nd marker. Then work SHORT ROWS – see explanation above and PATTERN as follows: 10-10-13-13-16-16 sts in GARTER ST – see explanation above, diagram M.1 over the next 24 sts and 6-6-7-7-8-8 sts in garter st. Work until piece measures approx. 112-120-128-140-152-164 cm / 44"-47"-50½"-55"-60"-64½" measured along the bottom edge – SEE MEASURING TIP – finish after 2 rows have been worked on all sts. Work next row as follows (from RS): K 13-13-16-16-19-19, K the next 8 sts tog 2 by 2, K 2, K the next 8 sts tog 2 by 2, K 9-9-10-10-11-11 = 32-32-36-36-40-40 sts. K 1 row over all sts, then bind off all sts with K from RS. Piece measures approx. 114-122-130-142-154-166 cm / 45"-48"-51"-55¾"-60½"-65¼" at bottom edge. INSERTING MARKERS: Remove the markers in the piece and insert 4 new markers as follows: Place piece flat on a table and measure along the longest side. First find centre of piece – measure 18-20-21½-24-26½-29½ cm / 7"-8"-8½"-9½"-10½"-11½" from centre out to each side – insert a marker in each side (i.e. there are 36-40-43-48-53-59 cm / 14¼"-15¾"-17"-19"-21"-23¼" between markers on front piece), then measure 18-20-21½-24-26½-29½ cm / 7"-8"-8½"-9½"-10½"-11½" in from bind off edge and cast on edge (= back piece) – insert markers here. There are now approx. 21-21-22-23-24-24 cm / 8¼"-8¼"-8¾"-9"-9½"-9½" in each side between markers on front and back piece (= armholes). Sew yoke tog, sew edge to edge mid back to avoid a chunky seam. BODY: Worked in the round on circular needle. Knit up sts along bottom edge of yoke with 1 strand Delight and 1 strand Kid-Silk on circular needle size 5 mm / US 8 – start round at marker in transition between left sleeve and back piece. Knit up 1 st in front loop of st in every ridge (1 ridge = 2 rows in garter st) between markers on back piece (approx. 60 to 98 sts), cast on 6-6-8-8-10-10 new sts (= under sleeve), skip to first marker on front piece and knit up 1 st in front loop of sts in every ridge on front piece (= approx. 60 to 98 sts), cast on 6-6-8-8-10-10 new sts (= under the other sleeve). NOW MEASURE PIECE FROM HERE! P 1 round while at the same time adjusting the no of sts to 136-148-162-180-200-220. Remove markers and insert 4 new markers as follows: K 14-15-16-18-20-22 sts, insert a marker, K 34-38-41-46-50-56 sts, insert a marker (these 2 markers marks where waistline should be worked on back piece), K 34-36-40-44-50-54 sts, insert a marker, K 34-38-41-46-50-56 sts, insert a marker (these 2 markers marks where waistline should be worked on front piece), K rest of round (= 20-21-24-26-30-32 sts). On next round, P 10-10-12-12-14-14 sts under each sleeve, K the remaining sts. Continue in stockinette st over all sts. REMEMBER THE GAUGE! When piece measures 10 cm / 4", dec 1 st on each side of the 4 markers - READ DECREASE TIP! Repeat dec when piece measures 15 cm / 6" = 120-132-146-164-184-204 sts. When piece measures 20-21-21-22-22-23 cm / 8"-8¼"-8¼"-8¾"-8¾"-9", inc 1 st on each side of the 4 markers – see INCREASE TIP. Repeat inc every 8 rounds a total of 9 times = 192-204-218-236-256-276 sts. When piece measures 63-65-65-67-67-69 cm / 24¾"-25½"-25½"-26⅜"-26⅜"-27⅛", K 1 round while at the same time dec 12 sts evenly. Then work 4 cm / 1½" in garter st. LOOSELY bind off. CROCHET LACE EDGE: Crochet an edge in bottom st in garter st along yoke (i.e. in same st that was knit up on body). Hold piece with neck opening towards you, work with 1 strand Kid-Silk on hook size 3.5 mm/E/4 as follows – start mid back as follows: ROUND 1: 1 sc in first ridge (1 ridge = 2 rounds in garter st), * ch 3, 1 sc in next ridge *, repeat from *-* the entire round, finish with ch 3 and 1 sl st in first sc on round (adjust so that there is an even number of ch-spaces). ROUND 2: ch 2, 1 sc in first ch-space, * ch 5, 1 sc in next ch-space, ch 1, 1 sc in next ch-space*, repeat from *-*, finish with 1 sl st (instead of 1 sc) in first sc on round. ROUND 3: Work as follows in each of the large ch-space (= 5 ch): 1 sc, 5 dc, 1 sc and work 1 sc in each of the small ch-spaces (= 1 ch), finish with 1 sl st at beg of round, fasten off. Steam iron the lace edge well to make it fold nicely downwards. |
|||||||||||||||||||
Diagram explanations |
|||||||||||||||||||
|
|||||||||||||||||||
 |
|||||||||||||||||||
Have you finished this pattern?Tag your pictures with #dropspattern #forestnymphdress or submit them to the #dropsfan gallery. Do you need help with this pattern?You'll find 17 tutorial videos, a Comments/Questions area and more by visiting the pattern on garnstudio.com. © 1982-2026 DROPS Design A/S. We reserve all rights. This document, including all its sub-sections, has copyrights. Read more about what you can do with our patterns at the bottom of each pattern on our site. |
|||||||||||||||||||


With over 40 years in knitting and crochet design, DROPS Design offers one of the most extensive collections of free patterns on the internet - translated to 17 languages. As of today we count 324 catalogs and 12290 patterns - 12280 of which are translated into English (US/in).
We work hard to bring you the best knitting and crochet have to offer, inspiration and advice as well as great quality yarns at incredible prices! Would you like to use our patterns for other than personal use? You can read what you are allowed to do in the Copyright text at the bottom of all our patterns. Happy crafting!
Post a comment to pattern DROPS 132-1
We would love to hear what you have to say about this pattern!
If you want to leave a question, please make sure you select the correct category in the form below, to speed up the answering process. Required fields are marked *.