
Popular categories
Looking for a yarn?


Comments / Questions (60)
![]() HILDE VAN DURPE wrote:
HILDE VAN DURPE wrote:
Hallo ik wil patroon 127-17 breien maar ik vind uitleg nogal onduidelijk ,wat bedoelen jullie met 2 eerst tekens ,vierkantje en vierkantje met streepje door
01.09.2021 - 19:15
![]() Gudrun wrote:
Gudrun wrote:
Drops design Model nr. R- 597 Er i tvivl om ikonerne i strikkediagrammet. Er i tvivl om det "ikon" der er vist i M.1 B.,på første nederste linje Symboliserer det =sæt 1 m på hj.p. foran arb.,1 r,1 r fra hj.p.? Eller 2 r sammen og derefter tag 1 m. løst af p.,1 r.,løft den løse m over? I 3. nederste linje af diagrammet er vist 2 omvendte V'er.Symboliserer de = sæt 1 m på hj.p.........?
10.08.2021 - 09:41DROPS Design answered:
Hei Gudrun. Ikon nr. 3: Strek over 2 masker fra høyre hjørne oppe og ned til venstre hjørne = tag 1 m løst af p, 1 r, løft den løse m over (blir strikkes over de siste maskene i M.1B). Ikon nr. 4: Strek over 2 masker fra venstre hjørne oppe og ned til høyre hjørne = 2 r sm (blir strikkes over de første maskene i M.1B). Ikon nr. 8: sæt 1 m på hj.p foran arb, 1 r, 1 r fra hj.p (strikke i 3. og 7. rad i M.1B). mvh DROPS design
18.08.2021 - 09:03
![]() Elisabetta wrote:
Elisabetta wrote:
La diminuzione per gli scafi dalla descrizione sembra che sia fatta una sola volta in unico ferro mentre dal disegno sembra a giro cioè scalati in diversi ferri. Vorrei poter capire Grazie
14.04.2021 - 21:27DROPS Design answered:
Buonasera Elisabetta, le maglie per gli scalfi vengono intrecciate in un unico ferro. Buon lavoro!
15.04.2021 - 19:33
![]() Christina Cersosimo wrote:
Christina Cersosimo wrote:
It looks like the Diagram instructions on the English translations are backwards. Normally a box with a line slanting upwards and to the right is a symbol for K2 together and those facing to the left are an SSK or Slip 1, Knit 1, Pass. Your instructions show the opposite.
19.02.2021 - 02:19
![]() Heide Hitzemann wrote:
Heide Hitzemann wrote:
Das ist ein tolles Musterund ich würde sehr gerne ein asymetrisches Tuch danach stricken . Wie müßte ich da vorgehen? Man sollte auf einer Seite ,in jeder 2. Reihe ein KFB arbeiten ,aber wie kommt man dann mit dem Muster aus? Vielleicht können sie mir weiterhelfen . Mit freundlichen Grüßen Heide Hitzemann
21.05.2019 - 18:45DROPS Design answered:
Liebe Frau Hitzemann, wir können leider nicht jede Anleitung nach jeder Anfrage anpassen, allerdings können Sie vielleicht die ersten Zunahmen zuerst entweder rechts/links wie im Muster stricken, dann die Zunahmen im Muster stricken, wenn Sie dann genügend Maschen haben. Gerne bekommen Sie weitere Hilfe von Ihrem DROPS Laden - auch telefonsich oder per E-Mail. Viel Spaß beim stricken!
22.05.2019 - 09:05
![]() Goethals Veerle wrote:
Goethals Veerle wrote:
Hallo, bij het breien van de mouwen in maat L staat: Kant bij een hoogte van 48 cm af voor de mouwkop aan het begin van iedere nld aan iedere kant als volgt: 1 x 3 st, 3 x 2 st, 3 x 1 st en kant dan 2 st af aan iedere kant tot het werk 57 cm meet. Betekent dat dan: in de eerste naald 3 st afkanten, in de tweede, derde en vierde naald 2 st afkanten en in de vijfde naald 1 st afkanten? Alvast bedankt voor uw antwoord!
30.10.2018 - 15:50DROPS Design answered:
Dag Goethals Veerle,
Je mindert op de heengaande en de teruggaande naald, dus de eerste naald minder je aan het begin van de naald 3 steken, de tweede (= teruggaande) naald minder je ook 3 steken. Daarna aan beide kanten 3 maal 2 steken, enzovoort.
05.11.2018 - 08:40
![]() Veerle Goethals wrote:
Veerle Goethals wrote:
Hallo, ik ben nog maar net begonnen aan dit patroon en ik begrijp het niet. Ik heb 210 steken opgezet en dan de eerste naald gebreid als volgt: 1 kant st, 1steek recht/2 steken averecht (tot het einde van de naald) en geëindigd met 1 steek recht en 1 kant steek. De volgende naald moet toch hetzelfde herhaald worden? Als ik dit doe dan kom ik niet uit op een mooie boordsteek zoals op de foto. Wat doe ik verkeerd?
05.09.2018 - 17:23DROPS Design answered:
Dag Veerle, Je hebt de eerste naald goed gebreid, zoals je het beschrijft. De volgende naald, dus de teruggaande naald brei je op de verkeerde kant en brei je precies anders om, dus waar je op de heengaande naald recht breit, brei je op de teruggaande naald averecht en vice versa.
06.09.2018 - 10:24
![]() Lizeth wrote:
Lizeth wrote:
Super, dankjewel!
25.05.2018 - 08:15
![]() Lizeth wrote:
Lizeth wrote:
Leuke oplossing en dat had ik al geprobeerd, maar werkt helaas niet. Ik heb meer nieuwe patronen gezien waarvoor hetzelfde geldt. Misschien omdat mijn laptop een Apple is? F5 doet in elk geval niets. Misschien kan ik beter een computerexpert vragen?
23.05.2018 - 20:21DROPS Design answered:
Dag Lizeth, Dergelijk computerzaken liggen inderdaad buiten onze scope. Het kan aan je browser liggen, waardoor sommige onderdelen geblokkeerd zijn. Als je safari gebruikt (dat denk ik omdat je een apple hebt), kun je bij voorkeuren de extensies in- en uitschakelen. Even op google zoeken naar 'Als een pagina niet wordt geladen in Safari of onderdelen van een webpagina ontbreken', dan vind je het wel :)
25.05.2018 - 05:31
![]() Lizeth wrote:
Lizeth wrote:
Hallo, prachtig patroon. Ik heb 1 probleempje: bij de verklaring van het patroon staan de symbolen 1, 2, 3, 4 en 7 als witte vraagtekentjes in een blauw vierkant blokje. Weet u hiervoor de oplossing?
21.05.2018 - 14:17DROPS Design answered:
Hallo Lizeth, Dat is niet de bedoeling. Waarschijnlijk werden de symbooltjes (tijdelijk) niet geladen. Ze staan namelijk wel op de site. Probeer even opnieuw door de pagina te verversen met functietoets F5. Hopelijk lukt het!
23.05.2018 - 11:19
|
|||||||||||||||||||||||||
Eiffel#eiffelcardigan |
|||||||||||||||||||||||||
 |
 |
||||||||||||||||||||||||
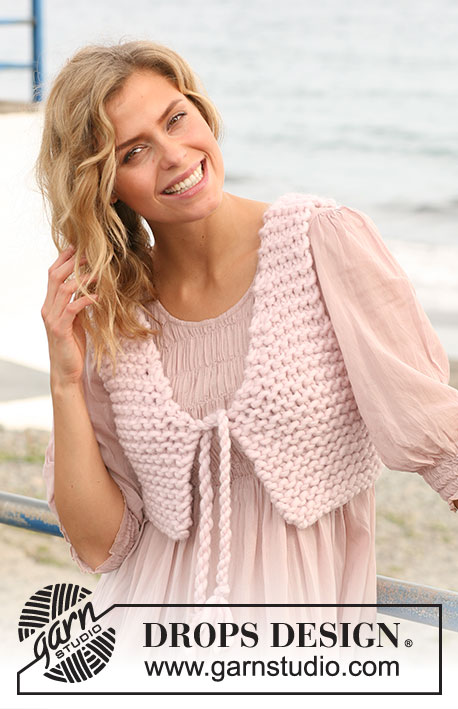
Knitted DROPS jacket with pattern and front band in rib in "Muskat" and "Kid-Silk". Size S-XXXL
DROPS 127-17 |
|||||||||||||||||||||||||
|
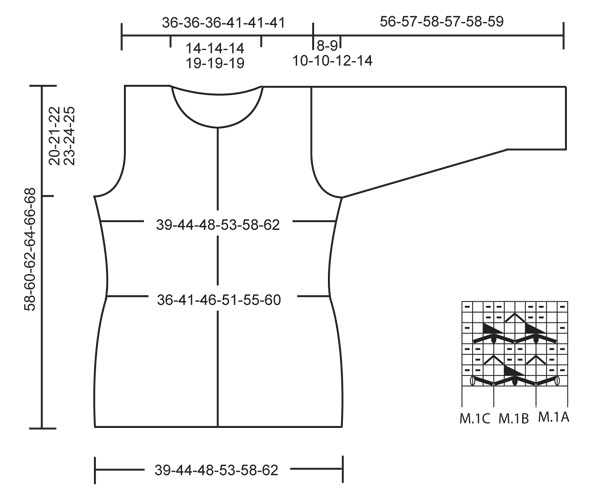
GARTER ST (back and forth on needle): K all rows. PATTERN: See diagram M.1. The diagram shows the pattern from RS. BUTTON HOLES: bind off for button holes when right front band measures 2.5 cm / 1". 1 button hole = bind off 1 P st in P section. On next row cast on 1 new st over the bind off st. Bind off for button holes when piece measures (measured from the neck and down): SIZE S-L: 1, 10 and 18 cm / ½", 4" and 7". SIZE XL-XXXL: 1, 10, 18 and 26 cm / ½", 4", 7" and 10". -------------------------------------------------------- JACKET: Worked back and forth on circular needle. Cast on 168-189-210-225-249-270 sts on circular needle 4.5 mm/ US 7 with 1 strand Muskat and 1 strand Kid-Silk. Work first row from RS as follows: 1 edge st, rib K1/P2, finish with K1 and 1 edge st. Continue with rib until piece measures 5 cm / 2". Work next row from RS as follows: 1 edge st, work in stockinette st over the first 36-42-48-51-57-63 sts while AT THE SAME TIME dec 6-8-10-9-11-13 sts evenly (= 30-34-38-42-46-50 sts) work rib as before over the next 13 sts (K1, P2, K1, P2, K1, P2, K1, P2, K1), work in stockinette st over the next 68-77-86-95-107-116 sts while AT THE SAME TIME dec 14-15-16-17-21-22 sts evenly (= 54-62-70-78-86-94 sts), work rib as before over the next 13 sts (K1, P2, K1, P2, K1, P2, K1, P2, K1), work in stockinette st over the next 36-42-48-51-57-63 sts while AT THE SAME TIME dec 6-8-10-9-11-13 sts evenly (= 30-34-38-42-46-50 sts), finish with 1 edge st = 142-158-174-190-206-222 sts. Switch to circular needle size 5 mm / US 8. K 1 row from WS (continue with rib over the sts in the sides). Work next row from RS as follows: 1 edge st, M.1A (= 3 sts), M.1B a total of 6-7-8-9-10-11 times, M.1C (= 3 sts), 13 sts in rib as before, M.1A, M.1B a total of 12-14-16-18-20-22 times, M.1C, 13 sts in rib as before, M.1A, M.1B a total of 6-7-8-9-10-11 times, finish with M.1C and 1 edge st. Continue this pattern. When piece measures 18 cm / 7", dec 4 sts in each side, i.e. dec 1 st in every P section in the sides (P 2 tog) = 134-150-166-182-198-214 sts. Continue with pattern as before and rib K1/P1 in the sides. When piece measures 24 cm / 9½", inc 4 sts in each side, i.e. inc 1 st in every P section in the sides (P 2 sts in 1 P st) = 142-158-174-190-206-222 sts. Continue with pattern as before and rib K1/P2 in the sides. When piece measures 38-39-40-41-42-43 cm / 15-15¼"-15¾"-16⅛"-16½"-17", bind off for armholes on next row from RS as follows: Work 35-35-35-39-39-39 sts, bind off 5-13-21-21-29-37 sts, work 62-62-62-70-70-70 sts, bind off 5-13-21-21-29-37 sts, work 35-35-35-39-39-39 sts. Now finish each piece separately. BACK PIECE: = 62-62-62-70-70-70 sts. Work as follows from RS: 1 edge st, K1, P2, K1, P2, K1, M.1A, M.1B a total of 10-10-10-12-12-12 times, M.1C, K1, P2, K1, P2, K1, 1 edge st. When piece measures 56-58-60-62-64-66 cm / 22"-22¾"-23⅝"-24⅜"-25¼"-26", bind off the middle 24-24-24-32-32-32 sts for neckline and finish each piece separately with pattern = 19 sts remain on the shoulder. Continue from the side (seen from RS) as follows: 1 edge st, K1, P2, K1, P2, K1, M.1A, M.1B, M.1C, 1 edge st. Bind off when piece measures 58-60-62-64-66-68 cm / 22¾"-23⅝"-24⅜"-25¼"-26"-26¾". RIGHT FRONT PIECE: = 35-35-35-39-39-39 sts. Work from RS and mid front as follows: 1 edge st, M.1A, M.1B a total of 5-5-5-6-6-6 times, M.1C, K1, P2, K1, P2, K1, 1 edge st. When piece measures 50-52-54-54-56-58 cm / 19¾"-20½"-21¼"-21¼"-22"-22¾", slip 7 sts towards mid front for neckline on a stitch holder (after working them). Continue to bind off in beg of every row from mid front as follows: 4 sts 1-1-1-2-2-2 times and 5 sts 1 time (the sts that do not fit the pattern after bind off are worked in stockinette st) = 19 sts remain on the shoulder. Work from RS and mid front as follows: 1 edge st, M.1A, M.1B, M.1C, K1, P2, K1, P2, K1, 1 edge st. Bind off when piece measures 58-60-62-64-66-68 cm / 22¾"-23⅝"-24⅜"-25¼"-26"-26¾". LEFT FRONT PIECE: Work as right front piece but reversed. SLEEVES: Worked back and forth on circular needle. Cast on 54-54-54-57-57-60 sts on circular needle 4.5 mm/ US 7 with 1 strand Muskat and 1 strand Kid-Silk. Work as follows from RS: 1 edge st, *K1, P2*, repeat from *-* and finish with K1 and 1 edge st. When piece measures 5 cm / 2", K 1 row from RS while AT THE SAME TIME dec 10-10-10-9-9-8 sts evenly = 44-44-44-48-48-52 sts. Switch to circular needle size 5 mm / US 8 and K 1 row from WS. Continue to work as follows from RS: 1 edge st, M.1A, M.1B a total of 9-9-9-10-10-11 times, M.1C, 1 edge st. When piece measures 8 cm / 3", inc 1 st in each side, work the inc sts in stockinette st until there are enough sts for another repetition of M.1. Repeat inc every 5-4-3-3-2½-2 cm / 2"-1½"-1⅛"-1⅛"-⅞"-¾" a total of 8-10-13-13-15-16 times = 60-64-70-74-78-84 sts. When piece measures 48-48-48-47-46-45 cm / 19"-19"-19"-18½"-18"-17¾" (NOTE! Shorter measurements in the larger sizes because of longer sleeve cap and wider shoulder width), bind off for sleeve cap at beg of every row in each side as follows: 3 sts 1 time, 2 sts 3 times, 1 st 1-2-3-3-5-7 times, then bind off 2 sts in each side until piece measures 55-56-57-56-57-58 cm / 21⅝"-22"-22½"-22"-22½"-22¾". Bind off 3 sts 1 time in each side before the remaining sts are bind off. ASSEMBLY: Sew the shoulder seams. Sew the seams under the sleeve. Sew in the sleeves. RIGHT FRONT BAND: Knit up 106-109-112-112-115-118 sts on circular needle 4.5 mm/ US 7 with 1 strand Muskat and 1 strand Kid-Silk up along the right front piece. K 1 row from WS, then work as follows from RS: 5 sts in garter st, *K1, P2*, repeat from *-* until 2 sts remain, K1 and 1 st in garter st. When the front band measures 2.5 cm / 1", start binding off for BUTTON HOLES on next row from RS - see explanation above! When the front band measures 5 cm / 2", bind off with K over K and P over P. Repeat on left front piece but without button holes. Sew the buttons on to the left front band. NECKLINE: Knit up approx. 78 to 98 sts around the neckline and also over the front bands inside 1 edge st (including the sts on the stitch holders). Work 4 rows in garter st, bind off. |
|||||||||||||||||||||||||
Diagram explanations |
|||||||||||||||||||||||||
|
|||||||||||||||||||||||||
 |
|||||||||||||||||||||||||
Have you finished this pattern?Tag your pictures with #dropspattern #eiffelcardigan or submit them to the #dropsfan gallery. Do you need help with this pattern?You'll find 27 tutorial videos, a Comments/Questions area and more by visiting the pattern on garnstudio.com. © 1982-2026 DROPS Design A/S. We reserve all rights. This document, including all its sub-sections, has copyrights. Read more about what you can do with our patterns at the bottom of each pattern on our site. |
|||||||||||||||||||||||||


With over 40 years in knitting and crochet design, DROPS Design offers one of the most extensive collections of free patterns on the internet - translated to 17 languages. As of today we count 324 catalogs and 12290 patterns - 12280 of which are translated into English (US/in).
We work hard to bring you the best knitting and crochet have to offer, inspiration and advice as well as great quality yarns at incredible prices! Would you like to use our patterns for other than personal use? You can read what you are allowed to do in the Copyright text at the bottom of all our patterns. Happy crafting!
Post a comment to pattern DROPS 127-17
We would love to hear what you have to say about this pattern!
If you want to leave a question, please make sure you select the correct category in the form below, to speed up the answering process. Required fields are marked *.