
Popular categories
Looking for a yarn?


Comments / Questions (79)
![]() LENOIR Marie France wrote:
LENOIR Marie France wrote:
Je suis bloquée au niveau de l'empiècement au niveau du point à trous le demi devant est impeccable mais les manhes et le dos rien ne va pouvez vous me guider SVP
07.06.2017 - 17:23DROPS Design answered:
Bonjour Mme Lenoir, vous devez tricoter les diagrammes sur toutes les mailles indiquées, avec ou sans m jersey entre les diagrammes en fonction de la taille. Les rangs des diagrammes doivent bien s'aligner les uns au-dessus des autres, comme dans les diagrammes et ne doivent pas être décalés. Bon tricot!
08.06.2017 - 09:12
![]() Grietje De Weerd wrote:
Grietje De Weerd wrote:
In het patroon staat, dat je 2x het telpatroon moet breien, boven elkaar. Ik heb het vestje inmiddels een aantal keren gebreid en dat steeds gedaan, maar dan ziet het er anders uit dan op de foto. Nu ben ik het weer aan het breien en heb het telpatroon 1x gebreid. En nu is het, zoals op de foto. Ik denk dus, dat het er fout staat.
23.03.2017 - 16:55
![]() Katja Müller wrote:
Katja Müller wrote:
Hallo! Ich bin am verzweifeln! Mein Muster stimmt hinten und vorne nicht! Meine Frage: Muss ich M1 nach jedem Abschnitt also Vorderteil, Armteil, Rücken fließend stricken mit den Abnahmen dazwischen oder bei jedem Abschnitt und jeder Abnahme M1 wieder von vorn anfangen und Stricke ich nur M1 oder auch M2? L.G. K. Müller
25.12.2016 - 00:14DROPS Design answered:
Liebe Frau Müller, M1/M2 muss wie beschrieben 1 x in der Höhe gestrickt werden, beachten Sie nur daß die beiden Muster nicht verschiebt sind wenn Sie für den Raglan abnehmen. Viel Spaß beim stricken!
29.12.2016 - 13:47
![]() Katja Müller wrote:
Katja Müller wrote:
Hallo! Vielen Dank für die Hilfe! Aber ich komme immer noch nicht weiter! Sie haben geschrieben, dass ich allein M1 stricken soll aber ab dem linken Arm und dem linken Vorderteil entsteht ein ganz anderes Muster trotz der richtigen Maschenanzahl! Wasc mach ich nun?
15.12.2016 - 01:10DROPS Design answered:
Liebe Frau Müller, beachten Sie daß M.1 nicht verschieben wird, das Muster soll wie zuvor in der Höhe gestrickt werden, aber die Maschen /Abnahmen so arrangieren, daß die Raglanabnahmen richtig werden. Sie sollen vielleicht dann weniger Maschen in M.1 stricken, damit Muster stimmt in der Höhe. Viel Spaß beim stricken!
15.12.2016 - 09:37
![]() Katja Müller wrote:
Katja Müller wrote:
Vielen Dank für die schnelle Antwort aber ich verstehe es trotzdem nicht! Also die Maschenanzahl in der 4. R. der Raglanpasse stimmt schon mal wie sie sagen. Ich stricke 4 BM, dann 24 M in M1 und dann scheitert bei mir! Mich iritieren die Ma. re. die ich stricken soll vor und nach der Abnahmen! Was meinen Sie mit der letzten Masche in M1 die zusätzlich mit dem Vorderteil gestrickt werden soll?
14.12.2016 - 11:37DROPS Design answered:
Liebe Frau Müller, es gibt 29 M für das Vorderteil bevor Markierer, dann stricken Sie: 4 BM, 23 M in M.1 und die letzte M in M.1 wird zs gestrickt mit der M vor der Markierung (die letzte M in M.1 = 1 M re) = 28 M. Die Raglanabnahmen sollen Sie wie zuvor stricken, und M.1 muss dann angepasst. Viel Spaß beim stricken!
14.12.2016 - 14:08
![]() Katja Müller wrote:
Katja Müller wrote:
Oder ist es richtig so? Warum mus ich alles in M1 stricken und nicht wie in derxBeschreibung für die andere Seite M2? Meine Maschenanzahl in der 4 R. Der Raglanpasse beträgt: 25 Vorderteil ohne BM, 33 Arm, 51 Rückenteil, 33 Arm, 25 Vorderteil ohne BM! Stimmt das so?
14.12.2016 - 01:22DROPS Design answered:
Liebe Frau Müller, ja stimmt so, bei den Abnahmen beachten Sie nur, daß M.1/M.2 immer wie zuvor gestrickt wird, dh jeder Rapport muss der eine über der anderen gestrickt werden, beachten Sie auch daß der Maschenanzahl mit Muster und Raglanabnahme immer stimmt. Viel Spaß beim stricken!
14.12.2016 - 09:19
![]() Katja Müller wrote:
Katja Müller wrote:
Hallo! Veilen Dank für die schnelle Antwort! Ich habe für die Raglanpasse immer direkt die letzten 2 M. Vor dem Markierer und 2 M. hinter dem Markierer abgenommen. Jetzt zu Beginn des Lochmusters soll ich nach der Abnahme 1 re. stricken. Habe ich da zuvor etwas falsch gemacht?
14.12.2016 - 01:18DROPS Design answered:
Liebe Frau Müller, Sie sind schon recht, 1 re M zuviel habe ich geschrieben, bei der 4. R haben Sie: 4 Blendem, die nächste M in M.1 wie zuvor stricken, dann die Raglanabnahme wie zuvor (die letzte M in M.1 wird dann zs mit der letzten M. Vorderteil gestrickt), usw. Viel Spaß beim stricken!
14.12.2016 - 09:16
![]() Katja Müller wrote:
Katja Müller wrote:
Hallo! Für mich ist diese Anleitung sehr schwierig zu verstehen! Ich scheitere einfach beim Beginn des Lochmusters! Könnten sie mir vielleicht sagen wie die Anzahl der Maschen für Vorderteile, Arme und Rückenteil zu Beginn der 4. Runde in der Raglanpasse bei Beginn des Lochmusters ist? Wenn ich zum Beispiel 24 Maschen in M1 stricken soll muss ich doch noch 2 Maschen dazu rechen für die Abnahme in der Raglanpasse in den Übergängen oder verstehe ich das falsch?
12.12.2016 - 00:47DROPS Design answered:
Liebe Frau Müller, bei der letzten Größe stricken Sie so: 4 Blendem, 24 M in M.1, (Abnahme, 1 re, Markierer, 1 re, Abnahme), M.1 über die nächsten 30 M, (Abnahme, 1 re, Markierer, 1 re, Abnahme), 48 M in M.1, 1 M glatt re, (Abnahme, 1 re, Markierer, 1 re, Abnahme), M.1 über die nächsten 30 M, (Abnahme, 1 re, Markierer, 1 re, Abnahme), 24 M in M.1, 4 Blendemaschen. Viel Spaß beim stricken!
12.12.2016 - 10:21
![]() Adela wrote:
Adela wrote:
Dice : "Después de 1 repetición vertical de M.1 y M.2 (t 6/9) ,significa que tejo solamente 4 vueltas? osea una sola vez cada linea del diagrama?por favor aclarame Gracias
30.03.2016 - 22:51DROPS Design answered:
Hola Adela, los diagramas M.1 y M.2 se trabajan unicamente una vez.
31.03.2016 - 10:34Adela wrote:
Explicación comprendida.Muchas gracias.Cuando publican nuevos patrones de bebes? Un abrazo Adela
28.03.2016 - 21:30DROPS Design answered:
Hola Adela. Todavía no tenemos fecha para el nuevo catálogo de DropsBaby.
29.03.2016 - 10:18
|
||||||||||||||||
Lille Mille#lillemillecardigan |
||||||||||||||||
 |
 |
|||||||||||||||
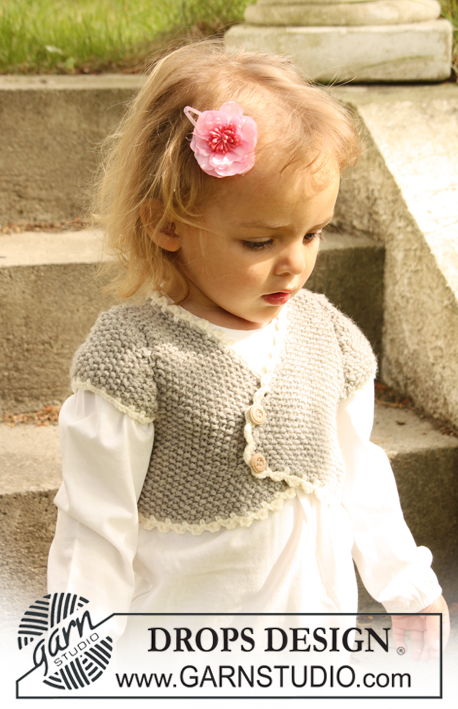
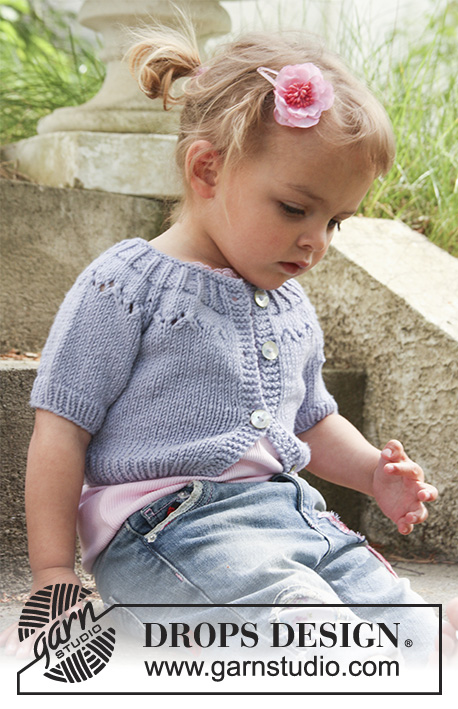
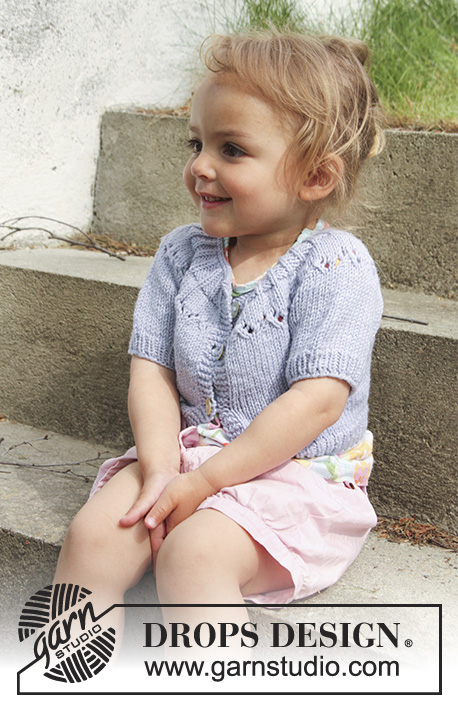
Knitted DROPS short jacket with short or long sleeves, raglan and lace pattern on yoke in ”Merino Extra Fine”.
DROPS Extra 0-684 |
||||||||||||||||
|
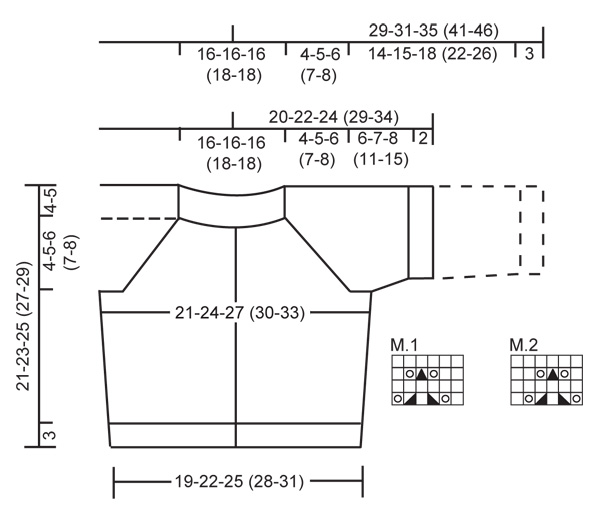
JACKET: GARTER ST (back and forth on needle): K all rows. PATTERN: See diagram M.1 and M.2. Diagrams show the pattern from RS – first row = RS. DECREASING TIP (applies to raglan): Make all dec from RS. Dec as follows in each transition between sleeve and body piece, beg 2 sts before marker: K2 tog, slip 1 st as if to K, K1, psso. BUTTONHOLES: Make buttonholes on right front band by K tog 2nd and 3rd st from edge and make 1 YO. Make buttonholes when piece measures approx: SIZE 1/3 months: 2, 8 and 13 cm / ¾", 3⅛" and 4". SIZE 6/9 months: 2, 8 and 14 cm / ¾", 3⅛" and 5½" SIZE 12/18 months: 2, 8 and 14 cm / ¾", 3⅛" and 5½" SIZE 2 years: 2, 7, 13 and 18 cm / ¾", 2¾", 5⅛" and 7" SIZE 3/4 years: 2, 8, 14 and 20 cm / ¾", 3⅛", 5½" and 8" The last buttonhole is made on neckline. --------------------------------------------------------- --------------------------------------------------------- BODY PIECE: Worked back and forth on circular needle from mid front. Cast on 85-97-109 (121-133) sts (includes 4 front band sts each side towards mid front) on circular needle size 3.5 mm / US 4 with Merino Extra Fine. P 1 row from WS and continue in rib as follows from RS: 4 front band sts in GARTER ST – see above, * K1/P1 *, repeat from *-* and finish with K1 and 4 front band sts in GARTER ST. Continue in rib like this. REMEMBER buttonholes on right front band – SEE ABOVE. When piece measures 3 cm / 1⅛" change to circular needle size 4.5 mm / US 7. Insert a marker 23-26-29 (32-35) sts in from each side (= 39-45-51 (57-63) sts between markers on back piece). Now continue in stockinette st with front bands in garter st as before. When piece measures 4-5-5 (5-6) cm / 1½"-2"-2" (2"-2⅜") inc 1 st each side of both markers (= 4 inc sts per row) and repeat the inc when piece measures 8-10-10 (10-11) cm / 3⅛"-4"-4"- (4"-4⅜") = 93-105-117 (129-141) sts. When piece measures 13-14-14 (15-16) cm / 5⅛"-5½"-5½" (6"-6¼") work next row as follows from RS: 22-25-28 (30-33) sts (= right front piece), bind off 6-6-6 (8-8) sts for armhole, 37-43-49 (53-59) sts (= back piece), bind off 6-6-6 (8-8) sts for armhole, 22-25-28 (30-33) sts (= left front piece). Put piece aside and knit the sleeves. SHORT SLEEVE: Worked in the round on double pointed needles. Cast on 30-34-38 (40-44) sts on double pointed needles size 3.5 mm / US 4 with Merino Extra Fine – beg of round = mid under sleeve. K 1 round and continue in rib, K1/P1. When piece measures 2 cm / ¾" change to double pointed needles size 4.5 mm / US 7 and continue in stockinette st. When piece measures 4-4-4 (5-5) cm / 1½"-1½"-1½" (2"-2") inc 2 sts mid under sleeve and repeat the inc in SIZE 2 years + 3/4 years when piece measures 10 cm / 4" = 32-36-40 (44-48) sts. When piece measures 8-9-10 (13-17) cm / 3⅛"-3½"-4" (5⅛"-6¾") bind off 6-6-6 (8-8) sts mid under sleeve = 26-30-34 (36-40) sts. Put piece aside and knit the other sleeve. LONG SLEEVE: Worked in the round on double pointed needles. Cast on 28-30-32 (34-34) sts on double pointed needles size 3.5 mm / US 4 with Merino Extra Fine – beg of round = mid under sleeve. K 1 round and continue in rib, K1/P1. When rib measures 3 cm / 1⅛" change to double pointed needles size 4.5 mm / US 7 and continue in stockinette st. When piece measures 5 cm / 2" inc 2 sts mid under sleeve and repeat the inc on every 8-5-4 (4-3.5) cm / 3⅛"-2"-1½" (1½"-1¼") a total of 2-3-4 (5-7) times = 32-36-40 (44-48) sts. When piece measures 17-18-21 (25-29) cm / 6¾"-7"-8¼" (9¾"-11⅜") bind off 6-6-6 (8-8) sts mid under sleeve = 26-30-34 (36-40) sts. Put piece aside and knit the other sleeve. YOKE: Slip sleeves on the same circular needle as body piece where bind off for armhole = 133-153-173 (185-205) sts. Insert a marker in all transitions between body piece and sleeves = 4 markers. P 1 row from WS with front bands in garter st as before. NOW READ ALL OF THE FOLLOWING SECTION BEFORE CONTINUING! Continue in stockinette st with front bands in garter st as before back and forth on circular needle, AT THE SAME TIME on first row (= RS) dec 1 st each side of all markers for raglan – See DECREASING TIP. Repeat the dec on every other row (i.e. on every row from RS) a total of 5-7-8 (9-10) times = 93-97-109 (113-125) sts. AT THE SAME TIME on row 3-3-5 (5-7) (i.e. on the 2-2-3 (3-4) row with raglan dec) work lace pattern as follows from RS: 4 front band sts in garter st, M.1 on the next 12-18-18 (18-24) sts, 3-0-2 (4-0) stockinette sts, dec 2 sts for raglan as before, 0-0-0 (2-0) stockinette sts, M.1 on the next 18-24-24 (24-30) sts, 2-0-2 (2-0) stockinette sts, dec 2 sts for raglan as before, 0-0-2 (1-0) stockinette sts, M.1 on the next 30-36-36 (42-48) sts, 1-1-3 (2-1) stockinette sts, dec 2 sts for raglan as before, 2-0-2 (2-0) stockinette sts, M.2 on the next 18-24-24 (24-30) sts, 0-0-0 (2-0) stockinette sts, dec 2 sts for raglan as before, 3-0-2 (4-0) stockinette sts, M.2 on the next 12-18-18 (18-24) sts and finish with 4 front band sts in garter st. NOTE: Make sure to keep no of sts in M.1/M.2 the same when next decreasing for raglan. After 1 vertical repeat of M.1 and M.2 continue in stockinette st as before, at the same time continue dec for raglan. After the last dec for raglan piece measures approx 21-23-25 (27-29) cm / 8¼"-9"-9¾" (10⅝"-11⅜") up to the shoulder. P 1 row from WS. NECKLINE: = 93-97-109 (113-125) sts. Change to circular needle size 3.5 mm / US 4 and work rib as follows from RS: 4 front band sts in garter st, * K1/P3 *, repeat from *-* and finish with K1 and 4 front band sts garter st. When rib measures 1-1-1 (2-2) cm / ⅜"-⅜"-⅜" (3/4"-¾") dec all P3 to P2 = 72-75-84 (87-96) sts. AT THE SAME TIME when rib measures 1.5-1.5-1.5 (2-2) cm / ½"-½"-½" (3/4"-¾") make 1 buttonhole in line with the others on right front band. When rib measures 3-3-3 (4-4) cm / 1⅛"-1⅛"-1⅛" (1½"-1½") dec every 3rd P section from P2 to P1 = 65-68-76 (79-87) sts. On next row from RS K 2 rows on all sts and bind off. ASSEMBLY: Sew openings under sleeves. Sew on buttons. |
||||||||||||||||
Diagram explanations |
||||||||||||||||
|
||||||||||||||||
 |
||||||||||||||||
Have you finished this pattern?Tag your pictures with #dropspattern #lillemillecardigan or submit them to the #dropsfan gallery. Do you need help with this pattern?You'll find 24 tutorial videos, a Comments/Questions area and more by visiting the pattern on garnstudio.com. © 1982-2026 DROPS Design A/S. We reserve all rights. This document, including all its sub-sections, has copyrights. Read more about what you can do with our patterns at the bottom of each pattern on our site. |
||||||||||||||||


With over 40 years in knitting and crochet design, DROPS Design offers one of the most extensive collections of free patterns on the internet - translated to 17 languages. As of today we count 324 catalogs and 12252 patterns - 12242 of which are translated into English (US/in).
We work hard to bring you the best knitting and crochet have to offer, inspiration and advice as well as great quality yarns at incredible prices! Would you like to use our patterns for other than personal use? You can read what you are allowed to do in the Copyright text at the bottom of all our patterns. Happy crafting!
Post a comment to pattern DROPS Extra 0-684
We would love to hear what you have to say about this pattern!
If you want to leave a question, please make sure you select the correct category in the form below, to speed up the answering process. Required fields are marked *.