
Popular categories
Looking for a yarn?


Comments / Questions (125)
![]() Poitzsch wrote:
Poitzsch wrote:
Hallo, ich sehe nicht wie beim Ärmel 86 M bei Grösse 2 raus kommen? Mfg
10.01.2018 - 11:52DROPS Design answered:
Liebe Frau Poitzsch, es waren 38 M für das Vorderteil, dann schlagen Sie für den Ärmel neuen Maschen so an: 4 M. 2 Mal, 8 M. 1 Mal, 10 M. 1 Mal und 22 M. 1 Mal = 38 + (8 + 8 + 10 + 22)= 86 M. Viel Spaß beim stricken!
10.01.2018 - 13:43
![]() Ruth Stanbridge wrote:
Ruth Stanbridge wrote:
Hi is there a video on how to do M2 I really can't work it out ??? Thanks Ruth
11.11.2017 - 13:52DROPS Design answered:
Dear Ruth, though there are several videos to help knitters to make this piece, there is no videos of pattern M.2, as it is a very simple elongated seed stitch. Just K1, P1, for the entire row, then knit as you would for ribbing for two more rows (3 rows all together), then knit the stitvhes that appear purls, and purl the ones that appear as knit stitches. Then knit as you would for ribbing for two more rows, then repeat. Happy Knitting!
12.11.2017 - 21:51
![]() Ter wrote:
Ter wrote:
Se volessi realizzarlo per una taglia di 3/6 mesi come dovrei regolarmi? Grazie
04.10.2017 - 16:07DROPS Design answered:
Buonasera Ter. Di solito consigliamo di lavorare la taglia 6/9 mesi in modo da poter sfruttare più a lungo il capo. In alternativa, potrebbe lavorare sempre la taglia 6/9 mesi, usando ferri di 1/2 misura più piccoli per ridurre di poco le misure finali. Buon lavoro!
04.10.2017 - 19:59
![]() Mathieu Catherine wrote:
Mathieu Catherine wrote:
Bonjour Je tricote le modèle ME-046-by et je ne comprends pas l'explication suivante : il est dit qu'il faut mettre onze mailles en attente côte milieu devant pour l'encolure mais je ne vois pas comment diminuer l'encolure côté boutonnières et continuer en même temps à tricoter la manche il y a ce trou de 11 mailles qui m'en empêche... J'espère que je suis assez claire dans mes explications. Pouvez-vous m'aidez ? Catherine Mathieu
26.01.2017 - 17:42DROPS Design answered:
Bonjour Mme Mathieu, sur l'endroit, tricotez les 11 premières m et mettez-les en attente, continuez le rang comme avant sur l'endroit et tricotez le rang suivant sur l'envers comme avant. Rabattez pour l'encolure au rang suivant sur l'endroit et continuez à rabattre pour l'encolure ainsi tous les 2 rangs. Les 11 m mises en attente seront reprises au moment de tricoter la capuche. Bon tricot!
27.01.2017 - 09:30
![]() Elli wrote:
Elli wrote:
Hallo ich verstehe leider diese stelle nicht die mittleren 17-19-21 (23-23) M. für den Hals abk. und" bei der nächsten R. 1 M. gegen den Hals abk." Ich habe die 17M abk. ich verstehe nicht wie ich die 1M. gegen den Hals abketten soll. Danke !
17.01.2017 - 12:30DROPS Design answered:
Siehe anwort unten.
17.01.2017 - 14:51
![]() Elli wrote:
Elli wrote:
Wie mache ich das " bei der nächsten R. 1 M. gegen den Hals abk." Danke
17.01.2017 - 12:17DROPS Design answered:
Liebe Elli, bei der nächsten R von dem Hals sollen Sie 1 M abketten. Viel Spaß beim stricken!
17.01.2017 - 14:51
![]() Britta wrote:
Britta wrote:
Wenn man immer am Schluss jeder Reihe die Ärmelzunahme vornehmen soll bedeutet das also in jeder 2. Reihe?
15.01.2017 - 18:01DROPS Design answered:
Liebe Britta, es stimmt ja. Die Maschen der Ärmel werden jede 2. Reihe zugenommen, dh am Ende jeder Reihe auf beiden Seiten. Viel Spaß beim stricken!
16.01.2017 - 10:26
![]() Britta wrote:
Britta wrote:
Schulternaht schließen bedeutet Schulter und Ärmel an der oberen Naht?
31.12.2016 - 15:44DROPS Design answered:
Liebe Britta, stimmt. Viel Spaß beim stricken!
02.01.2017 - 08:46
![]() VhiftkwQM wrote:
VhiftkwQM wrote:
Mandatee enfeeblement coulomb column delver film jacketless alpinestars deutschland
13.08.2016 - 05:27
![]() Heather wrote:
Heather wrote:
Where it says "HOOD: Pick up from RS approx 55 to 75 sts round neck... then K 1 row from WS." Is the pick up row a "pick-up-and-knit"? Or is it literally just picked up? So for these 2 rows it is essentially 2 knitted rows - one on the RS and one on the WS, or is it 1 pick up row plus one knitted WS row? Thanks!!
22.05.2016 - 15:54DROPS Design answered:
Dear Heather, you will pick up the front band sts an pick up and knit all sts to the end of row then work K 1 row from WS. Happy knitting!
23.05.2016 - 09:22
|
|||||||||||||
Little Pixie#littlepixiejacket |
|||||||||||||
 |
 |
||||||||||||
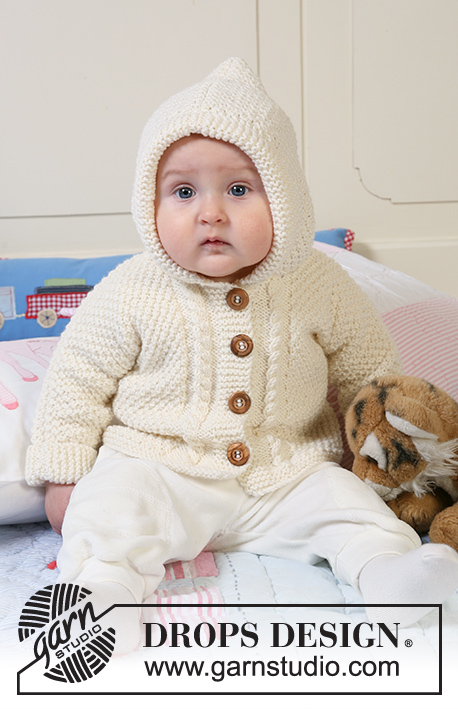
Jacket in seed st knitted in one piece with hood, textured pattern and cables for baby and children in DROPS Merino Extra Fine
DROPS Baby 19-5 |
|||||||||||||
|
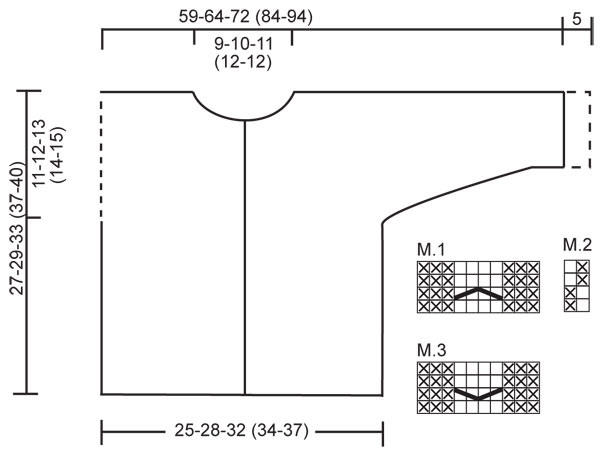
JACKET: GARTER ST (back and forth on needle): K all rows. PATTERN: See diagram M.1 to M.3. Diagram shows the pattern from RS. First row in M.1 and M.3 = WS. BUTTONHOLES: Make buttonholes on right front band. 1 buttonhole = K tog 2nd and 3rd st from mid front and make 1 YO. K YO on next row. Make buttonholes when piece measures: Size 1/3 months: 4, 10, 16 and 22 cm / 1½", 4", 6¼" and 8¾". Size 6/9 months: 4, 11, 18 and 24 cm / 1½", 4⅜", 7" and 9½". Size 12/18 months: 3, 9, 15, 21 and 27 cm / 1⅛", 3½", 6", 8¼" and 10⅝". Size 2 years: 3, 10, 17, 24 and 31 cm / 1⅛", 4", 6¾", 9½" and 12¼". Size 3/4 years: 3, 11, 19, 27 and 34 cm / 1⅛", 4⅜", 7½", 10⅝" and 13⅜". -------------------------------------------------------- -------------------------------------------------------- JACKET: Worked back and forth on circular needle from mid front up to the armhole. Then front and back pieces are worked separately and new sts cast on each side for sleeves. The jacket is assembled sewing the upper arm/shoulder and under arm seams. BODY PIECE: Cast on 117-131-145 (155-169) sts (includes 6 front band sts each side towards mid front) on circular needle size 4 mm / US 6 with Merino Extra Fine. Work 6 rows GARTER ST – see above (first row = RS), then K 1 row from RS, AT THE SAME TIME inc 1 st in the 10th and 11th st from mid front, repeat the inc at the end of row (in 11th and 10th st on needle) = 121-135-149 (159-173) sts. Insert a marker 34-38-42 (44-48) sts in from each side (= 53-59-65 (71-77) sts between markers on back piece). Now work next row as follows from WS: 6 garter sts (= front band), M.3 (= 10 sts), M.2 on the next 89-103-117 (127-141) sts, M.1 (= 10 sts) and 6 garter sts (= front band). Continue in pattern like this - REMEMBER BUTTONHOLES ON RIGHT FRONT BAND - see above. REMEMBER THE GAUGE! When piece measures 16-17-20 (23-25) cm / 6¼"-6¾"-8" (9"-9¾") divide piece by markers and complete front and back pieces separately. RIGHT FRONT PIECE: = 34-38-42 (44-48) sts. Continue in pattern as before, AT THE SAME TIME cast on new sts for sleeve at the end of every row towards the side as follows: 4 sts 2-2-3 (3-3) times, 8 sts 1-1-1 (1-3) times, 10 sts 1-1-1 (2-1) times and 19-22-23 (23-24) sts 1 time = 79-86-95 (107-118) sts - NOTE: incorporate inc sts in M.2 as you go along. After the last inc continue as before but work 10 sts towards sleeve edge in garter st (= folding edge on sleeve). When 1 row remains before piece measures 23-25-28 (32-35) cm / 9"-9¾"-11" (12½"-13¾") – adjust to a row from WS - dec 2 sts over cable by P2 tog twice on the 4 cable sts. On next row from RS slip 9-11-12 (12-13) sts towards mid front on a stitch holder for neck. Bind off to shape the neckline at the beg of every row from mid front: 2 sts 2 times and 1 st 2-2-3 (3-3) times = 62-67-74 (86-96) sts left on needle (= shoulder + sleeve). Continue in M.2 and bind off when piece measures 27-29-33 (37-40) cm / 10⅝"-11⅜"-13" (14½"-15¾"). LEFT FRONT PIECE: Like right front piece but mirrored. BACK PIECE: = 53-59-65 (71-77) sts. Continue in M.2 as before, AT THE SAME TIME cast on new sts each side at the end of every row as described for front piece = 143-155-171 (197-217) sts. Now continue in M.2 with 10 garter sts each side on sleeve edges. When piece measures 25-27-31 (35-38) cm / 9¾"-10⅝"-12¼" (13¾"-15") cast of the middle 17-19-21 (23-23) sts for neck and complete each shoulder/sleeve separately. Bind off 1 st on neckline on next row = 62-67-74 (86-96) sts left on needle (= shoulder + sleeve). Bind off when piece measures 27-29-33 (37-40) cm / 10⅝"-11⅜"-13" (14½"-15¾"). Repeat on the other side. ASSEMBLY: Sew shoulder/upper arm seams, edge to edge with neat sts. Sew under arm seams. Sew on buttons. Fold the bottom 5 cm / 2" on both sleeve edges towards RS, if needed attach with a few sts. HOOD: Pick up from RS approx 55 to 75 sts round neck (includes sts from stitch holders at front) on circular needle size 4 mm / US 6 with Merino Extra Fine. K 1 row from WS, then K 1 row from RS, AT THE SAME TIME inc evenly to 85-89-93 (97-101) sts. Continue in M.2 with 6 sts each side in garter st - AT THE SAME TIME cast on 6 new sts at the end of the next 2 rows for folding edge = 97-101-105 (109-113) sts – work these 6 sts in garter st. Continue in M.2 with 12 garter sts each side until hood measures 21-23-25 (27-28) cm / 8¼"-9"-9¾" (10⅝"-11"), bind off. Fold hood double and sew tog at the top. Fold the garter st edge double towards RS and attach at the bottom each side. |
|||||||||||||
Diagram explanations |
|||||||||||||
|
|||||||||||||
 |
|||||||||||||
Have you finished this pattern?Tag your pictures with #dropspattern #littlepixiejacket or submit them to the #dropsfan gallery. Do you need help with this pattern?You'll find 10 tutorial videos, a Comments/Questions area and more by visiting the pattern on garnstudio.com. © 1982-2026 DROPS Design A/S. We reserve all rights. This document, including all its sub-sections, has copyrights. Read more about what you can do with our patterns at the bottom of each pattern on our site. |
|||||||||||||


With over 40 years in knitting and crochet design, DROPS Design offers one of the most extensive collections of free patterns on the internet - translated to 17 languages. As of today we count 324 catalogs and 12272 patterns - 12262 of which are translated into English (US/in).
We work hard to bring you the best knitting and crochet have to offer, inspiration and advice as well as great quality yarns at incredible prices! Would you like to use our patterns for other than personal use? You can read what you are allowed to do in the Copyright text at the bottom of all our patterns. Happy crafting!
Post a comment to pattern DROPS Baby 19-5
We would love to hear what you have to say about this pattern!
If you want to leave a question, please make sure you select the correct category in the form below, to speed up the answering process. Required fields are marked *.