
Popular categories
Looking for a yarn?


Comments / Questions (125)
![]() Melanie wrote:
Melanie wrote:
Vergeet mijn vorige vraag maar.... was op t verkeerde been gezet, het is al duidelijk
20.02.2020 - 10:12DROPS Design answered:
Dag Melanie,
Oh, haha , ik zie nu pas deze opmerking. Bedankt voor de terugkoppeling en veel breiplezier!
20.02.2020 - 19:51
![]() Melanie wrote:
Melanie wrote:
Op de foto lijkt het babyjasje in gerstekorrel te zijn gebreid, maar het patroon zegt ribbelsteek.... Klopt dit wel?
19.02.2020 - 17:36DROPS Design answered:
Dag Melanie,
De boorden en biezen brei je in ribbelsteek, maar de rest brei je overwegen in Gerstekorrel volgens M.2. Bij elk onderdeel staat aangegeven wanneer je ribbelsteek breit en wanneer gerstelkorrel (en kabels).
20.02.2020 - 19:49
![]() Susanne Rupprecht wrote:
Susanne Rupprecht wrote:
Habe die Jacke mit Originalwolle in Größe 86/92 gestrickt und mich exakt an die Maschenanzahl gehalten. Bei der Kapuze in einer Höhe von 17 cm waren die angegebenen 350g verstrickt... (Ärgerlich, dass ein Knäuel nachbestellt werden muss). Für die nächste Größe ist die gleiche Menge vorgesehen - reicht definitiv nicht. Bitte entweder die Ärmellänge korrigieren (kommen mir sehr lang vor) oder Knäuelmenge erhöhen.
27.01.2020 - 14:48
![]() SHARON LHEUREUX wrote:
SHARON LHEUREUX wrote:
I am making Drops Baby 19-5 pattern. I am making Drops Design 19-5 . I do not understand directions Right Front Piece. It says to cast on new sts for sleeve at the end of every row towards the side as follows: What does "toward the side" mean?? Then you have a NOTE: Incorporate inc sts in M.2 as you go along. What inc sts are you talking about??
23.01.2020 - 00:20DROPS Design answered:
Hi Sharon, The cast on stitches are on the sleeve-side of the piece (at the end of the rows on that side) and the increased stitches you make are worked into pattern M.2 on the following rows. Hope this helps and happy knitting!
23.01.2020 - 07:14
![]() Gloria wrote:
Gloria wrote:
I just completed this sweater in size 12/18 mos. I swatched and measured as per the directions. The completed garment measures as it should. I ordered 6 skeins of the suggested yarn (300g) but ran out about 2” shy of the finished hood. I was lucky enough to find another skein in the same dye lot. However I would like to suggest knitters get 7 skeins for this size. It is no fun to run out. I am very happy with the finished product.
18.11.2019 - 02:24
![]() Anna wrote:
Anna wrote:
Buon giorno Quando devo chiudere le maglie delle maniche,si chiudono a punto riso? Grazie
30.09.2019 - 08:49DROPS Design answered:
Buongiorno Anna. Può chiudere le maglie a punto riso. Buon lavoro!
30.09.2019 - 15:45
![]() Anna wrote:
Anna wrote:
Buon giorno Sto lavorando la manica destra ,mi trovo in difficoltà quando avvio le 4 maglie al ferro di ritorno li lavoro a diritto e poi a punto riso? Mi sono confusa
26.09.2019 - 13:11DROPS Design answered:
Buongiorno Anna. Lavora le maglie aumentate per le maniche subito a punto riso. Buon lavoro!
26.09.2019 - 14:04
![]() Anna Maria wrote:
Anna Maria wrote:
Buon giorno m2 si lavora da destra verso sinistra il secondo rido sempre da destra verso sinistra o viceversa? Geazie
25.09.2019 - 11:23DROPS Design answered:
Buongiorno Anna Maria. Le righe lavorate sul rovescio del lavoro (quindi in questo caso anche la prima riga del diagramma che è lavorata sul rovescio) si leggono da sinistra verso destra. Le righe lavorate sul diritto del lavoro, si leggono da destra verso sinistra. Il diagramma inoltre è letto dal basso verso l'alto. Buon lavoro!
25.09.2019 - 11:33
![]() Anna wrote:
Anna wrote:
Buon giorno Sto lavorando la prima misura ,ho fatto sei giro a legaccio Non ho capito il diagramma
25.09.2019 - 08:04DROPS Design answered:
Buongiorno Anna. La prima riga dei diagrammi viene lavorata sul rovescio del lavoro, in questo modo: M3: 3 m diritto, 3 m rovescio, 3 m diritto; ripete M.2 (1 m diritto, 1 m rovescio) sulle 89 maglie successive; M1: 3 m diritto, 3 m rovescio, 3 m diritto. Buon lavoro!
25.09.2019 - 09:36
![]() Marja wrote:
Marja wrote:
Hoe ga ik op de rondbreinaald te werk zodra ik het werk moet gaan verdelen? Dus het rechtervoorpand moet gaan breien? Laat ik alle steken op de rondbreinaald staan? Of ga ik verder met een losse naald van 4 mm? Alvast bedankt voor je hulp! Groetjes, Marja
16.07.2019 - 10:36DROPS Design answered:
Dag Marja,
Je kan de steken van het achterpand (en de steken van het linker voorpand) op de rondbreinaald laten staan of op een hulpnaald zetten en de steken van het rechter voorpand heen en weer breien (met een rechte naald of een rondbreinaald.
22.07.2019 - 11:11
|
|||||||||||||
Little Pixie#littlepixiejacket |
|||||||||||||
 |
 |
||||||||||||
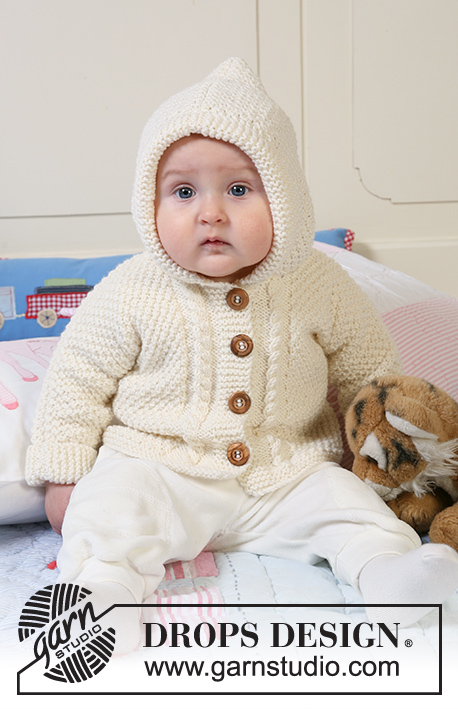
Jacket in seed st knitted in one piece with hood, textured pattern and cables for baby and children in DROPS Merino Extra Fine
DROPS Baby 19-5 |
|||||||||||||
|
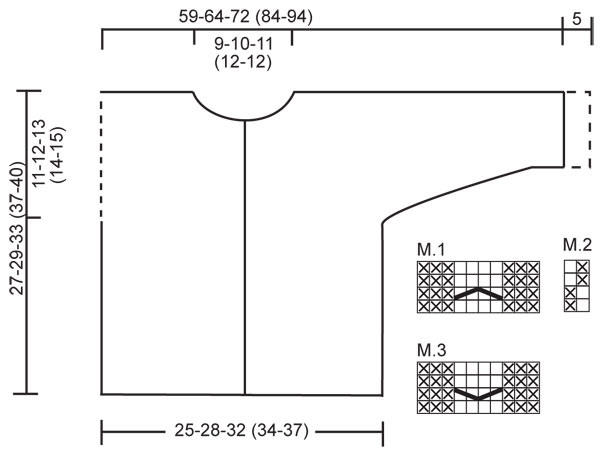
JACKET: GARTER ST (back and forth on needle): K all rows. PATTERN: See diagram M.1 to M.3. Diagram shows the pattern from RS. First row in M.1 and M.3 = WS. BUTTONHOLES: Make buttonholes on right front band. 1 buttonhole = K tog 2nd and 3rd st from mid front and make 1 YO. K YO on next row. Make buttonholes when piece measures: Size 1/3 months: 4, 10, 16 and 22 cm / 1½", 4", 6¼" and 8¾". Size 6/9 months: 4, 11, 18 and 24 cm / 1½", 4⅜", 7" and 9½". Size 12/18 months: 3, 9, 15, 21 and 27 cm / 1⅛", 3½", 6", 8¼" and 10⅝". Size 2 years: 3, 10, 17, 24 and 31 cm / 1⅛", 4", 6¾", 9½" and 12¼". Size 3/4 years: 3, 11, 19, 27 and 34 cm / 1⅛", 4⅜", 7½", 10⅝" and 13⅜". -------------------------------------------------------- -------------------------------------------------------- JACKET: Worked back and forth on circular needle from mid front up to the armhole. Then front and back pieces are worked separately and new sts cast on each side for sleeves. The jacket is assembled sewing the upper arm/shoulder and under arm seams. BODY PIECE: Cast on 117-131-145 (155-169) sts (includes 6 front band sts each side towards mid front) on circular needle size 4 mm / US 6 with Merino Extra Fine. Work 6 rows GARTER ST – see above (first row = RS), then K 1 row from RS, AT THE SAME TIME inc 1 st in the 10th and 11th st from mid front, repeat the inc at the end of row (in 11th and 10th st on needle) = 121-135-149 (159-173) sts. Insert a marker 34-38-42 (44-48) sts in from each side (= 53-59-65 (71-77) sts between markers on back piece). Now work next row as follows from WS: 6 garter sts (= front band), M.3 (= 10 sts), M.2 on the next 89-103-117 (127-141) sts, M.1 (= 10 sts) and 6 garter sts (= front band). Continue in pattern like this - REMEMBER BUTTONHOLES ON RIGHT FRONT BAND - see above. REMEMBER THE GAUGE! When piece measures 16-17-20 (23-25) cm / 6¼"-6¾"-8" (9"-9¾") divide piece by markers and complete front and back pieces separately. RIGHT FRONT PIECE: = 34-38-42 (44-48) sts. Continue in pattern as before, AT THE SAME TIME cast on new sts for sleeve at the end of every row towards the side as follows: 4 sts 2-2-3 (3-3) times, 8 sts 1-1-1 (1-3) times, 10 sts 1-1-1 (2-1) times and 19-22-23 (23-24) sts 1 time = 79-86-95 (107-118) sts - NOTE: incorporate inc sts in M.2 as you go along. After the last inc continue as before but work 10 sts towards sleeve edge in garter st (= folding edge on sleeve). When 1 row remains before piece measures 23-25-28 (32-35) cm / 9"-9¾"-11" (12½"-13¾") – adjust to a row from WS - dec 2 sts over cable by P2 tog twice on the 4 cable sts. On next row from RS slip 9-11-12 (12-13) sts towards mid front on a stitch holder for neck. Bind off to shape the neckline at the beg of every row from mid front: 2 sts 2 times and 1 st 2-2-3 (3-3) times = 62-67-74 (86-96) sts left on needle (= shoulder + sleeve). Continue in M.2 and bind off when piece measures 27-29-33 (37-40) cm / 10⅝"-11⅜"-13" (14½"-15¾"). LEFT FRONT PIECE: Like right front piece but mirrored. BACK PIECE: = 53-59-65 (71-77) sts. Continue in M.2 as before, AT THE SAME TIME cast on new sts each side at the end of every row as described for front piece = 143-155-171 (197-217) sts. Now continue in M.2 with 10 garter sts each side on sleeve edges. When piece measures 25-27-31 (35-38) cm / 9¾"-10⅝"-12¼" (13¾"-15") cast of the middle 17-19-21 (23-23) sts for neck and complete each shoulder/sleeve separately. Bind off 1 st on neckline on next row = 62-67-74 (86-96) sts left on needle (= shoulder + sleeve). Bind off when piece measures 27-29-33 (37-40) cm / 10⅝"-11⅜"-13" (14½"-15¾"). Repeat on the other side. ASSEMBLY: Sew shoulder/upper arm seams, edge to edge with neat sts. Sew under arm seams. Sew on buttons. Fold the bottom 5 cm / 2" on both sleeve edges towards RS, if needed attach with a few sts. HOOD: Pick up from RS approx 55 to 75 sts round neck (includes sts from stitch holders at front) on circular needle size 4 mm / US 6 with Merino Extra Fine. K 1 row from WS, then K 1 row from RS, AT THE SAME TIME inc evenly to 85-89-93 (97-101) sts. Continue in M.2 with 6 sts each side in garter st - AT THE SAME TIME cast on 6 new sts at the end of the next 2 rows for folding edge = 97-101-105 (109-113) sts – work these 6 sts in garter st. Continue in M.2 with 12 garter sts each side until hood measures 21-23-25 (27-28) cm / 8¼"-9"-9¾" (10⅝"-11"), bind off. Fold hood double and sew tog at the top. Fold the garter st edge double towards RS and attach at the bottom each side. |
|||||||||||||
Diagram explanations |
|||||||||||||
|
|||||||||||||
 |
|||||||||||||
Have you finished this pattern?Tag your pictures with #dropspattern #littlepixiejacket or submit them to the #dropsfan gallery. Do you need help with this pattern?You'll find 10 tutorial videos, a Comments/Questions area and more by visiting the pattern on garnstudio.com. © 1982-2026 DROPS Design A/S. We reserve all rights. This document, including all its sub-sections, has copyrights. Read more about what you can do with our patterns at the bottom of each pattern on our site. |
|||||||||||||


With over 40 years in knitting and crochet design, DROPS Design offers one of the most extensive collections of free patterns on the internet - translated to 17 languages. As of today we count 324 catalogs and 12272 patterns - 12262 of which are translated into English (US/in).
We work hard to bring you the best knitting and crochet have to offer, inspiration and advice as well as great quality yarns at incredible prices! Would you like to use our patterns for other than personal use? You can read what you are allowed to do in the Copyright text at the bottom of all our patterns. Happy crafting!
Post a comment to pattern DROPS Baby 19-5
We would love to hear what you have to say about this pattern!
If you want to leave a question, please make sure you select the correct category in the form below, to speed up the answering process. Required fields are marked *.