
Popular categories
Looking for a yarn?


Comments / Questions (125)
![]() Lisette wrote:
Lisette wrote:
Should sleeves height on front and back be the same?
15.02.2021 - 16:16DROPS Design answered:
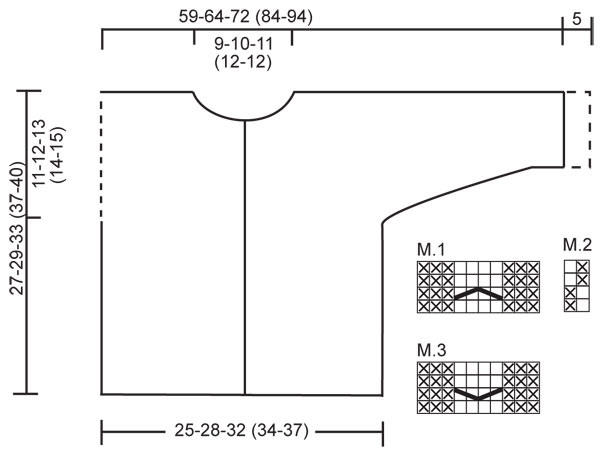
Dear Lisette, yes sleeves should have same height, you divide piece (body) when it measures 16-17-20 (23-25) cm, you then work each piece separately casting on the new stitches for sleeve and cast off all stitches for sleeve/shoulder when piece measures 27-29-33 (37-40) cm. Happy knitting!
16.02.2021 - 08:47
![]() Lisette wrote:
Lisette wrote:
I have been trying to figure out what the length of the sleeve will be. I am knitting size 2 yrs, if i go by the diagram the length of the sleeve would be after substraction of body and cuff of sleeve, 50 cm. That is very long sleeve?? Am I calculating this wrong ??
05.02.2021 - 16:28DROPS Design answered:
Dear Lisette, in 2 years you will cast on: 4 sts x 3 + 8 sts x 1 + 10 sts x 2 + 23 sts x 1 = 63 sts = 30 cm if your tension is correct - the 5 cm at the bottom of sleeves will be folded from RS = sleeve will be 25 cm. Hope this helps. Happy knitting!
08.02.2021 - 07:35
![]() Jutta Kotamäki wrote:
Jutta Kotamäki wrote:
Hei, teen oikeaa etukappaletta. Mitkä ovat keskiedun uloimmat silmukat?
16.01.2021 - 16:56DROPS Design answered:
Hei, nämä silmukat ovat etureunan reunimmaiset silmukat. Hihan silmukat luotiin vastakkaiseen reunaan, eli sivuun.
12.03.2021 - 13:23
![]() Carolyn wrote:
Carolyn wrote:
When working on the sleeve ... "work 10 sts towards sleeve edge in garter st" ... is this garter stich for the cuff part of the sleeve at the bottom of the sleeve?
04.01.2021 - 18:05DROPS Design answered:
Hi Carolyn, Yes that is correct, the garter stitch section will be the cuff when the jacket is assembled. Happy knitting!
05.01.2021 - 06:59
![]() Ulla Hein wrote:
Ulla Hein wrote:
Der er ikke nok garn til str. 3/4 år. Der er mindst 2 nøgler for lidt. Str og strikkefasthed passer. Jeg kan se at i har fået tilsvarende kommentarer. Er det svært at ændre i opskriften? I øvrigt en meget populær model. Hos os hedder den "Trøjen". Med venlig hilsen Ulla Hein
18.11.2020 - 19:41
![]() Veronica Pavel wrote:
Veronica Pavel wrote:
Rabattre ensuite pour l'encolure en début de rang, tous les rangs à partir du milieu devant : 2 fois 2 m et 2-2-3 (3-3) fois 1 m Je suis un peu bloquee concernant la technique pour rabatrre. Pourriez vous svp m'aider? Je vous remercie!
17.10.2020 - 14:04DROPS Design answered:
Bonjour Mme Pavel, pour le devant droit, vous tricotez d'abord les 9-11-12 (12-13) premières mailles sur l'endroit et les glissez en attente, terminez le rang sur l'endroit, tournez et tricotez le rang sur l'envers, tournez et rabattez maintenant en début de rang sur l'endroit: 2 x 2 m (= 2 mailles au début des 2 rangs sur l'endroit suivants) et 2-2-3 (3-3) fois 1 m (= 1 m au début des 2 ou 3 rangs sur l'endroit suivants). Pour le devant gauche, vous mettrez les mailles en attente et rabattrez pour l'encolure en début de rang sur l'envers. Bon tricot!
19.10.2020 - 10:21
![]() Vibeke Marschall wrote:
Vibeke Marschall wrote:
Hvorfor er der ikke garn nok. der mangler 1 ngl. surt
24.05.2020 - 15:05DROPS Design answered:
Hej Vibeke, det har vi ikke hørt før... Det skal vi se på, men for at kunne gøre det er vi nødt til at spørge om følgende: Hvilken størrelse strikker du? Strikker du i DROPS Merino Extra Fine? Hvor mange masker har du på 10x10 cm?
26.05.2020 - 15:06
![]() Maria-Magdalena wrote:
Maria-Magdalena wrote:
Was machen ich denn mit den 10 Maschen die ich beim Ärmel auf eine Hilfsnadel gelegt habe?
29.03.2020 - 19:53DROPS Design answered:
Liebe Marie-Magdalena, die 10 stillgelgten Maschen beim Vorderteil sind die Blende-Maschen + die 4 nächsten Maschen, die sind für Halsausschnitt stillgelegt und später bei der Kapuze gestrickt. Viel Spaß beim stricken!
30.03.2020 - 11:45
![]() Kathryn Royles wrote:
Kathryn Royles wrote:
Can this pattern be done using normal needles instead of a circular needle?
17.03.2020 - 15:45DROPS Design answered:
Dear Mrs Royles, yes it can - we use here a circular needle to get enough room for all stitches - read more here. Happy knitting!
17.03.2020 - 16:42
![]() Kathryn Royles wrote:
Kathryn Royles wrote:
What does m.1 to m.3 mean in this pattern please?
05.03.2020 - 13:29DROPS Design answered:
Dear Mrs Royles, M.1, M.2 and M.3 refer to the diagrams for the pattern (cables = M.1 and M.3, double seed stitch in height = M.2) - read more about diagrams here. Happy knitting!
05.03.2020 - 14:14
|
|||||||||||||
Little Pixie#littlepixiejacket |
|||||||||||||
 |
 |
||||||||||||
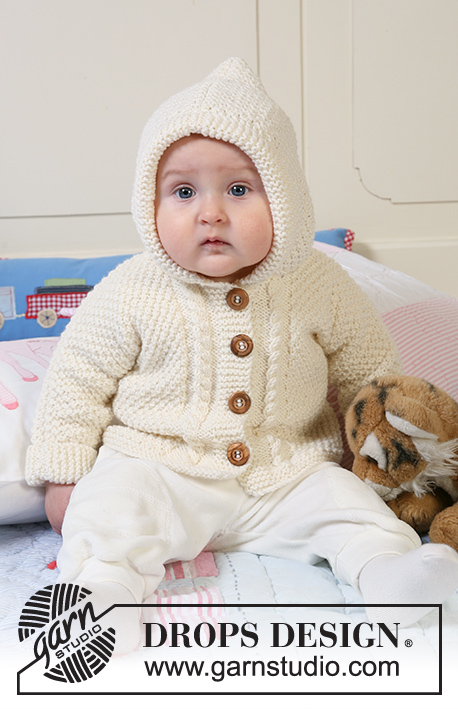
Jacket in seed st knitted in one piece with hood, textured pattern and cables for baby and children in DROPS Merino Extra Fine
DROPS Baby 19-5 |
|||||||||||||
|
JACKET: GARTER ST (back and forth on needle): K all rows. PATTERN: See diagram M.1 to M.3. Diagram shows the pattern from RS. First row in M.1 and M.3 = WS. BUTTONHOLES: Make buttonholes on right front band. 1 buttonhole = K tog 2nd and 3rd st from mid front and make 1 YO. K YO on next row. Make buttonholes when piece measures: Size 1/3 months: 4, 10, 16 and 22 cm / 1½", 4", 6¼" and 8¾". Size 6/9 months: 4, 11, 18 and 24 cm / 1½", 4⅜", 7" and 9½". Size 12/18 months: 3, 9, 15, 21 and 27 cm / 1⅛", 3½", 6", 8¼" and 10⅝". Size 2 years: 3, 10, 17, 24 and 31 cm / 1⅛", 4", 6¾", 9½" and 12¼". Size 3/4 years: 3, 11, 19, 27 and 34 cm / 1⅛", 4⅜", 7½", 10⅝" and 13⅜". -------------------------------------------------------- -------------------------------------------------------- JACKET: Worked back and forth on circular needle from mid front up to the armhole. Then front and back pieces are worked separately and new sts cast on each side for sleeves. The jacket is assembled sewing the upper arm/shoulder and under arm seams. BODY PIECE: Cast on 117-131-145 (155-169) sts (includes 6 front band sts each side towards mid front) on circular needle size 4 mm / US 6 with Merino Extra Fine. Work 6 rows GARTER ST – see above (first row = RS), then K 1 row from RS, AT THE SAME TIME inc 1 st in the 10th and 11th st from mid front, repeat the inc at the end of row (in 11th and 10th st on needle) = 121-135-149 (159-173) sts. Insert a marker 34-38-42 (44-48) sts in from each side (= 53-59-65 (71-77) sts between markers on back piece). Now work next row as follows from WS: 6 garter sts (= front band), M.3 (= 10 sts), M.2 on the next 89-103-117 (127-141) sts, M.1 (= 10 sts) and 6 garter sts (= front band). Continue in pattern like this - REMEMBER BUTTONHOLES ON RIGHT FRONT BAND - see above. REMEMBER THE GAUGE! When piece measures 16-17-20 (23-25) cm / 6¼"-6¾"-8" (9"-9¾") divide piece by markers and complete front and back pieces separately. RIGHT FRONT PIECE: = 34-38-42 (44-48) sts. Continue in pattern as before, AT THE SAME TIME cast on new sts for sleeve at the end of every row towards the side as follows: 4 sts 2-2-3 (3-3) times, 8 sts 1-1-1 (1-3) times, 10 sts 1-1-1 (2-1) times and 19-22-23 (23-24) sts 1 time = 79-86-95 (107-118) sts - NOTE: incorporate inc sts in M.2 as you go along. After the last inc continue as before but work 10 sts towards sleeve edge in garter st (= folding edge on sleeve). When 1 row remains before piece measures 23-25-28 (32-35) cm / 9"-9¾"-11" (12½"-13¾") – adjust to a row from WS - dec 2 sts over cable by P2 tog twice on the 4 cable sts. On next row from RS slip 9-11-12 (12-13) sts towards mid front on a stitch holder for neck. Bind off to shape the neckline at the beg of every row from mid front: 2 sts 2 times and 1 st 2-2-3 (3-3) times = 62-67-74 (86-96) sts left on needle (= shoulder + sleeve). Continue in M.2 and bind off when piece measures 27-29-33 (37-40) cm / 10⅝"-11⅜"-13" (14½"-15¾"). LEFT FRONT PIECE: Like right front piece but mirrored. BACK PIECE: = 53-59-65 (71-77) sts. Continue in M.2 as before, AT THE SAME TIME cast on new sts each side at the end of every row as described for front piece = 143-155-171 (197-217) sts. Now continue in M.2 with 10 garter sts each side on sleeve edges. When piece measures 25-27-31 (35-38) cm / 9¾"-10⅝"-12¼" (13¾"-15") cast of the middle 17-19-21 (23-23) sts for neck and complete each shoulder/sleeve separately. Bind off 1 st on neckline on next row = 62-67-74 (86-96) sts left on needle (= shoulder + sleeve). Bind off when piece measures 27-29-33 (37-40) cm / 10⅝"-11⅜"-13" (14½"-15¾"). Repeat on the other side. ASSEMBLY: Sew shoulder/upper arm seams, edge to edge with neat sts. Sew under arm seams. Sew on buttons. Fold the bottom 5 cm / 2" on both sleeve edges towards RS, if needed attach with a few sts. HOOD: Pick up from RS approx 55 to 75 sts round neck (includes sts from stitch holders at front) on circular needle size 4 mm / US 6 with Merino Extra Fine. K 1 row from WS, then K 1 row from RS, AT THE SAME TIME inc evenly to 85-89-93 (97-101) sts. Continue in M.2 with 6 sts each side in garter st - AT THE SAME TIME cast on 6 new sts at the end of the next 2 rows for folding edge = 97-101-105 (109-113) sts – work these 6 sts in garter st. Continue in M.2 with 12 garter sts each side until hood measures 21-23-25 (27-28) cm / 8¼"-9"-9¾" (10⅝"-11"), bind off. Fold hood double and sew tog at the top. Fold the garter st edge double towards RS and attach at the bottom each side. |
|||||||||||||
Diagram explanations |
|||||||||||||
|
|||||||||||||
 |
|||||||||||||
Have you finished this pattern?Tag your pictures with #dropspattern #littlepixiejacket or submit them to the #dropsfan gallery. Do you need help with this pattern?You'll find 10 tutorial videos, a Comments/Questions area and more by visiting the pattern on garnstudio.com. © 1982-2026 DROPS Design A/S. We reserve all rights. This document, including all its sub-sections, has copyrights. Read more about what you can do with our patterns at the bottom of each pattern on our site. |
|||||||||||||


With over 40 years in knitting and crochet design, DROPS Design offers one of the most extensive collections of free patterns on the internet - translated to 17 languages. As of today we count 324 catalogs and 12272 patterns - 12262 of which are translated into English (US/in).
We work hard to bring you the best knitting and crochet have to offer, inspiration and advice as well as great quality yarns at incredible prices! Would you like to use our patterns for other than personal use? You can read what you are allowed to do in the Copyright text at the bottom of all our patterns. Happy crafting!
Post a comment to pattern DROPS Baby 19-5
We would love to hear what you have to say about this pattern!
If you want to leave a question, please make sure you select the correct category in the form below, to speed up the answering process. Required fields are marked *.