
Popular categories
Looking for a yarn?


Comments / Questions (125)
![]() Lis Pedersen wrote:
Lis Pedersen wrote:
Trøjen bliver utrolig stor og løs i det når den har været vasket, selv om strikkefastheden er overholdt.Prøv evt. med noget andet garn.
26.03.2013 - 21:52Gudrun wrote:
Die "äusseren" steht es doch! Also am Ende des Ärmels!
08.03.2013 - 17:51
![]() Judith wrote:
Judith wrote:
Wie ich sehe, wurde diese Frage schon zwei Mal gestellt, aber nie beantwortet. Da ich das Garn über Ihre Website online gekauft habe, kann ich auch nicht in einen Laden gehen und dort um Hilfe bitten. Es handelt sich auch nur um eine Zeile, die mir nicht verständlich wird. "Mit dem Muster weiterfahren und die untersten 10. M in Krausrippe stricken".
08.03.2013 - 16:15DROPS Design answered:
Hallo Judith , ich bin nicht ganz sicher, welche Stelle Sie meinen, aber ich vermute folgende: die die äußeren 10 M. an der Ärmelkante in Krausrippe stricken ergeben zum Schluss das Ärmelbündchen, das umgeschlagen wird. Übrigens geben auch unsere Onlineshops gerne Auskunft, wenn Sie Fragen zu den Modellen haben.
11.03.2013 - 10:04
![]() Joukje wrote:
Joukje wrote:
Hebben jullie ook een patroon voor twee naalden te breien,dat is er haast niet bij jullie.zou dat kunnen. mvg joukje
06.02.2013 - 12:07DROPS Design answered:
Zo ongeveer de helft van onze patronen worden heen en weer gebreid - dus ze zijn er wel ;o) Dit patroon wordt ook heen en weer gebreid, dus je kan hier ook een rechte naald gebruiken. We gebruiken eigenlijk alleen maar rondbreinaalden in Scandinavië (ook voor heen en weer) en je kan veel meer st kwijt op deze. Vaak kan je ook een patroon aanpassen voor heen en weer breien. Veel plezier.
06.02.2013 - 15:28Teres wrote:
I find it very difficult to assemble the sleeves with an invisible seam in this kind of pattern. Any ints?
26.12.2012 - 07:18
![]() Angela wrote:
Angela wrote:
Non riesco a capire come si formano le maniche trovo difficoltà potreste aiutarmi? sono una nonna in attesa del primo nipotino grazie Angela
22.11.2012 - 12:06DROPS Design answered:
Le maniche si lavorano insieme ai davanti e il dietro; una volta finito il corpo, c'è scritto (nelle spiegazioni del DAVANTI) di avviare nuove maglie per la manica alla fine di ogni f al lato. 4 m per 2-2-3 (3-3) volte, 8 m per 1-1-1 (1-3) volte, 10 m per 1-1-1 (2-1) volte e 19-22-23 (23-24) m per 1 volta = 79-86-95 (107-118) m (a seconda della misura che ha scelto).
24.11.2012 - 07:41
![]() Petra wrote:
Petra wrote:
Hej Drops! Diagrammet är inte särskilt tydligt, pga det raka strecket neråt. Att måtten inkluderar bägge ärmarna, hurså... Jfr t.ex. Babydrops 10:10 och andra med bättre lösningar.
11.10.2012 - 19:07
![]() Yvonne wrote:
Yvonne wrote:
Hallo ich habe diese Jacke für meine Enkelin in Größe 74/80. Leider ist es doch noch zu groß für sie gewesen. Aber eines liegt gewiss nicht daran das die Jacke noch zu groß ist. Die Ärmel sind viel zu lang. Im nach hinein habe ich mal die Zeichnung der Jacke angeshcaut und verglichen mit andere Jacken. Bei diese Jacke ist ein Ärmel 40cm lang, bei anderen (z.B model ME-035) ca. 14-15cm. Da stimmt wohl etwas nicht oder verstehe ich das falsch.
09.10.2012 - 18:55DROPS Design answered:
Liebe Yvonne, ich fürchte da haben Sie etwas falsch verstanden. Die obere Zahl ist inklusive beider Ärmel. Das Maß sollte entstehen, wenn Sie die Maschenprobe berücksichtigen und sich genau an die Anleitung halten.
10.10.2012 - 08:26
![]() Heike Dürrschmidt wrote:
Heike Dürrschmidt wrote:
Was bedeutet "am Schluss jeder R. gegen die Seite neue M. für den Ärmel anschlagen: 4 M. 2-2-3 (3-3) Mal, 8 M. 1-1-1 (1-3) Mal, 10 M. 1-1-1 (2-1) Mal und 19-22-23 (23-24) M. 1 Mal = 79-86-95 (107-118) M. – die neuen M. werden ins Muster eingestrickt. Mit dem Muster weiterfahren und die untersten 10 M. in Krausrippe stricken"
11.09.2012 - 05:14DROPS Design answered:
Dürfen wir Sie bitten, sich für individuelle Strickhilfe an den Laden zu wenden, in dem Sie die Wolle gekauft haben? Vielen Dank für Ihr Verständnis!
11.09.2012 - 07:43
![]() Sabrina wrote:
Sabrina wrote:
Was bedeutet "am Schluss jeder R. gegen die Seite neue M. für den Ärmel anschlagen: 4 M. 2-2-3 (3-3) Mal, 8 M. 1-1-1 (1-3) Mal, 10 M. 1-1-1 (2-1) Mal und 19-22-23 (23-24) M. 1 Mal = 79-86-95 (107-118) M. – die neuen M. werden ins Muster eingestrickt. Mit dem Muster weiterfahren und die untersten 10 M. in Krausrippe stricken"
09.07.2012 - 18:36DROPS Design answered:
Es war etwas unverständlich formuliert, vielelicht ist es jetzt klarer.
10.07.2012 - 17:09
|
|||||||||||||
Little Pixie#littlepixiejacket |
|||||||||||||
 |
 |
||||||||||||
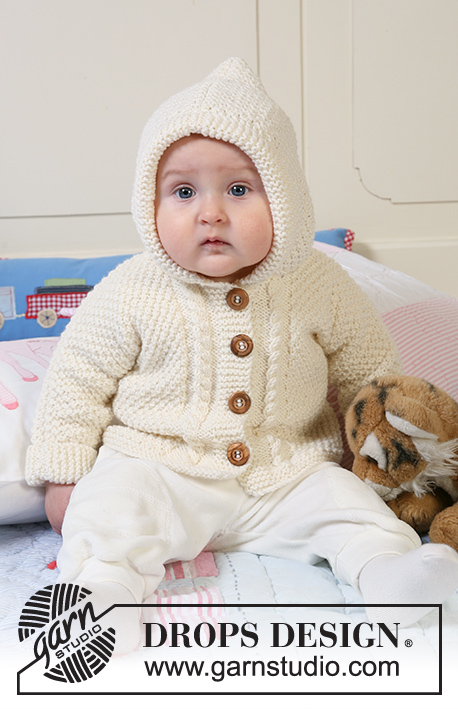
Jacket in seed st knitted in one piece with hood, textured pattern and cables for baby and children in DROPS Merino Extra Fine
DROPS Baby 19-5 |
|||||||||||||
|
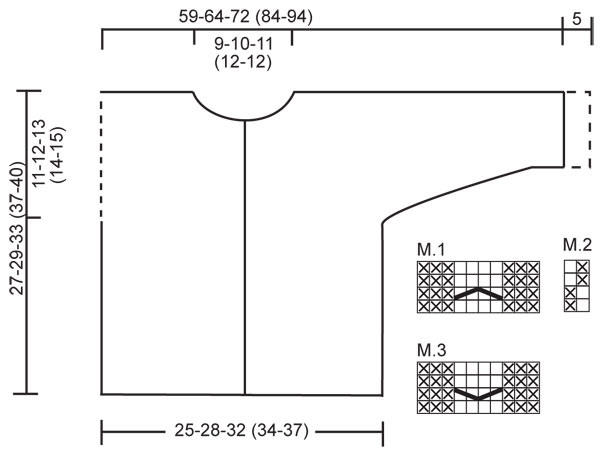
JACKET: GARTER ST (back and forth on needle): K all rows. PATTERN: See diagram M.1 to M.3. Diagram shows the pattern from RS. First row in M.1 and M.3 = WS. BUTTONHOLES: Make buttonholes on right front band. 1 buttonhole = K tog 2nd and 3rd st from mid front and make 1 YO. K YO on next row. Make buttonholes when piece measures: Size 1/3 months: 4, 10, 16 and 22 cm / 1½", 4", 6¼" and 8¾". Size 6/9 months: 4, 11, 18 and 24 cm / 1½", 4⅜", 7" and 9½". Size 12/18 months: 3, 9, 15, 21 and 27 cm / 1⅛", 3½", 6", 8¼" and 10⅝". Size 2 years: 3, 10, 17, 24 and 31 cm / 1⅛", 4", 6¾", 9½" and 12¼". Size 3/4 years: 3, 11, 19, 27 and 34 cm / 1⅛", 4⅜", 7½", 10⅝" and 13⅜". -------------------------------------------------------- -------------------------------------------------------- JACKET: Worked back and forth on circular needle from mid front up to the armhole. Then front and back pieces are worked separately and new sts cast on each side for sleeves. The jacket is assembled sewing the upper arm/shoulder and under arm seams. BODY PIECE: Cast on 117-131-145 (155-169) sts (includes 6 front band sts each side towards mid front) on circular needle size 4 mm / US 6 with Merino Extra Fine. Work 6 rows GARTER ST – see above (first row = RS), then K 1 row from RS, AT THE SAME TIME inc 1 st in the 10th and 11th st from mid front, repeat the inc at the end of row (in 11th and 10th st on needle) = 121-135-149 (159-173) sts. Insert a marker 34-38-42 (44-48) sts in from each side (= 53-59-65 (71-77) sts between markers on back piece). Now work next row as follows from WS: 6 garter sts (= front band), M.3 (= 10 sts), M.2 on the next 89-103-117 (127-141) sts, M.1 (= 10 sts) and 6 garter sts (= front band). Continue in pattern like this - REMEMBER BUTTONHOLES ON RIGHT FRONT BAND - see above. REMEMBER THE GAUGE! When piece measures 16-17-20 (23-25) cm / 6¼"-6¾"-8" (9"-9¾") divide piece by markers and complete front and back pieces separately. RIGHT FRONT PIECE: = 34-38-42 (44-48) sts. Continue in pattern as before, AT THE SAME TIME cast on new sts for sleeve at the end of every row towards the side as follows: 4 sts 2-2-3 (3-3) times, 8 sts 1-1-1 (1-3) times, 10 sts 1-1-1 (2-1) times and 19-22-23 (23-24) sts 1 time = 79-86-95 (107-118) sts - NOTE: incorporate inc sts in M.2 as you go along. After the last inc continue as before but work 10 sts towards sleeve edge in garter st (= folding edge on sleeve). When 1 row remains before piece measures 23-25-28 (32-35) cm / 9"-9¾"-11" (12½"-13¾") – adjust to a row from WS - dec 2 sts over cable by P2 tog twice on the 4 cable sts. On next row from RS slip 9-11-12 (12-13) sts towards mid front on a stitch holder for neck. Bind off to shape the neckline at the beg of every row from mid front: 2 sts 2 times and 1 st 2-2-3 (3-3) times = 62-67-74 (86-96) sts left on needle (= shoulder + sleeve). Continue in M.2 and bind off when piece measures 27-29-33 (37-40) cm / 10⅝"-11⅜"-13" (14½"-15¾"). LEFT FRONT PIECE: Like right front piece but mirrored. BACK PIECE: = 53-59-65 (71-77) sts. Continue in M.2 as before, AT THE SAME TIME cast on new sts each side at the end of every row as described for front piece = 143-155-171 (197-217) sts. Now continue in M.2 with 10 garter sts each side on sleeve edges. When piece measures 25-27-31 (35-38) cm / 9¾"-10⅝"-12¼" (13¾"-15") cast of the middle 17-19-21 (23-23) sts for neck and complete each shoulder/sleeve separately. Bind off 1 st on neckline on next row = 62-67-74 (86-96) sts left on needle (= shoulder + sleeve). Bind off when piece measures 27-29-33 (37-40) cm / 10⅝"-11⅜"-13" (14½"-15¾"). Repeat on the other side. ASSEMBLY: Sew shoulder/upper arm seams, edge to edge with neat sts. Sew under arm seams. Sew on buttons. Fold the bottom 5 cm / 2" on both sleeve edges towards RS, if needed attach with a few sts. HOOD: Pick up from RS approx 55 to 75 sts round neck (includes sts from stitch holders at front) on circular needle size 4 mm / US 6 with Merino Extra Fine. K 1 row from WS, then K 1 row from RS, AT THE SAME TIME inc evenly to 85-89-93 (97-101) sts. Continue in M.2 with 6 sts each side in garter st - AT THE SAME TIME cast on 6 new sts at the end of the next 2 rows for folding edge = 97-101-105 (109-113) sts – work these 6 sts in garter st. Continue in M.2 with 12 garter sts each side until hood measures 21-23-25 (27-28) cm / 8¼"-9"-9¾" (10⅝"-11"), bind off. Fold hood double and sew tog at the top. Fold the garter st edge double towards RS and attach at the bottom each side. |
|||||||||||||
Diagram explanations |
|||||||||||||
|
|||||||||||||
 |
|||||||||||||
Have you finished this pattern?Tag your pictures with #dropspattern #littlepixiejacket or submit them to the #dropsfan gallery. Do you need help with this pattern?You'll find 10 tutorial videos, a Comments/Questions area and more by visiting the pattern on garnstudio.com. © 1982-2026 DROPS Design A/S. We reserve all rights. This document, including all its sub-sections, has copyrights. Read more about what you can do with our patterns at the bottom of each pattern on our site. |
|||||||||||||


With over 40 years in knitting and crochet design, DROPS Design offers one of the most extensive collections of free patterns on the internet - translated to 17 languages. As of today we count 324 catalogs and 12272 patterns - 12262 of which are translated into English (US/in).
We work hard to bring you the best knitting and crochet have to offer, inspiration and advice as well as great quality yarns at incredible prices! Would you like to use our patterns for other than personal use? You can read what you are allowed to do in the Copyright text at the bottom of all our patterns. Happy crafting!
Post a comment to pattern DROPS Baby 19-5
We would love to hear what you have to say about this pattern!
If you want to leave a question, please make sure you select the correct category in the form below, to speed up the answering process. Required fields are marked *.