
Popular categories
Looking for a yarn?


Comments / Questions (125)
![]() Luce wrote:
Luce wrote:
Bonjour Je viens de commencer ce modèle (sur aiguilles droites). Après les 6 rangs endroit, j'ai fait le premier rang envers avec les torsades et le point fantaisie comme indiqué, mais je bloque sur le rang suivant à l'endroit. Est-ce que je dois faire ce rang comme le précédent? ou dois-je faire que le point fantaisie après les mailles de bordure ? ou tout à l'endroit????? Merci de votre prompte réponse.
29.05.2015 - 20:02DROPS Design answered:
Bonjour Luce, au 1er rang point fantaisie sur l'endroit, continuez les diagrammes commencés au 1er rang, avec les bordures comme avant, soit: 6 point mousse (= bordure devant), M.1 (= 10 m), M.2 sur les 89-103-117 (127-141) m suivantes, M.3 (= 10 m) et 6 m point mousse (= bordure devant). Dans les diagrammes, le 1er rang et tous les rangs impairs sont sur l'envers (on lit alors de gauche à droite - commencez en bas à gauche du diagramme), et le 2ème rang et tous les rangs pairs se lisent de droite à gauche. Bon tricot!
30.05.2015 - 14:42
![]() Djaouida wrote:
Djaouida wrote:
Vous dites pour la première parties, lorsqu'on finis les augmentation de la Manchu, au début du rang, on met en attente les 9 premières millers. Et apres commenced les diminution pour l'encolure. Quoi faire avec les m. en attested?
10.02.2015 - 18:32DROPS Design answered:
Bonjour Djaouida, les 9 m en attente pour l'encolure seront reprises ensuite pour tricoter la capuche: on reprend les m en attente et on relève les mailles tout autour de l'encolure. Bon tricot!
11.02.2015 - 09:03
![]() Kai Aasmaa wrote:
Kai Aasmaa wrote:
Miks on kirjutatud, et kampsun pärlkoes, õpetus aga ripskoes?
04.02.2015 - 14:22DROPS Design answered:
Põhikude on topeltpärlkude, näidatud skeemil M.2.
06.02.2015 - 13:39
![]() Teresa wrote:
Teresa wrote:
Buongiorno, il video lo avevo già visto quindi gli occhielli vanno bene. Ma a questo punto mi viene da chiedere:"devo fare prima il davanti destro e mettere in sospeso il resto delle maglie"?. Non so proprio dove sbaglio. Chiedo scusa per il disturbo ma è la prima volta che faccio un lavoro del genere, pensavo di riuscirci e adesso non vorrei lasciarlo. Ringraziando ancora, auguro una buona giornata.
30.01.2015 - 11:32DROPS Design answered:
Buongiorno Teresa. Sì esatto, deve lavorare un pezzo alla volta. Lavori prima il davanti destro, e lasci le altre maglie in attesa su dei ferma maglie o su dei fili di scarto. Continua poi con il davanti sinistro (lasciando il dietro sempre in sospeso); e poi lavora il dietro. Eventuali piccole imperfezioni negli aumenti si possono correggere quando cuce le maniche insieme. Buon lavoro!
30.01.2015 - 12:13
![]() Teresa wrote:
Teresa wrote:
Buonasera, devo iniziare le maniche del lavoro ma sto trovando delle difficoltà. Innanzitutto i davanti e il dietro devono essere lavorati separatamente o li porto insieme sul ferro? Gli aumenti delle maniche devono essere fatti alla fine di ogni ferro verso il lato, quindi ogni due ferri?
28.01.2015 - 17:43DROPS Design answered:
Buonasera Teresa. Quando lavora le maniche, i davanti e il dietro vengono lavorati separatamente. Gli aumenti per le maniche vengono fatti ogni due ferri. Ci riscriva se incontra altre difficoltà. Buon lavoro!
28.01.2015 - 18:44
![]() Teresa wrote:
Teresa wrote:
Buonasera, Vorrei un chiarimento sul motivo della treccia nei diagrammi M.1 e M.3. Le maglie, ad ogni lato della treccia, vengono lavorate a rovescio sul diritto del lavoro e a diritto sul rovescio del lavoro?Quindi a maglia rasata?
22.01.2015 - 21:08DROPS Design answered:
Buonasera Teresa, ha ragione, le maglie a lato della treccia vengono lavorate a rovescio sul diritto del lavoro e a diritto sul rovescio del lavoro, è maglia rasata rovescio, sul diritto del lavoro risultano come rovesci. Buon lavoro!
22.01.2015 - 22:31
![]() Teresa wrote:
Teresa wrote:
Grazie mille :D
20.01.2015 - 20:54
![]() Teresa wrote:
Teresa wrote:
I diagrammi (M.1,M.2,M.3) si leggono dall'angolo in basso verso l'alto e da destra verso sinistra?
20.01.2015 - 14:46DROPS Design answered:
Buonasera Teresa, i diagrammi si leggono dal basso verso l'alto, da destra verso sinistra. Buon lavoro!
20.01.2015 - 18:32Katia wrote:
Hello Could you please precise if it is correct that the third line of the m1 and m3 (cable part - 4 middle sts) havé to be knitted always, whatever side it is? Thanks
01.01.2015 - 18:07DROPS Design answered:
Dear Katia, cable row (crossing sts) should be worked on 2nd row in M1 and M3 (please read more about diagrams here), ie always on a RS row (1st row in diagrams = WS). Happy knitting!
02.01.2015 - 16:36
![]() Nuna wrote:
Nuna wrote:
Hi, was bedeutet: Weiter bei jeder R. von der Mitte für den Hals abnehmen. wie geht es von der MITTE
18.11.2014 - 16:31DROPS Design answered:
Von der Mitte heißt hier: am vorderen Rand. Sie haben ja die äußersten M für den Halsausschnitt stillgelegt und ketten nun neben diesen stillgelegten M wie beschrieben für den Halsausschnitt ab.
20.11.2014 - 10:20
|
|||||||||||||
Little Pixie#littlepixiejacket |
|||||||||||||
 |
 |
||||||||||||
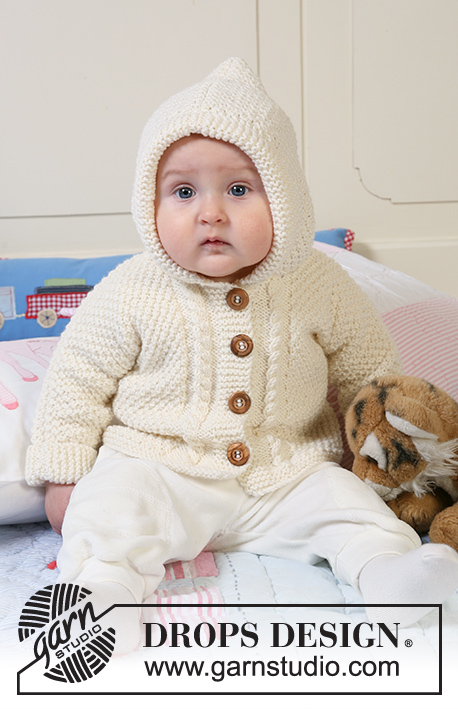
Jacket in seed st knitted in one piece with hood, textured pattern and cables for baby and children in DROPS Merino Extra Fine
DROPS Baby 19-5 |
|||||||||||||
|
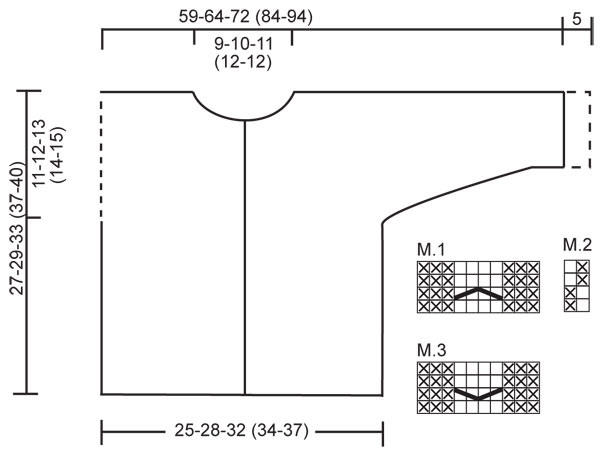
JACKET: GARTER ST (back and forth on needle): K all rows. PATTERN: See diagram M.1 to M.3. Diagram shows the pattern from RS. First row in M.1 and M.3 = WS. BUTTONHOLES: Make buttonholes on right front band. 1 buttonhole = K tog 2nd and 3rd st from mid front and make 1 YO. K YO on next row. Make buttonholes when piece measures: Size 1/3 months: 4, 10, 16 and 22 cm / 1½", 4", 6¼" and 8¾". Size 6/9 months: 4, 11, 18 and 24 cm / 1½", 4⅜", 7" and 9½". Size 12/18 months: 3, 9, 15, 21 and 27 cm / 1⅛", 3½", 6", 8¼" and 10⅝". Size 2 years: 3, 10, 17, 24 and 31 cm / 1⅛", 4", 6¾", 9½" and 12¼". Size 3/4 years: 3, 11, 19, 27 and 34 cm / 1⅛", 4⅜", 7½", 10⅝" and 13⅜". -------------------------------------------------------- -------------------------------------------------------- JACKET: Worked back and forth on circular needle from mid front up to the armhole. Then front and back pieces are worked separately and new sts cast on each side for sleeves. The jacket is assembled sewing the upper arm/shoulder and under arm seams. BODY PIECE: Cast on 117-131-145 (155-169) sts (includes 6 front band sts each side towards mid front) on circular needle size 4 mm / US 6 with Merino Extra Fine. Work 6 rows GARTER ST – see above (first row = RS), then K 1 row from RS, AT THE SAME TIME inc 1 st in the 10th and 11th st from mid front, repeat the inc at the end of row (in 11th and 10th st on needle) = 121-135-149 (159-173) sts. Insert a marker 34-38-42 (44-48) sts in from each side (= 53-59-65 (71-77) sts between markers on back piece). Now work next row as follows from WS: 6 garter sts (= front band), M.3 (= 10 sts), M.2 on the next 89-103-117 (127-141) sts, M.1 (= 10 sts) and 6 garter sts (= front band). Continue in pattern like this - REMEMBER BUTTONHOLES ON RIGHT FRONT BAND - see above. REMEMBER THE GAUGE! When piece measures 16-17-20 (23-25) cm / 6¼"-6¾"-8" (9"-9¾") divide piece by markers and complete front and back pieces separately. RIGHT FRONT PIECE: = 34-38-42 (44-48) sts. Continue in pattern as before, AT THE SAME TIME cast on new sts for sleeve at the end of every row towards the side as follows: 4 sts 2-2-3 (3-3) times, 8 sts 1-1-1 (1-3) times, 10 sts 1-1-1 (2-1) times and 19-22-23 (23-24) sts 1 time = 79-86-95 (107-118) sts - NOTE: incorporate inc sts in M.2 as you go along. After the last inc continue as before but work 10 sts towards sleeve edge in garter st (= folding edge on sleeve). When 1 row remains before piece measures 23-25-28 (32-35) cm / 9"-9¾"-11" (12½"-13¾") – adjust to a row from WS - dec 2 sts over cable by P2 tog twice on the 4 cable sts. On next row from RS slip 9-11-12 (12-13) sts towards mid front on a stitch holder for neck. Bind off to shape the neckline at the beg of every row from mid front: 2 sts 2 times and 1 st 2-2-3 (3-3) times = 62-67-74 (86-96) sts left on needle (= shoulder + sleeve). Continue in M.2 and bind off when piece measures 27-29-33 (37-40) cm / 10⅝"-11⅜"-13" (14½"-15¾"). LEFT FRONT PIECE: Like right front piece but mirrored. BACK PIECE: = 53-59-65 (71-77) sts. Continue in M.2 as before, AT THE SAME TIME cast on new sts each side at the end of every row as described for front piece = 143-155-171 (197-217) sts. Now continue in M.2 with 10 garter sts each side on sleeve edges. When piece measures 25-27-31 (35-38) cm / 9¾"-10⅝"-12¼" (13¾"-15") cast of the middle 17-19-21 (23-23) sts for neck and complete each shoulder/sleeve separately. Bind off 1 st on neckline on next row = 62-67-74 (86-96) sts left on needle (= shoulder + sleeve). Bind off when piece measures 27-29-33 (37-40) cm / 10⅝"-11⅜"-13" (14½"-15¾"). Repeat on the other side. ASSEMBLY: Sew shoulder/upper arm seams, edge to edge with neat sts. Sew under arm seams. Sew on buttons. Fold the bottom 5 cm / 2" on both sleeve edges towards RS, if needed attach with a few sts. HOOD: Pick up from RS approx 55 to 75 sts round neck (includes sts from stitch holders at front) on circular needle size 4 mm / US 6 with Merino Extra Fine. K 1 row from WS, then K 1 row from RS, AT THE SAME TIME inc evenly to 85-89-93 (97-101) sts. Continue in M.2 with 6 sts each side in garter st - AT THE SAME TIME cast on 6 new sts at the end of the next 2 rows for folding edge = 97-101-105 (109-113) sts – work these 6 sts in garter st. Continue in M.2 with 12 garter sts each side until hood measures 21-23-25 (27-28) cm / 8¼"-9"-9¾" (10⅝"-11"), bind off. Fold hood double and sew tog at the top. Fold the garter st edge double towards RS and attach at the bottom each side. |
|||||||||||||
Diagram explanations |
|||||||||||||
|
|||||||||||||
 |
|||||||||||||
Have you finished this pattern?Tag your pictures with #dropspattern #littlepixiejacket or submit them to the #dropsfan gallery. Do you need help with this pattern?You'll find 10 tutorial videos, a Comments/Questions area and more by visiting the pattern on garnstudio.com. © 1982-2026 DROPS Design A/S. We reserve all rights. This document, including all its sub-sections, has copyrights. Read more about what you can do with our patterns at the bottom of each pattern on our site. |
|||||||||||||


With over 40 years in knitting and crochet design, DROPS Design offers one of the most extensive collections of free patterns on the internet - translated to 17 languages. As of today we count 324 catalogs and 12272 patterns - 12262 of which are translated into English (US/in).
We work hard to bring you the best knitting and crochet have to offer, inspiration and advice as well as great quality yarns at incredible prices! Would you like to use our patterns for other than personal use? You can read what you are allowed to do in the Copyright text at the bottom of all our patterns. Happy crafting!
Post a comment to pattern DROPS Baby 19-5
We would love to hear what you have to say about this pattern!
If you want to leave a question, please make sure you select the correct category in the form below, to speed up the answering process. Required fields are marked *.