
Popular categories
Looking for a yarn?


Comments / Questions (55)
![]() Miriam wrote:
Miriam wrote:
"Die nächste R. wie folgt: 4 re., 2 re. zusammen, 1 Umschlag, 1 re., 2 re. in jede der 3 nächsten M. (= 6 re.), 2 re., 2 re. in jede der 3 nächsten M. (= 6 re.), 1 re., 1 M. re. abheben, 1 re., die abgehobene über die gestrickte ziehen, 4 re. = 28 M." ich komme dabei aber nur auf 27 M. wo liegt der Fehler?
06.10.2013 - 12:33DROPS Design answered:
Liebe Miriam, herzlichen Dank für den Hinweis, Sie haben völlig Recht. Da hat unsere damalige Übersetzerin einen Umschlag vergessen, wir werden das gleich korrigieren. Entschuldigung für die Umstände.
07.10.2013 - 09:06
![]() Els-Marie wrote:
Els-Marie wrote:
Du skrev att de förkortade varven görs i nederkanten. Så förstår jag INTE att man gör De spänner ju över 21 maskor och då är flätan inbegripen. Hur gör jag
05.04.2013 - 21:07DROPS Design answered:
De förkortade varven görs i nederkanten av oket. Flätan stickar du enligt diagrammet. När du har ett förkortad varv fortsätter du med flätan i diagrammet nästa gång du stickar över dessa maskor.
10.04.2013 - 11:59
![]() Els-Marie Edelfeldt wrote:
Els-Marie Edelfeldt wrote:
Får inte mönster 1 och de förkortade varven att stämma. Flätan blir längre med jämna mellanrum. Något är hopplöst fel. Ber er hjälpa mig
23.03.2013 - 11:44DROPS Design answered:
De förkortade varven stickar du i nederkanten. Flätan stickar du överst enligt diagrammet!
03.04.2013 - 10:33
![]() Dale wrote:
Dale wrote:
How do the shortened rows on Yoke 1 work into the pattern? I am just not getting something. I need to add rows to make it work!
07.02.2013 - 22:37DROPS Design answered:
Dear Mrs Dale, work the short rows as stated, and at the same time, follow the diagram, working the sts as they should be on that row. Repeat cables every 6th row and every other row, you will have 1 time (yo, sl,K,psso) less or only (K2tog,yo) from M1. Happy Knitting!
08.02.2013 - 09:09
![]() Dale wrote:
Dale wrote:
How do the shortened rows on Yoke 1 work into the pattern? I am just not getting something. I need to add rows to make it work!
07.02.2013 - 22:32
![]() DROPS Design wrote:
DROPS Design wrote:
Yes Lynne, you are right, the picture is reversed. You can also see that on the button holes.
21.01.2011 - 18:07Lynne S wrote:
The cables on the yoke of the cardigan in the picture go the opposite way to that described in the pattern. The pattern has them going inwards, whilst the model has them going outwards (is the picture reversed?).
21.01.2011 - 03:04
![]() Pucha wrote:
Pucha wrote:
Tout simplement magnifique Je vais essayer de la tricoter dans les prochains jours (pour le plaisir) Merci aux créateurs de tous ces modèles qui sont superbes
11.02.2010 - 12:56Kay Weller wrote:
So beautiful, feminine and fitted! Will the instructions be available soon?
04.02.2010 - 03:17
![]() Katherine wrote:
Katherine wrote:
Absolutely exquisite detailing. I want to knit one in every color. This collection is so creatively original. You have designed your crochet pieces beautifully. Thank you for always surprising and delighting me!
03.02.2010 - 21:35
|
|||||||||||||||||||||||||
Seaside Victoria#seasidevictoriacardigan |
|||||||||||||||||||||||||
 |
 |
||||||||||||||||||||||||
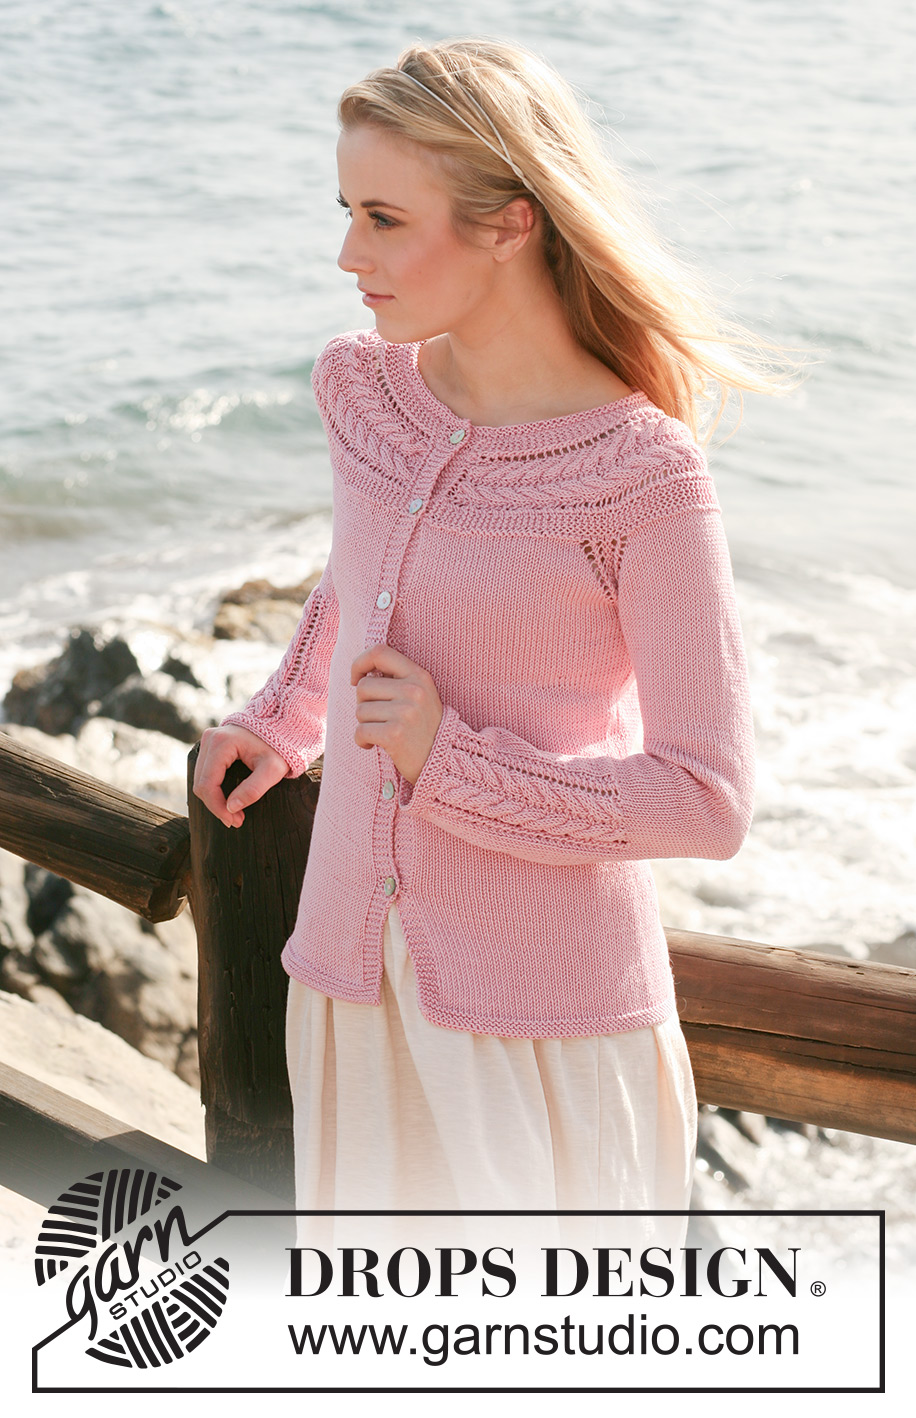
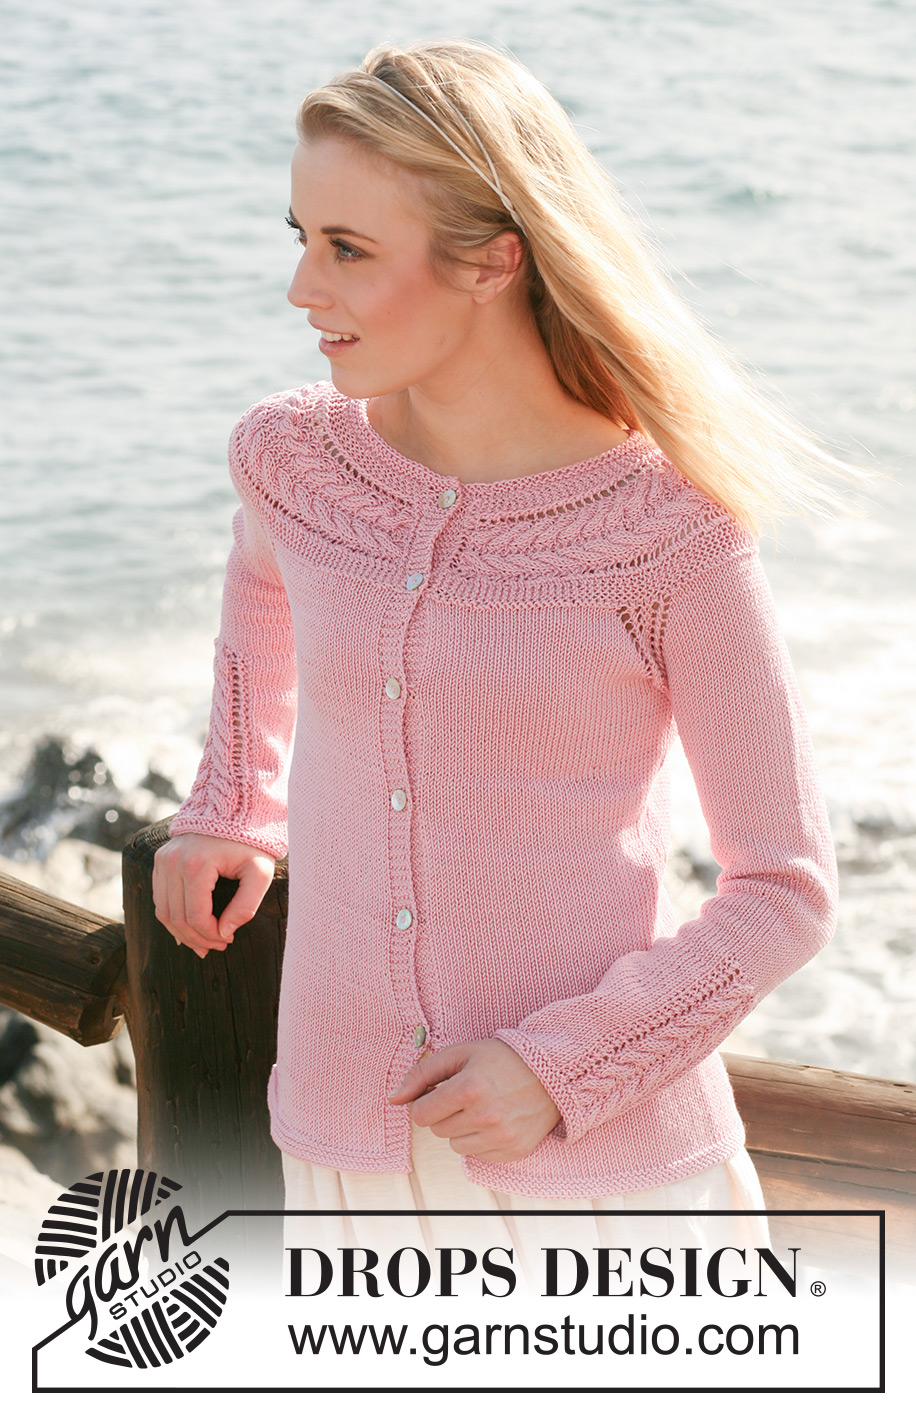
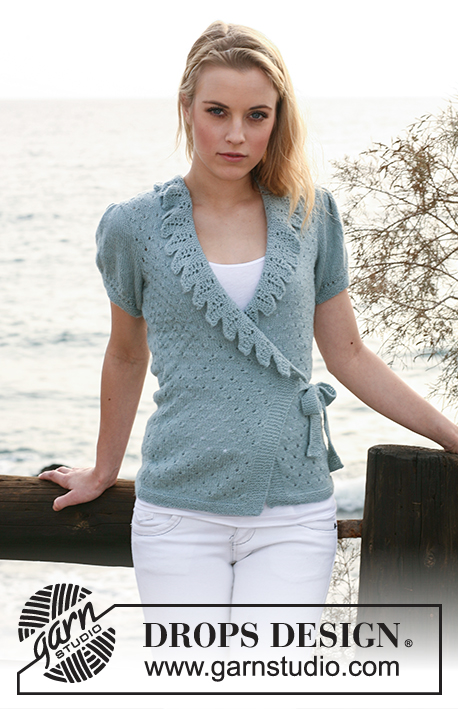
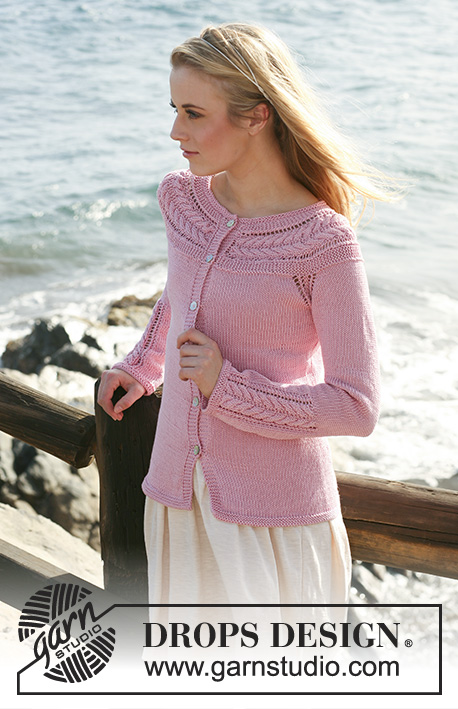
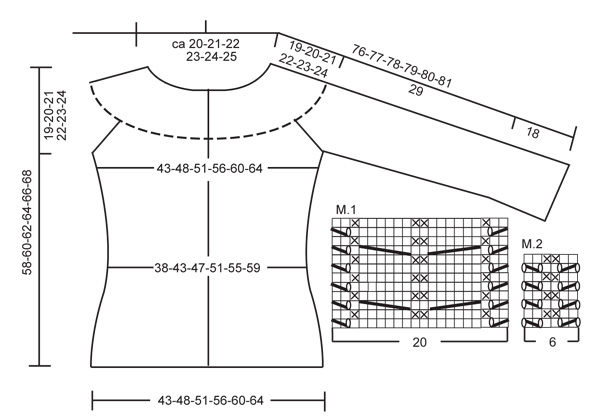
DROPS jacket in ”Muskat” with yoke knitted from side to side with cables and shortened rows. Size S to XXXL.
DROPS 119-25 |
|||||||||||||||||||||||||
|
GARTER ST (back and forth on needle): K all rows. GARTER ST (in the round): K 1 round, P 1 round. SHORTENED ROWS: To make yoke wider along bottom edge work shortened rows as follows: * Work 2 rows on all sts, work row to marker-2, turn, tighten thread and work return row, work 2 rows on all sts, work row to marker-1, turn, tighten thread and work return row *, repeat from *-*, i.e. 1 repeat = 4 rows at the top and 8 rows at the bottom. PATTERN: See diagram M.1 and M.2 - diagram is seen from RS and shows 1 pattern repeat. DECREASING TIP (applies to body piece and sleeves): Make all dec from RS! Dec as follows BEFORE marker at the side: K2 tog. Dec as follows AFTER marker at the side: slip 1 st as if to K, K1, psso. BUTTONHOLES: Make buttonholes on right front band from WS. 1 BUTTONHOLE = K tog 3rd and 4th st from mid front and make 1 YO. Make buttonholes when piece measures: SIZE S and M: 6, 14, 22 and 30 cm / 2⅜", 5½", 8¾" and 11¾". SIZE L, XL, XXL, XXXL: 6, 13, 20, 27 and 34 cm / 2⅜", 5⅛", 8", 10⅝" and 13⅜". -------------------------------------------------------- -------------------------------------------------------- YOKE (part 1): Worked back and forth on 2 double pointed needles, from side to side from mid front. LOOSELY cast on 22 sts (for all sizes) on needle size 4 mm / US 6 with Muskat. K 2 rows on all sts (first row = RS from bottom edge). Work next row as follows: K4, K2 tog, 1 YO, K1, K2 in each of the next 3 sts (= K6), K2, K2 in each of the next 3 sts (= K6), K1, 1 YO, slip 1 st as if to K, K1, psso, K4 = 28 sts. Work next row as follows from WS: K4, P2, K1, P6, K2, P6, K1, P2 and K4, turn. Insert 2 markers in piece as follows (from RS): marker-1 after 7 sts and marker-2 after a total of 21 sts, i.e. there are 7 sts after marker-2 at the top. Now work SHORTENED ROWS – see above - and PATTERN as follows: 4 GARTER STS – see above, M.1 on the next 20 sts and 4 garter sts. REMEMBER THE GAUGE! Continue until piece measures approx 96-100-104-108-112-116 cm / 37¾"-39⅜"-41"-42½"-44"-45¾"- along bottom edge (piece measures approx 48-50-52-54-56-58 cm / 19"-19¾"-20½"-21¼"-22"-22¾" at the top) - adjust to after 1 full repeat. Work next row as follows: K7, * K2 tog, K2 tog, K2 tog *, K2, repeat from *-* 1 more time, K7 = 22 sts. K 1 row on all sts, and bind off in K sts from RS. Remove markers. YOKE (part 2): Worked back and forth on circular needle. Cast on 5 sts (= left front band) on circular needle size 4 mm / US 6, then pick up 1 st in outer loop of each garter st along bottom edge of yoke part-1, cast on 5 new sts at the end of row (= right front band) = approx 200 to 260 sts. K 1 row from WS on all sts, AT THE SAME TIME adjust no of sts to 210-218-230-238-250-258 (if you have less sts make a YO at evenly intervals across the row to make up the no of sts – work YO into back of loop on return row to avoid a hole – if you have to many sts K2 tog evenly across the row). Insert 4 markers in piece as follows from RS: MARKER-1 after 36-38-40-42-44-46 sts, MARKER-2: 38-38-40-40-42-42 sts from marker-1, MARKER-3: 62-66-70-74-78-82 sts from marker-2 and MARKER-4: 38-38-40-40-42-42 sts from marker-3 (= 36-38-40-42-44-46 sts left after the last marker). Work next row as follows (from RS): 5 front band sts in garter st, 28-30-32-34-36-38 stockinette sts, M.2 (= 6 sts – marker-1 sits in the middle of these sts), 32-32-34-34-36-36 stockinette sts, M.2 (marker-2 sits in the middle of these sts), 56-60-64-68-72-76 stockinette sts, M.2 (marker-3 sits in the middle of these sts), 32-32-34-34-36-36 stockinette sts, M.2 (marker-4 sits in the middle of these sts), 28-30-32-34-36-38 stockinette sts and 5 front band sts in garter st. In M.2 you inc 2 sts on every other row (incorporate inc sts in stockinette st as you go along). Continue like this until there are 298-322-342-366-386-402 sts on needle. Work 1 row from WS after the last inc, yoke now measures a total of approx 19-20-21-22-23-24 cm / 7½"-8"-8¼"-8¾"-9"-9½" in the height. BODY PIECE: Continue as follows: Work row to marker-1 (= 47-51-54-58-61-64 sts), slip sts from here to marker-2 on a stitch holder for sleeve (= 60-64-68-72-76-78 sts), cast on 6-8-10-12-14-16 new sts under sleeve, work sts to marker-3 (= 84-92-98-106-112-118 sts), slip sts from here to marker-4 on a stitch holder for sleeve (= 60-64-68-72-76-78 sts), cast on 6-8-10-12-14-16 new sts under sleeve, work remaining sts (= 47-51-54-58-61-64 sts). There is now a total of 190-210-226-246-262-278 sts on needle. Remove all markers. Insert 1 new marker each side 50-55-59-64-68-72 sts in from each side (= 90-100-108-118-126-134 sts between markers on back piece). NOW MEASURE PIECE FROM HERE! Continue in stockinette st back and forth on needle with 5 front band sts in garter st each side towards mid front. When piece measures 3-3-4-4-5-5 cm / 1⅛"-1⅛"-1½"-1½"-2"-2" dec 1 st each side of both markers – SEE DECREASING TIP! Repeat the dec on every 4 cm / 1½" a total of 5 times = 170-190-206-226-242-258 sts. AT THE SAME TIME when piece measures 6 cm / 2⅜" make BUTTONHOLES – see above! When piece measures 23-24-25-26-27-28 cm / 9"-9½"-9¾"-10¼"-10⅝"-11" inc 1 st each side of both markers (inc from RS by K2 in st each side of marker), repeat the inc on every 3 cm / 1⅛" a total of 5 times = 190-210-226-246-262-278 sts. When piece measures 38-39-40-41-42-43 cm / 15-15¼"-15¾"-16⅛"-16½"-17" change to circular needle size 3.5 mm / US 4, work 6 rows garter st and bind off loosely. SLEEVE: Worked in the round on double pointed needles. Slip the 60-64-68-72-76-78 sts from one stitch holder on double pointed needles size 4 mm / US 6 and pick up 1 st in each of the 6-8-10-12-14-16 sts cast on under sleeve = 66-72-78-84-90-94 sts. NOW MEASURE PIECE FROM HERE! Insert a marker mid under sleeve and work stockinette st in the round. When sleeve measures 2 cm / ¾" dec 1 st each side of marker – SEE DECREASING TIP! Repeat the dec on every 4-3-2.5-2-2-2 cm / 1½"-1⅛"-⅞"-¾"-¾"-¾" a total of 7-9-11-13-14-14 times = 52-54-56-58-62-66 sts. When piece measures 29 cm / 11⅜" work next round as follows: K 21-22-23-24-26-28, P1, K2 in each of the next 3 sts (= K6), P2, K2 in each of the next 3 sts (= K6), P1 and K 21-22-23-24-26-28 = 58-60-62-64-68-72 sts. Continue as follows: 18-19-20-21-23-25 stockinette sts, 1 garter st, M.1 (= 20 sts), 1 garter st and 18-19-20-21-23-25 stockinette sts. When sleeve measures approx 45 cm / 17¾" (adjust after 1 full repeat) K2 tog on the 6 sts on cable (i.e. 6 sts become 3 sts) – work remaining sts as before = 52-54-56-58-62-66 sts. Change to double pointed needles size 3.5 mm / US 4, work 6 rows garter st on all sts and bind off loosely. Knit the other sleeve in the same way on sts on the other stitch holder. LEFT FRONT BAND: Pick up 1 st in each of the 5 sts cast on for front band when working yoke, part-2. Work garter st back and forth on 2 double pointed needles size 3.5 mm / US 4 until front band measures approx 2 cm / ¾" less than the width of yoke, part 1 - slip sts on a stitch holder. Sew front band to yoke, edge to edge – pull it slightly when sewing it on. RIGHT FRONT BAND: Like left front band, but after 1 cm / ⅜" make 1 buttonhole in line with the others on front band, repeat when 2 rows remain. NECKLINE: Work the 5 sts from right front band in on circular needle size 3.5 mm / US 4, pick up 1 st in the outer loop in each garter st along neckline (= approx 100 to 120 sts) and work the 5 sts from left front band in on needle = approx 110 to 130 sts in total. K 3 rows back and forth on needle and bind off. ASSEMBLY: Sew on buttons. |
|||||||||||||||||||||||||
Diagram explanations |
|||||||||||||||||||||||||
|
|||||||||||||||||||||||||
 |
|||||||||||||||||||||||||
Have you finished this pattern?Tag your pictures with #dropspattern #seasidevictoriacardigan or submit them to the #dropsfan gallery. Do you need help with this pattern?You'll find 26 tutorial videos, a Comments/Questions area and more by visiting the pattern on garnstudio.com. © 1982-2026 DROPS Design A/S. We reserve all rights. This document, including all its sub-sections, has copyrights. Read more about what you can do with our patterns at the bottom of each pattern on our site. |
|||||||||||||||||||||||||


With over 40 years in knitting and crochet design, DROPS Design offers one of the most extensive collections of free patterns on the internet - translated to 17 languages. As of today we count 325 catalogs and 12298 patterns - 12288 of which are translated into English (US/in).
We work hard to bring you the best knitting and crochet have to offer, inspiration and advice as well as great quality yarns at incredible prices! Would you like to use our patterns for other than personal use? You can read what you are allowed to do in the Copyright text at the bottom of all our patterns. Happy crafting!
Post a comment to pattern DROPS 119-25
We would love to hear what you have to say about this pattern!
If you want to leave a question, please make sure you select the correct category in the form below, to speed up the answering process. Required fields are marked *.