
Popular categories
Looking for a yarn?


Comments / Questions (77)
![]() Regina wrote:
Regina wrote:
Dankeschön. Jetzt klappt es. 👍
16.06.2025 - 09:38
![]() Regina wrote:
Regina wrote:
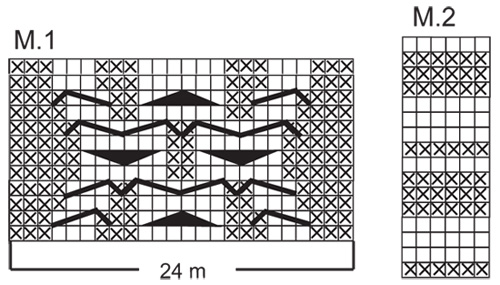
So, eigenes Diagramm erstellt - und es klappt immer noch nicht. Auch nicht mit den bisher von Drops Design gegebenen Antworten. Spätestens beim Beginn der verkürzten Reihen ist Schluss. Wann und wo verkürzten Reihen erfolgen ist sehr verwirrend und unverständlich beschrieben. :-(( Ich komme auch auf keinen Rapport. Es wäre besser, die beiden Diagramme M1 + M2 zu einem Diagramm zusammenzufügen. Schade um die gekaufte Wolle.
12.06.2025 - 22:44DROPS Design answered:
Liebe Regina, die beide Diagramme werden gleichezeitig gestrickt aber dazu mit verkürzten Reihen so wenn diese verkürzten Reihen beginnen stricken Sie M.2 wie zuvor (wie im Diagram gezeigt), und lassen Sie die Maschen M.1 nicht gestrickt, und dann wenn Sie wieder alle Maschen beide Diagramme stricken sollen, stricken Sie M.2 weiter genauso wie zuvor im Diagram gezeigt und gleichzeitig stricken Sie die nächste Reihe (die nach der letzten Reihe gestrickt wurde). So stricken Sie immer 2 Reihen über alle Maschen dann 2 Maschen mit nur M.2 und diese 4 Reihen wiederholen Sie bis die Arbeit 52 cm (gegen M.1 = bei der kürzeste Seite) misst. Viel Spaß beim Stricken!
13.06.2025 - 07:37
![]() Regina wrote:
Regina wrote:
Ich habe bereits problemlos die Mütze gestrickt, hatte beim Kragen meine Probleme mit dem Musterverlauf beim Zusammenfügen von M1 und M2, insbesonders bei den zusätzlichen Reihen der 17 M. Das Diagramm war mir nicht hilfreich und brachte mich durcheinander. Hinzu kommt, dass nur die rechte Seite der Arbeit beschrieben wird. Ich habe mir daher über das Tabellenprogramm in Word ein eigenes, zusammenhängendes Diagramm für M1 und M2 (mit Hin- u. Rückreihe, wie man es strickt) erstellt.
10.06.2025 - 23:07
![]() Laroche wrote:
Laroche wrote:
Bonjour Puis je prendre la laine Snow uni colour pour ce modèle, je me demande si ça rendrait bien ? Merci
03.02.2025 - 12:40DROPS Design answered:
Bonjour Mme Laroche, pour tricoter en DROPS Snow, consultez plutôt les modèles à tricoter en laine du groupe de fils E (comme Snow) ici ou avec une tension de 11-9 mailles pour 10 cm là - cette dernière possibilité vous donne davantage de modèles. Bon tricot!
03.02.2025 - 13:49
![]() Lena wrote:
Lena wrote:
Lengde 48 cm ? Det er veldig smått ? Jeg bruker til vanlig stl 54 på hodeplagg.( Det er ikke mye stretch når du strikker på lengden,bare på bredden...) Hvordan anpasse lengden/vidden ? Hvor mye ekstra må man legge til omkrets uten att den blir før stor?
09.01.2024 - 17:55DROPS Design answered:
Hej Lena, prøv den rundt om hovedet når du når til de 48 cm, så ser du hvor mange cm du mangler for at den skal passe dig :)
11.01.2024 - 15:26
![]() Sabine wrote:
Sabine wrote:
Hallo ! Laut Anleitung sollen 23 M für die Kante der Mütze angeschlagen werden, das Diagramm zeigt 24 M. Wird anscheinend ohne Randmaschen gestrickt? Freue mich, von Ihnen zu hören. Viele Grüße Sabine
16.01.2023 - 14:41DROPS Design answered:
Liebe Sabine, man soll 23 Maschen anschlagen dann bei der 1. Hinreihe wird man 4 Maschen wie beschrieben zunehmen: 2 M. Krausrippe, 3 li., in die nächste M. 1 M. aufnehmen und beide M. re. stricken (= 1. Zunahme), 1 re., 3 li., 1 re., in beiden der 2 nächsten M. 1 M. aufnehmen und alle 4 M. re. stricken (=2 Zunahmen), 1 re., 3 li., 1 re., in der nächste M. 1 M. aufnehmen und beide M. re. stricken (= 1 Zunahem), 3 li. und 1 M. Krausrippe = 2+3+2+1+3+1+4+1+3+1+2+3+1= 27 Maschen. Viel Spaß beim stricken!
16.01.2023 - 16:42
![]() Francine wrote:
Francine wrote:
Picking up 104 stitches on cable band directions state to pick up inside this garter. Does this mean on the wrong side of the cable band? Looking at the pattern picture looks like you see the edge of band. Please help. Francine
17.08.2016 - 05:03DROPS Design answered:
Dear Francine, you have to pick up the 104 sts from RS, inside the garter sts. Happy knitting!
17.08.2016 - 09:29
![]() Mary wrote:
Mary wrote:
Would you be so kind as to email me instructions for 4 rows after the increase row. Thanks you so much.
27.05.2015 - 14:46DROPS Design answered:
Dear Mary, after increase row from RS, work from WS: 8 sts in garter st, then the 24 sts in M.1 (read from the bottom corner on the left side towards the right), then work the 17 sts in M.2 = K from WS. On next row, start short rows: 2 rows on all sts: 2nd + 3d row in M1 and M2 , 2 rows on the 17 sts in M.2 = row 4+5 in M.2, then work again 2 rows on all sts (= row 4 + 5 in M.1 and row 6 + 7 in M2) and 2 rows in M2 only (= row 8 + 9) and so on, ie follow each diagram separately. Happy knitting!
27.05.2015 - 17:13
![]() Hazel wrote:
Hazel wrote:
I have a question about 114-5 hat and neck warmer with cables. Neck Warmer: I have finished 10 rows garter stitch and increased to 49 sts and worked next row using row 1 of M.1 and M.2 but I’m a bit confused with AT THE SAME TIME (from next row) work shortened rows as follows 2 rows on all sts (does this mean to work 2 rows in garter st) and 2 rows back and forth on the bottom 17sts (m.2) only 9(does this mean work 2 more rows for m.2 only). Hazel
20.05.2015 - 23:41DROPS Design answered:
Dear Hazel, when working short rows, work sts in pattern following diagrams at the same time, ie when working 2 rows over the sts in M.2 continue following diagram M.2. Happy knitting!
21.05.2015 - 09:00
![]() Martine Pageau wrote:
Martine Pageau wrote:
Merci beaucoup pour la réponse. Bye.
17.04.2015 - 04:29
|
|||||||||||||||||||
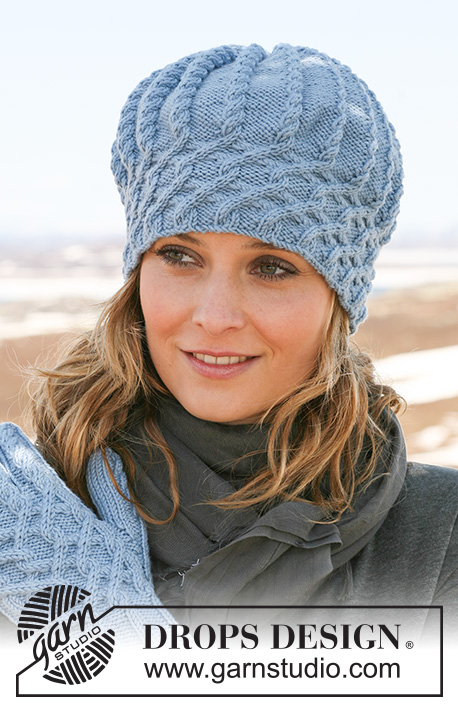
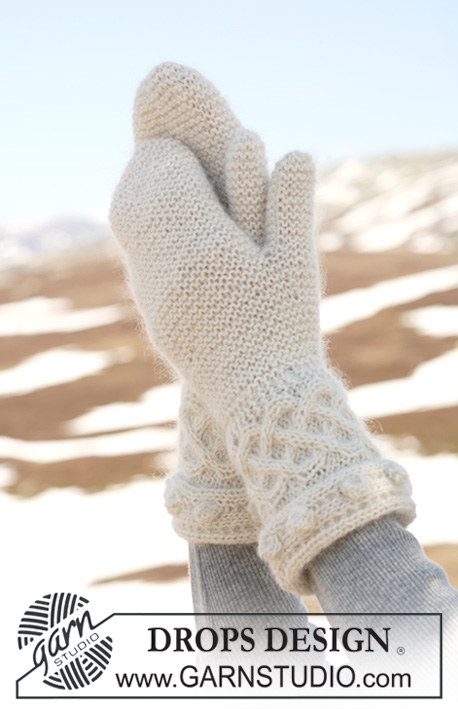
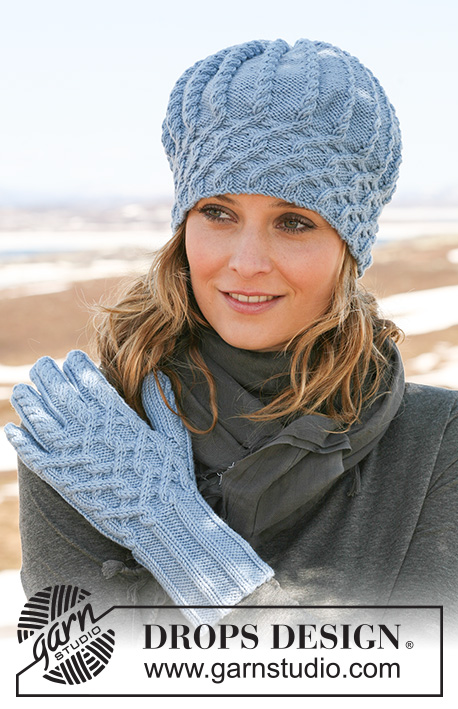
Alpine Twist Set#alpinetwistset |
|||||||||||||||||||
|
|
|||||||||||||||||||
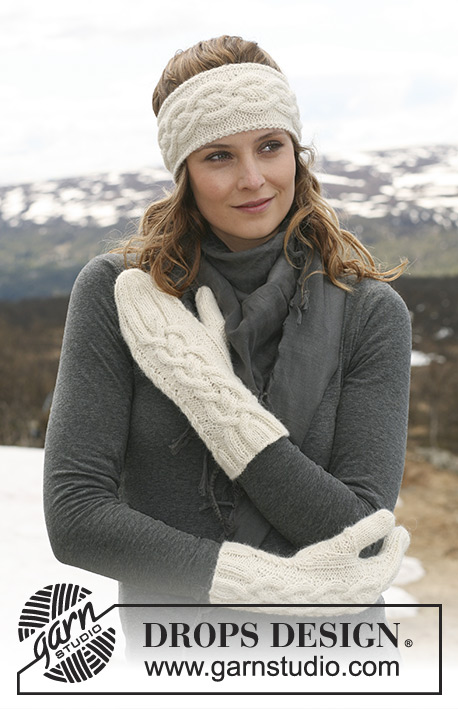
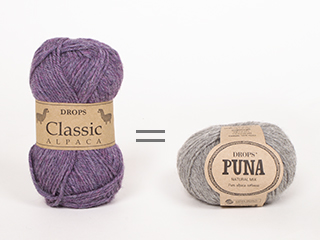
DROPS hat with cables and neck warmer with cables and buttoned at front in ”Classic Alpaca” or "Puna".
DROPS 114-5 |
|||||||||||||||||||
|
GARTER ST (back and forth on needle): K all rows. PATTERN: See diagram M.1 and M.2. Diagram shows the pattern from RS. -------------------------------------------------------- -------------------------------------------------------- HAT: First work bottom edge back and forth on needle, then pick up sts in edge and continue in the round towards top of hat. EDGE: Worked back and forth on 2 double pointed needles from mid back to mid back. Cast on 23 sts on needle size 4 mm / US 6 with Classic Alpaca. K 1 row from WS. NOTE: Work the bottom st (= last st on first row) in double thread throughout to make the edge firmer, i.e. have an extra ball of yarn and use this only for this st. Work next row as follows (from RS): 2 GARTER STS – see above - P3, inc 1 st in next st and K both sts, K1, P3, K1, inc 1 st in each of the next 2 sts and K all 4 sts, K1, P3, K1, inc 1 st in next st and K both sts, P3 and 1 garter st = 27 sts. Continue as follows: 1 garter st, M.1 (first row = WS) and 2 garter sts (= towards bottom edge). Continue in pattern like this until piece measures approx 48 cm / 19", adjust to after the last but one row in M.1 (i.e. row from WS). Work next row as follows from RS: 2 garter sts, P3, K2 tog, K1, P3, K1, K2 tog, K2 tog, K1, P3, K1, K2 tog, P3 and 1 garter st = 23 sts. K 1 row on all sts from WS and then bind off. Sew tog, edge to edge, mid back. HAT: Pick up 104 sts with Classic Alpaca on circular needle size 4 mm / US 6 along the side of edge with only 1 garter st – pick up inside this garter st (approx 21 sts on 10 cm / 4"). Work stockinette st in the round. When piece measures 4 cm / 1½" from where sts were picked up insert 8 markers in piece with 13 sts between each. On next round dec 1 st before each marker by K2 tog. Repeat the dec on every other round a total of 11 times = 16 sts. Cut the thread, pull through remaining sts, tighten and fasten. Hat measures approx 22 cm / 8¾" in total. -------------------------------------------------------- NECK WARMER: Worked from side to side back and forth on needle. Cast on 45 sts on needle size 4 mm / US 6 with Classic Alpaca. Work GARTER ST (first row = RS) on all sts – see above – AT THE SAME TIME on row 5 make 1 buttonhole as follows: Work 37 sts, bind off 3 sts, work 5 sts. On next row cast on 3 new sts over bound off sts. After 10 rows garter st work next row as follows (from RS): 17 garter sts, P3, inc 1 st in next st and K both sts, K1, P3, K1, inc 1 st in each of the next 2 sts and K all 4 sts, K1, P3, K1, inc 1 st in next st and K both sts, P3 and 8 garter sts = 49 sts. Work next row as follows (= WS): 8 garter sts, M.1 (= 24 sts) and M.2 on 17 sts. Continue like this, AT THE SAME TIME (from next row) work shortened rows as follows: * 2 rows on all sts, 2 rows back and forth on the bottom 17 sts (= M.2) only *, repeat from *-* until piece measures approx 52 cm / 20½" on the shorter side - adjust to after the last but one row in M.1 (i.e row from WS). Work next row as follows (from RS): 17 garter st, P3, K2 tog, K1, P3, K1, K2 tog, K2 tog, K1, P3, K1, K2 tog, P3 and 8 garter sts = 45 sts. Work 10 rows garter st on all sts, bind off. Sew on button mid in M.1 approx 6 cm/ 2⅜" from the edge. |
|||||||||||||||||||
Diagram explanations |
|||||||||||||||||||
|
|||||||||||||||||||
 |
|||||||||||||||||||
Have you finished this pattern?Tag your pictures with #dropspattern #alpinetwistset or submit them to the #dropsfan gallery. Do you need help with this pattern?You'll find 18 tutorial videos, a Comments/Questions area and more by visiting the pattern on garnstudio.com. © 1982-2026 DROPS Design A/S. We reserve all rights. This document, including all its sub-sections, has copyrights. Read more about what you can do with our patterns at the bottom of each pattern on our site. |
|||||||||||||||||||


With over 40 years in knitting and crochet design, DROPS Design offers one of the most extensive collections of free patterns on the internet - translated to 17 languages. As of today we count 324 catalogs and 12290 patterns - 12280 of which are translated into English (US/in).
We work hard to bring you the best knitting and crochet have to offer, inspiration and advice as well as great quality yarns at incredible prices! Would you like to use our patterns for other than personal use? You can read what you are allowed to do in the Copyright text at the bottom of all our patterns. Happy crafting!
Post a comment to pattern DROPS 114-5
We would love to hear what you have to say about this pattern!
If you want to leave a question, please make sure you select the correct category in the form below, to speed up the answering process. Required fields are marked *.