
Popular categories
Looking for a yarn?


Comments / Questions (208)
![]() Angela wrote:
Angela wrote:
Bonjour, Peut-on faire le bonnet en tricotant une bande verticale pour les Torsades, ensuite côté horizontal remonter 42 M et faire le haut du bonnet en procédant à des diminutions. Le rendu sera peut-être moins joli. Qu'en pensez-vous? Sur le haut du bonnet, on dirait qu'il y a une maille jersey double à la verticale. Cela ressemble plus au point de côte qu'au point Jersey. Là aussi, j'ai besoin de savoir. Merci
27.02.2018 - 14:22DROPS Design answered:
Bonjour Angela, vous pouvez tout à fait tricoter votre propre bonnet en vous inspirant de ce modèle. Celui-ci se tricote au point mousse, avec des rangs raccourcis, dans le sens de la longueur, avec une couture à la fin (mailles montées aux mailles rabattues). Bon tricot!
27.02.2018 - 16:19
![]() Angela wrote:
Angela wrote:
Bonsoir, En ce qui concerne le Bonnet, doit-on tricoter les torsades dès le début sur les 42 mailles, ou faire une bande verticale d'une certaine longueur et ensuite remonter 42 mailles sur un côté de l'ouvrage. D'autre part les torsades me semblent bien longues alors que sur le diagramme il y a 4 mailles en attente et 4 à tricoter! Merçi de votre réponse
26.02.2018 - 18:38DROPS Design answered:
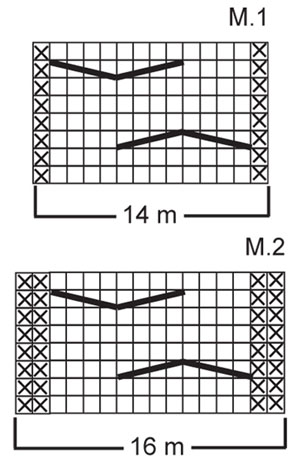
Bonjour Angela, vous tricotez les 42 m en rangs raccourcis pour que le bonnet soit plus large en bas (côté torsade) et moins en haut ("pointe" du bonnet) ainsi, en même temps, tricotez en suivant le diagramme M.1: *2 rangs sur toutes les mailles (= rangs 1 et 2 de M.1), 2 rangs sur 40 mailles (= rangs 3 et 4 de M.1), 2 rangs sur 38 mailles (= rangs 5 et 6 de M.1), 2 rangs sur 35 mailles (= rangs 7 et 8 de M.1) *, répétez de *à* = vous avez tricoté 1 fois M.1 en hauteur à droite, vu sur l'endroit et n'avez que 2 rangs sur les 4 dernières mailles à gauche, vu sur l'endroit. Bon tricot!
27.02.2018 - 08:39
![]() Angela wrote:
Angela wrote:
Bonsoir, Je ne comprends pas la Technique des torsades horizontales, même avec le diagramme. Doit-on tricoter celles-çi dès le début sur les 42 mailles, ou faire une bande verticale en tricotant ces torsades, ensuite monter 42 mailles sur un côté. D'autre part, ces torsades sont bien longues alors que sur le diagramme, il y a 4 m à mettre en attente et 4 à tricoter ! Merçi de votre réponse
26.02.2018 - 18:34DROPS Design answered:
Bonjour Angela, vous tricotez des rangs raccourcis en commençant par le bas du bonnet (= côté torsades), ainsi,vous tricoterez M.1 tous les rangs ainsi: rang 3: croisez les 8 premières mailles après la m env et terminez par 4 m end, 1 m env. Au rang 7, tricotez 1 m env, 4 m end et croisez les 8 m suivantes, 1 m env. Bon tricot!
27.02.2018 - 08:36
![]() Angela wrote:
Angela wrote:
Bonsoir, Je ne comprends pas la technique des Torsades Horizontales, même avec le Diagramme. Celles-çi se font-elles sur les 42 mailles, dès le début, où doit-on tricoter une bande verticale sur une certaine longueur et ensuite remonter des mailles sur un côté de l'ouvrage. De plus, les torsades semblent bien longues, alors que sur le diagramme il y a 4 M en attente et 4 M à tricoter! Alors je ne comprends pas. Merci de votre aide
26.02.2018 - 18:26DROPS Design answered:
Bonjour Angela, les torsades se font verticalement, le bonnet se tricote dans le sens de la longueur (en transversale), on monte 42 m (= hauteur totale du bonnet) et on tricote ainsi: 2 m point mousse, M1 (= 14 m), 26 m point mousse. Dans le diagramme 1 case = 1 m x 1 rang, on croise ainsi les 8 premières puis les 8 dernières mailles tous les 4 rangs - les 4 dernières et les 4 premières m sont alors tricotées simplement en jersey. Bon tricot!
27.02.2018 - 08:33
![]() Imbert wrote:
Imbert wrote:
Bonjour, Je ne comprends pas le procédé des Torsades Horizontales. Pour ce bonnet, doit-on monter 42 Mailles et tricoter les torsades à la verticale puis ensuite les relever sur le côté ? Ou bien faire une bande dans le sens de la longueur pour les Torsades et ensuite remonter des mailles pour le reste du Bonnet. Suis-je claire? (Je ne comprends pas les explications de la page)
26.02.2018 - 15:28DROPS Design answered:
Cf réponse ci-dessous :)
26.02.2018 - 15:34
![]() Imbert wrote:
Imbert wrote:
Bonjour,Je débute le Tricot, je sais faire les Torsades verticales, mais les Torsades Horizontales je n'y arrive pas! Et je ne comprends pas trop les explications sur la Page. Doit-on monter 42 Mailles et tricoter les torsades à la verticale et ensuite relever les mailles sur le côté de ces Torsades, ou d\'abord tricoter une bande dans le sens de la longueur, puis ensuite remonter des mailles pour le reste du bonnet. J'espère que j\'ai été assez claire !! Merçi de votre Réponse
26.02.2018 - 15:23DROPS Design answered:
Bonjour Mme Imbert, le bonnet et le chauffe-épaules se tricotent tous deux dans le sens de la longueur (= transversalement). Pour le bonnet, on monte 42 mailles, et on tricote ainsi: 2 m point mousse (bas du bonnet), M.1 et 26 m point mousse, puis on tricote les rangs raccourcis comme indiqué, on aura ainsi plus de rangs sur le bas du bonnet et moins sur le haut du bonnet, ce qui va lui donner sa forme. Le diagramme M.1 se tricote simplement en lisant de droite à gauche sur l'endroit (en commençant dans le coin en bas à droite) et de gauche à droite sur l'envers. Bon tricot!
26.02.2018 - 15:34
![]() Grazia wrote:
Grazia wrote:
Buon giorno sarei interessata al vs progetto Drops 114-31 è possibile avere le spiegazioni x ferri normali (che nr) e non circolari ed un suggerimento su che lana equivalente a quella del progetto che si possa lavare senza infeltrire purtroppo non sono molto esperta grazie x l'aiuto e buona giornata Grazia
17.01.2018 - 08:36DROPS Design answered:
Buongiorno Grazia. Può usare i ferri dritti e seguire le spiegazioni senza alcuna modifica in quanto si lavora avanti e indietro sui ferri. Scelga la misura di ferri che le consente di avere il campione indicato. Al seguente link trova indicazioni utili per sostituire il filato. Buon lavoro!
17.01.2018 - 09:56
![]() Bettina wrote:
Bettina wrote:
I am really confused about working the M2 section and the shortened row. First question - in the M2 diagram do I start the first row, 2 P, 12 K, 2 P and then 2nd row do I start the cable on the WS? Second question - 1st row is knitted as normal, no shortening 2nd row - I do a U-turn after 20 stitches- does this include the cable 3rd - normal 4 th row - I do U-turn after 37 st 5th row - same as 4 th row
28.11.2017 - 01:14DROPS Design answered:
Dear Bettina, row 1 will be worked as you say. On row 2, work from WS on row 2 in pattern with short rows (from WS: read from the left towards the right): K2, P12, K2. On row 3 work row 3 in diagram (= cable) from RS. Turn and work next row from WS over all sts (= row 4 in 1st M.2 (seen from WS) and row 2 in 2nd M.2 (seen from WS). The cables in both M.2 will not be worked at the same time because of the short rows you will work at the top of neck warmer (collar, beg of row from WS) and at the bottom edge (beg of row from RS). Happy knintting!
28.11.2017 - 09:18
![]() France Morneau wrote:
France Morneau wrote:
Bonjour, Au 2 ième rang raccourcis , nous devons faire 20 mailles et tournez et refaire les 20 mailles. Quand c'est écrit 2 rangs de sur 37 mailles , est-ce la même chose ? On tricote les 37 mailles , on tourne et on refait les 37 mailles ?
15.04.2017 - 04:29DROPS Design answered:
Bonjour Mme Morneau, tricotez d'abord 1 rang sur toutes les mailles, puis tricotez 20 m au rang suivant, tourner et tricotez 20 m, tournez et tricotez ensuite toutes les mailles au rang suivant, tournez, tricotez 37 m, tournez et tricotez les 37 m, tournez et tricotez 33 m, tournez et tricotez 33 m, tournez et tricotez 29 m, tournez et tricotez 29 m, tournez et tricotez 2 rangs sur toutes les mailles (= 1 aller-retour), tournez et tricotez 37 m, tournez et tricotez 37 m, tournez et tricotez 33 m, tournez et tricotez 33 m, tricotez 29 m, tournez et tricotez 29 m. Bon tricot!
18.04.2017 - 10:01
![]() Caroline CEDELLE wrote:
Caroline CEDELLE wrote:
Bonjour, je suis en train de tricoter le chauffe-épaules et j'ai dû mal à comprendre quand tricoter le motif et quand tricoter les rangs raccourcis. Dois-je faire : - un rang de motif et un de rang raccourcis, - ou un rang de motif puis faire tous les rangs raccourcis et reprendre un rang de motif - ou encore après un rang de motif, faire un rang de retour et ensuite tricoter un rang raccourcis ? Pour moi ce n'est pas très clair Merci pour votre aide
24.03.2017 - 15:39DROPS Design answered:
Bonjour Mme Cedelle, vous devez tricotez les rangs raccourcis comme indiqué, et en même temps tricoter la torsade sur les mailles concernées, les 2 motifs de M2 vont avancer à un rythme différent car l'un des 2 (en bas) sera tricoté plus souvent, mais vous devez continuer la torsade comme dans le diagramme dans les 2 cas, soit tous les 4 rangs tricotés sur ces mailles. Bon tricot!
24.03.2017 - 17:10
|
|||||||||||||
Chocolate Fudge#chocolatefudgeset |
|||||||||||||
|
|
|||||||||||||
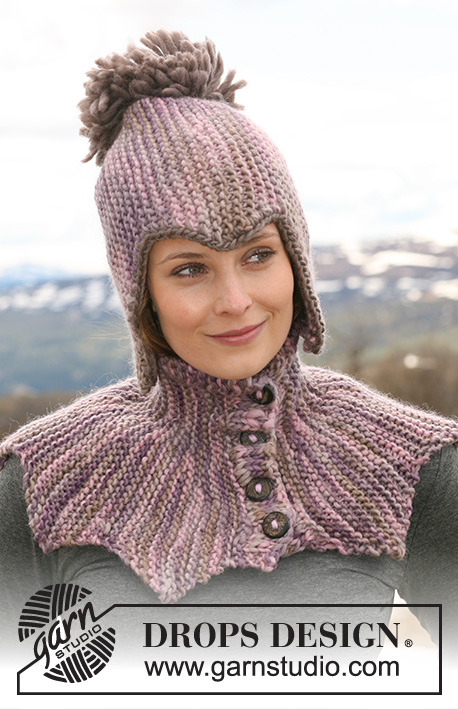
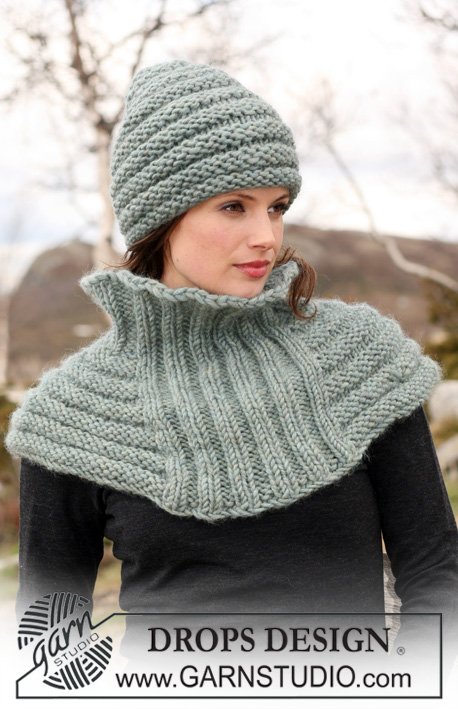
Set comprises: DROPS hat and shoulder wrap knitted from side to side with cables and garter st in ”Snow”.
DROPS 114-31 |
|||||||||||||
|
HAT: -------------------------------------------------------- GARTER ST (back and forth on needle): K all rows. PATTERN: See diagram M.1. Diagram shows the pattern from RS. -------------------------------------------------------- -------------------------------------------------------- HAT: Worked from side to side, back and forth on needle. Work the first 2 sts from RS with double thread (to make edge firmer) in GARTER ST throughout - see above. Cast on 38-42 sts on needle size 7 mm / US 10½ with Snow and work PATTERN as follows from RS: 2 garter sts – see above - M.1 (= 14 sts), 22-26 garter sts. Continue in pattern like this, AT THE SAME TIME work shortened rows, back and forth on needle, with start from RS as follows: * 2 rows on all sts, 2 rows on 36-40 sts, 2 rows on 34-38 sts, 2 rows on 31-35 sts *, repeat from *-*. REMEMBER THE GAUGE! Continue like this until there are 10-11 vertical repeats of M.1, piece measures approx 50-55 cm / 19¾"-21⅝" where longest. Bind off loosely on the last row in the last pattern repeat. ASSEMBLY: Sew cast on row to bind off row, edge to edge. Run a thread through sts at the top of hat, tighten and fasten. -------------------------------------------------------- SHOULDER WRAP: -------------------------------------------------------- GARTER ST (back and forth on needle): K all rows. PATTERN: See diagram M.2. Diagram shows the pattern from RS. BUTTONHOLES: Make buttonholes when piece measures 2 cm / ¾" as follows from RS: Work 7-7-7 sts, bind off 1 st, * work 8-9-10 sts, bind off 1 st *, repeat from *-* a total of 4 times, finish with 3 sts = 5 buttonholes. Cast on new sts over bind off sts on return row. -------------------------------------------------------- -------------------------------------------------------- SHOULDER WRAP: Worked from side to side, back and forth on circular needle. Cast on 47-51-55 sts on circular needle size 8 mm / US 11 with Snow. Work GARTER ST – see above - AT THE SAME TIME work the first 2 sts on every row from RS with double thread throughout. AT THE SAME TIME when piece measures 2 cm / ¾" make BUTTONHOLES on next row from RS – see above! When piece measures 4 cm / 1½" inc as follows on row from WS: Work garter st on the first 4 sts, inc 6 sts evenly on the next 10 sts, garter st on the next 17-21-25 sts, inc 6 sts evenly on the next 10 sts, complete row in garter st = 59-63-67 sts. READ ALL OF THE FOLLOWING SECTION BEFORE CONTINUING! Continue in pattern and shortened rows as follows from RS: 2 garter sts, P 4 (K from WS), M.2 (= 16 sts), P2 (K from WS), garter st on the next 15-19-23 sts, M.2 (=16 sts), 4 garter sts - AT THE SAME TIME work shortened rows starting on RS as follows: * 1 row on all sts, 1 row on 20 sts, turn, work return row on 20 sts, 1 row on all sts, 2 rows on 37-41-45 sts, 2 rows on 33-37-41 sts, 2 rows on 29-33-37 sts, 2 rows on all sts, 2 rows on 37-41-45 sts, 2 rows on 33-37-41 sts, 2 rows on 29-33-37 sts *, repeat from *-*. REMEMBER THE GAUGE! Continue in pattern like this. When piece measures 128-148-168 cm / 50⅜"-58⅛"-66" measured along bottom edge (adjust to after a full repeat of M.2) work next row from RS as follows: Work garter st, AT THE SAME TIME dec 6 sts evenly on all cables = 47-51-55 sts. Continue in garter st on all sts. Bind off when edge in garter st measures 4 cm / 1½". Sew on buttons. |
|||||||||||||
Diagram explanations |
|||||||||||||
|
|||||||||||||
 |
|||||||||||||
Have you finished this pattern?Tag your pictures with #dropspattern #chocolatefudgeset or submit them to the #dropsfan gallery. Do you need help with this pattern?You'll find 11 tutorial videos, a Comments/Questions area and more by visiting the pattern on garnstudio.com. © 1982-2026 DROPS Design A/S. We reserve all rights. This document, including all its sub-sections, has copyrights. Read more about what you can do with our patterns at the bottom of each pattern on our site. |
|||||||||||||


With over 40 years in knitting and crochet design, DROPS Design offers one of the most extensive collections of free patterns on the internet - translated to 17 languages. As of today we count 325 catalogs and 12298 patterns - 12288 of which are translated into English (US/in).
We work hard to bring you the best knitting and crochet have to offer, inspiration and advice as well as great quality yarns at incredible prices! Would you like to use our patterns for other than personal use? You can read what you are allowed to do in the Copyright text at the bottom of all our patterns. Happy crafting!
Post a comment to pattern DROPS 114-31
We would love to hear what you have to say about this pattern!
If you want to leave a question, please make sure you select the correct category in the form below, to speed up the answering process. Required fields are marked *.