
Popular categories
Looking for a yarn?


Comments / Questions (15)
![]() Tina wrote:
Tina wrote:
Hallo, laut Strickschrift M1 (Schal) wird die zweite Reihe rechts gestrickt. Auf dem Bild sieht es aber nach glatt rechts aus, damit wäre die zweite Reihe dann doch links gestrickt. Bei den Handschuhen ist es klar, da hier ja in Runden gestrickt wird.
11.01.2026 - 19:21DROPS Design answered:
Liebe Tina, die 2. Reihe soll wie recht bei der Vorderseite aussehen, dh bei den Rückreihen wird man links stricken (= glattrechts). Viel Spaß beim Stricken!
12.01.2026 - 17:02
![]() Antonella Brunetti wrote:
Antonella Brunetti wrote:
Come si finisce la sciarpa con i 2 ferri a legaccio o con un ferro a M1? nella spiegazione non è chiaro
23.02.2017 - 20:26DROPS Design answered:
Buonasera Antonella, deve lavorare due ferri a legaccio, mantenendo il motivo M.1 quindi gli aumenti e diminuzioni. Buon lavoro!
23.02.2017 - 21:18
![]() Irmgard wrote:
Irmgard wrote:
Ik ben met de laatste 2 naalden bezig van de sjaal Drops 103-2. Hoe moeten deze gebreid worden? Als deze recht gebreid worden dan verandert er toch niets aan de goede kant? Moet de tweede naald (aan de verkeerde kant) dan hetzelfde als de goede kant gebreid worden? Telt de averechte naald die dan recht gebreid wordt als eerste naald van de laatste twee?
09.12.2013 - 12:32DROPS Design answered:
Hoi Irmgard. De twee laatste naalden moeten recht gebreid worden tegelijkertijd met het breien van M.1. Ik zie dat het recht breien niet in de Nederlandse vertaling stond. Dat is nu aangepast. Bedankt voor het melden.
10.12.2013 - 13:29
![]() Chris33 wrote:
Chris33 wrote:
Bonjour, je ne comprends pas ce que veut dire "enlever une aiguille" dans la réalisation de l'écharpe ? Merci pour votre aide !
28.09.2012 - 10:02DROPS Design answered:
Bonjour Chris, pour que le montage soit très souple, on monte les mailles sur 2 aiguilles et on continue ensuite avec 1 seule des aiguilles. Je vous invite à regarder la vidéo "Montage sur 2 aiguilles" - cf index vidéothèque. Bon tricot !
28.09.2012 - 10:54
![]() Brigitte wrote:
Brigitte wrote:
Danke für die schönen Anleitungen, stricke nur noch Drops Sachen und Natürlich mit Drops Wolle.
09.08.2011 - 23:06
![]() DROPS Design wrote:
DROPS Design wrote:
This is when the scarf is almost ready. You should work two last rows in garter which means K1 from RS, and K1 from WS. At the same time you do this - don't stop working M.1 but still do inc and dec as before when doing these last two rows.
14.01.2009 - 19:45
![]() Laurel Dormaier wrote:
Laurel Dormaier wrote:
What is the meaning of "Knit 2 rows of garter sts at the same time knit in Zig-zag pattern according to M.1." mean? Do I knit 2 garter stitch rows between each Zig-zag row or are the garter stitch rows only at the beginning and the end of the scarf?
14.01.2009 - 19:25
![]() DROPS Design wrote:
DROPS Design wrote:
Yes you place them alongside eachother to get larger sts so that the edge isn't turning out too tight.
05.04.2008 - 18:43Linda wrote:
Scarf:"Cast on 84 sts on 2 needles size 4mm. Pull out 1 needle and knit 2 rows garter stitch" So, you are using 2 needles alongside eachother to make one wide needle? Would you clarify this please? Many thanks
05.04.2008 - 17:54
![]() DROPS Design wrote:
DROPS Design wrote:
This is a pretty one.
05.09.2007 - 21:59
|
|||||||||||||
DROPS 103-2 |
|||||||||||||
|
|
|||||||||||||
The set consist of: DROPS scarf and gloves with a zig-zag pattern in ”Fabel”.
DROPS 103-2 |
|||||||||||||
|
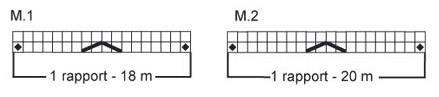
SCARF Knitting gauge: 28 sts in zig-zag pattern = 10 cm [4"] in the width. Garter sts: Knit back and forth on all rows. Pattern: See diagram M.1. The diagram is shown from the RS. Scarf: Cast on 84 sts on 2 needles size 4 mm [US 6] with Fabel (This is done to make the edge more elastic). Pull out 1 needle and knit 2 rows of garter sts – see explanation above. Continue with the zig-zag pattern as follows (1st row = RS): 5 garter sts, 1 stockinette st, M.1 (M.1= K into front and back of st, K6, slip 1 st as if to K, K1, psso, K2 tog, K6, K into front and back of st) over the following 72 sts, 1 stockinette st, 5 garter sts. Continue until the piece measures approx. 149 cm [58½"]. Knit 2 rows of garter sts at the same time knit in Zig-zag pattern according to M.1. Bind off loosely. ________________________________________ GLOVES Size: S/M – L/XL Materials:DROPS Fabel from Garnstudio 100 g for both sizes col. no. 672, wine red mix. DROPS double pointed needles size 2 mm [US 0] – or the size needed to obtain the correct knitting gauge. Knitting gauge: 30 sts x 39 rows in stockinette sts = 10 x 10 cm [4" x 4"] Pattern: See diagram M.1 and M.2. The diagram are shown from the RS. M.1 applies for size S/M. M.2 applies for size L/XL. Rib: * K1 , P1*, repeat from *-*. Glove: Remember the knitting gauge! Knit round on double pointed needles. Cast on 72-80 sts on double pointed needles size 2 mm [US 0] with Fabel. Knit 2 rounds of garter sts. Then knit M.1 or M.2 – see explanation abover. When the work measures 8-9 cm [3⅛"-3½"] K1 round at the same time dec. 16 sts evenly distributed = 56-64 sts. Continue in Rib – see explanation above. When the piece measures 10-11 cm [4"-4⅜"] continue with stockinette sts –all measures are now done from this point onwards. Insert 1 MT (marking thread) in the 2nd st. After 2-3 cm [¾"-1⅛"] of stockinette sts inc. for the thumb as follows: Inc. 1 st each side of the MT on every 4th row a total of 6-7 times = 13-15 thumb sts (knit new sts in stockinette sts). On the next row put those 13-15 st + 1 st each side = 15-17 sts on a thread or a stitch holder and cast on 3 new sts behind the gusset = 56-64 sts. Continue to knit until the piece measures 9-10 cm [3½"-4"]. On the next round knit as follows: 21-24 sts, put 13-15 sts on a thread or a stitch holder = no. 1, for the little finger. Cast on 1 new st and knit over the remaining 22-25 sts. Knit 4 rounds in stockinette sts over 44-50 sts. Then put the new st and 13-15 sts each side (= 27-31 sts) on a thread or a stitch holder = no. 2, for the third finger and the ring finger. Index finger: Knit 17-19 sts and cast on 1 new st = 18-20 sts. Knit in stockinette sts until the finger measures approx. 7-7 ½ cm [2¾"-2⅞"]. Knit the sts tog. 2 by 2, cut the thread and pull it through the remaining sts. Middle finger: Knit 7-8 sts from one end of thread or stitch holder no. 2. Cast on 2 new sts, knit 7-8 sts from the other end of thread or stitch holder no. 2, and pick up 2 sts towards the index finger = 18-20 sts. Knit in stockinette sts until the finger measures approx. 8-8 ½ cm [3⅛"-3 ¼"]. Now knit the sts tog. 2 by 2, cut the thread and pull through remaining sts. Ring finger: Knit the last 13-15 sts from thread or stitch holder no. 2, and pick up 3 sts towards the third finger = 16-18 sts. Knit in stockinette sts until the finger measures approx 7-7 ½ cm [2¾"-2⅞"]. Knit sts tog. 2 by 2 , cut the thread and pull through the remaining sts. Little finger: Knit the 13-15 sts from thread or stitch holder no. 1 and pick up 1 st towards the ring finger = 14-16 sts. Knit in stockinette sts until the finger measures approx. 6-6 ½ cm [2⅜"-2½"]. Now knit sts tog. 2 by 2, cut the thread and pull through the remaining sts. Thumb: Knit the 15-17 sts from the thread over the gusset, and pick up 3 sts behind the gusset = 18-20 sts. Knit in stockinette sts until the thumb measure approx. 6-6 ½ cm [2⅜"-2½"]. Now knit sts tog. 2 by 2, cut the thread and pull it through the remaining sts. Knit 1 more glove, but knit it reverse: Insert the MT in the second but last st. Separate for the little finger as follows: Knit 22-25 sts, put 13-15 sts on a thread or stitch holder, cast on 1 new st and then knit 21-24 sts. |
|||||||||||||
Diagram explanations |
|||||||||||||
|
|||||||||||||
 |
|||||||||||||
Have you finished this pattern?Tag your pictures with #dropspattern or submit them to the #dropsfan gallery. Do you need help with this pattern?You'll find 22 tutorial videos, a Comments/Questions area and more by visiting the pattern on garnstudio.com. © 1982-2026 DROPS Design A/S. We reserve all rights. This document, including all its sub-sections, has copyrights. Read more about what you can do with our patterns at the bottom of each pattern on our site. |
|||||||||||||


With over 40 years in knitting and crochet design, DROPS Design offers one of the most extensive collections of free patterns on the internet - translated to 17 languages. As of today we count 324 catalogs and 12290 patterns - 12280 of which are translated into English (US/in).
We work hard to bring you the best knitting and crochet have to offer, inspiration and advice as well as great quality yarns at incredible prices! Would you like to use our patterns for other than personal use? You can read what you are allowed to do in the Copyright text at the bottom of all our patterns. Happy crafting!
Post a comment to pattern DROPS 103-2
We would love to hear what you have to say about this pattern!
If you want to leave a question, please make sure you select the correct category in the form below, to speed up the answering process. Required fields are marked *.