
Popular categories
Looking for a yarn?


Comments / Questions (12)
![]() Bret wrote:
Bret wrote:
Ma question a bien été enregistrée le 15/04 mais sans réponse dois-je faire suivre mes fils ou bien puis-je faire des petites bobines pour chaque motifs mon problème avec les aiguilles circulaires c’est que le fil se trouve à l’opposé du motif sur certains rangs y’a t’il une solution merci.Je tiens à vous remercier pour la rapidité de livraison concernant ma commande laines de bonne qualité et coloris super je n’hésiterai pas à repasser une commande
17.04.2025 - 20:43DROPS Design answered:
Bonjour Mme Bret, comme indiqué ci-dessous, si les rayures sont tricotées en rond, le jacquard ne sera tricoté qu'en allers et retours, après la division de l'ouvrage pour le dos/le devant. Bon tricot!
22.04.2025 - 11:09
![]() Bret wrote:
Bret wrote:
En se qui concerne le jacquard lorsqu’on tricote avec des aiguilles circulaires vu que l’on tricote que sur l’endroit comment fait on on doit faire suivre les fils sur tout l’ensemble du tricot ou bien peut-on faire autrement merci d’avance pour votre réponse
15.04.2025 - 23:02DROPS Design answered:
Bonjour Mme Bret, tricotez les rayures/le diagramme comme indiqué au début des explications sous POINT FANTAISIE et JACQUARD ... tailles femme / homme. Le jacquard se tricote ici en allers et retours, lorsque vous divisez l'ouvrage après 31-32 (36-37) cm - vous terminez le dos et le devant en allers et retours et le jacquard comme indiqué sous Ancre et Roue. Bon tricot!
22.04.2025 - 10:08
![]() Linnea Petters wrote:
Linnea Petters wrote:
Hei hei, jeg forstår ikke helt hvordan jeg skal felle av rundt hals. Jeg strikker herregenser. Kan dere forklare dette litt nøyere: Videre felles mot halsen 3 m x 1, 1 m x 1 på hver 2.p. Fell de resterende m når arb måler 64-66 cm. Tusen takk. Hilsen Linnea
23.03.2024 - 19:22DROPS Design answered:
Hej Linnea, jo når du strikker pinden fra halsen, feller du først 3 masker, næste gang du strikker pinden fra halsen, feller du 1 maske :)
03.04.2024 - 14:44
![]() Torsten Grabow wrote:
Torsten Grabow wrote:
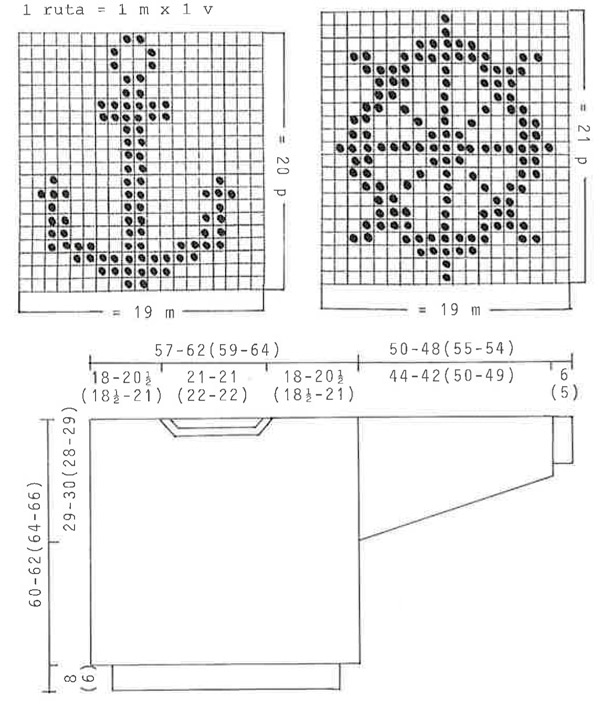
Ich habe festgestellt das in der Herren Anleitung ein Fehler ist bezüglich der Größe . Die Angaben für das Rückenteil (60-62 cm ) ist kleiner als das Vorderteil (64-66 cm)
13.05.2022 - 20:04
![]() Christine Brenna wrote:
Christine Brenna wrote:
Hei Jeg vil gjerne strikke begge disse genserne, men hettegenseren må bli strl xxl. Finnes det oppskrift på det? Mvh Christine
04.05.2022 - 12:43
![]() Grabow Torsten wrote:
Grabow Torsten wrote:
Also ich bin schon enttäuscht da ich den Pullover gestrickt und Gewaschen habe leider ist das weiß nicht mehr weiß weil das blau färbt. Sehr schade.
03.05.2022 - 12:17DROPS Design answered:
Lieber Torsten, dunkle Farben enthalten anfangs oft zusätzliche Farbe, daher ist es wichtig, dass das Kleidungsstück so lange ausgespült wird, bis das Wasser klar ist. Damit vermeidet man, dass die überschüssige Farbe andere Farben des Strickstücks beeinträchtigt.
03.05.2022 - 16:29
![]() Rhonda wrote:
Rhonda wrote:
Thank you your quick answer about the needle length. In the pattern it calls for 3 mm double pointed needles for the sleeves and then change to 5mm double pointed needles after the ribbing. Where do you use the 40cm circular needles?
01.03.2022 - 13:53DROPS Design answered:
Dear Rhonda, you will use the 40 cm circular needle size 5 m m when increasing mid under sleeve, when there will be too much stitches to fit the double pointed needes. Happy knitting!
01.03.2022 - 13:57
![]() Rhonda wrote:
Rhonda wrote:
What length circular needles do I need to knit these sweaters? I know it’s 3 and 5 mm but what length needle is best?
28.02.2022 - 18:54DROPS Design answered:
Hi Rhonda, You will need 80 cm circular needles for the body and 40 cm circular needles for the sleeves and collar. Happy knitting!
01.03.2022 - 09:09
![]() Lydie wrote:
Lydie wrote:
Serait il possible d’avoir les explications en XXL parce que même la plus grande taille homme n’est pas assez grande pour mon mari ?
06.02.2021 - 20:25DROPS Design answered:
Bonjour Lydie, nous ne sommes malheureusement pas en mesure de pouvoir adapter chacun de nos modèles à chaque demande, vous pouvez toutefois vous inspirer d'un modèle de même tension (= 17 m = 10 cm) dans la taille souhaitée. Votre magasin saura vous assister si besoin, même par mail ou téléphone. Merci pour votre compréhension, bon tricot!
08.02.2021 - 08:43
![]() Silje Hafredal wrote:
Silje Hafredal wrote:
Hei, er det bare 19 cm med turkis på dame-mønsteret? Synes det så kort ut. Kanskje det er 29 som på herremøsteret? Og skal det ene erme være hvit og det andre med flere farger?
18.08.2020 - 15:55DROPS Design answered:
Hej Silje, De 8 cm rib i turkis er ud over de cm som står under Damemønster, dvs du strikker først 8 cm rib og så 19 cm glatstrik i turkis. God fornøjelse!
19.08.2020 - 11:38
|
|||||||
Ahoy Mates! |
|||||||
 |
 |
||||||
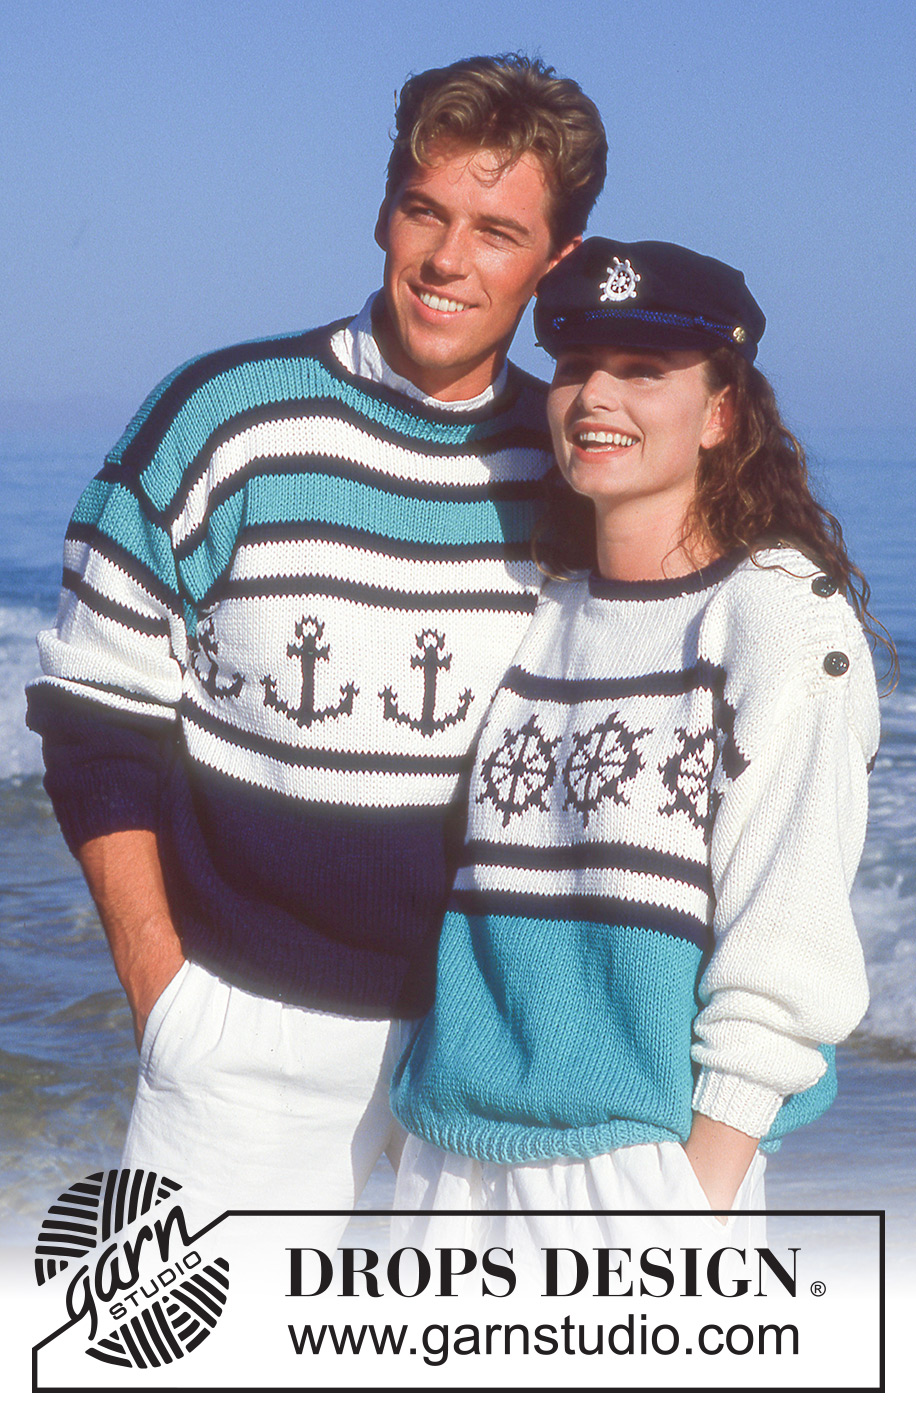
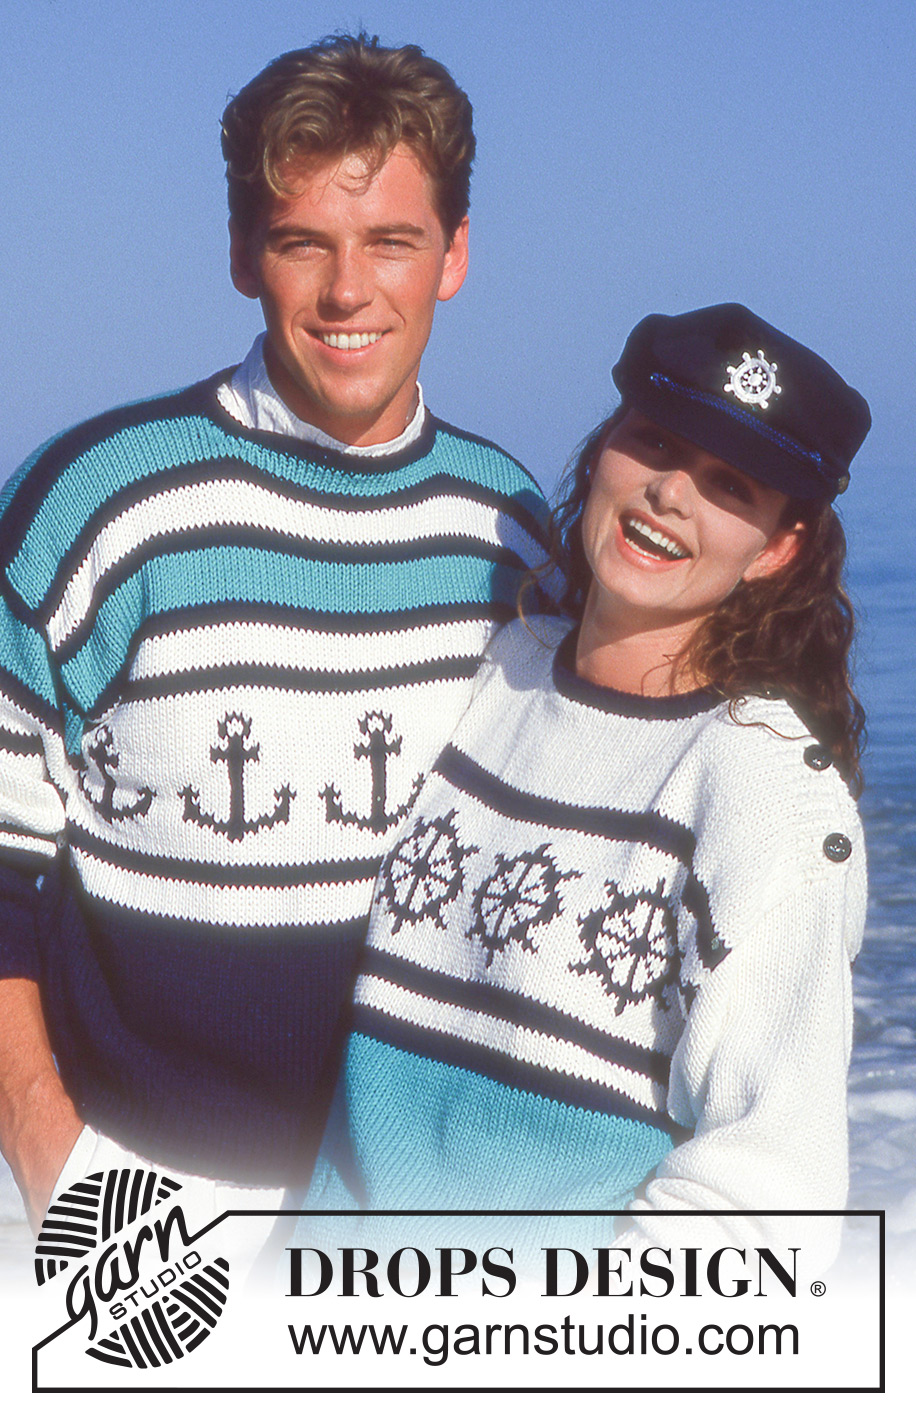
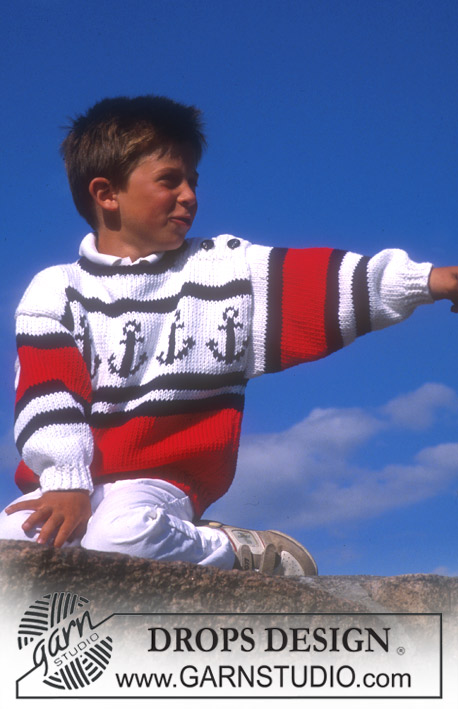
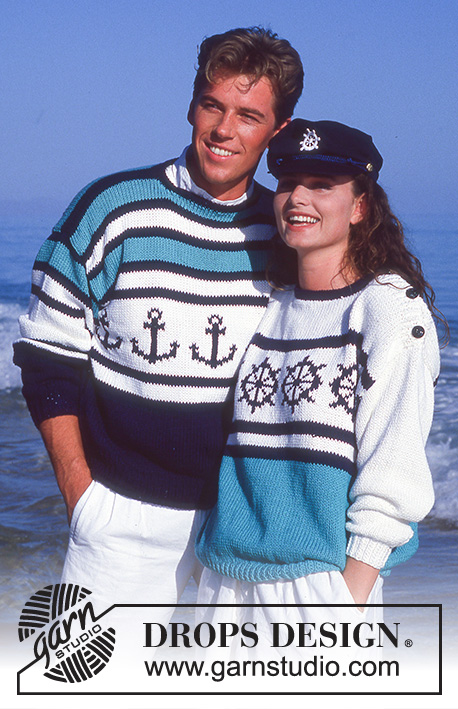
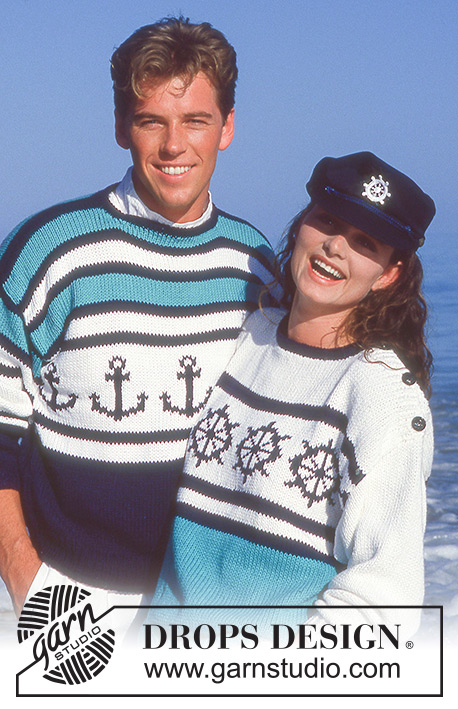
DROPS jumper with nautical pattern motifs in “Paris”. Ladies and men ’s size S – L.
DROPS 14-4 |
|||||||
|
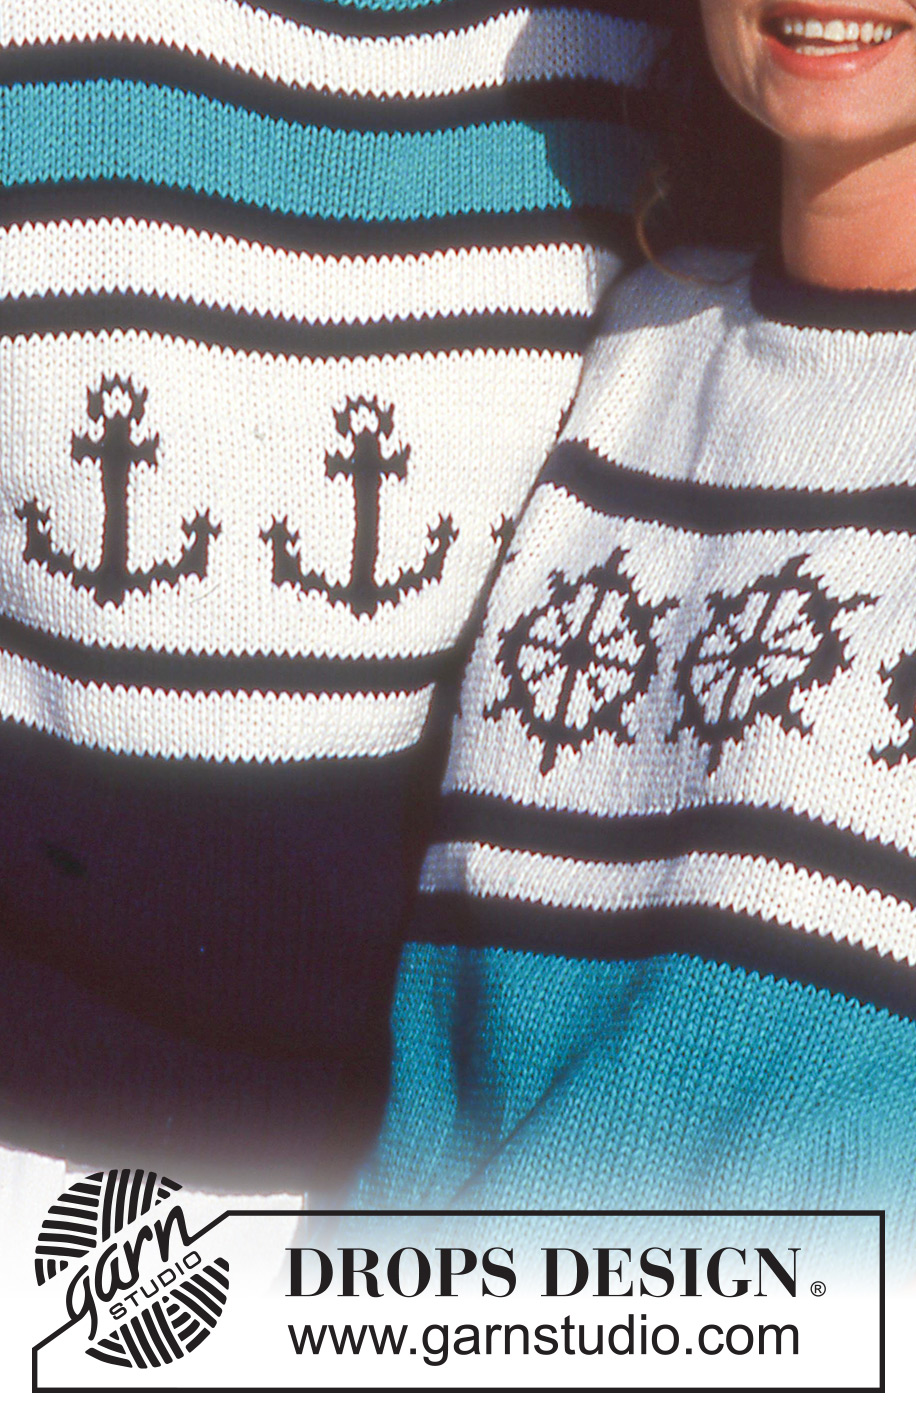
Rib: *K1 into back of loop, P1*, repeat from *-*. Pattern: See diagrams. The diagram shows the pattern from the RS and the entire pattern is worked in stockinette st. Pattern ladies sizes: Body: 17-19 cm turquoise, 6 rounds navy blue, 4 rounds white, 6 rounds navy blue, wheel (se below), 6 rounds navy blue, complete piece in white. Right sleeve: All white Left sleeve: 18 cm white, 6 rounds navy blue, 6 rounds white, 6 rounds navy blue, 9 cm / 3½" / 3½" turquoise, 6 rounds navy blue, complete piece in white. Pattern men’s sizes: Body: navy blue until piece measures 27-29 cm, 6 rounds white, 4 rounds navy blue, 4 rounds white, anchor (see below), 4 rounds white, 4 rounds navy blue, 6 rounds white, 4 rounds navy blue, 10 rounds turquoise, 4 rounds navy blue, 6 rounds white, 4 rounds navy blue, 10 rounds turquoise, 4 rounds navy blue = finished measurements. Sleeves: navy blue until piece measures 25-24 cm, 6 rounds white, 4 rounds navy blue, 13 cm white, 4 rounds navy blue, 6 rounds white, 4 rounds navy blue, 10 rounds turquoise, 4 rounds navy blue = finished measurements. Anchor and wheel: See diagram. Work pattern on front piece as follows: 1-5 (3-7 white stockinette st, 5 repeats across row, 1-5 (3-7) white stockinette sts, and repeat on back piece. Body: The jumper is worked in the round on circular needle. Numbers in ( ) refer to men’s sizes. Cast on 148-154 (156-162) sts on circular needle size 3 mm / US 2.5 / US 2.5 with turquoise (navy blue) and work 8-8 (6-6) cm Rib. Change to circular needle size 5 mm / US 8 / US 8 and continue in stockinette st and pattern (see above), at the same time inc 46-56 (46-56) sts evenly on first round = 194-210 (202-218) sts. REMEMBER THE GAUGE! When piece measures 31-32 (36-37) cm divide the piece in two and complete front and back pieces separately. Front piece: = 97-105 (101-109) sts. Continue in pattern. When piece measures 56-58 (60-62) cm bind off the middle 29 sts for all sizes and complete each side separately. Continue as follows for ladies sizes: Right shoulder: bind off to shape the neckline on every other row: 1 st 3 times and bind off remaining sts on shoulder when piece measures 60-62 cm. Left shoulder: Change to needle size 3 mm / US 2.5 / US 2.5 and work 4 cm / 1½" / 1½" rib, but after 3 cm / 1" / 1" make 3 buttonholes evenly distributed on row. 1 buttonhole = bind off 2 sts and cast on 2 new sts on return row. Continue as follows for men’s sizes: bind off to shape the neckline on every other row: 3 sts 1 time, 1 st 1 time and bind off remaining sts on shoulder when piece measures 64-66 cm. Back piece: = 97-105 (101-109) sts. Continue in pattern. When piece measures 58-60 (62-64) cm bind off the middle 33-33 (35-35) sts for neck and continue as follows for ladies sizes: right shoulder: dec 1 st on neckline on next row and bind off remaining sts on shoulder when piece measures 60-62 cm. Left shoulder: change to needle size 3 mm / US 2.5 / US 2.5 and work 5 cm / 2" / 2" rib, bind off. Continue as follows for men’s sizes: dec 1 st on neckline on next row and bind off remaining sts on shoulder as described for front piece. Sleeve: Cast on 34-36 (36-36) sts on double pointed needles size 3 mm / US 2.5 / US 2.5 with white (navy blue) and work 6-6 (5-5) cm Rib. Change to double pointed needles size 5 mm / US 8 / US 8 and continue in pattern (see above), at the same time inc 15-15 (11-13) sts evenly on first round = 49-51 (47-49) sts. At the same time inc 2 sts mid under arm a total of 25-26 (25-25) times on every 4th round for ladies size S/M and men’s size M/L, on every *3rd and 4th round* alternately for ladies size M/L and on every 4th and 5th round alternately for men’s size S/M = 99-103 (97-99) sts. Bind off when piece measures 50-48 (55-54) cm. Assembly: Sew shoulder seams. Pick up approx 80 sts round neckline on double pointed needles size 3 mm / US 2.5 / US 2.5 with navy blue (for ladies sizes pick up along rib on front and back pieces as well and work edge back and forth on needle) and work 4 rows stockinette st, P 1 row (= folding edge), 4 rows stockinette st, bind off and fold edge double towards WS and fasten. Set in sleeves and sew on buttons. |
|||||||
Diagram explanations |
|||||||
|
|||||||
 |
|||||||
Have you finished this pattern?Tag your pictures with #dropspattern or submit them to the #dropsfan gallery. Do you need help with this pattern?You'll find 20 tutorial videos, a Comments/Questions area and more by visiting the pattern on garnstudio.com. © 1982-2026 DROPS Design A/S. We reserve all rights. This document, including all its sub-sections, has copyrights. Read more about what you can do with our patterns at the bottom of each pattern on our site. |
|||||||


With over 40 years in knitting and crochet design, DROPS Design offers one of the most extensive collections of free patterns on the internet - translated to 17 languages. As of today we count 324 catalogs and 12290 patterns - 12280 of which are translated into English (US/in).
We work hard to bring you the best knitting and crochet have to offer, inspiration and advice as well as great quality yarns at incredible prices! Would you like to use our patterns for other than personal use? You can read what you are allowed to do in the Copyright text at the bottom of all our patterns. Happy crafting!
Post a comment to pattern DROPS 14-4
We would love to hear what you have to say about this pattern!
If you want to leave a question, please make sure you select the correct category in the form below, to speed up the answering process. Required fields are marked *.