
Popular categories
Looking for a yarn?


Comments / Questions (185)
![]() KACZOROWSKI wrote:
KACZOROWSKI wrote:
Bonjour, Pour le dos et le devant il est demandé de monter 203 mailles, or quand je calcule le nombre de mailles des explications, j'ai 19+36+36+19+96 mais ça me donne 206. D'où viennent les trois mailles en plus et qu'est ce que j'ai mal compris? Merci par avance.
29.12.2013 - 10:04DROPS Design answered:
Bonjour Mm Kaczorowski, en taille XXL, on a : 3 m end, 36 m côtes 3 m env/3 m end, 26 m de M1, 36 m côtes 3 m end/3 m env, 3 m end (côté), 96 m côtes 3 m env/3 m end, 3 m env = 203 m. Au dernier rang de M1, on diminue 2 m au dos et on augmente 4 m au devant (cf diag) = 205 m. Bon tricot!
30.12.2013 - 15:36
![]() NTD wrote:
NTD wrote:
Les côtes du bonnet sont 5 env 2 rend , que veut dire 2 rend ? j ne vois pas d'explication merci
18.12.2013 - 20:22DROPS Design answered:
Bonjour NTD, les côtes se tricotent ainsi: "5 m env, 2 m end" (faute de frappe corrigée), merci. Bon tricot!
19.12.2013 - 08:53
![]() Mariethe House wrote:
Mariethe House wrote:
Vous annoncez le pull et le bonnet en Alaska mais dans les explications du bonnet, il est question de la laine: eskimo!! Pouvez-vous me dire quelle laine il faut employer pour le bonnet .Merci.
26.11.2013 - 22:27DROPS Design answered:
Bonjour Mme House, le titre du modèle était erroné, le bonnet se tricote bien en Eskimo, les fournitures nécessaires se trouvent après les explications du pull, soit 100 g Eskimo. Bon tricot!
27.11.2013 - 09:29
![]() Margit wrote:
Margit wrote:
När man gör raglanärm står det avigsidan vad menas med det eftersom den stickas på rundsticka
25.11.2013 - 18:18
![]() KACZOROWSKI wrote:
KACZOROWSKI wrote:
J'essaie désespérément de comprendre le modèle 85-23 notamment la transition entre M1 et M3. Pourquoi la maille ajoutée à l'endroit se retrouve tricotée à l'envers ? Et c'est pareil au milieu, où les mailles qu'on ajoute aux rangs précédents sont tricotées à l'envers puis à l'endroit. Existe il d'autres schémas explicatif avec une sorte de "dessin" plus clair sur ce que doit donner le tricot? J'espère que mes questions sont compréhensibles. Merci par avance pour votre aide.
16.11.2013 - 09:47DROPS Design answered:
Bonjour Mme Kaczorowski, un nouveau diagramme M.1 a été publié, merci. Bon tricot!
04.12.2013 - 13:59
![]() Chouli wrote:
Chouli wrote:
Bonjour, pour la taille L, combien de pelotes recommandez-vous ? merci !
05.11.2013 - 12:13DROPS Design answered:
Bonjour Chouli, en taille L, il faut 1000 g DROPS Alaska, soit 1000 / 50 g la pelote = 20 pelotes. Bon tricot!
05.11.2013 - 13:30
![]() Morganj wrote:
Morganj wrote:
Ontzetten bedankt voor de reactie, ik heb nog een opvolgvraagje. er staat in het patroon dat je de nieuwe steken recht moet breien tot dat ze deel uitmaken van teltekening M2, wat word daar dan precies mee bedoelt?
22.10.2013 - 14:32DROPS Design answered:
Hetzelfde antwoord. Je breit recht tot er weer een averechte steek zou moeten komen in het patroon. Misschien helpt het als je het voor je ziet als stof met een patroon waar je een vorm uitknipt - het patroon moet optische doorlopen. Succes!
22.10.2013 - 17:45
![]() Morgan wrote:
Morgan wrote:
Na 12 cm moet je 1 steek meerderen aan iedere kant van het markeerdraad. hoe zorg je er nou voor dat die meerderingen goed overlopen in het patroon? moet dan het patroon gewoon helemaal opgeschoven worden?
22.10.2013 - 12:24DROPS Design answered:
Het patroon moet niet verschuiven, blijf gewoon het patroon boven elkaar breien. Het patroon wordt breder aan de zijkanten. Stel de laatste st voor de markeerder zijn 1 av, 5 r, 1 av, 2 r, dan krijgt u dus een rechte steek erbij.
22.10.2013 - 12:57
![]() Mion Annie wrote:
Mion Annie wrote:
Bonjour, Montage devant et dos, taille L , 179 mailles : le total des mailles fait 197 mailles. Où se trouve l'erreur ? Merci par avance de votre réponse.
18.10.2013 - 11:22DROPS Design answered:
Bonjour Mme Mion, en taille L, on monte 179 m et on tricote ainsi: 3 m end, (marqueur côté), 30 m en côtes 3/3 en commençant par 3 m env, 26 m de M1, 30 m côtes 3/3 en commençant par 3 m end, 3 m end, (marqueur côté), 84 m côtes 3/3 en commençant par 3 m env, puis 3 m env. Bon tricot!
18.10.2013 - 15:11
![]() Wilma wrote:
Wilma wrote:
Ik heb deze trui voor mijn man gebreid. Hij is fantastisch mooi geworden en heerlijk warm.
16.08.2013 - 09:12
|
||||||||||||||||||||||||||||
To the Sea |
||||||||||||||||||||||||||||
|
|
||||||||||||||||||||||||||||
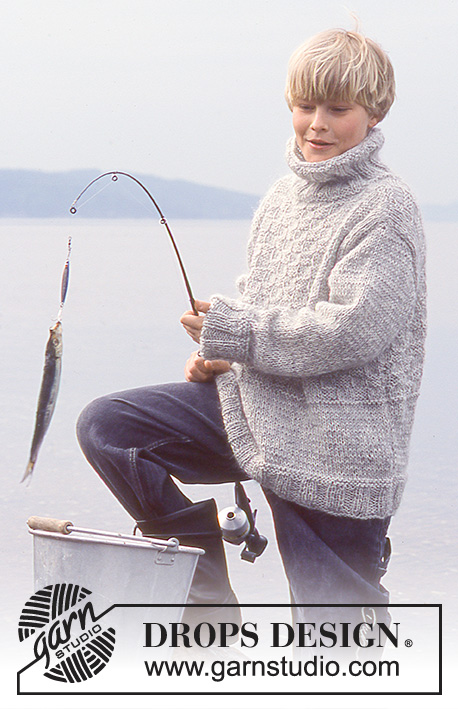
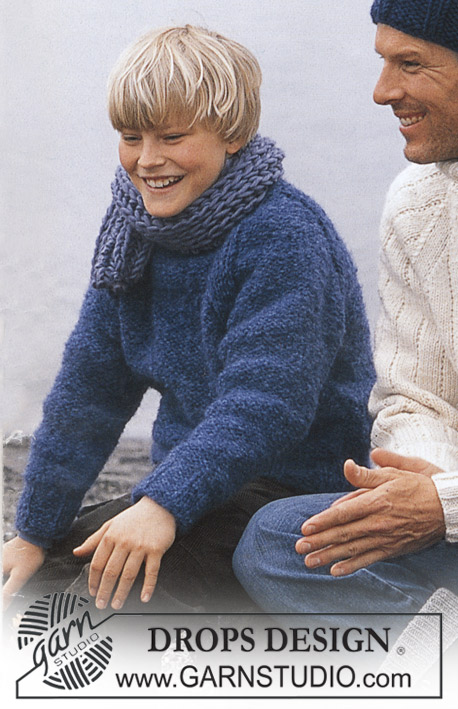
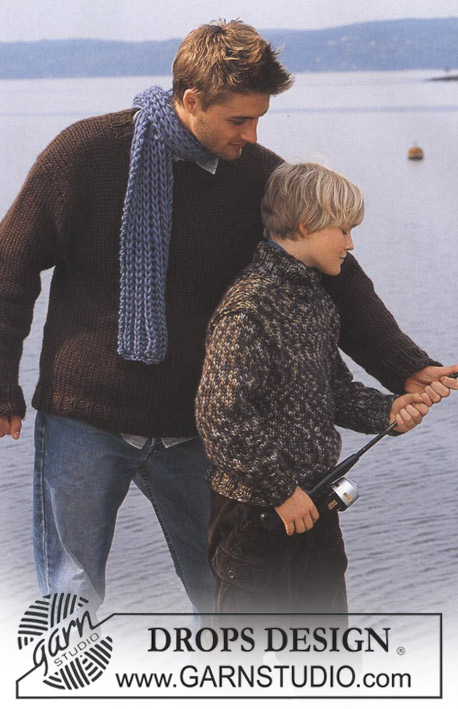
Knitted men's sweater with cables and high neck in DROPS Alaska, plus hat in DROPS Snow
DROPS 85-23 |
||||||||||||||||||||||||||||
|
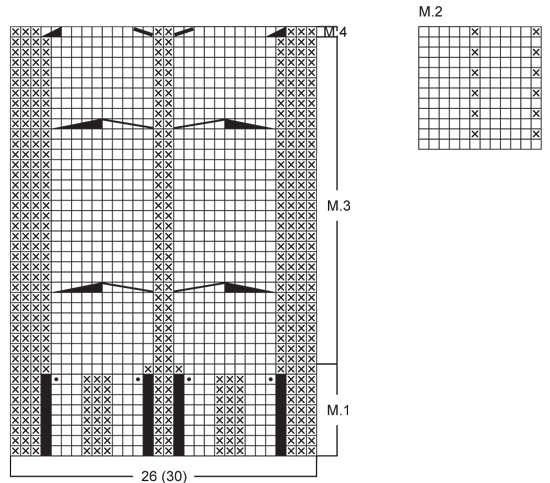
Gauge: 17 sts x 22 rows on larger needles in stockinette st = 10 x 10 cm. Rib: *K 3, P 3*, repeat from *-*. Pattern: See the chart below. The pattern is seen from the right side. Decreasing tips (for raglan): Dec as follows on right side: Start 4 sts before the marker: Sl 1 as if to knit, K 1, psso, K 4 (the marker is in the middle of these 4 sts), K 2 tog. Dec as follows on wrong side: Start 4 sts before the marker, P 2 tog, P 4, P 2 tog, twisting sts (if this is too difficult, sl 2, return to left needle 1 by 1, twisting each, then P 2 tog). BODY Cast on 155-159-179-183-203 sts on smaller circular needles; join and knit rib as follows: K 3-5-3-5-3 (put a marker in the center st = side), *P 3, K 3*, repeat *-* over the following 24-24-30-30-36 sts, Pattern 1 (= 26 sts), *K 3, P 3*, repeat *-* over the following 24-24-30-30-36 sts, K 3-5-3-5-3 (put a marker in the center st = side), *P 3, K 3*, repeat *-* over the following 72-72-84-84-96 sts and finish with P 3. On the last row of Pattern 1 dec 2 sts on back and at the same time inc 4 sts on the front as shown in chart = 157-161-181-185-205 sts. When Pattern 1 is complete (the piece measures approx. 4 cm) change to larger circular needles and continue as follows: K 3-5-3-5-3, Pattern 2 over the following 24-24-30-30-36 sts, Pattern 3 (= 30 sts), Pattern 2 over the following 24-24-30-30-36 sts – reverse the pattern so that it will be the same on both sides of Pattern 3, K 3-5-3-5-3 and Pattern 2 over the remaining 73-73-85-85-97 sts. When the piece measures 12 cm inc 1 st at each side of sts with markers at each side every 5-4-6-4-4 cm a total of 4-6-4-6-6 times – knit the increased sts in Pattern 2 as you go along = 173-185-197-209-229 sts. When the piece measures 34-41-42-43-43 cm bind off 7 sts at each side for armhole (= the sts with the markers + 3 sts each side = 82-88-94-100-110 sts on front and 77-83-89-95-105 sts on back. Lay piece aside and knit the sleeves. SLEEVE Cast on 42-42-42-48-48 sts on double-pointed needles 4 mm [US 6]; join and place a marker at the join. Knit rib. When the piece measures 4 cm change to larger double pointed needles and work following Pattern 2 (the pattern will not come out even). When the piece measures 9-12-14-14-14 cm inc 1 st on each side of seed st at marker every 3.5-2.5-2-2.5-2 cm a total of 11-14-17-15-20 times (knit the incd sts into the pattern as you go along) = 64-70-76-78-88 sts. When the piece measures 50-51-53-53-54 cm bind off 7 sts at marker (the st with the marker + 3 sts each side of marker) = 57-63-69-71-81 sts. Lay piece aside and knit second sleeve. Yoke: Put the sleeves in on the same circular needles as Body where you bound off for armhole = 273-297-321-337-377 sts Put a marker in each transition between Body and sleeves = 4 markers. Knit 2-3-0-0-0 rows before decreasing. Read the entire next section before knitting: Raglan shaping: Dec 1 st at each side of each marker (= 8 decs) – see Decreasing tips above. Dec every other row 18-21-23-24-24 times and every row 0-0-1-1-6 times. Pattern: When the piece measures 50-59-61-63-65 cm – adjust to end after a cable – knit Pattern 4 over the center 30 sts (decreasing the 4 sts incd on the last row of Pattern 1 at lower edge of Body) – knit the remaining sts as before. On the next row put the center 30-30-30-34-34 sts on a st holder for the neck and knit back and forth on needles. Continue to dec 1 st at each neck edge every other row 1-2-2-2-2 times. After all raglan and neck shaping is complete, 93-91-91-95-95 sts remain and the piece measures approx. 56-66-68-70-72 cm to shoulder. Neckband: Pick up and knit approx. 32-38 sts in front neck (incl. sts on st holder) on double-pointed needles and put all sts on same needles = approx. 125-133 sts. Join and P 1 row, then K 1 row, decreasing evenly distributed to 83-89-89-95-95 sts. Knit rib (K 3, P 3) – but at center front there should be a P 2, following pattern on front. When the collar measures 18-20-20-22-22 cm bind off all sts in rib. Fold neckband out to right side. If you want a crew neck, knit as follows: knit rib until the collar measures approx. 10-11-12-12-13 cm, bind off in pattern. Fold the neckband to wrong side and stitch in place. Assembly: Sew opening under the sleeve. HAT: Sizes: one-size Materials: DROPS SNOW from Garnstudio 100 gr nr 15, marine blue. DROPS 9 mm [US 13] double-pointed needles, or size needed to obtain correct gauge. Gauge: 10 sts x 14 rows in stockinette st = 10 x 10 cm. Rib: *P 5, K 2*, repeat from *-*. Hat: Cast on 56 sts; join and place a marker at the join. Knit 1 row stockinette st, then knit rib – see instructions above. When the piece measures 12 cm dec all P 5 to P 4 = 48 sts. When the piece measures 15 cm dec all P 4 to P 3 = 40 sts. Dec in the same way 2 more times with 3 cm between each dec round so that there will be 1 P less for each dec round = 24 sts – the rib is now *K 2, P 1*. When the piece measures 22 cm knit the next row as follows: *K 2 tog, P 1*, repeat from *-* over all sts = 16 sts. Cut yarn and pull through the remaining sts, fasten neatly. Hat measures approx 23 cm high. |
||||||||||||||||||||||||||||
Diagram explanations |
||||||||||||||||||||||||||||
|
||||||||||||||||||||||||||||
 |
||||||||||||||||||||||||||||
 |
||||||||||||||||||||||||||||
Have you finished this pattern?Tag your pictures with #dropspattern or submit them to the #dropsfan gallery. Do you need help with this pattern?You'll find 25 tutorial videos, a Comments/Questions area and more by visiting the pattern on garnstudio.com. © 1982-2026 DROPS Design A/S. We reserve all rights. This document, including all its sub-sections, has copyrights. Read more about what you can do with our patterns at the bottom of each pattern on our site. |
||||||||||||||||||||||||||||


With over 40 years in knitting and crochet design, DROPS Design offers one of the most extensive collections of free patterns on the internet - translated to 17 languages. As of today we count 324 catalogs and 12278 patterns - 12268 of which are translated into English (US/in).
We work hard to bring you the best knitting and crochet have to offer, inspiration and advice as well as great quality yarns at incredible prices! Would you like to use our patterns for other than personal use? You can read what you are allowed to do in the Copyright text at the bottom of all our patterns. Happy crafting!
Post a comment to pattern DROPS 85-23
We would love to hear what you have to say about this pattern!
If you want to leave a question, please make sure you select the correct category in the form below, to speed up the answering process. Required fields are marked *.