
Popular categories
Looking for a yarn?


Comments / Questions (185)
![]() Rosa wrote:
Rosa wrote:
Hola, estoy tejiendo el cuerpo y tengo una duda en esta parte: cuando la pieza mida 12 cm aum 1 pt en cada lado de los pts con MP, en cada lado, etc y tejer los pts aum en M.2 conforme avanza el tejido. Como tejo esos pts aum en M.2 ?? es decir, tengo 7 pts (5+2 aum) y los debo tejer en pt jersey der los 7 pts ?? Gracias y un saludo.
16.03.2015 - 18:10DROPS Design answered:
Hola Rosa. Los pts aum se trabajan según el diagrama M.2 (es decir, trabajar cada pt aum según toque en el diagrama para continuar el dibujo)
20.03.2015 - 10:57
![]() Mette Starcke wrote:
Mette Starcke wrote:
Hvorfor skal der kun strikkes en maske perlestrik i siden? På foto ser det ud som om at der er mange flere (hulmønster i alle "striberne") Venlig hilsen Mette
31.01.2015 - 12:19DROPS Design answered:
Hej Mette, Jo men følger du diagram M.2 så får du automatisk 1 række med perlestrik imellem hver glatstrikkede parti. God fornøjelse!
02.02.2015 - 13:43
![]() Dawn wrote:
Dawn wrote:
Is there a woman's sweater to match the mans sweater?
30.01.2015 - 16:03DROPS Design answered:
Dear Dawn, you can adapt this to a woman size checking measurement in the measurement chart (in cm) - or find a similar one for woman with our search engine. Happy knitting!
02.02.2015 - 08:40
![]() Gabriele wrote:
Gabriele wrote:
Liebes Dropsteam. Bin jetzt am Halsausschnitt angelangt. Es sind bei mir 26 Mittelmaschen, die 4 M wurden abgenommen. Es steht, es sollen jetzt 34 M sein.Verstehe ich nicht. Brauche noch M für den Raglan .L. G. Gabriele
21.01.2015 - 15:27DROPS Design answered:
Die Mittel-M sind ja nicht festgelegt. Sie haben am Anfang der Passe 337 M auf der Nadel, 100 M für das Vorderteil und 95 für das Rückenteil, der Rest ist für die Ärmel, dann nehmen Sie für die Raglanabnahmen ab (pro Abnahme-Rd 8 M) und wenn Sie die erforderliche Gesamthöhe erreicht haben, legen Sie die mittleren 34 M des Vorderteils still.
27.01.2015 - 22:50Justine wrote:
It states that in the last row of pattern 1 the pattern should be increased by 4 in the front, but decreased by 2 in the back. I don't see on the chart where the decreases should happen. Thank you for your assistance.
18.01.2015 - 06:18DROPS Design answered:
Dear Justine, in last row in M.1 you see some squares with a dot in the square, this means to inc working 2 sts in this st (ie work alternatly in front and back loop of st), ie you will inc 4 sts in M.1. Happy knitting!
19.01.2015 - 11:40JoAnne Nichols wrote:
In the instructions for the sleeve, the pattern says: "When the piece measures 9-12-14-14-14 cm inc 1 st on each side of seed st at marker". What is the "seed st"?
21.12.2014 - 16:34DROPS Design answered:
Dear Mrs Nichols, in M2 you work a st in seed st ( the sts worked alternately K and P every round), inc will be done before and after this st worked in seed st under arm. Happy knitting!
22.12.2014 - 15:31JoAnne Nichols wrote:
In the first row, it says (for L) to "knit rib as follows: K5(put a marker in the center st = side)". What does this mean? What center stitch? The 3rd stitch of the 5? And does the marker go IN the stitch itself or does it remain on the needle, moving up as the knitting progresses?
21.12.2014 - 15:32DROPS Design answered:
Dear Mrs Nichols, under body, you start row with K3, put the marker (marks 1st side) in the 2nd of the K3 st, the 2nd marker to the other side will be added in the 2nd of K3 on the other side. (Note: Size L is here 3rd size). Marker should be then moved up when knitting, increase will be done each side of the sts with markers. Happy knitting!
22.12.2014 - 15:29
![]() Gabriele H. wrote:
Gabriele H. wrote:
Liebes Drops Team. Lieben Dank. Yippi den ersten Ärmel richtig geschafft. Schöne Weihnachten. L.G Gabriele H.
14.12.2014 - 21:20
![]() Gabriele H. wrote:
Gabriele H. wrote:
Liebes Drops Team. Ärmel. Bin bei der 7. Zunahme, mittlere Perl -M, lings und rechts auch wieder Perl-M? Lieben Gruß Gabriele
13.12.2014 - 19:17DROPS Design answered:
Ja genau, Sie müssen ja immer wieder neue Muster-Rapporte "erschaffen". Einen haben Sie nun geschafft (1. Zunahme = Perl-M, 2.-6. Zunahme glatt re), also wiederholen Sie nun die 1.-6. Zunahme, d.h. nun kommt wieder rechts und links der mittleren Perl-M eine Perl-M.
14.12.2014 - 09:40
![]() Gabriele H. wrote:
Gabriele H. wrote:
Liebes Dropsteam. Lieben Dank, für die schnelle Antwort. Probiere es.,Wenn es nicht funktioniert, wende mich nochmal an Sie. L.G.
07.12.2014 - 21:01
|
||||||||||||||||||||||||||||
To the Sea |
||||||||||||||||||||||||||||
|
|
||||||||||||||||||||||||||||
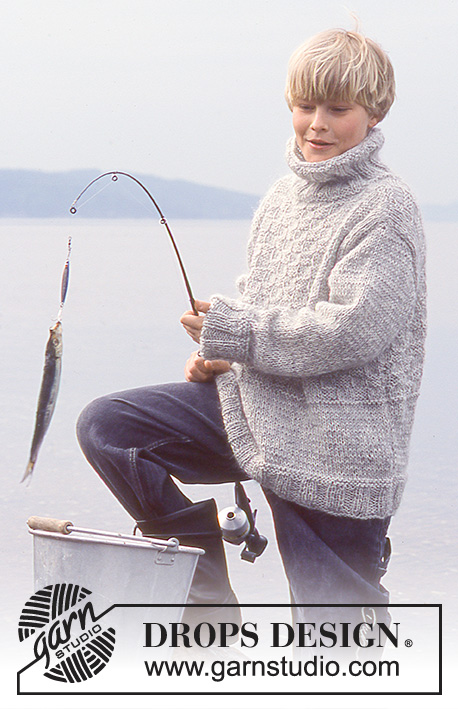
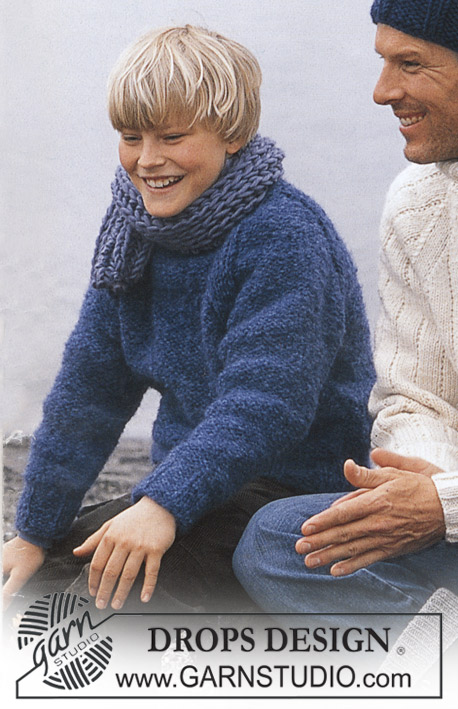
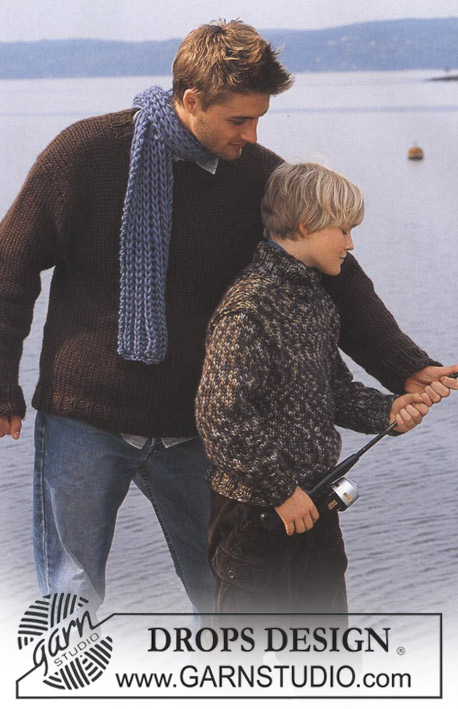
Knitted men's sweater with cables and high neck in DROPS Alaska, plus hat in DROPS Snow
DROPS 85-23 |
||||||||||||||||||||||||||||
|
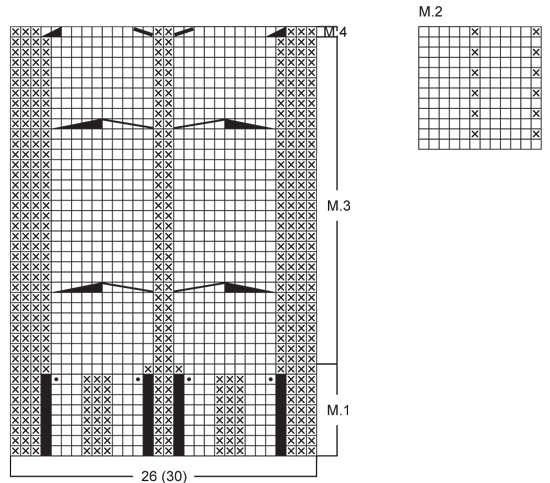
Gauge: 17 sts x 22 rows on larger needles in stockinette st = 10 x 10 cm. Rib: *K 3, P 3*, repeat from *-*. Pattern: See the chart below. The pattern is seen from the right side. Decreasing tips (for raglan): Dec as follows on right side: Start 4 sts before the marker: Sl 1 as if to knit, K 1, psso, K 4 (the marker is in the middle of these 4 sts), K 2 tog. Dec as follows on wrong side: Start 4 sts before the marker, P 2 tog, P 4, P 2 tog, twisting sts (if this is too difficult, sl 2, return to left needle 1 by 1, twisting each, then P 2 tog). BODY Cast on 155-159-179-183-203 sts on smaller circular needles; join and knit rib as follows: K 3-5-3-5-3 (put a marker in the center st = side), *P 3, K 3*, repeat *-* over the following 24-24-30-30-36 sts, Pattern 1 (= 26 sts), *K 3, P 3*, repeat *-* over the following 24-24-30-30-36 sts, K 3-5-3-5-3 (put a marker in the center st = side), *P 3, K 3*, repeat *-* over the following 72-72-84-84-96 sts and finish with P 3. On the last row of Pattern 1 dec 2 sts on back and at the same time inc 4 sts on the front as shown in chart = 157-161-181-185-205 sts. When Pattern 1 is complete (the piece measures approx. 4 cm) change to larger circular needles and continue as follows: K 3-5-3-5-3, Pattern 2 over the following 24-24-30-30-36 sts, Pattern 3 (= 30 sts), Pattern 2 over the following 24-24-30-30-36 sts – reverse the pattern so that it will be the same on both sides of Pattern 3, K 3-5-3-5-3 and Pattern 2 over the remaining 73-73-85-85-97 sts. When the piece measures 12 cm inc 1 st at each side of sts with markers at each side every 5-4-6-4-4 cm a total of 4-6-4-6-6 times – knit the increased sts in Pattern 2 as you go along = 173-185-197-209-229 sts. When the piece measures 34-41-42-43-43 cm bind off 7 sts at each side for armhole (= the sts with the markers + 3 sts each side = 82-88-94-100-110 sts on front and 77-83-89-95-105 sts on back. Lay piece aside and knit the sleeves. SLEEVE Cast on 42-42-42-48-48 sts on double-pointed needles 4 mm [US 6]; join and place a marker at the join. Knit rib. When the piece measures 4 cm change to larger double pointed needles and work following Pattern 2 (the pattern will not come out even). When the piece measures 9-12-14-14-14 cm inc 1 st on each side of seed st at marker every 3.5-2.5-2-2.5-2 cm a total of 11-14-17-15-20 times (knit the incd sts into the pattern as you go along) = 64-70-76-78-88 sts. When the piece measures 50-51-53-53-54 cm bind off 7 sts at marker (the st with the marker + 3 sts each side of marker) = 57-63-69-71-81 sts. Lay piece aside and knit second sleeve. Yoke: Put the sleeves in on the same circular needles as Body where you bound off for armhole = 273-297-321-337-377 sts Put a marker in each transition between Body and sleeves = 4 markers. Knit 2-3-0-0-0 rows before decreasing. Read the entire next section before knitting: Raglan shaping: Dec 1 st at each side of each marker (= 8 decs) – see Decreasing tips above. Dec every other row 18-21-23-24-24 times and every row 0-0-1-1-6 times. Pattern: When the piece measures 50-59-61-63-65 cm – adjust to end after a cable – knit Pattern 4 over the center 30 sts (decreasing the 4 sts incd on the last row of Pattern 1 at lower edge of Body) – knit the remaining sts as before. On the next row put the center 30-30-30-34-34 sts on a st holder for the neck and knit back and forth on needles. Continue to dec 1 st at each neck edge every other row 1-2-2-2-2 times. After all raglan and neck shaping is complete, 93-91-91-95-95 sts remain and the piece measures approx. 56-66-68-70-72 cm to shoulder. Neckband: Pick up and knit approx. 32-38 sts in front neck (incl. sts on st holder) on double-pointed needles and put all sts on same needles = approx. 125-133 sts. Join and P 1 row, then K 1 row, decreasing evenly distributed to 83-89-89-95-95 sts. Knit rib (K 3, P 3) – but at center front there should be a P 2, following pattern on front. When the collar measures 18-20-20-22-22 cm bind off all sts in rib. Fold neckband out to right side. If you want a crew neck, knit as follows: knit rib until the collar measures approx. 10-11-12-12-13 cm, bind off in pattern. Fold the neckband to wrong side and stitch in place. Assembly: Sew opening under the sleeve. HAT: Sizes: one-size Materials: DROPS SNOW from Garnstudio 100 gr nr 15, marine blue. DROPS 9 mm [US 13] double-pointed needles, or size needed to obtain correct gauge. Gauge: 10 sts x 14 rows in stockinette st = 10 x 10 cm. Rib: *P 5, K 2*, repeat from *-*. Hat: Cast on 56 sts; join and place a marker at the join. Knit 1 row stockinette st, then knit rib – see instructions above. When the piece measures 12 cm dec all P 5 to P 4 = 48 sts. When the piece measures 15 cm dec all P 4 to P 3 = 40 sts. Dec in the same way 2 more times with 3 cm between each dec round so that there will be 1 P less for each dec round = 24 sts – the rib is now *K 2, P 1*. When the piece measures 22 cm knit the next row as follows: *K 2 tog, P 1*, repeat from *-* over all sts = 16 sts. Cut yarn and pull through the remaining sts, fasten neatly. Hat measures approx 23 cm high. |
||||||||||||||||||||||||||||
Diagram explanations |
||||||||||||||||||||||||||||
|
||||||||||||||||||||||||||||
 |
||||||||||||||||||||||||||||
 |
||||||||||||||||||||||||||||
Have you finished this pattern?Tag your pictures with #dropspattern or submit them to the #dropsfan gallery. Do you need help with this pattern?You'll find 25 tutorial videos, a Comments/Questions area and more by visiting the pattern on garnstudio.com. © 1982-2026 DROPS Design A/S. We reserve all rights. This document, including all its sub-sections, has copyrights. Read more about what you can do with our patterns at the bottom of each pattern on our site. |
||||||||||||||||||||||||||||


With over 40 years in knitting and crochet design, DROPS Design offers one of the most extensive collections of free patterns on the internet - translated to 17 languages. As of today we count 324 catalogs and 12278 patterns - 12268 of which are translated into English (US/in).
We work hard to bring you the best knitting and crochet have to offer, inspiration and advice as well as great quality yarns at incredible prices! Would you like to use our patterns for other than personal use? You can read what you are allowed to do in the Copyright text at the bottom of all our patterns. Happy crafting!
Post a comment to pattern DROPS 85-23
We would love to hear what you have to say about this pattern!
If you want to leave a question, please make sure you select the correct category in the form below, to speed up the answering process. Required fields are marked *.