
Popular categories
Looking for a yarn?


Comments / Questions (185)
![]() Joelle wrote:
Joelle wrote:
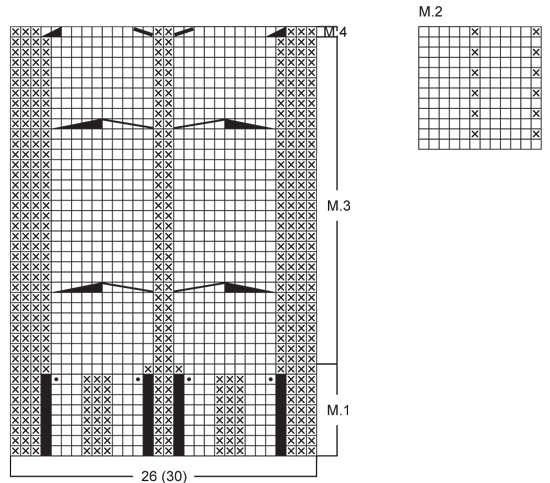
Je voudrai savoir svp ce que cela veut dire de ne pas " tricoter " le carré noir ce n'est pas une maille... Comment traiter cette maille en question ? D'autre part est ce que l'ouvrage doit se tricoter en rond dès le départ à savoir sans couture et toujours à l'endroit. Merci pour votre réponse
12.11.2015 - 19:37DROPS Design answered:
Bonjour Joëlle, au début de M.1, on a 26 m seulement, mais au dernier rang de M.1, on augmente 4 m pour obtenir 30 m au total. Aux premiers rangs de M.1, la case en noir n'est pas une maille sur l'aiguille, elle n'existe pas encore à ce moment là, tricotez: 3 m env, 3 m end, 3 m env, 3 m end, 2 m env, 3 m end, 3 m env, 3 m end, 3 m env. Bon tricot!
13.11.2015 - 09:11
![]() Sabine Tigges wrote:
Sabine Tigges wrote:
Guten Tag, Ich habe jetzt Rumpf und Ärmel fertig. Alles kommt auf eine Rundnadel? Was meinen Sie bei dem Abketten der Raglanärmel mit Hin- und Rückreihe, ich stricke doch rund? Oder heißt das hinten und vorn? Vielen Dank für Ihre Antwort. LG
27.08.2015 - 11:06DROPS Design answered:
Ja, Sie stricken zuerst in Runden, aber wenn Sie die M für den vorderen Halsausschnitt stillgelegt haben, stricken Sie in Hin- und Rück-R weiter.
01.09.2015 - 16:28
![]() Sabine Tigges wrote:
Sabine Tigges wrote:
Guten Tag, Ich habe jetzt Rumpf und Ärmel fertig. Alles kommt auf eine Rundnadel? Was meinen Sie bei dem Abketten der Raglanärmel mit Hin- und Rückreihe, ich stricke doch rund? Oder heißt das hinten und vorn? Vielen Dank für Ihre Antwort. LG
27.08.2015 - 10:38DROPS Design answered:
Wenn Sie alle M auf eine Rundnadel gelegt haben, stricken Sie die Raglanpasse in Runden weiter. Die Anleitung wurde diesbezüglich gerade korrigiert, dort stand R statt Rd. Wenn Sie die Maschen für den vorderen Halsausschnitt stillgelegt haben, stricken Sie in Hin- und Rück-R weiter. Ich hoffe, ich habe damit Ihre Frage beantwortet?
27.08.2015 - 11:02
![]() Oliver wrote:
Oliver wrote:
Ja, genau. Ich habe schon so viele Sachen und Pullover gestrickt und hatte nie Probleme. Ich glaube, ich stehe momentan auf'm Schlauch. Das wird sich sicher beim stricken von selbst auflösen, manchmal ist das ja so ;-) Vielen Dank für die ausführliche Hilfe und Entschuldigung für die mehrfach-Posts! O
01.05.2015 - 09:52
![]() Oliver wrote:
Oliver wrote:
Sind wir uns darüber einig, dass ich zum Schluss zwei Rapporte auf jeder Seite erarbeitet habe (eine links, fünf rechts)?
29.04.2015 - 18:56DROPS Design answered:
Wenn wir beide Folgendes meinen, sind wir uns einig: Sie nehmen insgesamt 24 M zu (in 6 Rd je 4 M), d.h. an beiden Seiten des Pullis je 12 M, also 6 M vor dem Markierer und 6 M danach. Das ergibt dann 1 li, 5 re (bzw. 5 re, 1 li) und es müsste sich in den bisherigen Musterrhythmus einpassen. Und ich hoffe, ich habe nun richtig gelesen. :-)
30.04.2015 - 23:00
![]() Oliver wrote:
Oliver wrote:
Sind wir uns darüber einig, dass ich zum Schluss zwei Rapporte auf jeder Seite erarbeitet habe (eine links, fünf rechts)?
29.04.2015 - 18:56
![]() Oliver wrote:
Oliver wrote:
Sind wir uns darüber einig, dass ich zum Schluss zwei Rapporte auf jeder Seite erarbeitet habe (eine links, fünf rechts)?
29.04.2015 - 18:46
![]() Oliver wrote:
Oliver wrote:
Sind wir uns darüber einig, dass ich zum Schluss zwei Rapporte auf jeder Seite erarbeitet habe (eine links, fünf rechts)?
29.04.2015 - 18:44
![]() Oliver wrote:
Oliver wrote:
Danke für die schnelle Antwort. Das Muster drei rechts, drei Links ist ja nur für das Bündchen interessant, welches ja ab 4 cm endet. Vor und nach der markierten Masche habe ich jeweils zwei rechts. ich werde es nach ihrer Anweisung ausprobieren, und berichten was daraus geworden ist. Herzliche Grüße, Oliver
29.04.2015 - 18:37DROPS Design answered:
Sie haben natürlich Recht, ich bitte um Entschuldigung für die fehlerhafte Antwort, ich bin beim Lesen wohl verrutscht. Aber das Prinzip bleibt gleich, Sie nehmen mustergemäß zu, sodass das Muster zu den Seiten hin passend weiterwächst.
30.04.2015 - 22:23
![]() Oliver wrote:
Oliver wrote:
Liebes Drops-Team! Die Anleitung ist spitze. Allerdings komme ich bei der Zunahme nach 12cm ins Schleudern. Sehe ich das richtig, dass der glatt re gestrickte Streifen (5M re)immer breiter wird, solange bis ich 5M re, 1M li, 5M re aus den 5M re heraus gestrickt habe? Wenn ich nach der ersten Zunahme-Rd. Mit dem Muster wie gewohnt beginnen will, werden ja die bisher erarbeiteten Perlmuster-Streifen versetzt. So sieht das aber auf dem Bild nicht aus?! Danke für die Mühe!
29.04.2015 - 07:41DROPS Design answered:
Sie müssen die M so betrachten, dass sie sich in die Gesamtmusterfolge des Pullis einpassen. Sie müssen die M also so stricken, dass sie bis zur markierten M das Muster * 3 M re, 3 M li * so weit wie möglich einhalten. Es fängt ja bei 12 cm damit an, dass Sie an den Seiten des Pullis, vor und nach der markierten Masche, je 2 M re haben, die erste Zunahme, die Sie vor und nach der markierten M machen, stricken Sie also auch re ab (= 3 M re), die 2. Zunahme wäre dann immer li, die 3. und 4. ebenfalls, die 5. und 6. dann wieder re. Das Muster "wächst" also zu den Seiten hin. Sie versetzen das Muster nicht, sondern stricken es folgerichtig weiter.
29.04.2015 - 16:04
|
||||||||||||||||||||||||||||
To the Sea |
||||||||||||||||||||||||||||
|
|
||||||||||||||||||||||||||||
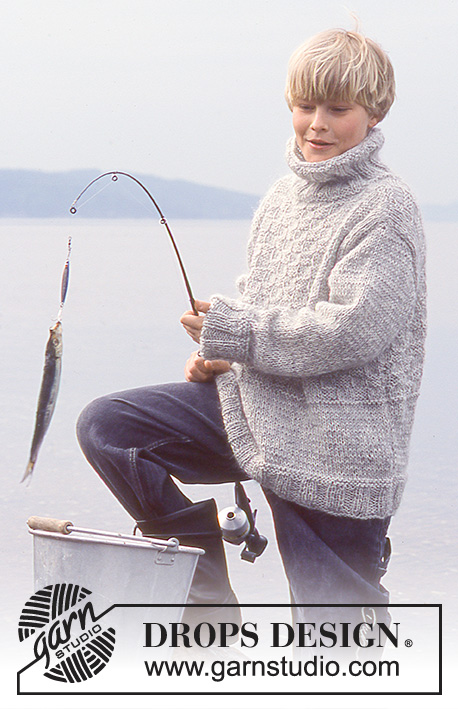
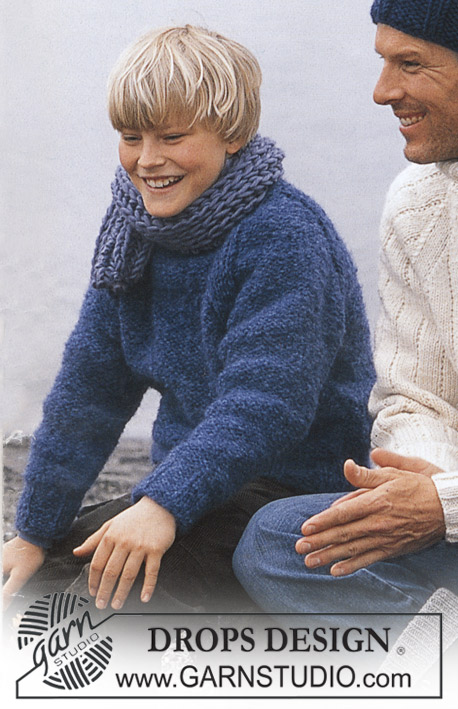
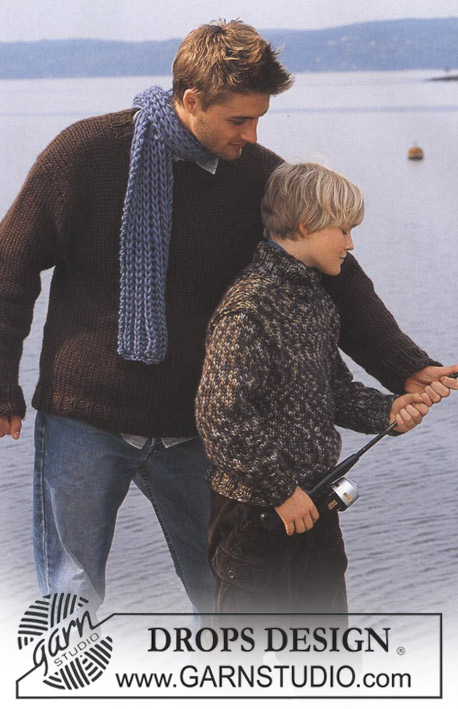
Knitted men's sweater with cables and high neck in DROPS Alaska, plus hat in DROPS Snow
DROPS 85-23 |
||||||||||||||||||||||||||||
|
Gauge: 17 sts x 22 rows on larger needles in stockinette st = 10 x 10 cm. Rib: *K 3, P 3*, repeat from *-*. Pattern: See the chart below. The pattern is seen from the right side. Decreasing tips (for raglan): Dec as follows on right side: Start 4 sts before the marker: Sl 1 as if to knit, K 1, psso, K 4 (the marker is in the middle of these 4 sts), K 2 tog. Dec as follows on wrong side: Start 4 sts before the marker, P 2 tog, P 4, P 2 tog, twisting sts (if this is too difficult, sl 2, return to left needle 1 by 1, twisting each, then P 2 tog). BODY Cast on 155-159-179-183-203 sts on smaller circular needles; join and knit rib as follows: K 3-5-3-5-3 (put a marker in the center st = side), *P 3, K 3*, repeat *-* over the following 24-24-30-30-36 sts, Pattern 1 (= 26 sts), *K 3, P 3*, repeat *-* over the following 24-24-30-30-36 sts, K 3-5-3-5-3 (put a marker in the center st = side), *P 3, K 3*, repeat *-* over the following 72-72-84-84-96 sts and finish with P 3. On the last row of Pattern 1 dec 2 sts on back and at the same time inc 4 sts on the front as shown in chart = 157-161-181-185-205 sts. When Pattern 1 is complete (the piece measures approx. 4 cm) change to larger circular needles and continue as follows: K 3-5-3-5-3, Pattern 2 over the following 24-24-30-30-36 sts, Pattern 3 (= 30 sts), Pattern 2 over the following 24-24-30-30-36 sts – reverse the pattern so that it will be the same on both sides of Pattern 3, K 3-5-3-5-3 and Pattern 2 over the remaining 73-73-85-85-97 sts. When the piece measures 12 cm inc 1 st at each side of sts with markers at each side every 5-4-6-4-4 cm a total of 4-6-4-6-6 times – knit the increased sts in Pattern 2 as you go along = 173-185-197-209-229 sts. When the piece measures 34-41-42-43-43 cm bind off 7 sts at each side for armhole (= the sts with the markers + 3 sts each side = 82-88-94-100-110 sts on front and 77-83-89-95-105 sts on back. Lay piece aside and knit the sleeves. SLEEVE Cast on 42-42-42-48-48 sts on double-pointed needles 4 mm [US 6]; join and place a marker at the join. Knit rib. When the piece measures 4 cm change to larger double pointed needles and work following Pattern 2 (the pattern will not come out even). When the piece measures 9-12-14-14-14 cm inc 1 st on each side of seed st at marker every 3.5-2.5-2-2.5-2 cm a total of 11-14-17-15-20 times (knit the incd sts into the pattern as you go along) = 64-70-76-78-88 sts. When the piece measures 50-51-53-53-54 cm bind off 7 sts at marker (the st with the marker + 3 sts each side of marker) = 57-63-69-71-81 sts. Lay piece aside and knit second sleeve. Yoke: Put the sleeves in on the same circular needles as Body where you bound off for armhole = 273-297-321-337-377 sts Put a marker in each transition between Body and sleeves = 4 markers. Knit 2-3-0-0-0 rows before decreasing. Read the entire next section before knitting: Raglan shaping: Dec 1 st at each side of each marker (= 8 decs) – see Decreasing tips above. Dec every other row 18-21-23-24-24 times and every row 0-0-1-1-6 times. Pattern: When the piece measures 50-59-61-63-65 cm – adjust to end after a cable – knit Pattern 4 over the center 30 sts (decreasing the 4 sts incd on the last row of Pattern 1 at lower edge of Body) – knit the remaining sts as before. On the next row put the center 30-30-30-34-34 sts on a st holder for the neck and knit back and forth on needles. Continue to dec 1 st at each neck edge every other row 1-2-2-2-2 times. After all raglan and neck shaping is complete, 93-91-91-95-95 sts remain and the piece measures approx. 56-66-68-70-72 cm to shoulder. Neckband: Pick up and knit approx. 32-38 sts in front neck (incl. sts on st holder) on double-pointed needles and put all sts on same needles = approx. 125-133 sts. Join and P 1 row, then K 1 row, decreasing evenly distributed to 83-89-89-95-95 sts. Knit rib (K 3, P 3) – but at center front there should be a P 2, following pattern on front. When the collar measures 18-20-20-22-22 cm bind off all sts in rib. Fold neckband out to right side. If you want a crew neck, knit as follows: knit rib until the collar measures approx. 10-11-12-12-13 cm, bind off in pattern. Fold the neckband to wrong side and stitch in place. Assembly: Sew opening under the sleeve. HAT: Sizes: one-size Materials: DROPS SNOW from Garnstudio 100 gr nr 15, marine blue. DROPS 9 mm [US 13] double-pointed needles, or size needed to obtain correct gauge. Gauge: 10 sts x 14 rows in stockinette st = 10 x 10 cm. Rib: *P 5, K 2*, repeat from *-*. Hat: Cast on 56 sts; join and place a marker at the join. Knit 1 row stockinette st, then knit rib – see instructions above. When the piece measures 12 cm dec all P 5 to P 4 = 48 sts. When the piece measures 15 cm dec all P 4 to P 3 = 40 sts. Dec in the same way 2 more times with 3 cm between each dec round so that there will be 1 P less for each dec round = 24 sts – the rib is now *K 2, P 1*. When the piece measures 22 cm knit the next row as follows: *K 2 tog, P 1*, repeat from *-* over all sts = 16 sts. Cut yarn and pull through the remaining sts, fasten neatly. Hat measures approx 23 cm high. |
||||||||||||||||||||||||||||
Diagram explanations |
||||||||||||||||||||||||||||
|
||||||||||||||||||||||||||||
 |
||||||||||||||||||||||||||||
 |
||||||||||||||||||||||||||||
Have you finished this pattern?Tag your pictures with #dropspattern or submit them to the #dropsfan gallery. Do you need help with this pattern?You'll find 25 tutorial videos, a Comments/Questions area and more by visiting the pattern on garnstudio.com. © 1982-2026 DROPS Design A/S. We reserve all rights. This document, including all its sub-sections, has copyrights. Read more about what you can do with our patterns at the bottom of each pattern on our site. |
||||||||||||||||||||||||||||


With over 40 years in knitting and crochet design, DROPS Design offers one of the most extensive collections of free patterns on the internet - translated to 17 languages. As of today we count 324 catalogs and 12278 patterns - 12268 of which are translated into English (US/in).
We work hard to bring you the best knitting and crochet have to offer, inspiration and advice as well as great quality yarns at incredible prices! Would you like to use our patterns for other than personal use? You can read what you are allowed to do in the Copyright text at the bottom of all our patterns. Happy crafting!
Post a comment to pattern DROPS 85-23
We would love to hear what you have to say about this pattern!
If you want to leave a question, please make sure you select the correct category in the form below, to speed up the answering process. Required fields are marked *.