
Popular categories
Looking for a yarn?


Comments / Questions (37)
![]() Thea wrote:
Thea wrote:
Wie lange muss ich die Arbeit bei 40C° in der Waschmaschine filzen? Und kann ich auch Waschmittel benutzen, oder muss es Schmierseife sein?
18.07.2025 - 18:22DROPS Design answered:
Liebe Thea, in der Regel reichen ca. 40 Minuten bei 40 °C im normalen Waschprogramm. Bitte kein Kurzprogramm verwenden. Schmierseife wird empfohlen, ist aber kein Muss – alternativ kann auch ein Vollwaschmittel verwendet werden. Mehr Infos finden Sie unter diesem Link. Viel Spaß beim stricken!
18.07.2025 - 19:06
![]() Hanna wrote:
Hanna wrote:
Dzień dobry, zrobiłam torbę z pomponem. Po sfilcowaniu pompon się rozwarstwia, nie jest ścisły. Dałam dużo wełny Dlaczego, jaki błąd zrobiłam? Hanna . Jaki
08.02.2025 - 18:05DROPS Design answered:
Witaj Haniu, albo było w nim za mało nitek, albo był za luźno związany. Trudno powiedzieć. Spróbuj sfilcować go jeszcze raz, włóż do pralki razem z innymi ubraniami. Pozdrawiamy!
10.02.2025 - 11:57
![]() Pam Moloney wrote:
Pam Moloney wrote:
Under the instructions for the striped bag it says see corrections for assembly but there are no corrections to see.Has it already been corrected? Pam
19.01.2025 - 21:48DROPS Design answered:
Dear Pam, yes, that's correct. We correct the version online, so the pattern that you can find here has already been corrected. The correction notification is for those that printed the pattern before the correction was done, so that they know that the pattern has been modified. So you can follow the online version; it's the correct version. Happy knitting!
19.01.2025 - 22:39
![]() Hanna wrote:
Hanna wrote:
Dzień dobry, robię torobkę z pomponem. Zrobiłam już przód. Mam pytanie. Jak zszyć przód z tyłem i potem spód torby. Na której stronie zszywać i jakim ściegiem? Włóczka jest gruba. Czy do zszywania użyć też włóczkę Snow czy może nitkę rozdzielić na połowę.Ile włóczki przeznaczyć na pompon? Pozdrawiam serdecznie Hanna Jasińska
06.01.2025 - 19:33DROPS Design answered:
Witaj Haniu, popatrz na instrukcje video, które znajdują się pod tytułem wzoru. Nie martw się grubością włóczki. Szwy staną się niewidoczne po filcowaniu. Pozdrawiamy!
07.01.2025 - 12:12
![]() Pam Moloney wrote:
Pam Moloney wrote:
Is it possible to reply to your reply to my question?
23.12.2024 - 21:27DROPS Design answered:
Dear Pam, unfortunately it's not possible. But you can mention your previous question in your new question and we will take both the previous question and answer into consideration when answering to your new question. Happy knitting!
29.12.2024 - 20:01
![]() Pam Moloney wrote:
Pam Moloney wrote:
I have just finished knitting the bag with the pom pom.It is the right size pre felted I e 34 cms wide and 48cms long.I haven't added the pom pom but I have only used 250 g not 350g as pattern states. Do you think the yarn requirement is incorrect as I don't think the pom pom could take 100g to complete could it ? Or am I wrong?
21.12.2024 - 19:35DROPS Design answered:
Dear Pam, have you done the strap and the loops for the pompom? These 2 plus the pompom may need something similar to 100gr. It also may vary depending on your working gauge, if you work slightly loosely than stated then you will work less rows, so you will have used less yarn; check the working gauge, since a variation in the working gauge may affect the final felted bag size. Happy knitting!
22.12.2024 - 23:29
![]() Ingrid wrote:
Ingrid wrote:
Für 8 Fransen sollen vier Fäden zugeschnitten werden. Wie soll das funktionieren? Soll jeder Faden nochmal durchgeschnitten werden?
26.09.2024 - 12:56
![]() Ingrid wrote:
Ingrid wrote:
Für 8 Fransen sollen vier Fäden zugeschnitten werden. Wie soll das funktionieren? Soll jeder Faden nochmal durchgeschnitten werden?
26.09.2024 - 12:39DROPS Design answered:
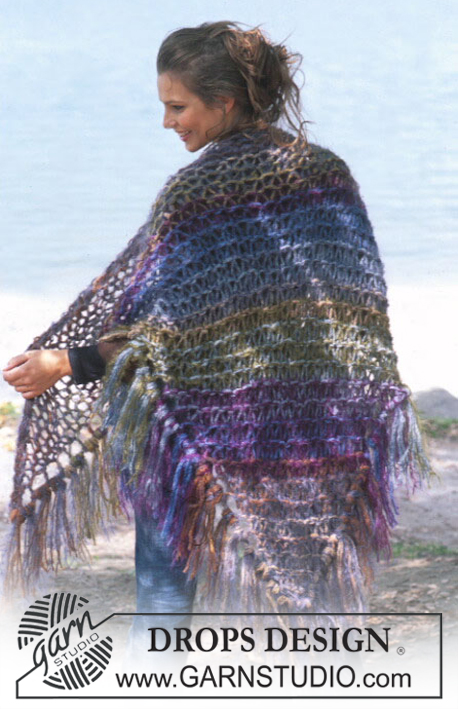
Liebe Ingrid, ja genau, die 8 Fransen werden regelmäßig verteilt um die Tasche befestigt - siehe Foto, wo man 2 davon sieht. Diese Fransen befestigen Sie in je 1 Masche der letzten Runde mit braun. Viel Spaß beim Stricken!
27.09.2024 - 08:12
![]() Sigrid wrote:
Sigrid wrote:
Hallo, ich möchte diese Tasche ein wenig in der Größe verändern-sie soll nach dem Filzen ca. 40x40x7 cm haben! Die Maschenprobe stimmt überein…aber mit wievielen Maschen und Reihen muss ich nun arbeiten??? Herzliche Grüße Sigrid
20.01.2023 - 12:08DROPS Design answered:
Liebe Sigrid, leider können wir nicht jede Anleitung nach jeder Anfrage umrechnen - gerne kann Ihnen aber Ihr DROPS Händler damit - auch per Telefon oder per E-Mail - weiterhelfen. Danke im voraus für Ihr Verständnis. Viel Spaß beim stricken und filzen!
20.01.2023 - 16:36
![]() Anki wrote:
Anki wrote:
Hej! Hur långt blir locket och hur lång blir remmen efter tovning? efter tovning?
27.01.2022 - 18:21DROPS Design answered:
Hej Anki, det kommer helt an på filteprocessen og den er forskellig fra farve til farve og fra maskine til maskine, men du kan altid prøve at forme og trække i arbejdet når det er vådt :)
28.01.2022 - 10:50
|
|
DROPS 86-14 |
|
|
|
|
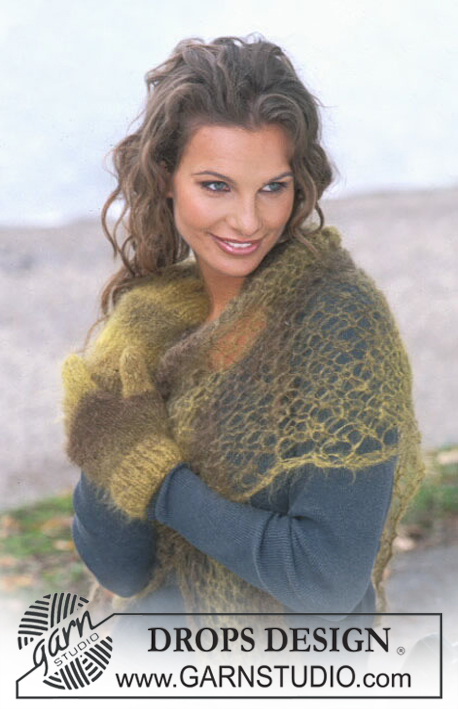
DROPS Felted Purses in Snow
DROPS 86-14 |
|
|
Gauge: Before felting: 11 sts x 15 rows in stockinette st = 10 x 10 cm. After felting: 13.5 sts x 28 rows (25 rows on strap). Front (side without flap): Cast on 38 sts and knit stockinette st. When the piece measures 8 cm dec 1 st at each side. Continue to dec 1 st at each side every 8 cm until 30 sts remain. When the piece measures 48 cm bind off all sts. Back (side with flap): Cast on and knit the same as the front. When the piece measures 48 cm dec 1 st at each side = 28 sts. Measure the flap from here. When the flap measures 15 cm bind off 2 sts at each side every other row a total of 4 times, bind off the remaining 12 sts. Assembly: Sew the front and back together at bottom and sides. Shoulder strap: Cast on 8 sts and knit stockinette st. When strap measures 140 cm bind off all sts. Fold in half lengthwise and sew edges together to form a long tube. Sew ends of strap at each side of the purse. Crochet 1 sc in the 5th st from one side of the bound-off edge on flap. Make a ch 50 cm long, then 1 sc in 8th st from same side of the bound-off edge = loop. Make a pompom approx. 10 cm in diameter – see instructions on page 29, and tie pompom to center of loop. Felt the bag as explained under. FELTING: The piece can be felted either in the washing machine or the tumble dryer – read description below. Remember: Subsequent washes are as for a normal wool garment. IN WASHING MACHINE: Washing machines will vary when felting. If the piece is not felted enough, it can be felted again. If it is felted too much, it can be stretched to the correct size while still wet. DO THE FOLLOWING: Lay the piece in the washing machine, using a programme of approx. 40 minutes (not a wool programme). Wash at 40 degrees C = 104 degrees F without pre-wash, detergent is optional. After washing, shape the piece while it is still wet. IN TUMBLE DRYER: Felting in a tumble dryer gives good control over the degree of felting. The tumble dryer can be opened during drying to check the size of the piece. If it is not felted enough it can be thoroughly wetted and felted again. If it is felted too much it can be stretched to the correct size while still wet. DO THE FOLLOWING: Lay the piece in water so it becomes completely wet, then place it in the tumble dryer and begin the drying process. Dry to the desired size, checking regularly. STRIPED PURSE Measurements: Before felting: 29 cm wide x 60 cm high [11?⅜" x 23?⅝"] After felting: 24 cm wide x 32 cm high [9.5" x 12?⅝"] Materials: SNOW 100 gr nr 3, brown 100 gr nr 5, turquoise 100 gr nr 6, olive 100 gr nr 25, green DROPS 8 mm [US 11] needles, or size needed to obtain correct gauge. Gauge: Before felting: 11 sts x 15 rows in stockinette st = 10 x 10 cm. After felting: 13.5 sts x 28 rows (25 rows on strap). Purse: The bag is worked from bottom upwards with side seam on right-hand side and seam at the bottom. Cast on 65 sts with green and knit stockinette st. When the piece measures 20 cm change to turquoise. When the piece measures 39 cm change to olive. When the piece measures 58 cm change to brown and knit 2 rows garter st and then bind off all sts. Shoulder strap: Cast on 8 sts with brown and knit stockinette st until strap measures 120 cm, bind off all sts. Assembly: Fold the purse in half and sew side seams. Sew bottom seam. Sew strap ends at each side on the inside of the purse – sew halfway down on the olive stripe. Fringe: Fasten 8 fringe tufts around the brown stripe at top as follows: cut 4 strands 35 cm long in brown, fold in half and pull folded end through the bound-off edge, pull ends through loop. Felt the bag as explained above. After felting – when the purse is still wet – fold half the olive stripe to right side. |
|
Have you finished this pattern?Tag your pictures with #dropspattern or submit them to the #dropsfan gallery. Do you need help with this pattern?You'll find 15 tutorial videos, a Comments/Questions area and more by visiting the pattern on garnstudio.com. © 1982-2026 DROPS Design A/S. We reserve all rights. This document, including all its sub-sections, has copyrights. Read more about what you can do with our patterns at the bottom of each pattern on our site. |


With over 40 years in knitting and crochet design, DROPS Design offers one of the most extensive collections of free patterns on the internet - translated to 17 languages. As of today we count 324 catalogs and 12290 patterns - 12280 of which are translated into English (US/in).
We work hard to bring you the best knitting and crochet have to offer, inspiration and advice as well as great quality yarns at incredible prices! Would you like to use our patterns for other than personal use? You can read what you are allowed to do in the Copyright text at the bottom of all our patterns. Happy crafting!
Post a comment to pattern DROPS 86-14
We would love to hear what you have to say about this pattern!
If you want to leave a question, please make sure you select the correct category in the form below, to speed up the answering process. Required fields are marked *.