DROPS Silke-Tweed
DROPS Silke-Tweed
52% Silk, 48% Wool
Discontinued
find alternatives
DROPS Vivaldi
DROPS Vivaldi
56% Mohair, 30% Polyamide, 14% Wool
Discontinued
find alternatives
DROPS SS24
DROPS 84-6
CARDIGAN:

Sizes: S - M - L - XL - XXL
Finished measurements:
Bust: 98-106-112-122-132 cm [38⅝" - 41.75" - 44" - 48" - 52"]
Hem: 82-90-98-112-124 cm [32.25" - 35⅜" - 38⅝" - 44" - 48⅞"]

Materials: DROPS SILKE-TWEED
52% silk, 48% lambswool, 50 g./200 m./218 yards
250-300-300-350-350 gr nr 21, pistachio
and use: DROPS VIVALDI
43% mohair, 27% acrylic, 30% polyester, 50 g./280 m./305 yards
200-200-250-250-250 gr nr 13, beige

3 DROPS silver buttons nr 534

DROPS 5 mm [US 8] needles, or size needed to obtain correct gauge.

-------------------------------------------------------

Alternative Yarn – See how to change yarns here
Yarn Groups A to F – Use the same pattern and change the yarn here
Yarn usage using an alternative yarn – Use our yarn converter here

-------------------------------------------------------

DROPS Silke-Tweed
DROPS Silke-Tweed
52% Silk, 48% Wool
Discontinued
find alternatives
DROPS Vivaldi
DROPS Vivaldi
56% Mohair, 30% Polyamide, 14% Wool
Discontinued
find alternatives

Pattern instructions

NOTE: This pattern is written in American English. All measurements in charts are in cm. For conversion from inches to cm - click here. There are different terms for crocheting in American and British English. If this pattern includes crochet, click for "crochet terms" here. For this pattern in British English, please click here.
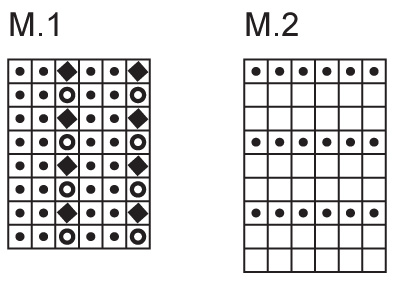
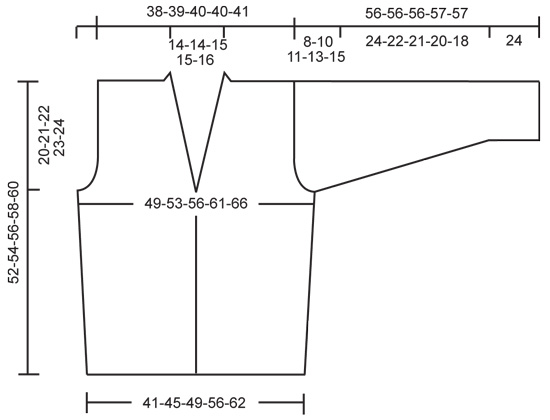
CARDIGAN:

Gauge: 16 sts x 22 rows with 1 strand of each yarn (2 strands) in Pattern = 10 x 10 cm.

Pattern: See charts. The pattern is seen from the right side.


Knitting tips (for front neck):
Dec 1 st inside 1 garter st edge sts.
Dec as follows from right side:
After 1 edge st: Slip 1 st as if to knit, K 1, psso. Before 1 edge st: K 2 tog.
Dec as follows from wrong side:
After 1 edge st: P 2 tog
Before 1 edge st: P 2 tog, twisting sts (if this is too difficult, slip 2 sts and return to left needle, twisting each, then P 2 tog)

Back: Cast on 68-74-80-92-101 sts with 1 strand Silke-Tweed + 1 strand Vivaldi (= 2 strands). P 1 row (wrong side), then knit the next row as follows (right side): K 1 (edge st knit in garter st), P 1, Pattern 1 over the following 64-70-76-88-97 sts, P 1 and K 1 (edge st knit in garter st). Continue the pattern as established.
When the piece measures 5 cm inc 1 st inside of 3 sts at each side: inc every 4-4-4-7-10 cm a total of 6-6-6-4-3 times = 80-86-92-100-107 sts – P the increased sts (seen from the right side) until Pattern 2 begins.
When the piece measures 19-20-21-22-23 cm knit Pattern 2 over all sts.
When the piece measures 32-33-34-35-36 cm bind off for armhole at each side every other row: 3 sts 1-1-1-2-2 times, 2 sts 2-2-3-3-4 times and 1 st 3-5-5-6-7 times = 60-62-64-64-65 sts.
When the piece measures 50-52-54-56-58 cm bind off the center 20-20-22-22-23 sts for the neck. On the next row dec 1 st at each neck edge = 19-20-20-20-20 sts remain on each shoulder. Bind off when the piece measures 52-54-56-58-60 cm.

Left front: Cast on 43-46-49-55-61 sts with 1 strand Silke-Tweed + 1 strand Vivaldi (= 2 strands). P 1 row (wrong side), then knit the next row as follows (right side, beginning at side edge): K 1 (edge st knit in garter st), P 1, Pattern 1 over the following 40-43-46-52-58 sts and K 1 (edge st knit in garter st). When the piece measures 5 cm inc at the side as on back = 49-52-55-59-64 sts.
When the piece measures 19-20-21-22-23 cm knit Pattern 2 over all sts, keeping 1 garter st edge st at the center front.
Read the entire section before knitting:
Buttonhole: When the piece measures 23-24-25-26-27 cm make 1 buttonhole at the center front (knit to last 3 sts, yo, K 2 tog, twisting sts, and K 1 (garter st edge st).
V-neck: When the piece measures 29-30-31-32-33 cm – adjust to end after 3, 6 or 9 rows in chart – dec 1 st at the center front every 6 rows – see knitting tips above – 5-5-5-5-6 times.
Armhole: When the piece measures 32-33-34-35-36 cm bind off for armhole at the side as on back.
After all armhole and neck shaping is complete, 34-35-36-36-37 sts remain (= 19-20-20-20-20 shoulder-sts + 15-15-16-16-17 sts for the neck edge).
When the piece measures 52-54-56-58-60 cm bind off shoulder sts.
Continue as before over the remaining 15-15-16-16-17 sts for neckband until it measures approx. 6-6-6.5-6.5-7 cm from shoulder. Put sts on a st holder.

Right front: Cast on and knit the same as the left reversing shaping, and make buttonholes when the piece measures 19-20-21-22-23 cm and 27-28-29-30-31 cm.
1 buttonhole = K tog the 2nd and 3rd sts from center front edge (or P 2 tog if on a P row), then yo.

Sleeve: Cast on 44-44-47-47-47 sts with 1 strand Silke-Tweed + 1 strand Vivaldi (= 2 strands). P 1 row (wrong side), then knit Pattern 1, keeping 1 edge st at each side in garter st.
When the piece measures 24 cm knit Pattern 2 to finished measurements.
When the piece measures 24 cm inc 1 st at each side every 2.5-2-2-1.5-1 cm a total of 9-10-10-13-14 times = 62-64-67-73-75 sts.
When sleeve measures 48-46-45-44-42 cm bind off for sleeve cap at each side every other row: 3 sts 1 time, 2 sts 3 times and 1 st 1-3-4-6-9 times, then 2 sts at each side until the piece measures 55-55-55-56-56 cm, then bind off 3 sts at each side 1 time. Bind off the remaining sts, the piece measures approx. 56-56-56-57-57 cm.

Assembly: Sew shoulder seams.
Collar: Weave the collar together at center back and sew the collar to back neckband with seam on wrong side. The neckband should fit a little tight so it will not stretch out.
Sew in sleeves. Sew sleeve and side seams using edge sts as a seam allowance.
Sew 2 buttons to left front. Sew one button on the inside of right front.


FELTED PURSE:

Measurements:
Before felting: 34 cm [13⅜"] wide at lower edge x 48 cm [18⅞"] high
After felting: 28 cm [11"] wide at lower edge x 25 cm [9⅞"] high

Materials: Snow
350 gr nr 6, olive

DROPS 8 mm [US 11] needles, or size needed to obtain correct gauge.
DROPS 7 mm [US K] crochet hook, or size needed to obtain correct gauge.

Gauge: Before felting: 11 sts x 15 rows in stockinette st = 10 x 10 cm.
After felting: 13.5 sts x 28 rows (25 rows on shoulder strap).

Felting: Felt the purse in the washing machine in warm water, regular cycle, with a small amount of detergent.

Purse: The purse is knit from the bottom up with seams at sides and bottom.
Front side (side without flap):
Cast on 38 sts and knit stockinette st. When the piece measures 8 cm dec 1 st at each side every 8 cm until 30 sts remain. When the piece measures 48 cm bind off all sts.

Back side (side with flap):
Cast on and knit the same as the front side. When the piece measures 48 cm dec 1 st at each side = 28 sts. Then knit flap. When flap measures 15 cm bind off 2 sts at each side every other row a total of 4 times, then bind off the remaining 12 sts.

Assembly: Sew the sides together. Sew the bottom.
Shoulder strap: Cast on 8 sts and knit stockinette st. When strap measures 140 cm bind off all sts. Fold in half lengthwise with wrong sides together and stitch together. Sew shoulder strap ends to each side of purse.
Assembly: Crochet 1 sc in the 5th st of the 12 sts on the bound-off edge of flap. Ch a cord 50 cm long, and fasten with 1 sc in the 8th st of the 12 sts = loop. Make a pompom approx. 10 cm in diameter and tie to center of loop.

Felt the purse – see instructions above.

Diagram

All measurements in charts are in cm.

symbols = P from RS, K from WS
symbols = K from RS, P from WS
symbols = 1 yo, slip 1 st as if to K
symbols = from WS: P tog yo and slipped st
diagram
diagram
Do you have a question? See a list of frequently asked questions (FAQ)

Knitting tension is what determines the final measurements of your work, and is usually measured per 10 x 10 cm. It is provided like so: number of stitches in width x number of rows in height - eg: 19 stitches x 26 rows = 10 x 10 cm.

The knitting tension is very individual; some people knit/crochet loosely while others work tightly. You adjust the knitting tension with the needle size, which is why the suggested needle size only serve as a guide! You need to adjust this (up or down) to ensure that YOUR knitting tension matches the knitting tension provided in the pattern. If you work with a different knitting tension than provided you will have a different yarn consumption, and your work will have different measurements than what the pattern suggests.

The knitting tension also determines which yarns can replace each other. As long as you achieve the same knitting tension you can replace one yarn with another.

See DROPS lesson: How to measure your tension/gauge

See DROPS video: How to make a gauge tension swatch

The required amount of yarn is provided in grams, eg: 450 g. To calculate how many balls you’ll need you first need to know how many grams are in 1 ball (25g, 50g or 100g). This information is available if you click on the individual yarn quality on our pages. Divide the amount required with the amount of each ball. For example, if each ball is 50g (the most common amount), the calculation will be as follows: 450 / 50 = 9 balls.

The important thing when changing from one yarn to another is that the knitting/crochet tension remains the same. This is so that the measurements of the finished piece will be the same as on the sketch provided. It is easier to achieve the same knitting tension using yarns from the same yarn group. It is also possible to work with multiple strands of a thinner yarn to achieve the knitting tension of a thicker one. Please try our yarn converter. We recommend you to always work a test swatch.

Please NOTE: when changing yarn the garment might have a different look and feel to the garment in the photo, due to individual properties and qualities of each yarn.

See DROPS lesson: Can I use a different yarn than the one mentioned in the pattern?

All our yarns are categorised into yarn groups (from A to F) according to thickness and knitting tension – group A contains the thinnest yarns and group F the thickest. This makes it easier for you to find alternative yarns to our patterns, should you wish to switch yarn. All yarns within the same group have a similar knitting tension and can easily replace each other. However, different yarn qualities have different structures and properties which will give the finished work a unique look and feel.

Click here for an overview of the yarns in each yarn group

At the top of all our patterns you’ll find a link to our yarn converter, which is a helpful tool should you wish to use a different yarn than suggested. By filling in the yarn quality you wish to replace, the amount (in your size) and number of strands, the converter will present good alternative yarns with the same knitting tension. Additionally it will tell you how much you’ll require in the new qualities and whether you’ll need to work with multiple strands. Most skeins are 50g (some are 25g or 100g).

If the pattern is worked with multiple colours, every colour will have to be converted separately. Similarly, if the pattern is worked with several strands of different yarns (for example 1 strand Alpaca and 1 strand Kid-Silk) you will have to find alternatives for each, individually.

Click here to see our yarn converter

Since different yarns have different qualities and textures we have chosen to keep the original yarn in our patterns. However, you can easily find options among our available qualities by using our yarn converter, or simply pick a yarn from the same yarn group.

It is possible that some retailers still have discontinued yarns in stock, or that someone has a few skeins at home that they would like to find patterns for.

The yarn converter will provide both alternative yarn as well as required amount in the new quality.

If you think it's hard to decide what size to make, it can be a good idea to measure a garment you own already and like the size of. Then you can pick the size by comparing those measures with the ones available in the pattern's size chart.

You'll find the size chart at the bottom of the pattern.

See DROPS lesson: How to read size chart

The needle size provided in the pattern serves only as a guide, the important thing is to follow the knitting tension. And since knitting tension is very individual, you will have to adjust the needle size to ensure that YOUR tension is the same as in the pattern – maybe you’ll have to adjust 1, or even 2 needle sizes, up or down to achieve the correct tension. For this, we recommend that you work test swatches.

Should you work with a different knitting tension than the one provided, the measurements of the finished garment might deviate from the measurement sketch.

See DROPS lesson: How to measure your tension/gauge

See DROPS video: How to make a gauge tension swatch

Working a garment top-down provides more flexibility and room for personal adjustment. For example it is easier to try the garment on while working, as well as making adjustments to length of yoke and shoulder caps.

The instructions are carefully explaining every step, in the correct order. Diagrams are adjusted to the knitting direction and are worked as usual.

The diagram depicts all rows/rounds, and every stitch seen from the right side. It is read from bottom to top, from right to left. 1 square = 1 stitch.

When working back and forth, every other row is worked from the right side and every other row is worked from the wrong side. When working from the wrong side, the diagram will have to be worked reversed: from left to right, knit stitches are purled, purl stitches are knit etc.

When working in the round every round is worked from the right side and the diagram are worked from right to left on all rounds.

See DROPS lesson: How to read knitting diagrams

The diagram depicts all rows/rounds, and every stitch seen from the right side. It is worked from bottom to top, from right to left.

When working back and forth every other row is worked from the right side: from right to left and every other row is worked from the wrong side: from left to right.

When working in the round, every row in the diagram are worked from the right side, from right to left.

When working a circular diagram you start in the middle and work your way outwards, counter clockwise, row by row.

The rows usually start with a given number of chain stitches (equivalent to the height of the following stitch), this will either be depicted in the diagram or explained in the pattern.

See DROPS lesson: How to read crochet diagrams

Instructions for working several diagrams after each other on the same row/round, will often be written like so: “work A.1, A.2, A.3 a total of 0-0-2-3-4 times". This means you work A.1 once, then A.2 is worked once, and A.3 is repeated (in width) the number of times provided for your size – in this case like so: S = 0 times, M = 0 times, L=2 times, XL= 3 times and XXL = 4 times.

The diagrams are worked as usual: begin with the first row in A.1, then work the first row in A.2 etc.

See DROPS lesson: How to read knitting diagrams

See DROPS lesson: How to read crochet diagrams

The total width of the garment (from wrist-to-wrist) will be larger in the larger sizes, despite the actual sleeves being shorter. The larger sizes have longer sleeve caps and wider shoulders, so there will be a good fit in all sizes.

The measurement sketch/schematic drawing provides information regarding the full length of the garment. If it’s a jumper or a jacket the length is measured from the highest point on the shoulder (usually closest to the neckline), and straight down to the bottom of the garment. It is NOT measured from the tip of shoulder. Similarly, the length of yoke is measured from the highest point on the shoulder and down to where yoke is split into body and sleeves.

See DROPS lesson: How to read a schematic drawing

Diagrams are often repeated on the round or in height. 1 repeat is the diagram the way it appears in the pattern. If it says to work 5 repeats of A.1 in the round, then you work A.1 a total of 5 times after/next to each other in the round. If it says to work 2 repeats of A.1 vertically/in height you work the entire diagram once, then begin again at the start and work the entire diagram one more time.

Chain stitches are slightly narrower than other stitches and to avoid working the cast-on edge too tight, we simply chain more stitches to begin with. The stitch count will be adjusted on the following row to fit the pattern and measurement sketch.

The rib edge is more elastic and will contract slightly compared to, for example, stocking stitch. By increasing before the rib edge, you avoid a visible difference in width between the rib edge and the rest of the body.

It’s very easy to cast off too tightly, and by making yarn overs while casting off (and simultaneously casting these off) you avoid a too tight cast off edge.

See DROPS video: How to bind off with yarn overs (yo)

To achieve an even increase (or decrease) you can increase on, for example: every 3rd and 4th row alternately, like so: work 2 rows and increase on the 3rd row, work 3 rows and increase on the 4th. Repeat this until the increase is complete.

See DROPS lesson: Increase or decrease 1 st on every 3rd and 4th row alternately

Should you prefer to work in the round instead of back and forth, you may of course adjust the pattern. You’ll need to add steeks mid-front (usually 5 stitches), and follow the instructions. When you would normally turn and work from the wrong side, simply work across the steek and continue in the round. At the end you’ll cut the piece open, pick up stitches to work bands, and cover the cut edges.

See DROPS video: How to knit steeks and cut open

Should you prefer to work back and forth instead of in the round, you may of course adjust the pattern so you work the pieces separately and then assemble them at the end. Divide the stitches for the body in 2, add 1 edge stitch in each side (for sewing) and work the front and back pieces separately.

See DROPS lesson: Can I adapt a pattern for circular needles into straight needles?

Pattern repeats can vary slightly in the different sizes, in order to get the correct proportions. If you’re not working the exact same size as the garment in the photo, yours might deviate slightly. This has been carefully developed and adjusted so that the complete impression of the garment is the same in all sizes.

Make sure to follow instructions and diagrams for your size!

If you have found a pattern you like which is available in women’s size it’s not very difficult to convert it to men’s size. The biggest difference will be the length of sleeves and body. Start working on the women size that you think would fit across the chest. The additional length will be worked right before you cast off for the armhole/sleeve cap. If the pattern is worked top-down you can add the length right after the armhole or before the first decrease on sleeve.

Regarding additional yarn amount, this will depend on how much length you add, but it is better with a skein too many than too few.

All yarns will have excess fibres (from production) that might come off as lint or shedding. Brushed yarns (ie hairier yarns) have more of these loose, excess fibres, causing more shedding.

Shedding also depends on what is worn under or over the garment, and whether this pulls at the yarn fibres. It’s therefore not possible to guarantee that there will be no shedding

Below are some tips on how to get the best result when working with hairier yarns:

1. When the garment is finished (before you wash it) shake it vigorously so the looser hairs come off. NOTE: do NOT use a lint roller, brush or any method that pulls at the yarn.

2. Place the garment in a plastic bag and put it in your freezer - the temperature will cause the fibres to become less attached to each other, and excess fibres will come off easier.

3. Leave in the freezer for a few hours before taking it out and shaking it again.

4. Wash the garment according to the instructions on the yarn label.

Pilling is a natural process that happens to even the most exclusive of fibers. It's a natural sign of wear and tear that is hard to avoid, and that is most visible in high friction areas of your garment like a sweater's arms and cuffs.

You can make your garment look as new by removing the pilling, using a fabric comb or a pill/lint remover.

Still can't find the answer you need? Then scroll down and leave your question so one of our experts can try to help you. This will be done normally within 5 to 10 working days.
In the meantime, you can read the questions and answers that others have left to this pattern or join the DROPS Workshop on Facebook to get help from fellow knitters/crocheters!

You might also like...

Post a comment to pattern DROPS 84-6

We would love to hear what you have to say about this pattern!

If you want to leave a question, please make sure you select the correct category in the form below, to speed up the answering process. Required fields are marked *.

Comments / Questions (20)

country flag Andrea wrote:

Hallo, ich würde die Jacke gerne stricken. Da es ja beide Garne anscheinend nicht mehr gibt, suche ich nach Alternativen. Allerdings finde ich keinen Hinweis welcher Garngruppe Silke-Tweed und Vivaldi angehörten. Vielen Dank schon für die Hilfe.

19.12.2022 - 12:39

DROPS Design answered:

Liebe Andrea, Silke-Tweed war Garngruppe A und Vivaldi Garngruppe C - hier finden Sie alle unsere Auslaufgarne - benutzen Sie unseren Garnumrechner um Alternative zu finden. Viel Spaß beim stricken!

19.12.2022 - 13:12

country flag Nathalie wrote:

Bonjour , pour M1 lorsque je fais le jeté est-ce que je dois ramener le fil vers moi (1 tour complet sur l'aiguille comme si on allait tricoté à l'envers? et glisser la maille suivante comme si on la tricoter à l'endroit ?

19.05.2019 - 15:04

DROPS Design answered:

Bonjour Nathalie, quand vous tricotez le 1er rang de M.1, pour la 1ère: passez le fil devant l'ouvrage, glissez la maille suivante comme pour la tricoter à l'endroit, repassez le fil entre les 2 aiguilles (veillez à ce qu'il entoure bien la maille glissée = il va ainsi former le jeté) et tricotez la m suivante à l'envers) - pour la 4ème m, le fil est déjà devant, glissez la m suivante à l'end, et repassez le fil devant en veillant à ce qu'il entoure bien la m glissée (= jeté). Sur l'envers, tricotez ensemble à l'envers le jeté et la m glissée. Bon tricot!

20.05.2019 - 12:33

country flag Charlotte wrote:

Hallo, habe gestern angefangen, die Jacke zu stricken, - mit einem der Ärmel. Ich finde die Form etwas seltsam... gibt es eine Zeichnung davon? Vor lauter Abnahmen in Richtung Schulter läuft er ja total spitz zu nach oben, - ich bin total verunsichert, ob ich alles richtig gemacht habe!

13.01.2019 - 11:27

DROPS Design answered:

Liebe Charlotte, wenn Ihre Maschenprobe stimmt, sollte die Ärmel korrekt sein, aber am besten zeigen Sie Ihr Strickstück Ihrem Laden (auch per Email), so können Sie besser sehen, ob alles stimmt. Viel Spaß beim stricken!

14.01.2019 - 11:24

country flag Nathalie wrote:

Mon magasin Drop est anglophone alors c'est pour cette raison que je demandais ici, merci tout de même

02.05.2018 - 15:46

country flag Nathalie wrote:

Bonjour, j'aimerais savoir la teinte de beige se rapprochant le plus au Vivaldi beige numéro 13 en le remplaçant par la laine brushed alpaca silk et si je prends flora couleur pistache pour remplacer le silke tweed est-ce que j'aurai sensiblement le même effet que sur le modèle

02.05.2018 - 03:02

DROPS Design answered:

Bonjour Nathalie, pour toute aide dans le choix des couleurs, merci de contacter votre magasin DROPS (même par mail ou téléphone), on pourra vous conseiller au plus près de vos envies. Bon tricot!

02.05.2018 - 10:43

country flag Vera wrote:

Ich verstehe das Muster M1 nicht Sind hier Hin- und Rückreihen aufgezeichnet? Es wird ja dann alles glatt rechts und nicht gerippt? Zwischen den „Patentmaschen ist es glatt rechts Bitte um Antwort Danke Lg Vera

17.04.2018 - 09:55

DROPS Design answered:

Liebe Vera, Diagram M.1 zeigt alle Reihen, dh Hin- sowie Rückreihen. Lesen Sie das Diagram von dem unteren Ecke und rechts nach links bei den Hinreihen und links nach rechts bei den Rückreihen. Aber 1. Symbol musste li auf der Vorderseite und rechts auf der Rückseite sein (wird korrigiert). Viel Spaß beim stricken!

17.04.2018 - 10:58

country flag Marleen wrote:

Beste, Ik zou dit patroon willen breien met 1 draad, bvb Big Merino. Omdat de draadlengte van de twee voorgestelde materialen verschilt, is het niet helemaal duidelijk hoeveel bollen wol ik nodig zal hebben voor maat M. Kan u dit voor mij berekenen? Dank bij voorbaat, Marleen

28.01.2014 - 14:11

DROPS Design answered:

Hoi Marleen. Je breit met een dubbele draad, dus je hoeft maar één van de draden te berekenen. Neem van de Silke-Tweed omdat deze de langste looplengte heeft (1200 m voor maat M), dan weet je zeker dat je genoeg berekend. Hoe kan je zien hier in de FAQ onder punt 5 van de Garens.

28.01.2014 - 15:44

country flag Ellen wrote:

The pattern definitions in English are at the top of the directions: Pattern: See charts. The pattern is seen from the right side. = purl from right side, knit from wrong side = knit from right side, purl from wrong side = yo, sl 1 as if to knit = from wrong side: P tog the yo and slipped st

27.12.2009 - 17:47

country flag Carsta Von Felskog wrote:

Und weil sie jemandem so gut gefiel, hab ich sie ein zweites Mal gestrickt.Hellbraunes Camel ist diesmal der Farbton und ein schönes Weihnachtsgeschenk. Liebe Grüße, Carsta-Clarice von Felskog

08.12.2009 - 21:18

country flag Carsta Von Felskog wrote:

Und weil sie jemandem so gut gefiel, hab ich sie ein zweites Mal gestrickt.Hellbraunes Camel ist diesmal der Farbton und ein schönes Weihnachtsgeschenk. Liebe Grüße, Carsta-Clarice von Felskog

08.12.2009 - 21:16