
Popular categories
Looking for a yarn?


Comments / Questions (43)
![]() Britta wrote:
Britta wrote:
Hej Jeg forstår ikke lige hvad der menes med 2 m 10 gange på 3mnd:hver4pind +24 skiftevis 5-6 pind Vh Britta
07.04.2026 - 16:38DROPS Design answered:
Hei Britte. Her er det delt opp litt mer. Velg setningen for den str. du strikker etter. Str. 3 mnd: øk på hver 4.pinne, 2 masker 9 ganger = 58 masker. Str. 6/9: øk vekselvis hver * 5. og 6.pinne * 2 masker 9 ganger = 62 masker. Str. 12/18 mnd: øk vekselvis hver * 5. og 6.p * 2 masker 10 ganger = (68) m. Str, 24 mnd: øk vekselvis hver * 5. og 6.p * 2 masker 10 ganger = (72) m. mvh DROPS Design
13.04.2026 - 11:55
![]() Denise Stothard wrote:
Denise Stothard wrote:
Little Mouse Sweater Sleeve after the rib inc 2 sts mid under arm a total of 9 times. Where is the mid under arm? In the middle of the row? Is it at the beginning and end of the row?
23.02.2026 - 23:25DROPS Design answered:
Hi Denise, The round on the sleeve begins and ends mid-under the sleeve so you increase 1 stitch at the beginning of the round and one stitch at the end of the round. Regards, Drops Team.
24.02.2026 - 07:04
![]() Heidi wrote:
Heidi wrote:
I need some help please. Knitting the front and back piece size 24 months. ‘When piece measures 18 cm’. Is this measurement from the very beginning or from the start of the stocking stitch after the rib?thanks!
07.11.2025 - 20:36DROPS Design answered:
Hi Heidi, The measurements are from the cast-on edge. Regards, Drops Team.
12.11.2025 - 07:03
![]() Magda wrote:
Magda wrote:
Welke lengte rondbreinaald ben ik hiervoor nodig?
01.09.2025 - 12:49DROPS Design answered:
Dag Magda,
Goede vraag, staat er inderdaad niet bij, bij dit wat oudere patroon. Het hangt natuurlijk een beetje af van je maat, maar je kan de omtrek van het lijf aanhouden voor de naaldmaat. Als je minder steken op de naald hebt, kun je de techniek 'magic loop' gebruiken.
07.09.2025 - 19:41
![]() Marianne wrote:
Marianne wrote:
Jeg mener, der er fejl i opskriften: 1) forstykke halsudskæring højre skulder: 3 m 1 gang, 2 m 2 gange og 1 m en gang, mens venstre skulder angives som: 3 m 1 gang og 1 m 1 gang.
07.08.2025 - 19:37DROPS Design answered:
Hej Marianne. Det stemmer, venstre side skal strikkes anderledes på grund af knappekanten. mvh DROPS Design
08.09.2025 - 11:20
![]() Raymonde wrote:
Raymonde wrote:
Comment assembler épaule bordure de bouton et l autre boutonnière avec manche Merci pour vos conseil s
04.08.2025 - 19:35DROPS Design answered:
Bonjour Raymonde, posez les bordures de boutonnage l'une au-dessus de l'autre, celle avec les boutons au-dessus, épinglez si besoin les 2épaisseurs côté emmanchure ou bien cousez déjà cette partie avant de coudre la manche le long de l'emmanchure. Bon assemblage!
05.08.2025 - 08:26
![]() Raymonde wrote:
Raymonde wrote:
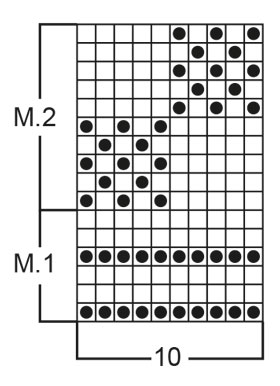
Pour diagramme ce fait aller retour si j ai compris après les 2 rvs endr . Je tric endr 5 mailles, 1 env 1 endr 1env 1 endr 1 env jusq la fin du gr. 2 fg c est gauche à droite le mailles ce qui est truc endr devient env et les rond noir seront endr est-ce correct Merci de votre aide
14.07.2025 - 20:33DROPS Design answered:
Bonjour Mme Raymonde, M2 rang 1 (sur l'endroit): 5 mailles end, 1 env, 1 end, 1env, 1 end, 1 env. Rang 2 (sur l'envers, lire le diagramme de gauche a droite): 1 env, 1 end, 1 env, 1 end, 6 env. Regardez la lecon DROPS ICI. Bon tricot!
18.07.2025 - 12:07
![]() Ia Pudas wrote:
Ia Pudas wrote:
Kolla svaret på min fråga. Samma fråga har ställts innan men svaren är olika. Jämför mitt svar med svar som Gitte fick. 24.01.2019 Vad är det som gäller? Mvh Ia Pudas
01.07.2025 - 21:43DROPS Design answered:
Hej, vi får titta på den :)
02.07.2025 - 12:16
![]() Ia Pudas wrote:
Ia Pudas wrote:
Hej, Hur är det tänkt med avm för hals, hö axel är 18 maskor när man maskar av och vänster är 22 maskor när man maskar av. Dom blir ju olika breda. Är det fel i mönstret? Mvh Ia
28.06.2025 - 20:40DROPS Design answered:
Design får titta på den :)
01.07.2025 - 09:04
![]() Riny Van Dijk wrote:
Riny Van Dijk wrote:
Kunt u telpatroon M2 uitleggen? Moet ik aan de verkeerde kant van het werk dezelfde steek breien als op de goede kant?
24.03.2025 - 16:34DROPS Design answered:
Dag Riny,
De steken die je op de goede kant recht breit, brei je op de verkeerde kant averecht en de steken die je op de goede kant averecht breit, brei je op de verkeerde kant recht. In het telpatroon zijn alle naalden weergegeven, dus zowel de naalden van de goede kant als de verkeerde kant. 1 hokje is dus 1 steek.
26.03.2025 - 20:35
|
|||||||
Little Mouse Sweater#littlemousesweater |
|||||||
|
|
|||||||
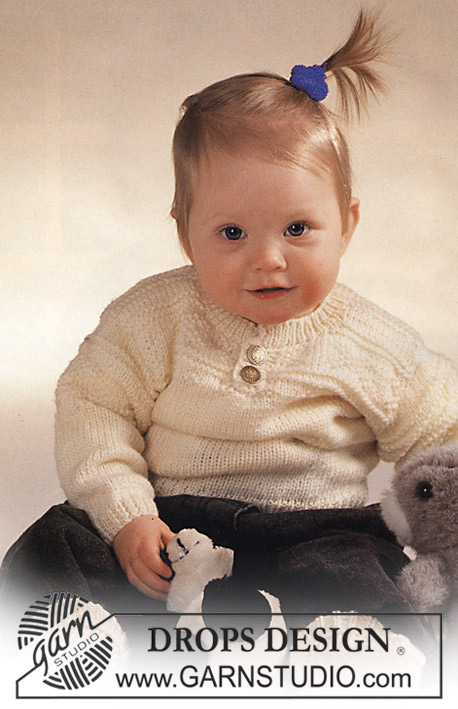
DROPS jumper with textured diamond pattern and socks in “Safran”.
DROPS Baby 2-12 |
|||||||
|
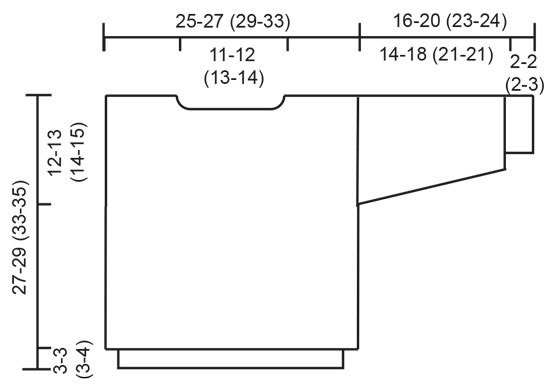
JUMPER: Knitting gauge: 24 sts x 32 rows on needles size 3 mm / US 2.5 in stockinette sts = 4" x 4" (10 x 10 cm). Rib: *K1, P1*, repeat from *-*. Front and back piece: Worked in the round on circular needle. Cast on 120-130-140-158 sts on circular needle size 2.5 mm / US 1.5 with mint and work 3-3-3-4 cm Rib. Change to needle size 3 mm / US 2.5 and continue in stockinette st, at the same time inc 0-0-0-2 sts evenly = 120-130-140-160 sts. When piece measures 14-15-17-18 cm work M.1, then complete piece in M.2. At the same time when piece measures 15-16-19-20 cm divide piece in 2 and complete front and back pieces separately. Front piece: = 60-65-70-80 sts. Continue in pattern. When piece measures 23-25-29-31 cm bind off the middle 10-13-16-18 sts for neck. Right shoulder: dec on every other row to shape the neckline: 3 sts 1 time, 2 sts twice and 1 st 1 time. Bind off remaining sts on shoulder when piece measures 27-29-33-35 cm. Left shoulder: bind off to shape the neckline on every other row: 3 sts 1 time, and 1 st 1 time. When piece measures 26-28-32-34 cm change to needle size 2.5 mm / US 1.5 and work 2 cm / ¾" Rib, but after 2 rows make 2 buttonholes evenly distributed. 1 buttonhole = bind off 2 sts and cast on 2 new sts on return row. Bind off. Back piece: = 60-65-70-80 sts. Continue in pattern. When piece measures 25-27-31-33 cm bind off the middle 18-21-24-26 sts for neck. Right shoulder: bind off to shape the neckline on every other row: 3 sts 1 time and 1 st 1 time. Bind off remaining sts when piece measures 27-29-33-35 cm. Left shoulder: When piece measures 26-28-32-34 cm, change to needle size 2.5 mm / US 1.5 and work 2 cm / ¾" Rib, bind off. Sleeve: Cast on 38-40-40-42 sts on double pointed needles size 2.5 mm / US 1.5 with mint and work 2-2-3-3 cm Rib. Change to needle size 3 mm / US 2.5 and continue in stockinette st, at the same time inc 2-4-8-10 sts evenly on round = 40-44-48-52 sts. At the same time after the Rib inc 2 sts mid under arm a total of 9-9-10-10 times as follows: Size 3 months: on every 4th round Size 6/9 + 12/18 + 24 months: on every 5th and 6th round alternately = 58-62-68-72 sts. When piece measures 10-13-15-15 cm work M.1 – place a pattern repeat mid upper sleeve – and then complete piece in M.2. Bind off when sleeve measures 16-20-22-24 cm. Assembly: Sew shoulder and side seams. Pick up approx 80-90 sts on double pointed needles size 2.5 mm / US 1.5 with mint round the neck and work M.1 back and forth on needle, then 1 cm / ⅜" Rib. At the same time after 2 rows, make 1 buttonhole in line with the others on shoulder. Bind off. Set in sleeves and sew on buttons. _____________________________________________________ SOCKS: Foot length: 10-11-12-14 cm DROPS double pointed needles size 2.5 and 3 mm / US 1.5 and 2.5 Knitting gauge: 24 sts x 32 rows on needles size 3 mm / US 2.5 in stockinette sts = 4" x 4" (10 x 10 cm). Rib: *K1, P1*, repeat from *-*. The sock is worked in the round. Cast on 34-36-36-38 sts on needle size 2.5 mm / US 1.5 with dark mint and work 1.5 cm Rib. Change to needle size 3 mm / US 2.5 and stockinette st. When piece measures 7-8-8-9 cm work 3 cm / 1" stockinette st back and forth on 18 sts mid back for heel. Heel decreases: Row 1 (= RS): K12, K2 tog into back of st, K1, turn the piece, Row 2: slip 1 st as if to P, P4, P2 tog, P1, turn the piece, Row 3: slip 1 st as if to K, K5, K2 tog into back of st, K1, turn the piece, Row 4: slip 1 st as if to P, P6, P2 tog, P1, turn the piece, Row 5: slip 1 st as if to K, K7, K2 tog into back of st, K1, turn the piece, Row 6: slip 1 st as if to P, P8, P2 tog, P1, turn the piece, Row 7: K2 tog, K8, K2 tog into back of st = 10 sts left on heel. Pick up 7-7-8-8 sts on each side of heel = 40-42-44-46 sts. Now dec 1 st on every round on both sides of the upper 16-18-18-20 sts a total of 4-4-5-5 times = 32-34-34-36 sts. When foot measures 7-8-9-11 cm insert a marker each side. Now dec 1 st on each side of markers (4 dec per round) on every other round a total of 4-4-5-5 times and then on every round twice. Cut the thread, pull though remaining sts and fasten. |
|||||||
Diagram explanations |
|||||||
|
|||||||
 |
|||||||
 |
|||||||
Have you finished this pattern?Tag your pictures with #dropspattern #littlemousesweater or submit them to the #dropsfan gallery. Do you need help with this pattern?You'll find 17 tutorial videos, a Comments/Questions area and more by visiting the pattern on garnstudio.com. © 1982-2026 DROPS Design A/S. We reserve all rights. This document, including all its sub-sections, has copyrights. Read more about what you can do with our patterns at the bottom of each pattern on our site. |
|||||||


With over 40 years in knitting and crochet design, DROPS Design offers one of the most extensive collections of free patterns on the internet - translated to 17 languages. As of today we count 324 catalogs and 12290 patterns - 12280 of which are translated into English (US/in).
We work hard to bring you the best knitting and crochet have to offer, inspiration and advice as well as great quality yarns at incredible prices! Would you like to use our patterns for other than personal use? You can read what you are allowed to do in the Copyright text at the bottom of all our patterns. Happy crafting!
Post a comment to pattern DROPS Baby 2-12
We would love to hear what you have to say about this pattern!
If you want to leave a question, please make sure you select the correct category in the form below, to speed up the answering process. Required fields are marked *.