
Popular categories
Looking for a yarn?


Comments / Questions (4)
![]() Annika wrote:
Annika wrote:
Dom tre maskor som ökas bakom tummen ska dom tillhöra första eller sista stickan?Alltså ovansidan eller insidan av handen?
21.12.2024 - 10:46DROPS Design answered:
Hei Annika. Litt usikker på hva du mener med ovansidan eller insidan av handen. De 3 maskene som strikkes opp i maskene som ble lagt opp bak tommelen blir de 3 siste maskene. mvh DROPS Design
02.01.2025 - 13:09
![]() Benedicte wrote:
Benedicte wrote:
Hvor meget garn skal man bruge hvis man vi strikke dem ensfarvet?
11.12.2024 - 22:39DROPS Design answered:
Hej Benedicte, vi har et par filtede vanter i DROPS Lima som er ensfarvet, du finder dem ved at søge på DROPS 242-67 eller Snowslide Mittens :)
12.12.2024 - 14:18
![]() Silje wrote:
Silje wrote:
Hei Fant dette litt uklart "Øk slik på utsiden av de økte maskene på hver 3.omgang totalt 6-7-8 ganger i høyden = 58-62-66 masker. Husk på strikkefastheten. Strikk til arbeidet måler 16-18-19 cm, økningene til tommelkile skal være ferdig. Mitt arbeid måler ca 14 cm når økning er ferdig (største str). Mao det mangler 5 cm. Skal jeg fortsette i glattstrikk, eller burde arbeidet nå faktisk målt 19 cm? Strikkefasthet er overholdt.
06.12.2024 - 22:09DROPS Design answered:
Hei Silje. Men stemmmer strikkefastheten din i høyden? Når vrangborden er ferdig måler arbeidet ca 8 cm, så skal det økes til tommelkile på hver 3. omgang 8 ganger = 24 pinner i høyden. Etter økningene (oppgitt strikkefasthet er 26 pinner = 10 cm), skal du ha ca 8 cm vrangbord + ca 9 cm glattstrikk = ca 17 cm. mvh DROPS Design
10.12.2024 - 08:30
![]() Asta Steen Åkerblom wrote:
Asta Steen Åkerblom wrote:
DROPS 253-38
08.11.2024 - 17:12
|
|
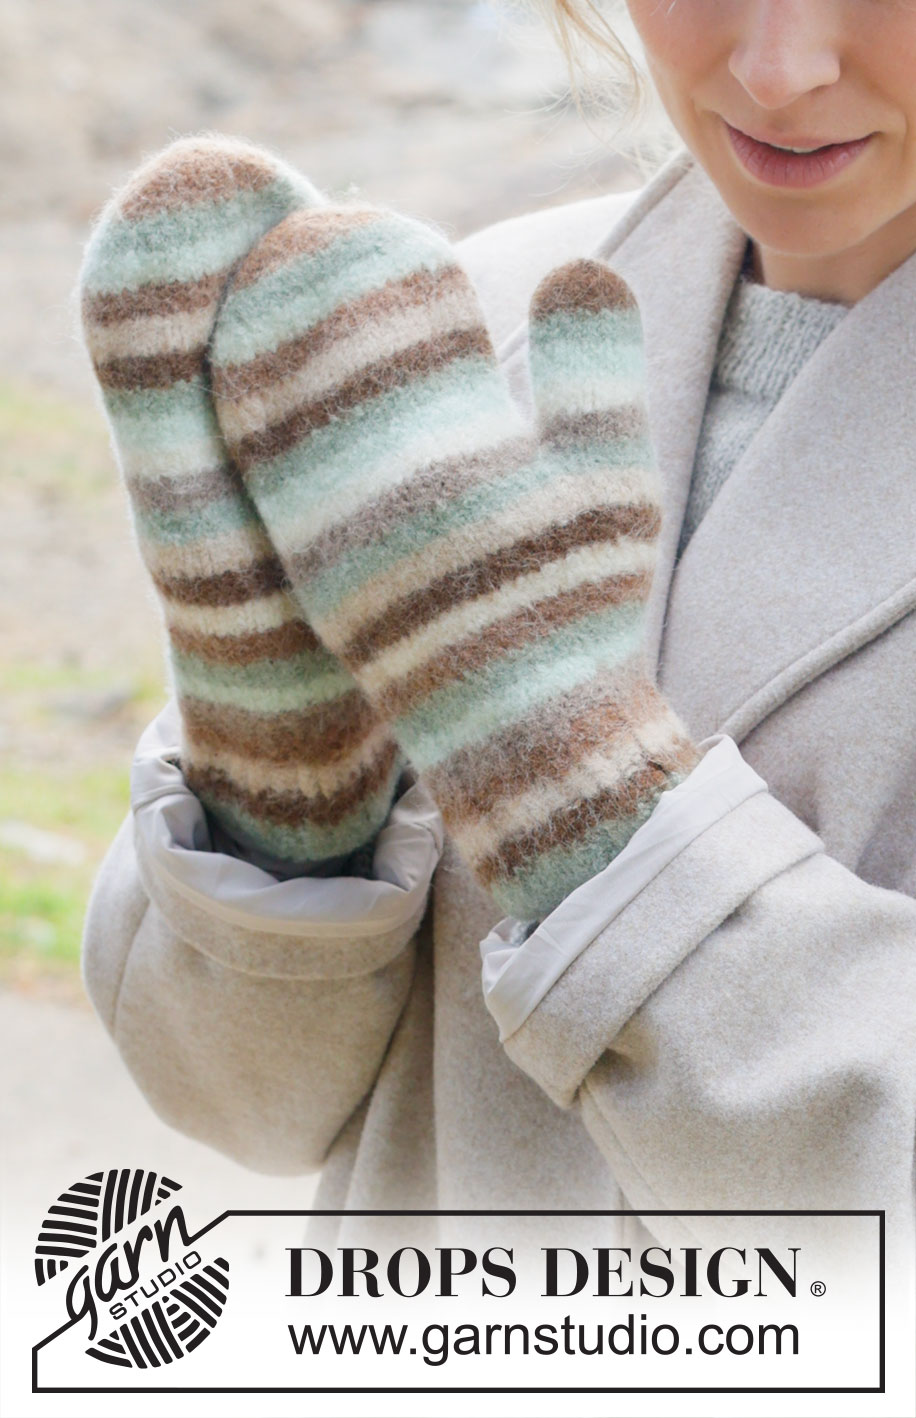
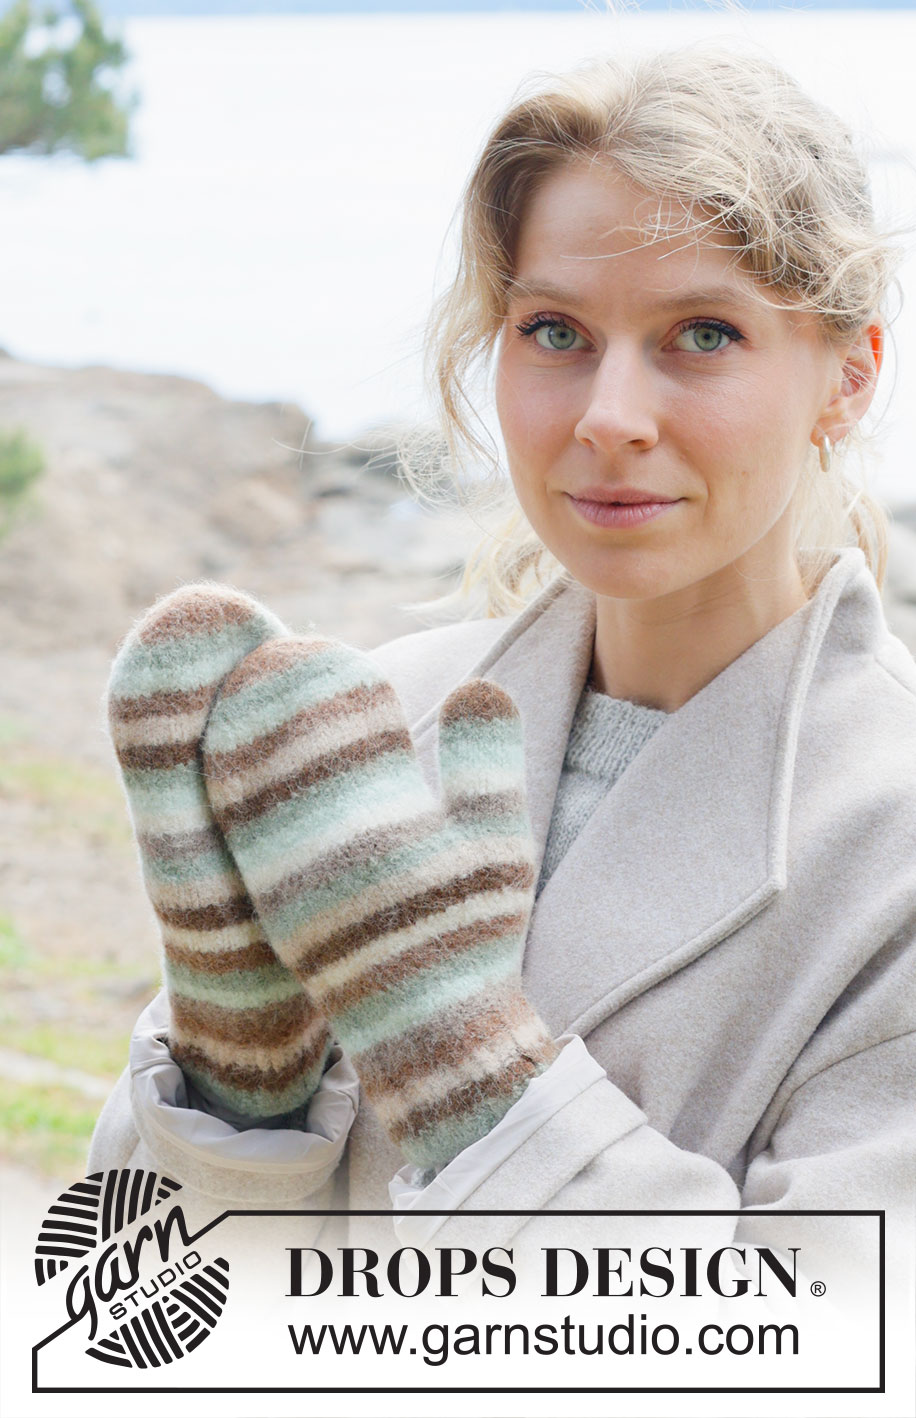
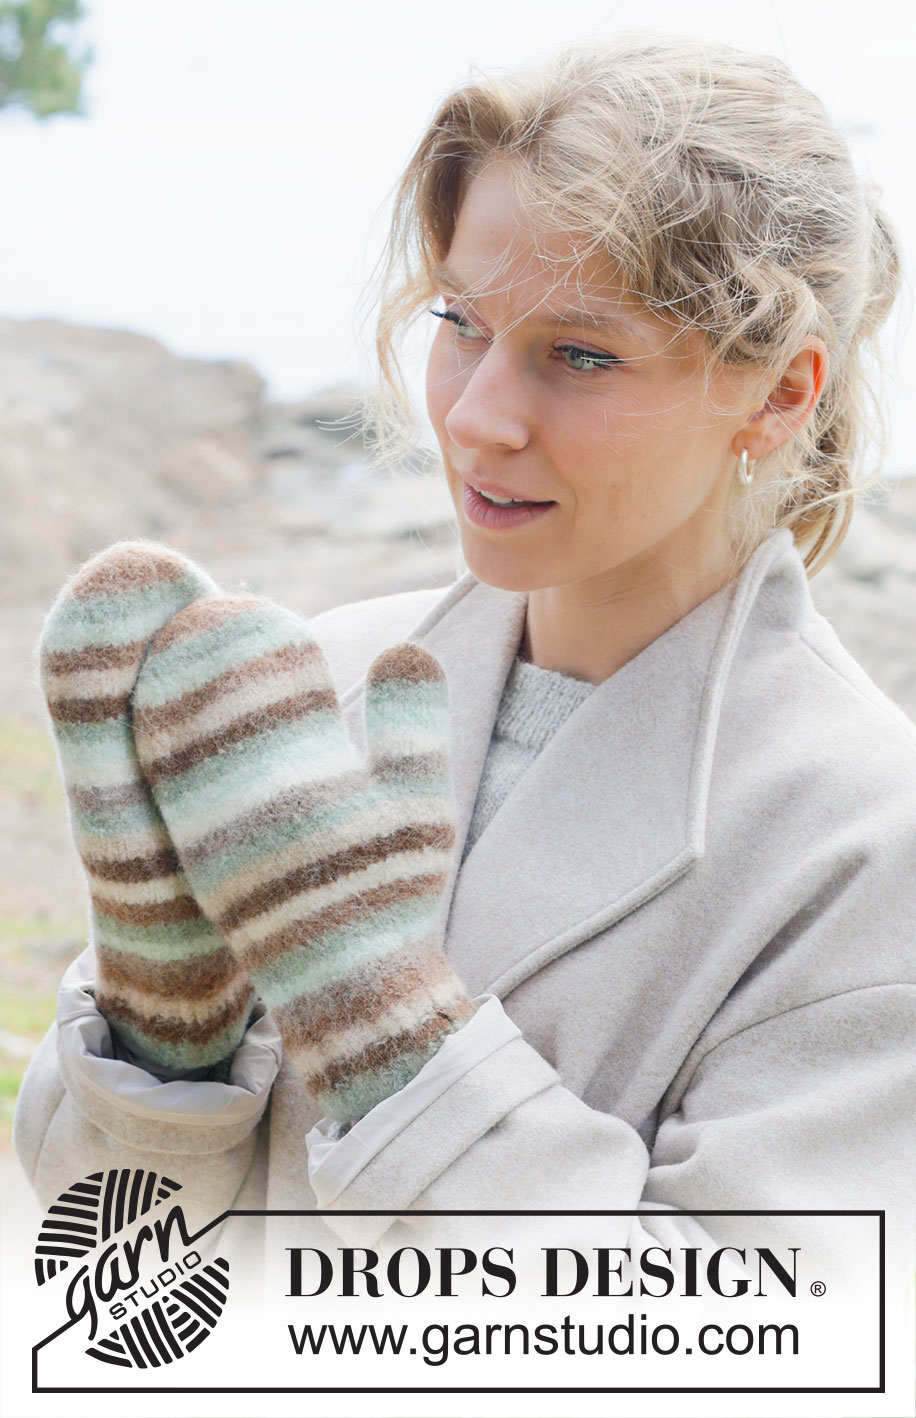
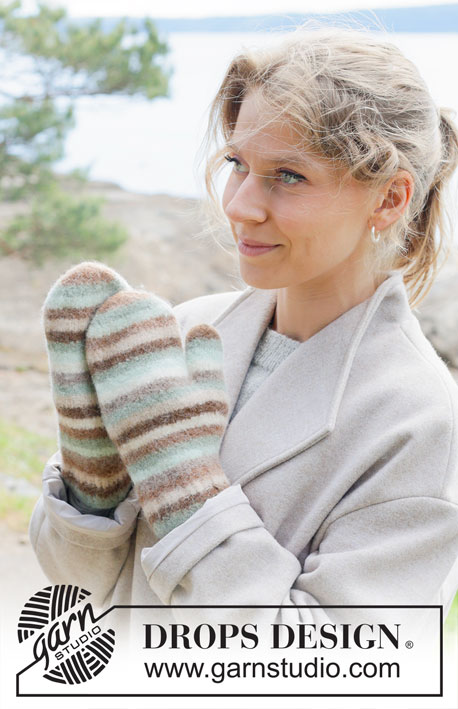
Winter Zebra Mittens#winterzebramittens |
|
 |
 |
Knitted and felted mittens with stripes in DROPS Lima.
DROPS 253-38 |
|
|
------------------------------------------------------- EXPLANATIONS FOR THE PATTERN: ------------------------------------------------------- STRIPES: The whole mitten is worked in stripes, with 4 rounds of each color in the following order: Sage green Chestnut Wheat Almond Beige Pistachio ice cream Sage green Almond Off white Chestnut Wheat Sage green Beige Off white Pistachio ice cream Sage green Chestnut Wheat Almond Pistachio ice cream Sage green Almond Off white Chestnut Wheat KNITTING TIP – changing colors without a «jump»: To get a nice transition at the beginning and end of the rounds when changing colors, work as follows: Change to the new color and work 1 round. Then work the first stitch on the next round as follows: Pick up the back loop of the stitch below the first stitch on the left needle, place it on the left needle. Knit it together with the next stitch. The transition will then be less visible. INCREASE TIP (for thumb-gusset): Increase by making 1 yarn over, which is knitted twisted on the next round. DECREASE TIP: Start 3 stitches before the marker-stitch, knit 2 together, knit 3 (marker-stitch is middle stitch), slip 1 stitch knit-wise, knit 1 and pass the slipped stitch over the knitted stitch (2 stitches decreased). ------------------------------------------------------- START THE PIECE HERE ------------------------------------------------------- MITTENS – SHORT OVERVIEW OF THE PIECE: The piece is worked in the round, from the cuff upwards. If there is a «0» in your chosen size, skip the information and go straight to the next instruction. LEFT MITTEN: Cast on 54-54-60 stitches with double pointed needles size 4.5 MM = US 7 and color sage green DROPS Lima. Insert 1 marker-thread at the beginning of the round. Read STRIPES and KNITTING TIP above. Work rib in the round (knit 3 twisted, purl 3) for 2 cm = ¾". Continue the rib AT THE SAME TIME as decreasing as follows: * Knit 1 twisted, knit 2 twisted together, purl 3 *, work from *-* to end of round = 45-45-50 stitches. Work the new rib (knit 2 twisted, purl 3) until the piece measures 7-8-8 cm = 2¾"-3⅛"-3⅛". Insert 1 marker in the last stitch on the round. Knit 1 round and increase 1-3-0 stitches evenly on the round = 46-48-50 stitches. Continue with stockinette stitch, AT THE SAME TIME increase 1 stitch on each side of the marker-stitch – read INCREASE TIP. Increase like this every 3rd round, always on the outside of the previously increased stitches, a total of 6-7-8 times = 58-62-66 stitches. Remember the knitting gauge. Work until the piece measures 16-18-19 cm = 6¼"-7"-7½", the increases for the thumb-gusset should be finished – with the last round a fourth round in a stripe. Place the marker-stitch + the 12-14-16 increased stitches + 1 stitch on each side of these on a thread = 15-17-19 thumb-stitches. Continue in the round, casting on 3 stitches behind the thumb-stitches = 46-48-50 stitches. Work until the piece measures 11-11-12 cm = 4⅜"-4⅜"-4¾" from the cast-on stitches. The piece measures approx. 27-29-31 cm = 10⅝"-11⅜"-12¼" from the cast-on edge. Now start to decrease as follows: Insert 1 marker in the first stitch and 1 marker in the 23rd-24th-25th stitch on the round. Continuing the stripes, decrease 1 stitch on each side of both markers on the first round – read DECREASE TIP (= 4 decreased stitches). Decrease like this every 2nd round a total of 4-3-3 times, then every round 5-7-7 times = 10-8-10 stitches left. To avoid changing colors towards the tip of the mitten, do not change colors on the last 7 rounds. Cut the strand, pull it through the remaining stitches, tighten and fasten well. The mitten measures approx. 32-34-36 cm = 12½"-13⅜"-14¼". THUMB: Continue the stripes from the mitten and work stockinette stitch in the round. Place the 15-17-19 thumb-stitches on double pointed needles size 4.5 MM = US 7 and knit up 3 stitches in the cast-on stitches behind the thumb = 18-20-22 stitches. Work for 6-6½-7 cm = 2⅜"-2½"-2¾". Now decrease 3 stitches evenly spaced = 15-17-19 stitches. Work 2 rounds without decreasing. On the next round decrease 5-7-7 stitches evenly spaced = 10-10-12 stitches. Work until the thumb measures 7½-8-8½ cm = 2⅞"-3⅛"-3¼". To avoid changing colors towards the tip of the thumb, do not change colors on the last 7 rounds. On the next round knit all stitches together 2 and 2 = 5-5-6 stitches. Cut the strand, pull it through the remaining stitches, tighten and fasten well. RIGHT MITTEN: Cast on 54-54-60 stitches with double pointed needles size 4.5 MM = US 7 and color sage green DROPS Lima. Insert 1 marker-thread at the beginning of the round. Work rib and stripes in the same way as on the left mitten until the piece measures 7-8-8 cm = 2¾"-3⅛"-3⅛". Insert 1 marker in the first stitch on the round. Knit 1 round and increase 1-3-0 stitches evenly on the round = 46-48-50 stitches. Finish in the same way as the left mitten. FELTING: To avoid the thumb being felted to the mitten, turn it inside out and fasten a small plastic bag/silk ribbon over the top of the thumb with a safety pin. The opening of the safety pin should point towards the tip of the thumb so it is easy to remove after felting. Turn the mitten back to the right side, with the bag/ribbon inside the thumb. The piece can be felted either in the washing machine or the tumble dryer – read description below. Remember: Subsequent washes are as for a normal wool garment. IN WASHING MACHINE: Washing machines will vary when felting. If the piece is not felted enough, it can be felted again. If it is felted too much, it can be stretched to the correct size while still wet. DO THE FOLLOWING: Lay the piece in the washing machine and use a programme of approx. 40 minutes (not a wool programme). Wash at 40 degrees C = 104 degrees F without pre-wash, detergent is optional. After washing, shape the piece while it is still wet. IN TUMBLE DRYER: Felting in a tumble dryer gives good control over the degree of felting. The tumble dryer can be opened during drying to check the size of the piece. If it is not felted enough it can be thoroughly wetted and felted again. If it is felted too much it can be stretched to the correct size while still wet. DO THE FOLLOWING: Lay the piece in water so it becomes completely wet, then place it in the tumble dryer and begin the drying process. Dry to the desired size, checking regularly. |
|
Have you finished this pattern?Tag your pictures with #dropspattern #winterzebramittens or submit them to the #dropsfan gallery. Do you need help with this pattern?You'll find 23 tutorial videos, a Comments/Questions area and more by visiting the pattern on garnstudio.com. © 1982-2026 DROPS Design A/S. We reserve all rights. This document, including all its sub-sections, has copyrights. Read more about what you can do with our patterns at the bottom of each pattern on our site. |
|


With over 40 years in knitting and crochet design, DROPS Design offers one of the most extensive collections of free patterns on the internet - translated to 17 languages. As of today we count 325 catalogs and 12298 patterns - 12288 of which are translated into English (US/in).
We work hard to bring you the best knitting and crochet have to offer, inspiration and advice as well as great quality yarns at incredible prices! Would you like to use our patterns for other than personal use? You can read what you are allowed to do in the Copyright text at the bottom of all our patterns. Happy crafting!
Post a comment to pattern DROPS 253-38
We would love to hear what you have to say about this pattern!
If you want to leave a question, please make sure you select the correct category in the form below, to speed up the answering process. Required fields are marked *.