
Popular categories
Looking for a yarn?


Comments / Questions (6)
![]() Avril McKoy wrote:
Avril McKoy wrote:
Hello, do you have to continue the pattern on the body in the under sleeve additional stitches following the separation of the sleeves? I apologise if I haven’t been clear in my question! Thanks 😊
26.10.2025 - 14:53DROPS Design answered:
Hi Avril, You have inserted a marker in the middle of the cast-on stitches under each sleeve (1 marker each side). You work the pattern to 1 stitch before the marker under each sleeve, then work 2 stitches in the background colour (with the marker between these 2 stitches) and continue the pattern on the other side of the marker (making sure you continue the pattern from the yoke on all pieces). Hope this helps. Regards, Drops Team.
27.10.2025 - 07:05
![]() Mrsmoriaty wrote:
Mrsmoriaty wrote:
Frage kam leider nicht ganz durch, kann ich den pulli auch mit karisma einfachem faden stricken? Einfch mehr
28.09.2025 - 13:04DROPS Design answered:
Das geht leider nicht. Karisma gehört in die Garngruppe B. Sie müssen ein Garn der Garngruppe E oder doppelten Faden Garngruppe C verwenden und die Maschenprobe einhalten. Weitere Möglichkeiten von Garnalternativen finden Sie unter dem Kopf der Anleitung, wenn Sie auf "Hier erfahren, wie man Garne austauscht" klicken. Viel Spaß beim Stricken!
25.10.2025 - 20:58
![]() Åsa Säfström wrote:
Åsa Säfström wrote:
Hej igen, det stämmer inte. Jag jämför möster med \"Winter Swirl Cardigan\" Stickad kofta i DROPS Air. Det är en liknande modell i annat garn och stickor. Till den stickbeskrivningen finns ökning och slätstickning i \"ok\"- delen beskrivet samt när mösterstickning ska komma igång. Vem kan översätta den delen till detta stickmönstret?
04.12.2024 - 15:18
![]() Åsa Säfström wrote:
Åsa Säfström wrote:
Hej, Enligt stickbeskrivning ska mönstret börja direkt efter halskant. Detta kan inte stämma. När ska den börja?
03.12.2024 - 20:24DROPS Design answered:
Hej Åsa. Du börjar att sticka diagrammen direkt efter halskanten, men om du ser på diagrammen så ser du den tvåfärgade delen börjar en bit upp på diagrammen. Mvh DROPS Design
04.12.2024 - 08:06
![]() COLOMBUS LAURENCE wrote:
COLOMBUS LAURENCE wrote:
Bonjour, je voudrais tricoter ce modèle de veste sans aucun motif une veste unie. Combien de pelotes me faudrait-il s’il vous plaît ? Je vous remercie.
12.11.2024 - 14:26DROPS Design answered:
Bonjour Mme Colombus, comme ce modèle a été tricoté avec jacquard, nous avons seulement la quantité pour chaque couleur - et nous n'avons plus le modèle original; vous pouvez ainsi simplement additionner toutes les couleurs, il vous en faudra peut être un peu moins - vous pouvez vous inspirer d'un modèle similaire de même tension (cf ici par ex.). Bon tricot!
12.11.2024 - 16:05
![]() Siv wrote:
Siv wrote:
Oppskriften mangler
22.10.2024 - 18:52
|
|||||||||||||
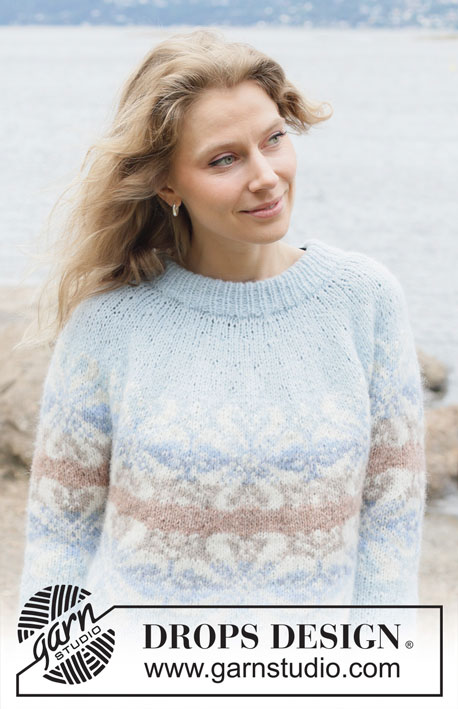
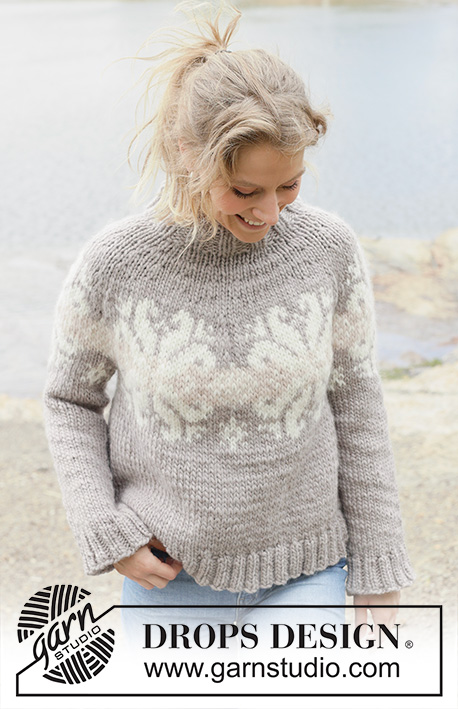
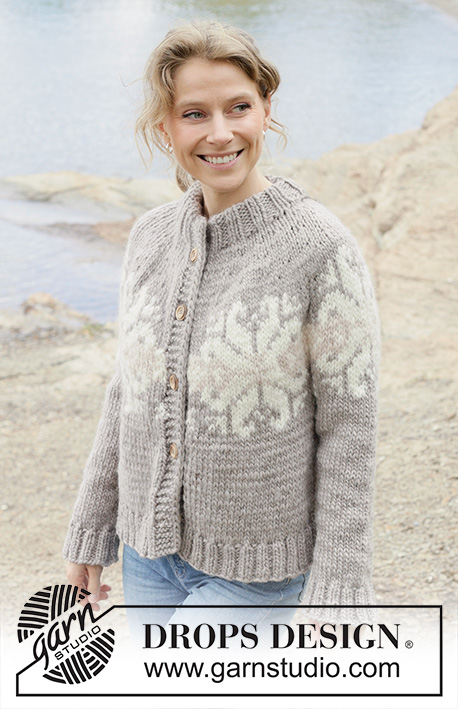
Spirit of Winter Cardigan#spiritofwintercardigan |
|||||||||||||
 |
 |
||||||||||||
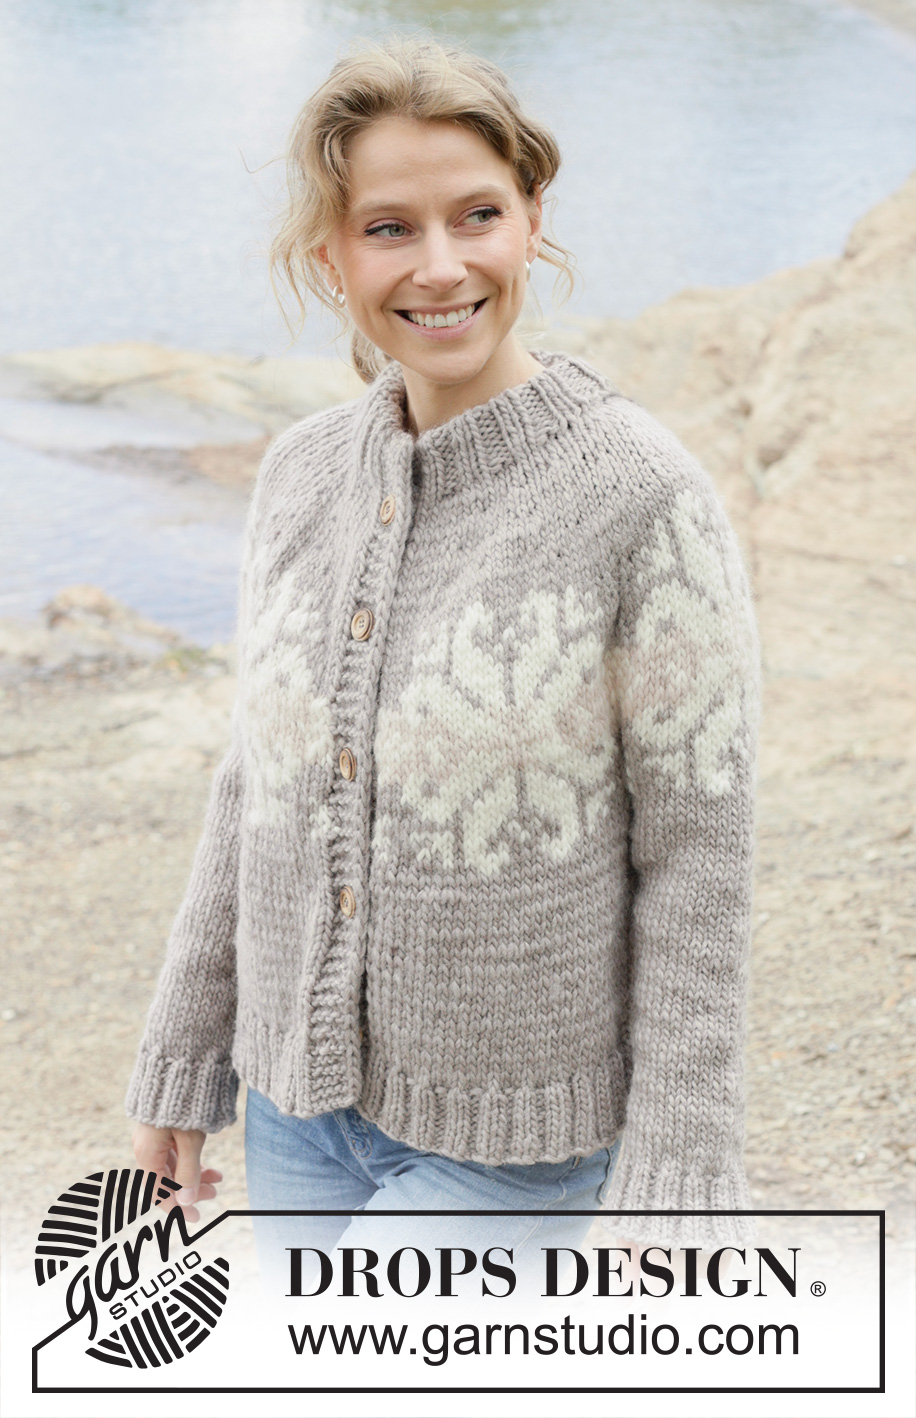
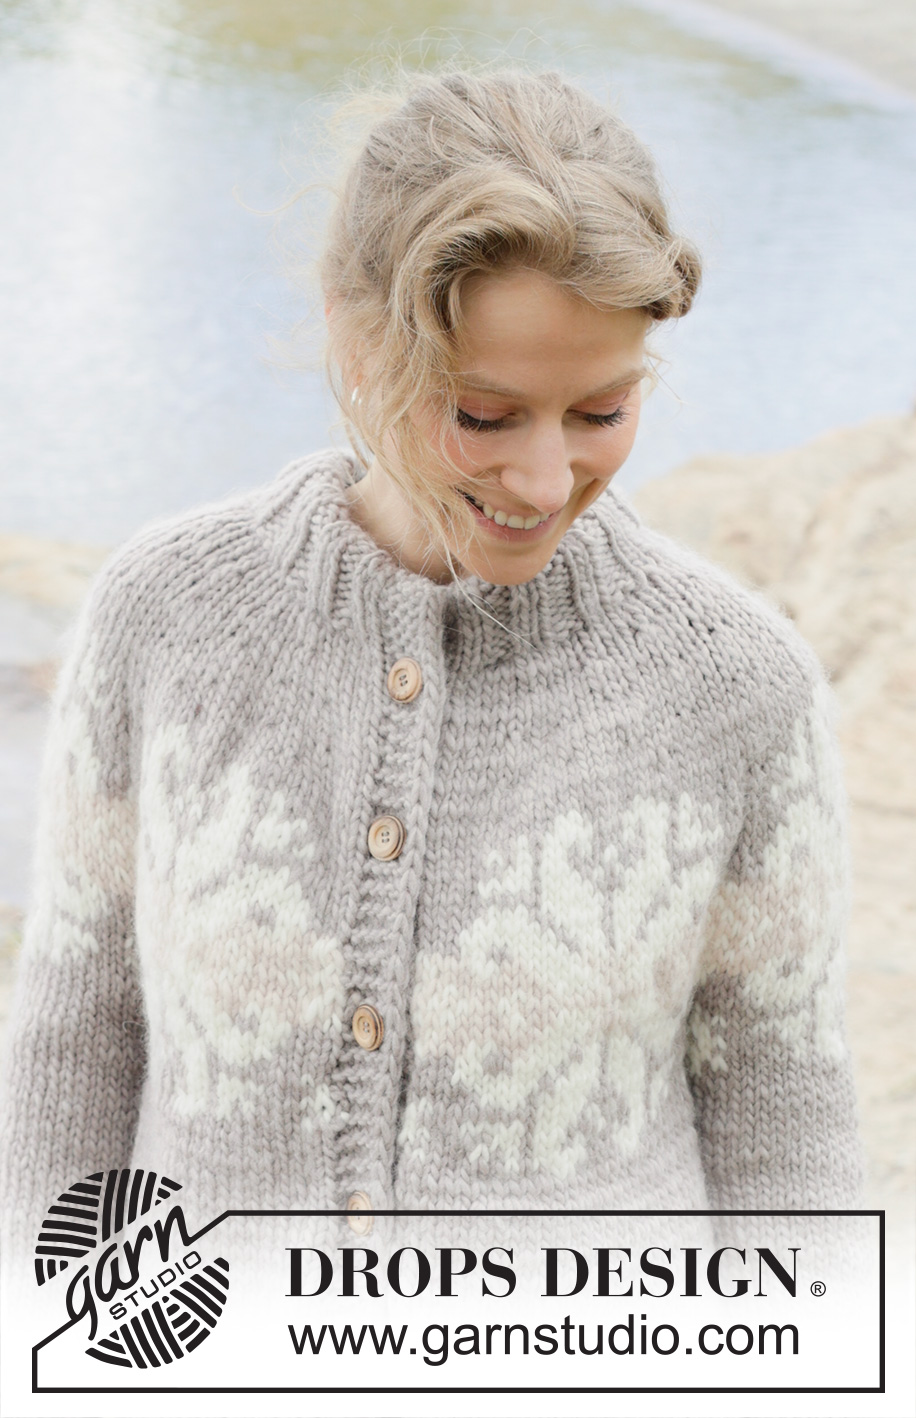
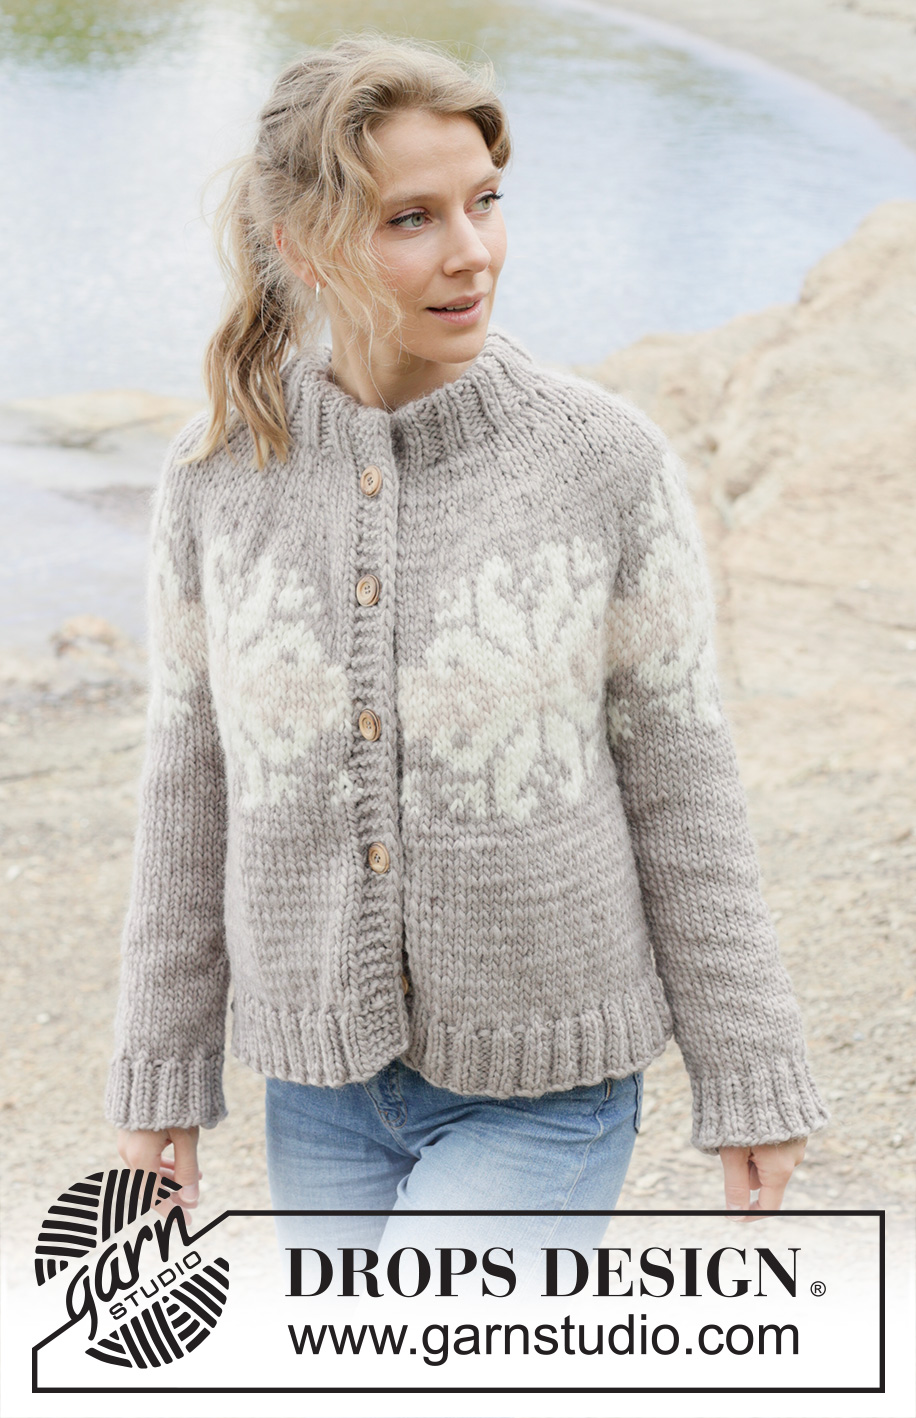
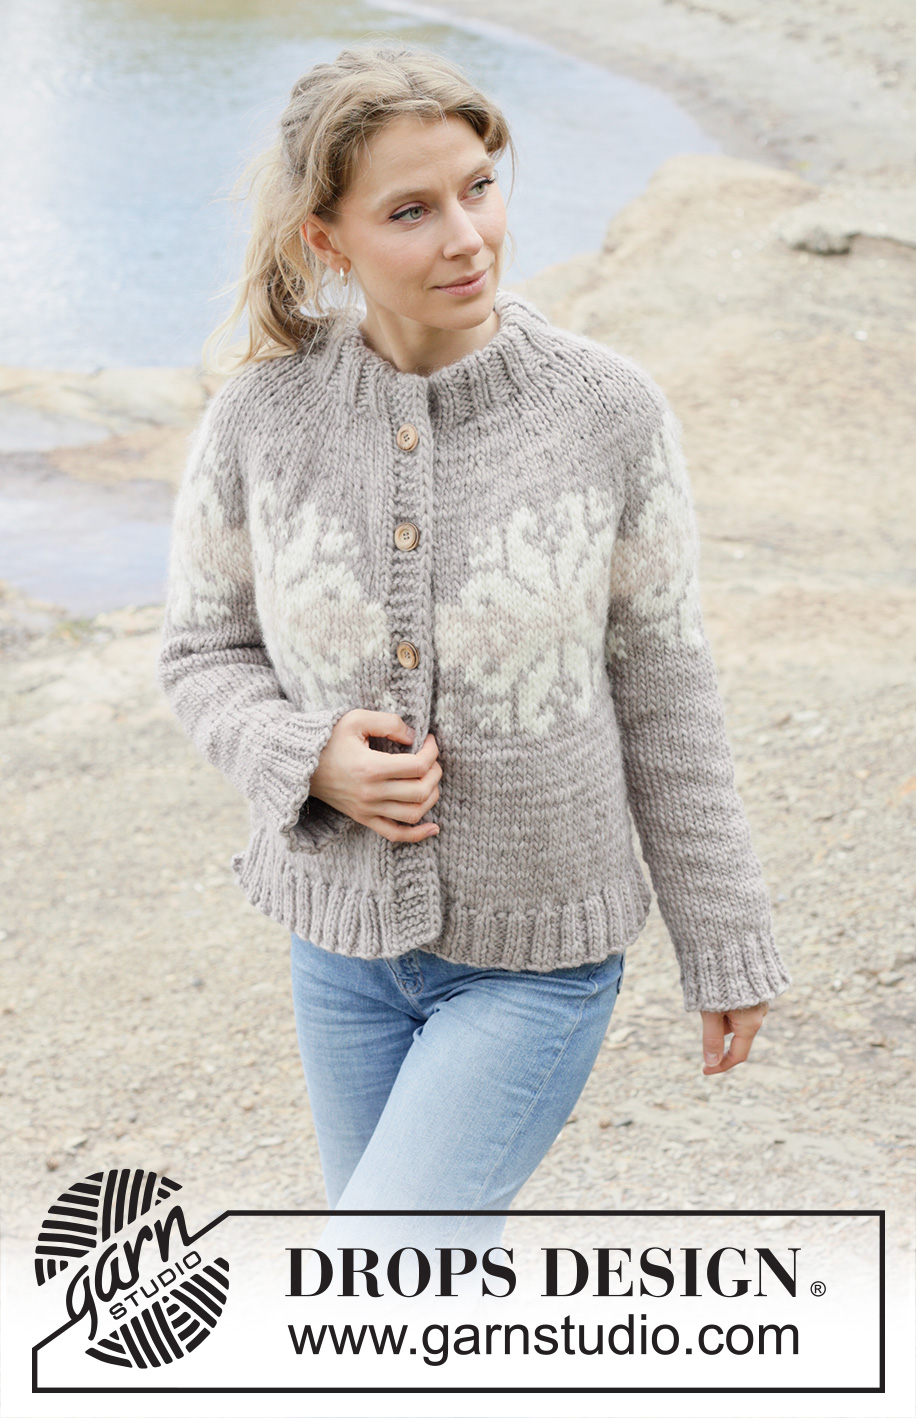
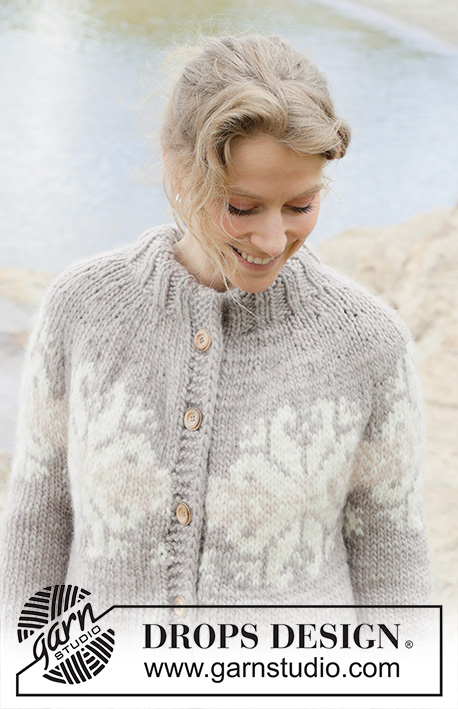
Knitted jacket in DROPS Snow. The piece is worked top down with round yoke, double neck, I-cord and Nordic pattern with large stars. Sizes S - XXXL.
DROPS 252-30 |
|||||||||||||
|
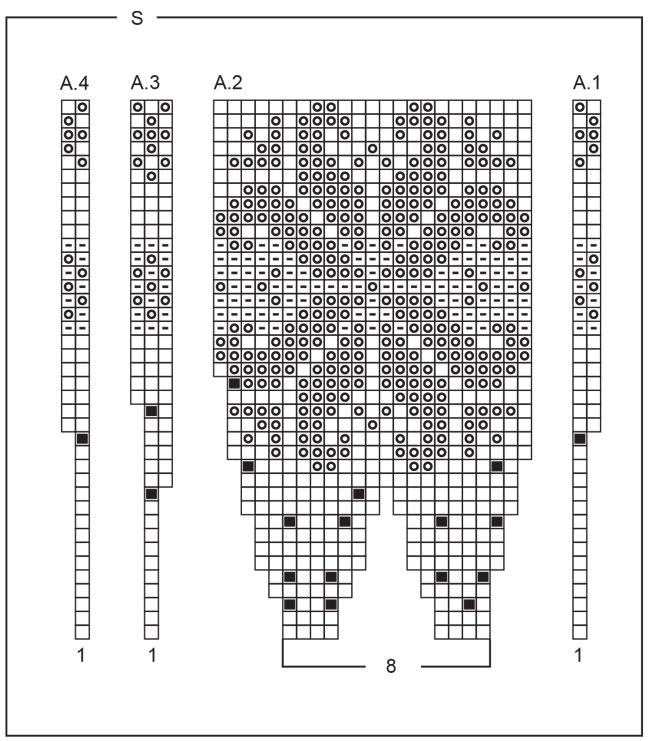
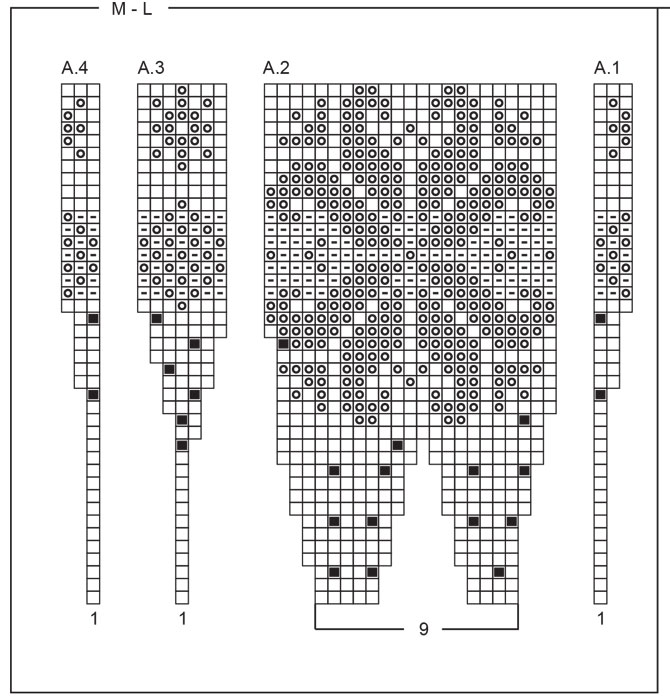
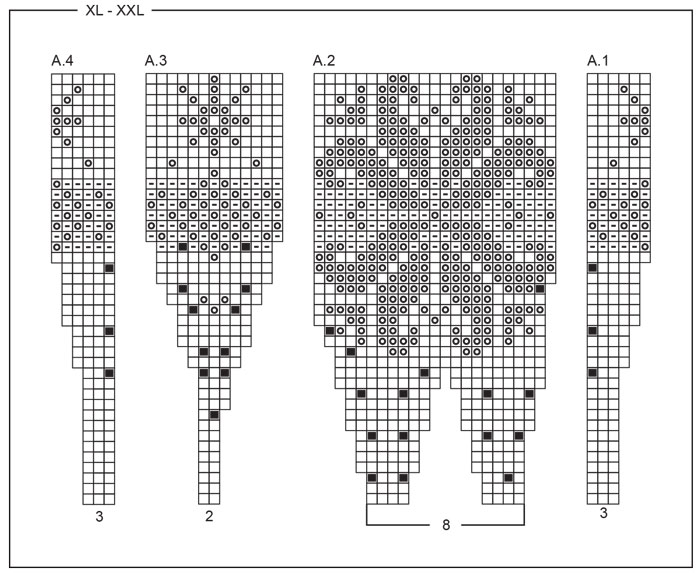
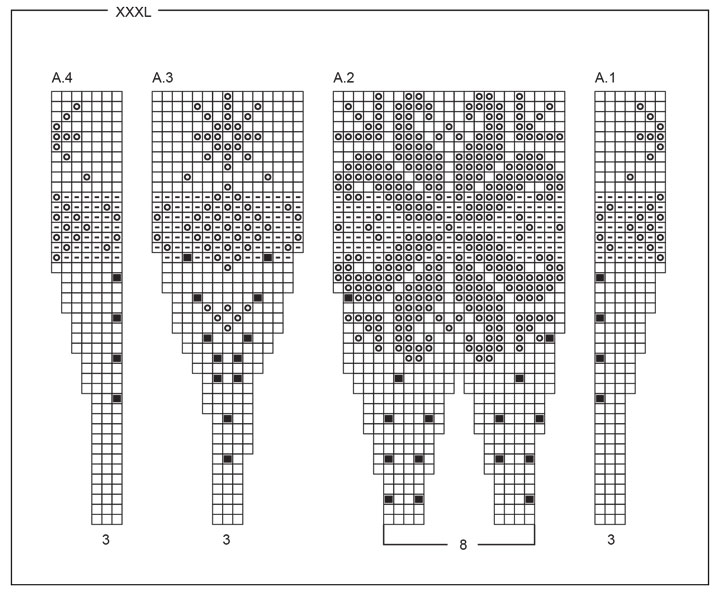
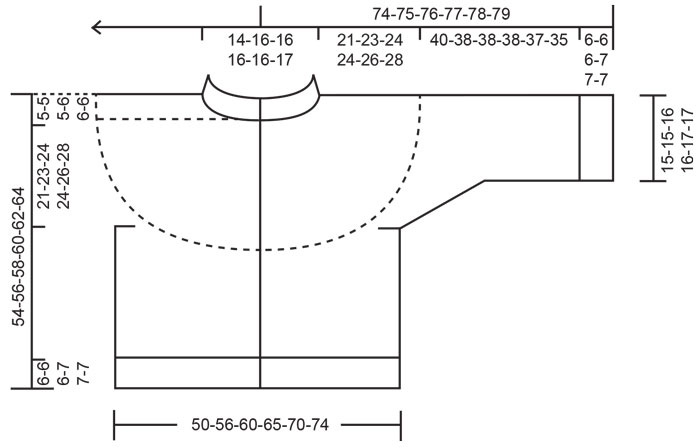
------------------------------------------------------- EXPLANATIONS FOR THE PATTERN: ------------------------------------------------------- GARTER STITCH (worked back and forth): Knit all rows, from both the right and wrong side. 1 ridge in height = knit 2 rows. BANDS WITH I-CORD: BEGINNING OF ROW: Work the band as follows: Slip 1 stitch purl-wise with yarn in front, knit 1, work 4 garter stitches. END OF ROW: Work the band as follows: Work until there are 6 stitches left on the row, work 4 garter stitches, slip 1 stitch purl-wise with yarn in front, knit 1. Work like this from both the right and wrong side. PATTERN: See diagrams A.1 to A.4. Choose diagram for your size. The diagrams show the pattern from the right side and the pattern is worked in stockinette stitch. To avoid the knitting gauge losing its elasticity when working pattern, it is important that the strands at the back are not tight. Use a size larger needle when working pattern if the piece becomes tight. INCREASE TIP: This symmetrical increase gives 1 new stitch. Follow points 1-4 below: 1. Slip the first stitch on the left needle onto the right needle purl-wise. Keep the working strand behind the piece. 2. Insert the left needle behind the slipped stitch, then between the slipped stitch and the first stitch on the right needle. 3. Make 1 yarn over the right needle and pull it through, giving 1 new stitch on the right needle. 4. Drop the outermost loop of the stitch on the left needle, knit the other loop through the front. 1 increased stitch. KNITTING TIP-1: When working a stripe with color marshmallow in the middle of the diagram the bands are still worked with color light beige. Use separate balls on each side to work the bands, twisting the light beige and marshmallow strands together after/before the bands to avoid holes. KNITTING TIP-2: When knitting up stitches under the sleeve, there will be a small hole in the transition between the body and sleeve. This hole can be closed by picking up the strand between two stitches and working it twisted together with the next stitch. DECREASE TIP: Decrease 1 stitch on each side of the marker-thread as follows: Work until there are 3 stitches left before the marker-thread, knit 2 together, knit 2 (marker-thread sits between these 2 stitches), slip 1 stitch knit-wise, knit 1 and pass the slipped stitch over the knitted stitch (2 stitches decreased). BUTTONHOLES: Work the buttonholes on the right front band from the right side. When there are 4 stitches left on the row work as follows: ROW 1 (right side): Make 1 yarn over, knit 2 together, knit 1, slip 1 purl-wise with strand in front, knit 1. ROW 2 (wrong side): Work the band as before, knit the yarn over to leave a hole. The first buttonhole is worked on the first row from the right side after the neck is finished. Then work the other 4-4-5-5-5-5 buttonholes with 11-11½-9½-9½-10-10 cm = 4⅜"-4⅝"-3⅝"-3⅝"-4"-4" between each one. The bottom buttonhole is worked in the transition between the stockinette stitch and rib. ------------------------------------------------------- START THE PIECE HERE: ------------------------------------------------------- JACKET – SHORT OVERVIEW OF THE PIECE. The pattern uses both long and short needles; start with the length which fits the number of stitches and change when necessary. The neck and yoke are worked back and forth with circular needle, from mid front and top down. When the yoke is finished, it is divided for body and sleeves and the body continued back and forth with circular needle, while the sleeves wait. The sleeves are worked in the round. The neck is folded to the inside and sewn down. NECK: Cast on 60-64-64-68-68-72 stitches with circular needle size 8 MM = US 11 and color light beige DROPS Snow. Change to circular needle size 6 MM = US 10 (casting on with a larger needle size makes the cast-on edge elastic). Purl 1 row from the wrong side, then work from the right side as follows: Work 1 GARTER STITCH – read description above, rib (knit 2, purl 2) until there are 3 stitches left, knit 2 and 1 garter stitch. Continue this rib back and forth for 5-5-5-6-6-6 cm = 2"-2"-2"-2⅜"-2⅜"-2⅜" (approx. neck-height when folded double). At the end of the next 2 rows cast on 5 stitches for the bands = 70-74-74-78-78-82 stitches. Continue the rib with the outermost 6 stitches on each side worked according to BANDS WITH I-CORD – read description above. Work until the neck measures 11-11-11-13-13-13 cm = 4⅜"-4⅜"-4⅜"-5⅛"-5⅛"-5⅛" – finishing with a row from the wrong side where the stitch count is adjusted to 67-73-73-76-76-81 stitches. Insert 1 marker inside one band; the piece is now measured from here. YOKE: Work PATTERN – read description above, from the right side as follows: Change to circular needle size 8 MM = US 11, work the band as before, work A.1, * A.2, A.3 *, work from *-* 5 times, work A.2, A.4 and the band as before – remember the first BUTTONHOLE – read description above. Continue the pattern and increase as shown in the diagrams. Remember to maintain the knitting gauge. When the background color changes from light beige to marshmallow, continue working the bands with color light beige – read KNITTING TIP-1. Work until the yoke measures 21-23-24-24-26-28 cm = 8¼"-9"-9½"-9½"-10¼"-11" from the marker. Now divide for the body and sleeves. NOTE: All increases in the diagrams should have finished = 169-191-191-227-227-239 stitches. The pattern continues on the body and sleeves. DIVIDE FOR BODY AND SLEEVES: Work 30-34-34-39-40-42 stitches as before (= front piece), place the next 30-34-34-42-40-42 stitches on 1 thread for the sleeve, cast on 6-6-10-6-10-10 stitches (in side mid-under sleeve), work 49-55-55-65-67-71 stitches (= back piece), place the next 30-34-34-42-40-42 stitches on 1 thread for the sleeve, cast on 6-6-10-6-10-10 stitches (in side mid-under sleeve), work the last 30-34-34-39-40-42 stitches as before (= front piece). The body and sleeves are finished separately. BODY: = 121-135-143-155-167-175 stitches. Insert 1 marker-thread in the middle of the 6-6-10-6-10-10 cast-on stitches under each sleeve. Continue the pattern back and forth with 6 band stitches on each side as before – NOTE: The pattern will not fit under the sleeves; work it as far as it will go until 1 stitch before each marker-thread, work the next 2 stitches (1 stitch on each side of the marker-thread) with the back ground color. When A.1 to A.4 are completed in height, continue with stockinette stitch and bands using color light beige until the piece measures 43-45-47-47-49-51 cm = 17"-17¾"-18½"-18½"-19¼"-20" from the marker. On the next row from the right side begin the rib, AT THE SAME TIME as increasing 21-23-27-27-27-31 stitches evenly on the row = 142-158-170-182-194-206 stitches, as follows: Change to circular needle size 6 MM = US 10, work the band as before, work rib (knit 2, purl 2 – remember to increase) until there are 8 stitches left, knit 2 and the band as before. When the rib measures 6-6-6-7-7-7 cm = 2⅜"-2⅜"-2⅜"-2¾"-2¾"-2¾", bind off. The jacket measures approx. 49-51-53-54-56-58 cm = 19¼"-20"-21"-21¼"-22"-22¾" from the marker and 54-56-58-60-62-64 cm = 21¼"-22"-22¾"-23⅝"-24⅜"-25¼" from the shoulder. SLEEVES: Place the 30-34-34-42-40-42 sleeve-stitches from one thread on circular needle size 8 MM = US 11 and knit up 1 stitch in each of the 6-6-10-6-10-10 stitches cast on under the sleeve = 36-40-44-48-50-52 stitches. Insert a marker-thread in the middle of the 6-6-10-6-10-10 stitches under the sleeve which will be used when decreasing under the sleeve. Now work pattern and decrease under the sleeve. Read the next 2 sections before continuing. PATTERN: Remember to decrease. Start at the marker-thread under the sleeve and continue the pattern from the yoke – read KNITTING TIP-2 – NOTE: The star is not symmetrical on the sleeve and the pattern will not fit under the sleeve, work it as far as it will go until 1 stitch before the marker-thread, work the next 2 stitches (1 stitch on each side of the marker-thread) with the back ground color. When the pattern is completed in height, continue with stockinette stitch and color light beige. DECREASE: When the sleeve measures 2 cm = ¾", decrease 2 stitches under the sleeve – read DECREASE TIP. Decrease like this every 3-3-3-2-2-1½ cm = 1⅛"-1⅛"-1⅛"-¾"-¾"-½" a total of 1-3-4-6-6-7 times = 34-34-36-36-38-38 stitches. Work until the sleeve measures 40-38-38-38-37-35 cm = 15¾"-15"-15"-15"-14½"-13¾" from the division. Change to double pointed needles size 6 MM = US 10. Work rib (knit 2, purl 2), AT THE SAME TIME increase 6-6-8-8-6-6 stitches evenly on round 1 = 40-40-44-44-44-44 stitches. When the rib measures 6-6-6-7-7-7 cm = 2⅜"-2⅜"-2⅜"-2¾"-2¾"-2¾" bind off. The sleeve measures approx. 46-44-44-45-44-42 cm = 18"-17¼"-17¼"-17¾"-17¼"-16½". ASSEMBLY: Fold the neck double to the inside and sew down. To avoid the neck being tight and rolling outwards, it is important that the seam is elastic. Sew the openings on the bands with small stitches. Sew the buttons onto the left band. |
|||||||||||||
Diagram explanations |
|||||||||||||
|
|||||||||||||
 |
|||||||||||||
 |
|||||||||||||
 |
|||||||||||||
 |
|||||||||||||
 |
|||||||||||||
Have you finished this pattern?Tag your pictures with #dropspattern #spiritofwintercardigan or submit them to the #dropsfan gallery. Do you need help with this pattern?You'll find 34 tutorial videos, a Comments/Questions area and more by visiting the pattern on garnstudio.com. © 1982-2026 DROPS Design A/S. We reserve all rights. This document, including all its sub-sections, has copyrights. Read more about what you can do with our patterns at the bottom of each pattern on our site. |
|||||||||||||


With over 40 years in knitting and crochet design, DROPS Design offers one of the most extensive collections of free patterns on the internet - translated to 17 languages. As of today we count 324 catalogs and 12290 patterns - 12280 of which are translated into English (US/in).
We work hard to bring you the best knitting and crochet have to offer, inspiration and advice as well as great quality yarns at incredible prices! Would you like to use our patterns for other than personal use? You can read what you are allowed to do in the Copyright text at the bottom of all our patterns. Happy crafting!
Post a comment to pattern DROPS 252-30
We would love to hear what you have to say about this pattern!
If you want to leave a question, please make sure you select the correct category in the form below, to speed up the answering process. Required fields are marked *.