
Popular categories
Looking for a yarn?


Comments / Questions (38)
![]() Johanna wrote:
Johanna wrote:
Hey, werden die Diagramme A1 und A2 von oben nach unten oder von unten nach oben gestrickt?
25.04.2026 - 12:35DROPS Design answered:
Liebe Johanna, ja genau, A.1 und A.2 lesen Sie von unten nach oben (rechts nach links jeder Runde) bis alle Reihen (11 Reihen) gestrickt werden). Viel Spaß beim Stricken!
27.04.2026 - 08:31
![]() Marion wrote:
Marion wrote:
Hallo, ich verstehe leider die Aufteilung der Markierer nicht. Verschiebt sich mein Runden Beginn um 36 M und ist das tatsächlich mein Runden Anfang? Liebe Grüße
08.01.2026 - 10:34DROPS Design answered:
Liebe Marion, der Rundenbeginn verschiebt sich nicht, der Markierer nach den 36 M ist nur zum Messen da. Viel Spaß beim Weiterstricken!
06.02.2026 - 13:47
![]() Vi wrote:
Vi wrote:
Hello! First, thank you very much for this pattern! I just finished the neck and am now on the yoke. Can I get some clarification on the instructions for the set up? Do I break the yarn and this is now my new start? Do I just go into the next round and place the marker as I work the next round? This is my first sweater and I am a little lost as there is no video specifying what is being done. Thank you!
28.12.2025 - 18:58DROPS Design answered:
Hi Vi, you don't break the yarn. You just work the next round (place marker at the beginning of round) according to the pattern: 'Insert 1 marker after the first 36...., etc.). Happy knitting!
28.12.2025 - 20:14
![]() Lynn wrote:
Lynn wrote:
Hello. Working on the yoke, Diagram explanations for A3 & A4 (using cable needle) specify to “knit” 1, yarn over, etc. Are all of these stitches to be ‘knit’ even though some of the stitches in previous row are purl stitches? So then those purls will become knits going forward? Many thanks!
10.12.2025 - 07:15DROPS Design answered:
Dear Lynn, correct, the 5 sts A.4/A.5 will be worked over the 4 sts A.1/A.2 + P1 (before or after the cable). You increase 3 sts in each A.3/A.4. on the next round work K over K and P over P and knit all stitches from the cable, you should have still P1, K2, P2 between each cable (A.3/A.4). Happy knitting!
10.12.2025 - 08:37
![]() Ciel wrote:
Ciel wrote:
I don't understand the following line (in the sleeves part): Slip 58-58-64-70-70-70 sleeve stitches from one thread on to circular needle size 4.5 mm and pick in addition up 1 stitch in each of the 4-6-8-8-10-16 stitches cast on under sleeve = 62-64-72-78-80-86 stitches. How can I pick up 1 stitch from 4 stitches?
11.09.2025 - 21:36DROPS Design answered:
Hi, you have to pick up 1 st in each of 4 sts cast on under the sleeve. Please watch the video HERE. Happy knitting!
11.09.2025 - 21:44
![]() Linda wrote:
Linda wrote:
When beginning the rib section, the pattern stitches appear to me to add up to 110 stitches. I’m knitting size small which provides only 100 stitches on my needles. What am I doing wrong? Thank you.
31.08.2025 - 17:40DROPS Design answered:
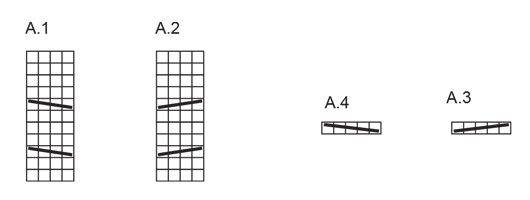
Dear Linda, A.1 and A.2 are 4 stitches each. So you work: Knit 1, purl 1, A.2 (= 4 stitches), * purl 1, knit 2 *, work from *-* 3 times in total (= 9 stitches), purl 1, A.1 (= 4 stitches), purl 1, knit 2, purl 1, A.2 (= 4 stitches), * purl 1, knit 2 *, work from *-* 5 times in total (=15 stitches), purl 1, A.1 (= 4 stitches), purl 1, knit 2, purl 1, A.2 (= 4 stitches), * purl 1, knit 2 *, work from *-* 3 times in total (= 9 stitches), purl 1, A.1 (= 4 stitches), purl 1, knit 2, purl 1, A.2 (= 4 stitches), * purl 1, knit 2 *, work from *-* 5 times in total (= 15 stitches), purl 1, A.1 (= 4 stitches), purl 1, knit 1. That is, 100 sts total. Happy knitting!
31.08.2025 - 20:39
![]() Johanna wrote:
Johanna wrote:
Hej! Försökte ge mig på den här som första tröja att sticka. Roligt mönster! Men jag får inte ihop mönstret med bilderna. Det ser ut på bilderna som det ska vara 6 flätor inklusive de i halsringningen (2+4) innan ökningarna fortsätter på fram och bakstycke, men när jag läser mönstret verkar det vara 6 flätor med ökningar utöver de i halsen, (2+6). Hur ska det vara?
05.07.2025 - 20:06DROPS Design answered:
Hej Johanna. Du ska göra 6 flätor på ärmarna (minsta storleken), du börjar med 100 maskor och ökar 24 maskor 6 gånger; 100+144= 244 maskor (minsta storleken). Mvh DROPS Design
08.07.2025 - 11:22
![]() MARIANNE Orighoni wrote:
MARIANNE Orighoni wrote:
Bonjour Les 40 premières mailles de l empiecement sont elles tricotés ? Merci
14.05.2025 - 09:15
![]() Orighoni wrote:
Orighoni wrote:
Bonjour Pour l empiecement doit on tricoter les 40 premières mailles ? Merci
14.05.2025 - 09:12DROPS Design answered:
Bonjour Mme Orighoni, lorsqu'il est indiqué de placer un marqueur après les 40 premières mailles (2 grandes tailles) au tout début de l'empiècement, on n'a pas besoin de tricoter ces mailles avant, on compte juste 40 mailles après le début du tour et on met un marqueur pour repérer le milieu du devant du pull. Bon tricot!
14.05.2025 - 09:48
![]() Anna wrote:
Anna wrote:
Ärmel in Größe S, hier kann doch etwas nicht stimmen? Stricke zuerst 3cm dann abnahmen 7 mal alle 5cm. Weiterstricken bis der Ärmel 36 cm ist? 3cm +(5x7 cm=35 cm) = ist doch bereis 38 cm. Also schon 3 cm länger als ich Stricken soll bevor rippenmuster und Nadelwechsel… Freue mich über eine kurze Erläuterung. VG
14.04.2025 - 16:35DROPS Design answered:
Liebe Anna, die 1. Abnahme wird nach 3 cm bearbeitet, dann die 2. nach 10cm, die 3. nach 17 cm, die 4. nach 24 cm und die 5. nach 31 cm, so sind nach 36 cm alle Abnahmen fertig. Viel Spaß beim Stricken!
22.04.2025 - 09:05
|
|||||||||||||
Snow Drift#snowdriftsweater |
|||||||||||||
 |
 |
||||||||||||
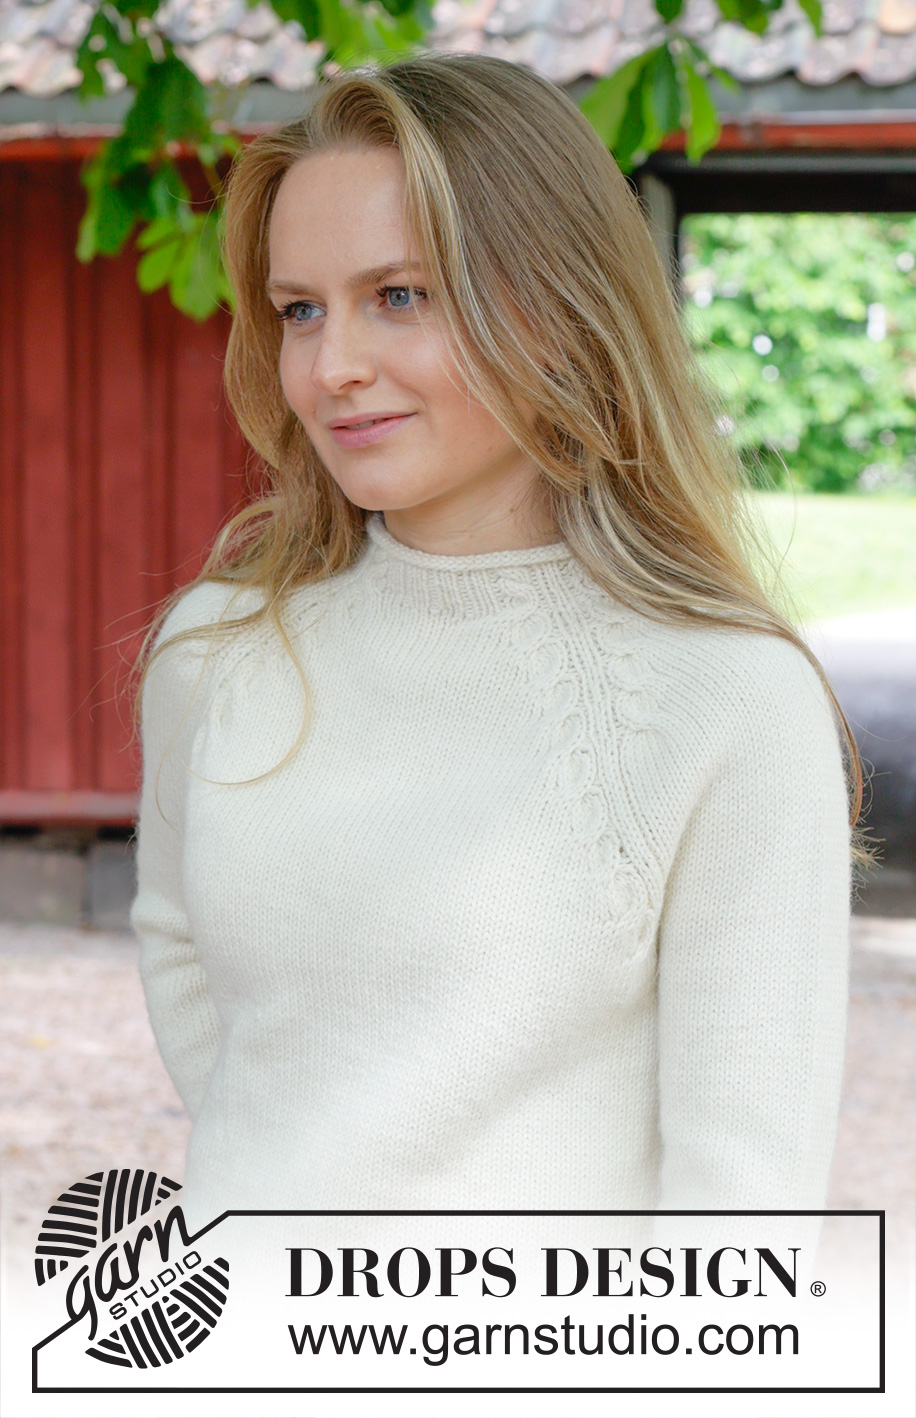
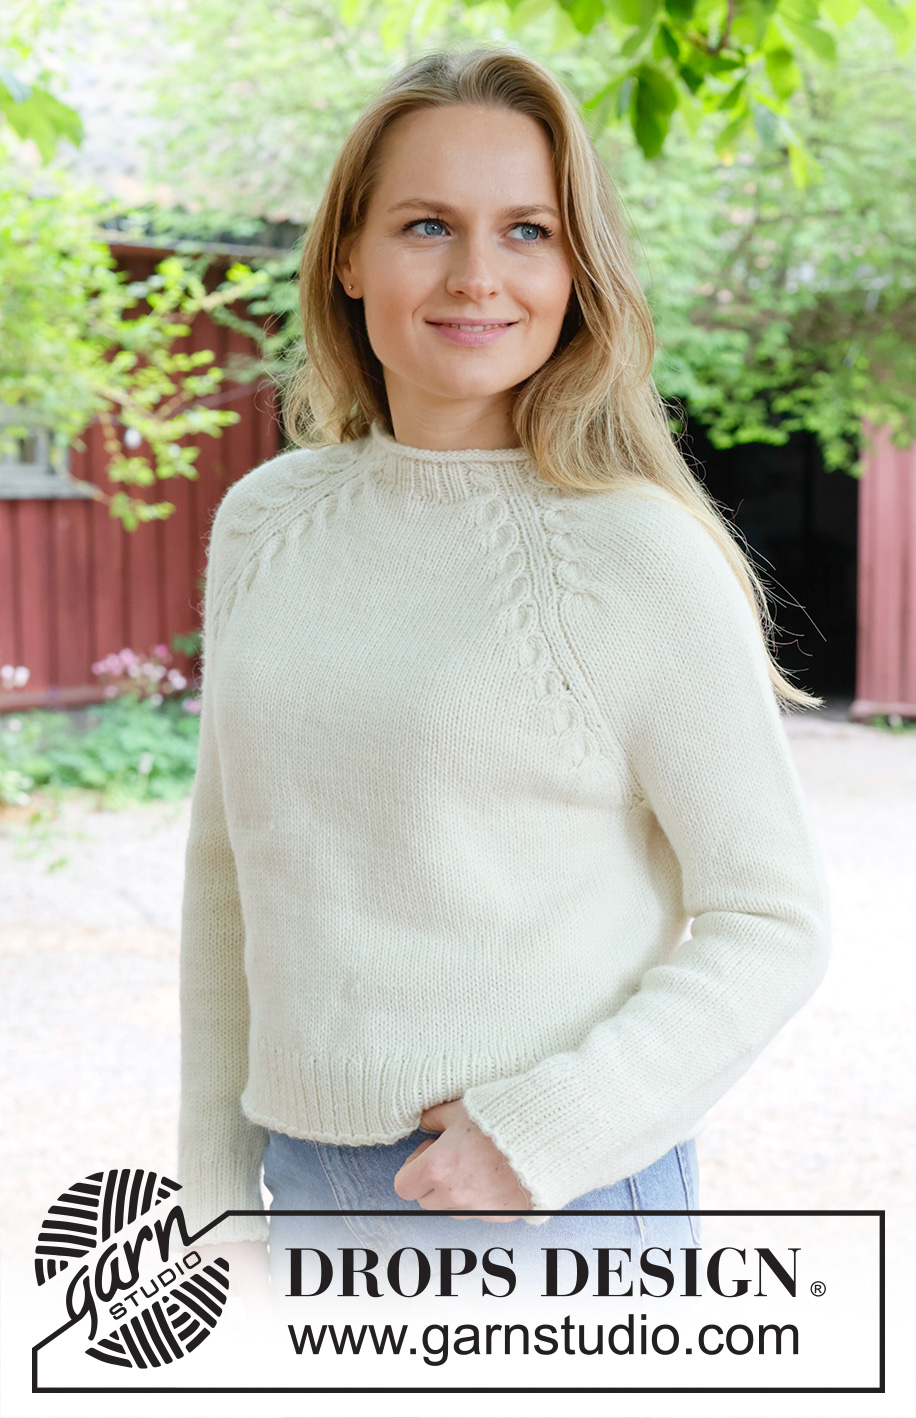
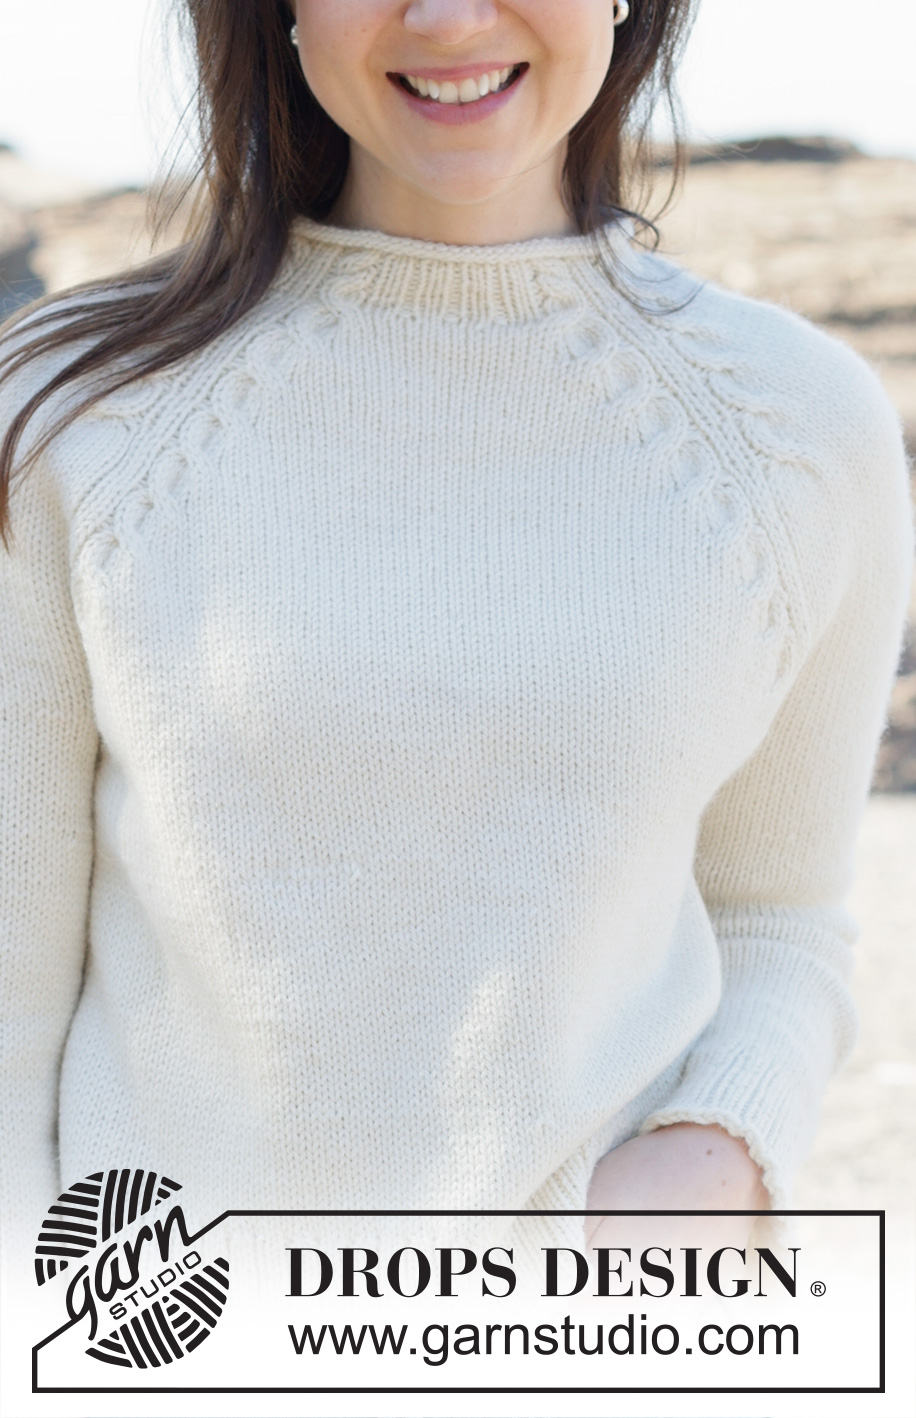
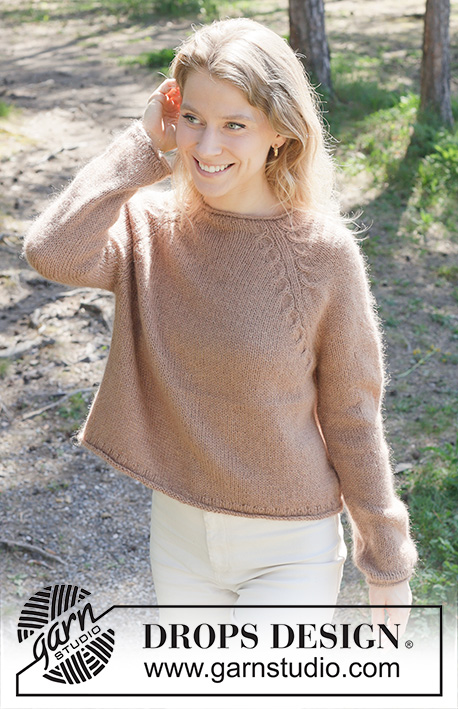
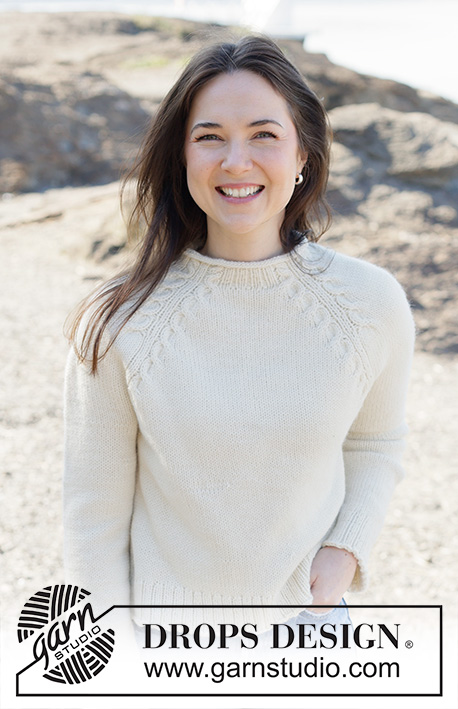
Knitted sweater in DROPS Nepal or DROPS Big Merino. Piece is knitted top down with raglan and cables. Size: S - XXXL
DROPS 255-19 |
|||||||||||||
|
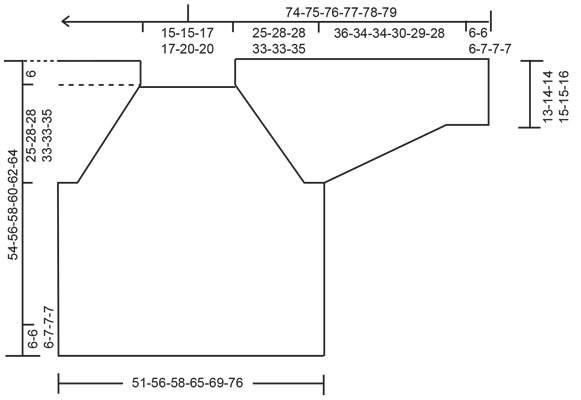
---------------------------------------------------------- EXPLANATION FOR THE PATTERN: ---------------------------------------------------------- PATTERN: See diagrams A.1 to A.4. Diagrams show all rows in pattern seen from the right side. DECREASE TIP: Decrease 1 stitch on each side of marker thread as follows: Work until 3 stitches remain before marker thread and knit 2 together, knit 2 (marker thread is in the middle of these 2 stitches), slip 1 stitch knitwise, knit 1, pass slipped stitch over stitch worked (= 2 stitches decreased). ---------------------------------------------------------- START THE PIECE HERE: ---------------------------------------------------------- SWEATER - SHORT OVERVIEW OF THE PIECE: In this pattern needles of different length have been used, begin with fitting length for number of stitches and switch as needed. Work neck edge and yoke in the round on circular needle from right shoulder back, and work top down. When yoke is done, divide piece for body and sleeves. Work body down wards in the round on circular needle while putting the sleeves aside. Then work sleeves downwards in the round on needle. NECK EDGE: Cast on 100-100-106-106-118-118 stitches on circular needle size 3.5 MM = US 4 with DROPS Nepal. Beginning of round is at right shoulder at the back. Knit 4 rounds (= stockinette stitch), then work rib as follows: Knit 1, purl 1, A.2, * purl 1, knit 2 *, work from *-* over the next 9 stitches, purl 1, A.1, purl 1, knit 2, purl 1, A.2, * purl 1, knit 2 *, work from *-* over the next 15-15-18-18-24-24 stitches, purl 1, A.1, purl 1, knit 2, purl 1, A.2, * purl 1, knit 2 *, work from *-* over the next 9 stitches, purl 1, A.1, purl 1, knit 2, purl 1, A.2, * purl 1, knit 2 *, work from *-* over the next 15-15-18-18-24-24 stitches, purl 1, A.1, purl 1, knit 1. Continue this pattern until A.1 and A.2 have been worked vertically. YOKE: Insert 1 marker after the first 36-36-37-37-40-40 stitches on round (= approx. mid front), measures piece from this marker. Switch to circular needle size 4.5 MM = US 7 and work next round as follows: Knit 1, purl 1, A.4, knit 8 (= sleeve), A.3, purl 1, knit 2, purl 1, A.4, knit 14-14-17-17-23-23 (= front piece), A.3, purl 1, knit 2, purl 1, A.4, knit 8 (= sleeve), A.3, purl 1, knit 2, purl 1, A.4, knit 14-14-17-17-23-23 (= back piece), A.3, purl 1, knit 1. When this round has been worked, 3 stitches have been increased in each cable (24 stitches increased in total on round) = 124-124-130-130-142-142 stitches. Work 5 rounds with knit over knit and purl over purl, knit yarn overs in A.3 and A.4 twisted. Remember to follow the knitting gauge! Then work as follows: Knit 1, purl 1, A.4, knit 14, A.3, purl 1, knit 2, purl 1, A.4, knit 20-20-23-23-29-29, A.3, purl 1, knit 2, purl 1, A.4, knit 14, A.3, purl 1, knit 2, purl 1, A.4, knit 20-20-23-23-29-29, A.3, purl 1, knit 1. When this round has been worked, 3 stitches have been increased in each cable (24 stitches increased in total on round) = 148-148-154-154-166-166 stitches. Work 5 rounds with knit over knit and purl over purl, knit yarn overs in A.3 and A.4 twisted. Continue pattern and increase this way until cable has been done 6-6-7-8-8-8 times in total, there are 244-244-274-298-310-310 stitches on needle. Then continue with cables and increases on front piece and back piece but increases on sleeves are now done, work stockinette stitch over these stitches (1 purl + 2 knit + 1 purl in every transition between body and sleeves continues as before). Continue increase until cable has been done 10-11-11-13-13-14 times in total on body (and 6-6-7-8-8-8 times on sleeves), there are now 292-304-322-358-370-382 stitches on round. Work 3 rounds with pattern as before , without cable. Piece measures approx. 25-28-28-33-33-35 cm = 9¾"-11"-11"-13"-13"-13¾", measured from marker after neck edge. DIVIDING FOR BODY AND SLEEVES: AT THE SAME TIME as next round is worked divide yoke for body and sleeves as follows: Slip the first 58-58-64-70-70-70 stitches on a thread for sleeve, cast on 4-6-8-8-10-16 new stitches on needle (= in the side mid under sleeve), work 88-94-97-109-115-121 stitches in stockinette stitch (= front piece), slip the next 58-58-64-70-70-70 stitches on a thread for sleeve, cast on 4-6-8-8-10-16 new stitches on needle (= in the side mid under sleeve), and work the last 88-94-97-109-115-121 stitches in stockinette stitch (= back piece). Work body and sleeves separately and beginning of round is in the transition between body and sleeve. BODY: = 184-200-210-234-250-274 stitches. Work stockinette stitch as before until piece measures 42-44-46-47-49-51 cm = 16½"-17¼"-18"-18½"-19¼"-20" from marker mid front. Switch to circular needles size 3.5 MM = US 4, work rib (= knit 2/purl 1) while AT THE SAME TIME increasing 20-22-21-24-26-29 stitches evenly on 1st round = 204-222-231-258-276-303 stitches. When rib measures 6-6-6-7-7-7 cm = 2⅜"-2⅜"-2⅜"-2¾"-2¾"-2¾" bind off. Sweater measures 48-50-52-54-56-58 cm = 19"-19¾"-20½"-21¼"-22"-22¾" from marker mid front and approx. 54-56-58-60-62-64 cm = 21¼"-22"-22¾"-23⅝"-24⅜"-25¼" from the top of shoulder. SLEEVES: Slip 58-58-64-70-70-70 sleeve stitches from one thread on to circular needle size 4.5 MM = US 7 and pick in addition up 1 stitch in each of the 4-6-8-8-10-16 stitches cast on under sleeve = 62-64-72-78-80-86 stitches. Insert 1 marker thread in the middle of the 4-6-8-8-10-16 new stitches under sleeve - round begins at the marker thread. Work in stockinette stitch in the round on needle - AT THE SAME TIME when sleeve measures 3 cm = 1⅛" from division, decrease mid under sleeve – read DECREASE TIP and decrease as follows: Decrease 2 stitches every 5-4½-3-2-2-1½ cm = 2"-1⅝"-1⅛"-¾"-¾"-½" 7-7-10-12-12-14 times in total = 48-50-52-54-56-58 stitches. Work until sleeve measures 36-34-34-30-29-28 cm = 14¼"-13⅜"-13⅜"-11¾"-11⅜"-11" from division. Switch to double pointed needles size 3.5 MM = US 4 and work rib (= knit 2/purl 1) while AT THE SAME TIME increasing 6-7-5-6-7-5 stitches evenly on 1st round = 54-57-57-60-63-63 stitches. When rib measures 6-6-6-7-7-7 cm = 2⅜"-2⅜"-2⅜"-2¾"-2¾"-2¾" bind off. Sleeve measures approx. 42-40-40-37-36-35 cm = 16½"-15¾"-15¾"-14½"-14¼"-13¾" from division. |
|||||||||||||
Diagram explanations |
|||||||||||||
|
|||||||||||||
 |
|||||||||||||
 |
|||||||||||||
Have you finished this pattern?Tag your pictures with #dropspattern #snowdriftsweater or submit them to the #dropsfan gallery. Do you need help with this pattern?You'll find 26 tutorial videos, a Comments/Questions area and more by visiting the pattern on garnstudio.com. © 1982-2026 DROPS Design A/S. We reserve all rights. This document, including all its sub-sections, has copyrights. Read more about what you can do with our patterns at the bottom of each pattern on our site. |
|||||||||||||


With over 40 years in knitting and crochet design, DROPS Design offers one of the most extensive collections of free patterns on the internet - translated to 17 languages. As of today we count 324 catalogs and 12290 patterns - 12280 of which are translated into English (US/in).
We work hard to bring you the best knitting and crochet have to offer, inspiration and advice as well as great quality yarns at incredible prices! Would you like to use our patterns for other than personal use? You can read what you are allowed to do in the Copyright text at the bottom of all our patterns. Happy crafting!
Post a comment to pattern DROPS 255-19
We would love to hear what you have to say about this pattern!
If you want to leave a question, please make sure you select the correct category in the form below, to speed up the answering process. Required fields are marked *.