
Popular categories
Looking for a yarn?


Comments / Questions (19)
![]() John Cawly wrote:
John Cawly wrote:
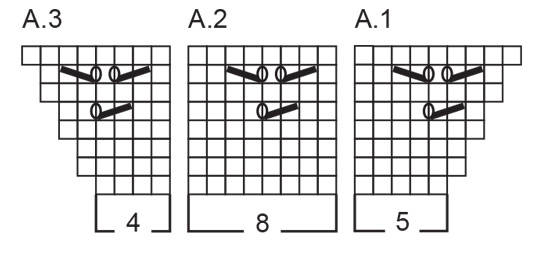
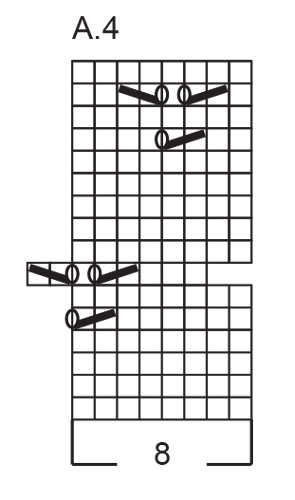
For all who are finding it difficult to continue as the increases change on the arm portions, what I found very helpful to keep track of those changes was to place a stitchmarker (of a different color) to identify the increases on the sleeve sections. It took me a very, very long time to figure out chart A4, and for me it is very confusingly written. Instead of using charts A1 and A3 in that portion, I used A4 in place of both. Hope this makes sense. John
28.10.2025 - 22:24
![]() Sabine wrote:
Sabine wrote:
Im vorletzten Satz gibt es einen Summierungsfehler: Der Ärmel der Größe 9-10 Jahre ist nach dem Abketten 39 cm lang (nicht 37). ;-)
11.09.2025 - 14:14DROPS Design answered:
Liebe Sabine, das stimmt, danke für den Hinweis! Es wird in Kürze korrigiert.
25.10.2025 - 00:21
![]() Sabine wrote:
Sabine wrote:
Liebes Drops-Team, A4 ist schwer zu verstehen - erkenntlich für mich ist, dass für das neue Daisy (Gänseblümchen) der Umschlag zwischen der 2. und 3. Masche entsteht, die sich zwischen den Daisys der vorherigen Reihe befinden. Auf den Fotos sind in dieser 3. Daisy-Reihe jedoch 5 Daisys zu erkennen, bei mir jedoch ist kein Platz dafür unter Berücksichtigung derRaglanmaschen und des Abstands der Daisys zueinander. Sollen an diesen Stellen ggf. auch halbe Daisys gestrickt werden?
07.09.2025 - 10:51DROPS Design answered:
Liebe Sabine, Sie stricken keine halben Lochmuster. Die Maschen, die nicht im Muster aufgehen, stricken Sie glatt rechts. Erst wenn wieder genug Maschen für einen Rapport vorhanden sind, stricken Sie wieder ein neues Lochmuster. Gutes Gelingen!
17.09.2025 - 09:43
![]() Charlotte Almar wrote:
Charlotte Almar wrote:
Jeg forstår overhovedet ikke, hvordan jeg, efter 158 masker, kommer videre med mønstret?? Jeg skal bruge A4, men ikke A1 og A3, men hvad med A2 og hvordan skal jeg starte?? Jeg fatter absolut intet... Kan det forklares i detaljer? På forhånd tak
26.05.2025 - 09:55DROPS Design answered:
Hej Charlotte, jo du fortsætter med at tage ud på hver 2.omgang til ryg og forstykke, men på ærmerne tager du nu kun ud på hver 4.omgang. Mønsteret på ærmerne fortsætter som du allerede gør :)
27.05.2025 - 14:36
![]() Charlotte Almar wrote:
Charlotte Almar wrote:
Det er en svær opskrift at gennemskue, jeg er ganske enkelt gået i stå tidligt i processen
25.05.2025 - 21:58
![]() EMILIE wrote:
EMILIE wrote:
A quel moment le diagramme A4 intervient ?
15.01.2025 - 16:07DROPS Design answered:
Bonjour Emilie, A.4 montre le point ajouré des manches; vous l'utilisez pour tricoter le point ajouré des manches. Bon tricot!
16.01.2025 - 08:49
![]() Rachel wrote:
Rachel wrote:
Bonjour, je désire faire le tricot en taille 2 ans. À quelle endroit se font les augmentations du dos avant et manche ? J’ai fait les 9 tours d’augmentation du raglan pour 158 mailles au total. Le rang suivant je dois augmenter de 4 mailles dont 2 pour le dos et 2 pour le devant et 4 mailles pour les manches donc 2 dans chaque manche. Merci
29.11.2024 - 01:09DROPS Design answered:
Bonjour Rachel, quand vous avez augmenté 9 x 8 mailles pour le raglan et que vous avez les 158 mailles, vous allez maintenant augmenter alternativement 8 mailles (= comme avant) et 4 mailles seulement (devants et dos seulement, mais plus sur les manches) pendant 20 rangs = vous aurez augmenté 10 fois de plus sur les devants/le dos et seulement 5 fois de plus sur les manches. Bon tricot!
29.11.2024 - 09:03
![]() Marie wrote:
Marie wrote:
Dobrý den, chtěla bych plést svetr ve velikosti 5-6 let. Ale jsem zmatená z jehlic, č.4 znamená že si mám koupit jehlice 4mm ? V úvodu se píše že potřebuji jehlice č.4, jen v různých délkách, na začátku návodu se ale píše že mám začít na jehlici č. 3 a pokračovat na jehlici č. 4, které jehlice tedy potebuji? Děkuji.
17.11.2024 - 09:56DROPS Design answered:
Milá Marie, uvedené jehlice potřebujete obě a k nim ještě i krátké, tzv. ponožkové, v obou uvedených sílách. Proč? Protože lemy svetru je vhodné plést na slabších jehlicích, tj. č.3, aby byly pevnější a držely svetru tvar. Ty krátké, ponožkové verze jehlic zase mají špičky na obou koncích a dá se s nimi tedy plést do kruhu - umožní vám uplést i menší kruhový obvod, např. rukávy. Hodně zdaru! Hana
17.11.2024 - 18:13
![]() Martyna wrote:
Martyna wrote:
Rozmiar 9-10 lat
06.11.2024 - 17:01DROPS Design answered:
Witaj Martyno, W rozmiarze 9-10 lat najpierw dodajesz oczka (przód, tył i rękawy) co 2 okrążenia 8 razy. Następnie dodajesz na przód i tył jak wcześniej (co 2 okr.) 16 razy, a w tym samym czasie na rękawy dodajesz co 4 okrążenia (to będzie 8 razy). Wprowadziłam poprawkę we wzorze - dodawanie oczek na rękawy NIE będzie wyglądać tak jak na schematach A.1 i A.3 ponieważ teraz dodajemy co 4 okr. Dlatego kieruj się schematem A.4, aby nie przesunąć wzoru. Pozdrawiamy!
07.11.2024 - 09:31
![]() Martyna wrote:
Martyna wrote:
Dzień dobry. Jak kontynuować wzór na rękawach przy dodawaniu oczek co 4 rząd? Co 2 rzędy dodaje tylko przód i tył, co 4 przód, tył i rękawy. Dodawanie zaczęłam od 4 oczek czyli tylko przód i tył, następnie 8 oczek czyli też na rękawach i kolejno 4 oczka, 8 oczek. Niestety jest za mało oczek na rękawach, by przerobić schematy A1 i A3 i jednocześnie wzór w pionie był jak na schemacie A4. Czy źle zrozumiałam i oczka trzeba dodawać na rękawach co 2 okrążenia?
06.11.2024 - 05:41DROPS Design answered:
Witaj Martyno, który rozmiar wykonujesz?
06.11.2024 - 09:16
|
|||||||||||||
Daisy Fields#daisyfieldssweater |
|||||||||||||
 |
 |
||||||||||||
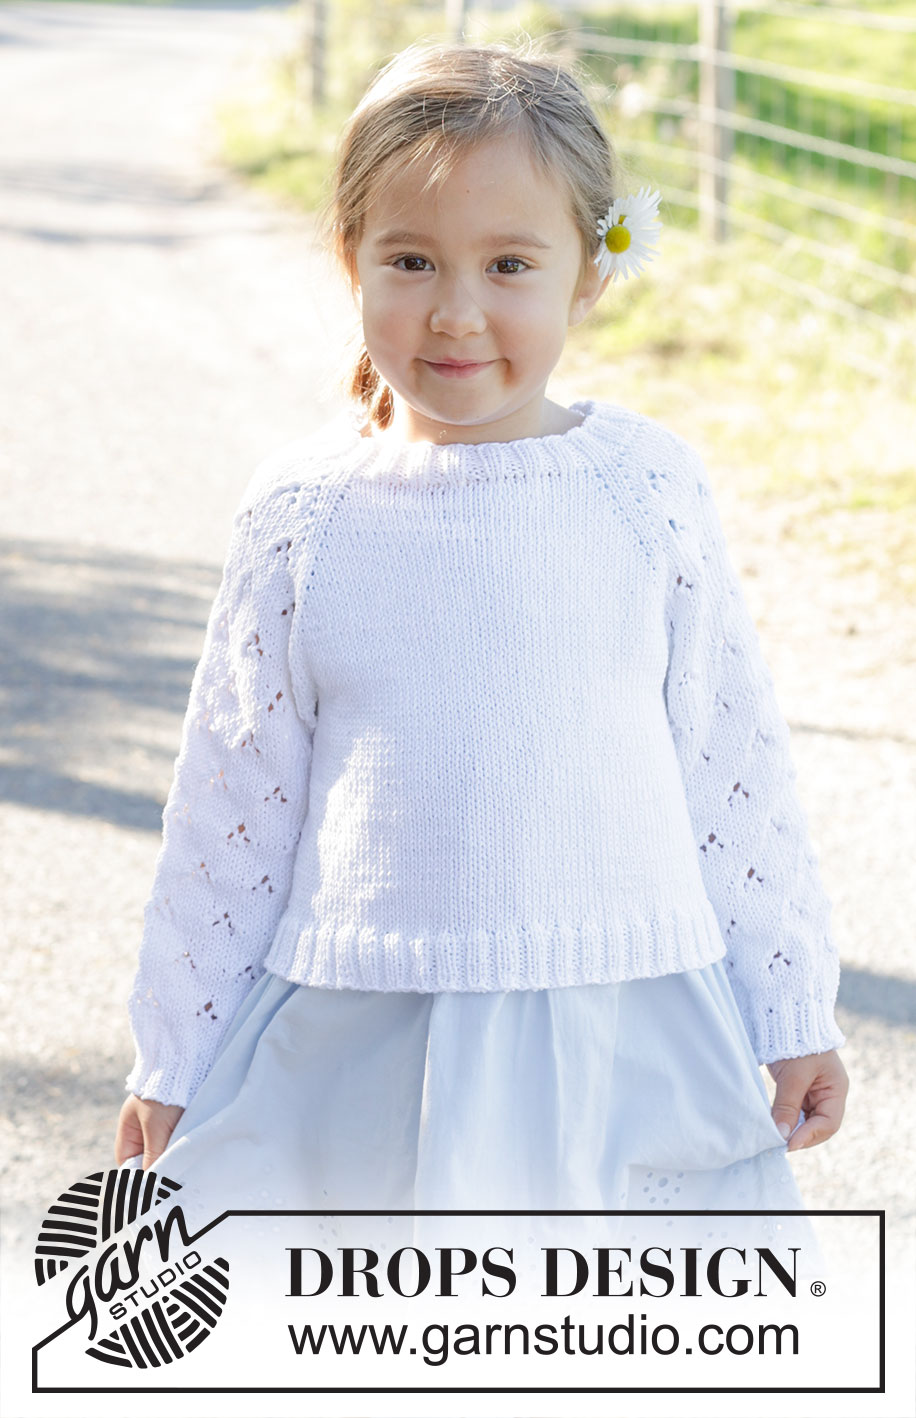
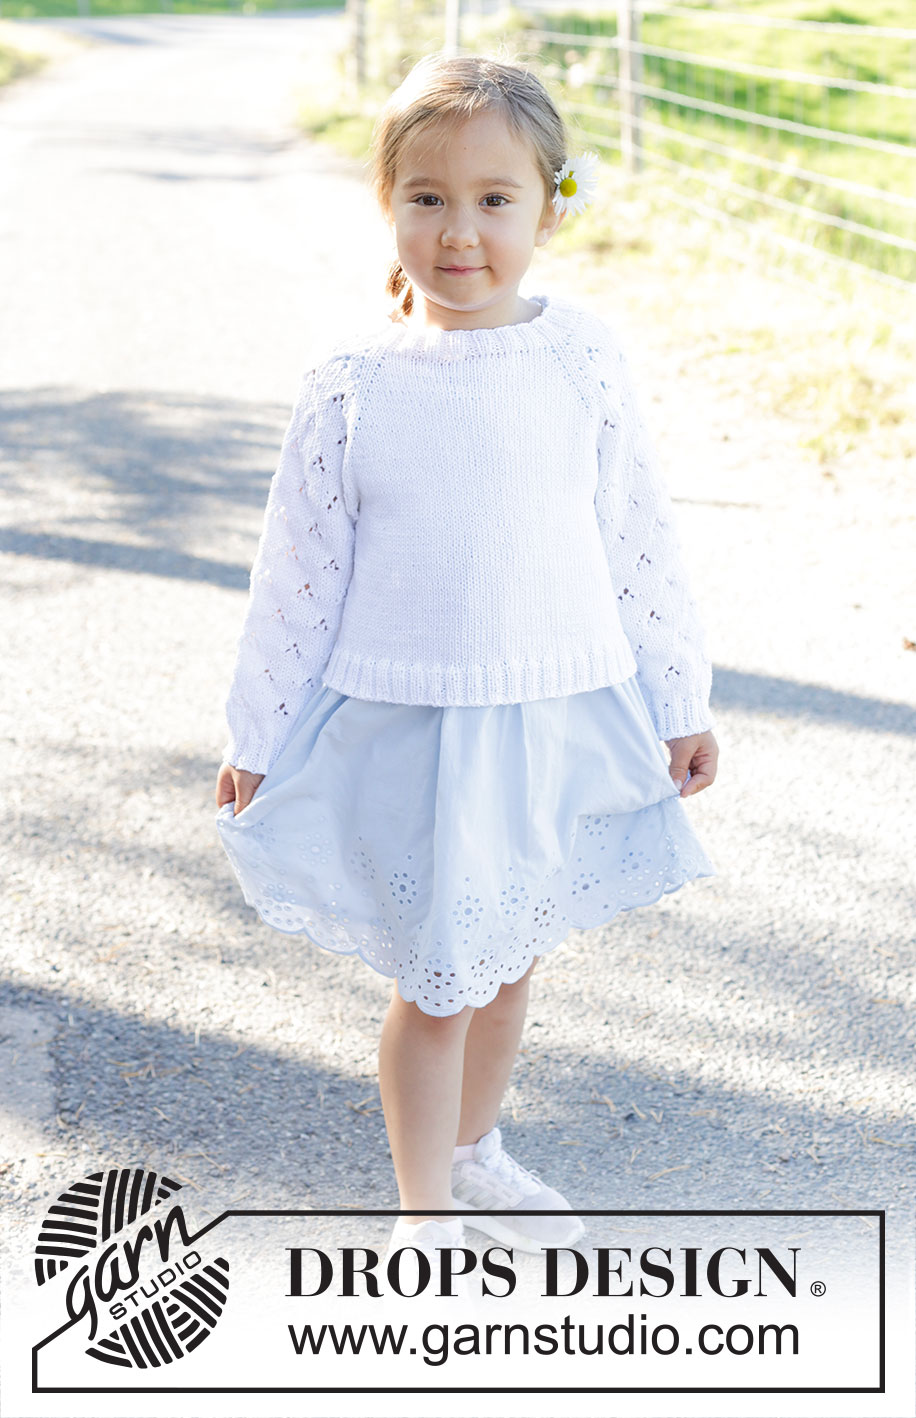
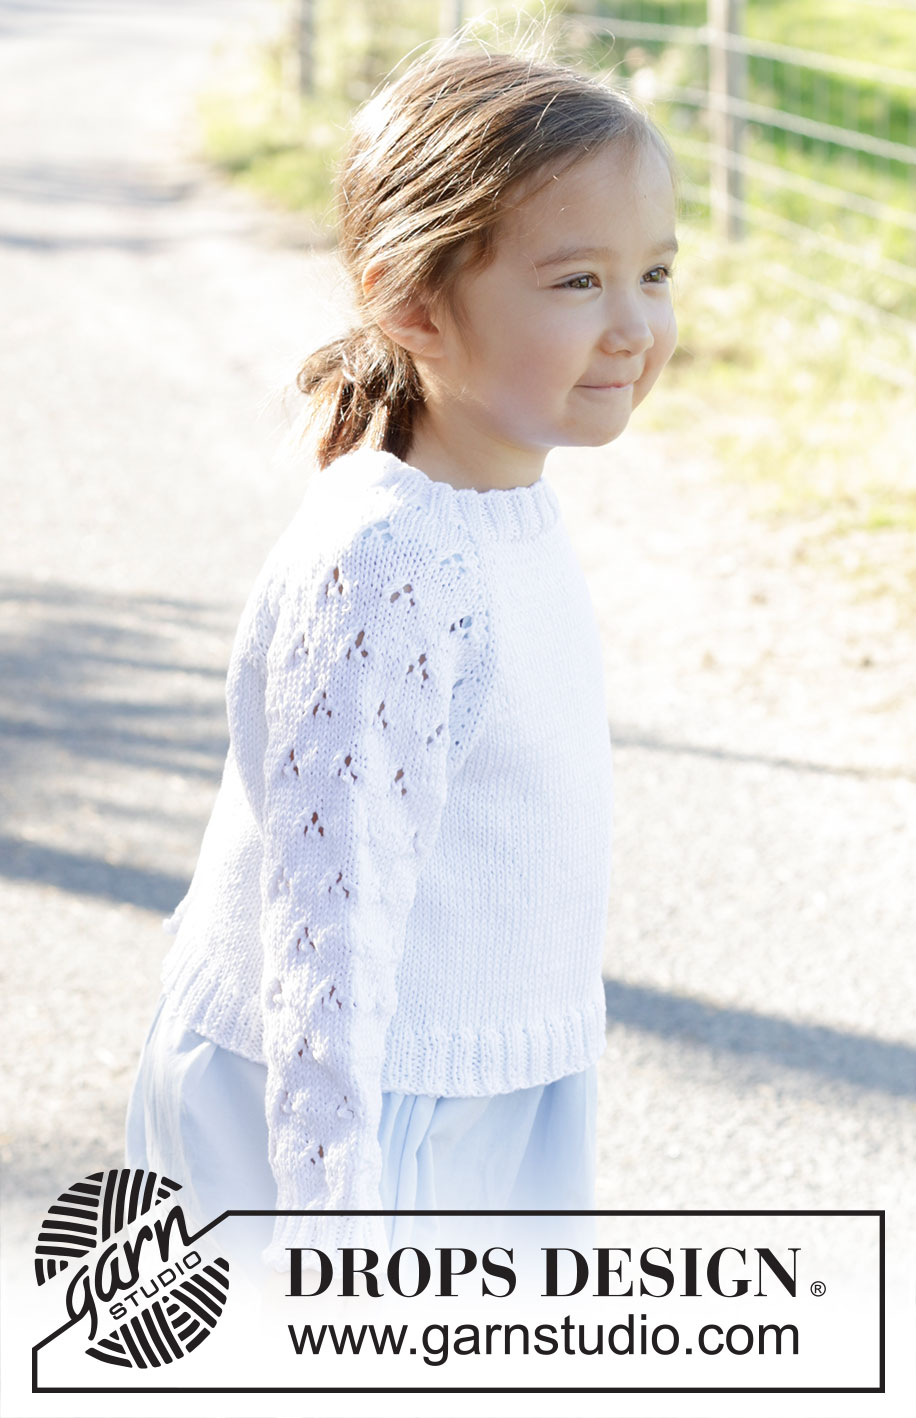
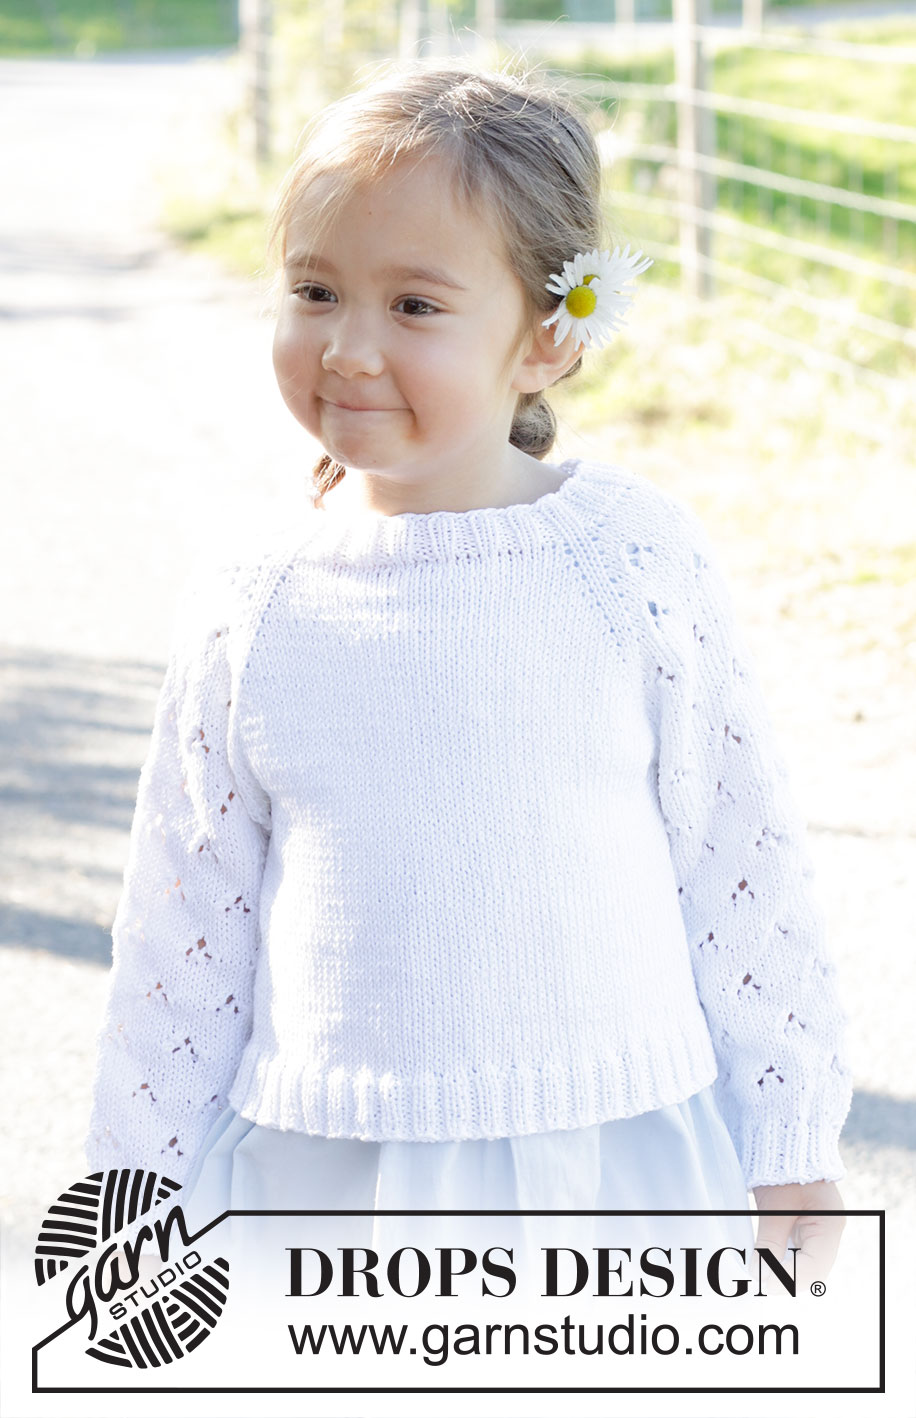
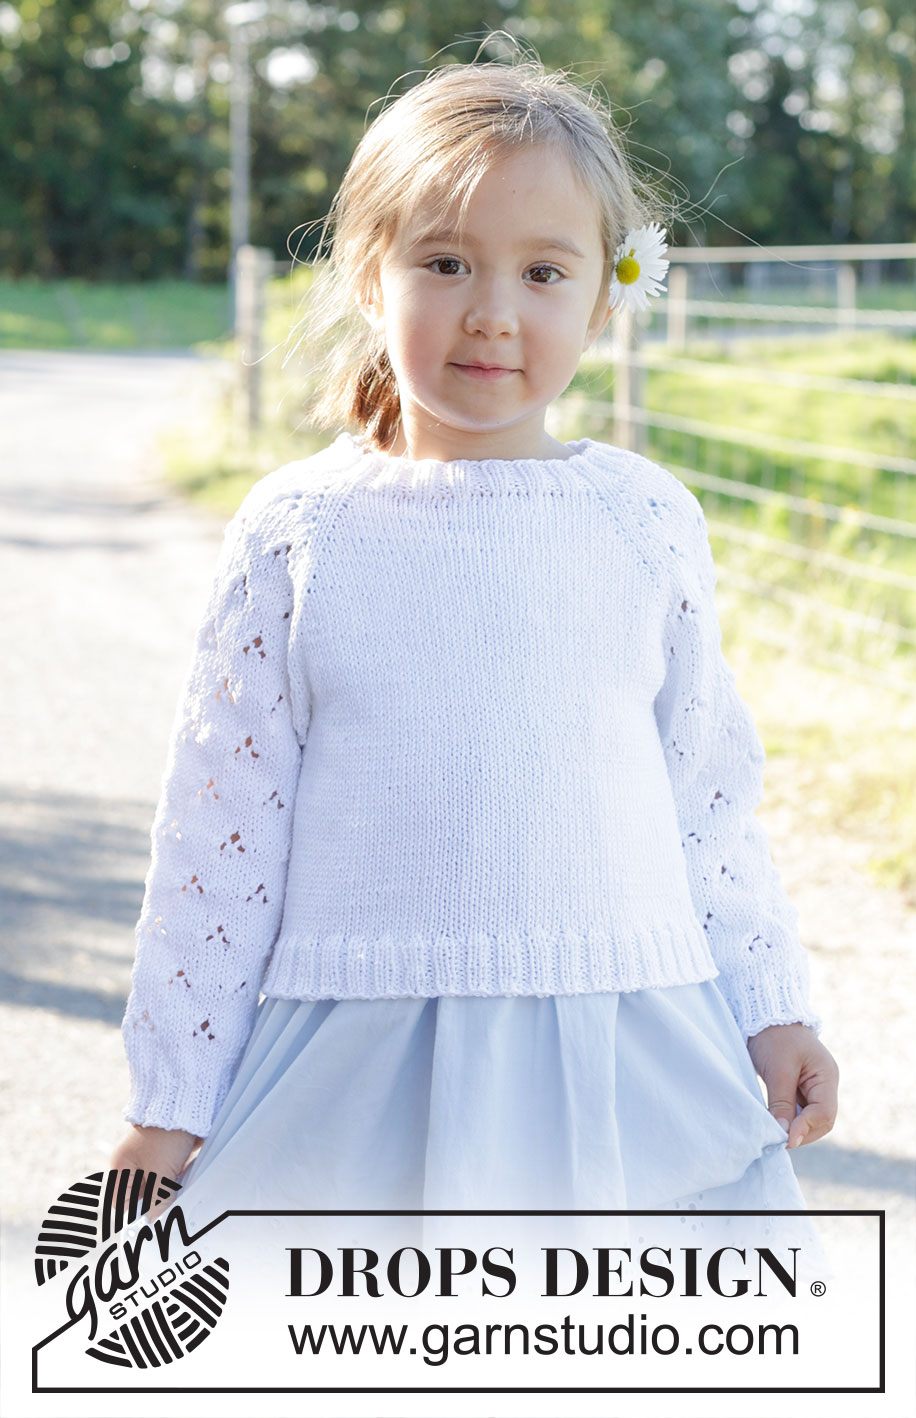
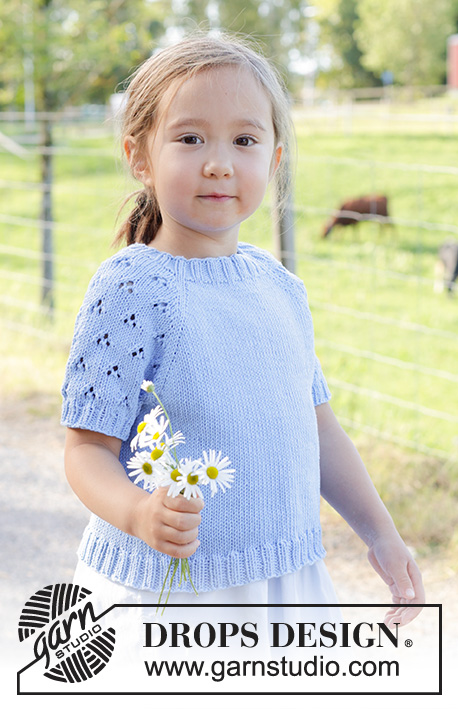
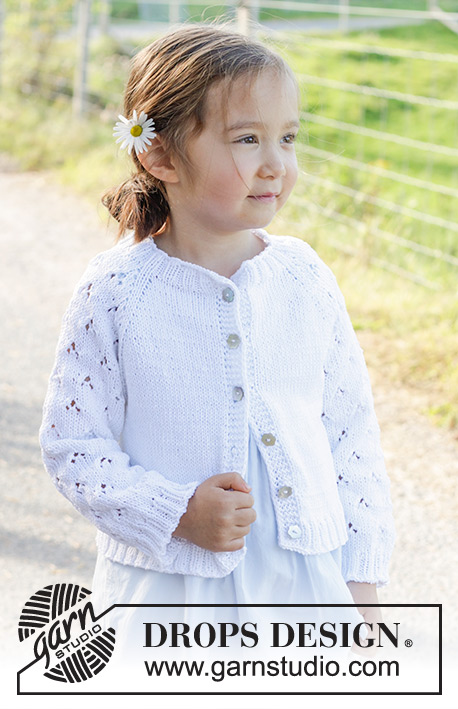
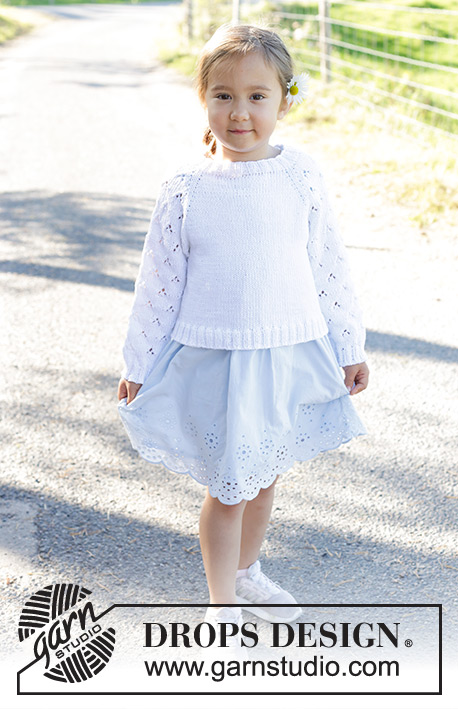
Knitted sweater for children in DROPS Muskat. The piece is worked top down with raglan, and lace pattern on the sleeves. Sizes 2 – 12 years.
DROPS Children 48-1 |
|||||||||||||
|
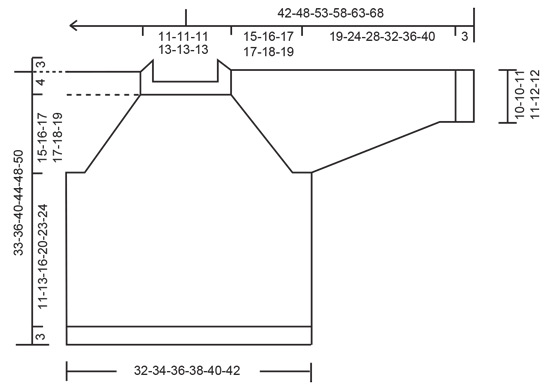
------------------------------------------------------- EXPLANATIONS FOR THE PATTERN: ------------------------------------------------------- RAGLAN: Increase 1 stitch before/after 2 knitted stitches in each transition between body and sleeves. The marker-threads sit between these 2 stitches. Increase 1 stitch by making 1 yarn over, which is knitted twisted on the next round to avoid a hole. PATTERN: See diagrams A.1 to A.4. DECREASE TIP (for sleeves): Decrease 1 stitch on each side of the marker-thread as follows: Work until there are 3 stitches left before the marker-thread, knit 2 together, knit 2 (marker-thread sits between these 2 stitches), slip 1 stitch knit-wise, knit 1 and pass the slipped stitch over the knitted stitch (2 stitches decreased). ------------------------------------------------------- START THE PIECE HERE: ------------------------------------------------------- SWEATER – SHORT OVERVIEW OF THE PIECE: The neck and yoke are worked in the round with circular needle, top down. The yoke is divided for body and sleeves and the body continued in the round with circular needle. The sleeves are worked in the round with double pointed needles. NECK: Cast on 80-80-80-88-88-88 stitches with double pointed needles/short circular needle size 3 MM = US 2.5 and DROPS Muskat. Knit 1 round, then work rib (knit 2, purl 2) for 3 cm =1⅛". YOKE: Change to circular needle size 4 MM = US 6. Knit 1 round, AT THE SAME TIME as you insert 4 marker-threads and increase stitches as follows: Knit 13-13-13-13-13-13 (approx. half back piece), insert 1 marker-thread, knit 16 and increase 3 stitches evenly spaced (sleeve), insert 1 marker-thread, knit 24-24-24-28-28-28 (front piece), insert 1 marker-thread, knit 16 and increase 3 stitches evenly spaced (sleeve), insert 1 marker-thread, knit 11-11-11-15-15-15 (approx. half back piece) = 86-86-86-94-94-94 stitches. On the next round begin to increase for raglan and work diagrams A.1 to A.3 over the sleeve-stitches as follows. NOTE! When A.1 to A.3 is finished in height, work 1 more repeat of A.2 in width between A.1 and A.3. Knit 12-12-12-12-12-12, increase 1 stitch for RAGLAN – read description above, knit 2 (marker-thread sits between these 2 stitches), increase 1 stitch for raglan, work A.1, A.2, A.3, increase 1 stitch for raglan, knit 2 (marker-thread sits between these 2 stitches), increase 1 stitch for raglan, knit 22-22-22-26-26-26, increase 1 stitch for raglan, knit 2 (marker-thread sits between these 2 stitches), increase 1 stitch for raglan, work A.1, A.2, A.3, increase 1 stitch for raglan, knit 2 (marker-thread sits between these 2 stitches), increase 1 stitch for raglan, knit 10-10-10-14-14-14. Continue with stockinette stitch on the front and back pieces, lace pattern on the sleeves and increase for raglan on each side of the 4 marker-threads every 2nd round a total of 9-9-7-8-8-7 times (including the first increase) = 158-158-142-158-158-150 stitches. Continue increasing every 2nd round but every 2nd increase is now only on the front and back pieces (4 increased stitches). I.e., increase on the front and back pieces every 2nd round, on the sleeves every 4th round. Increase like this 10-12-16-14-16-18 times on the front and back pieces (5-6-8-7-8-9 times on the sleeves). NOTE! The increases on the sleeves will not continue as shown in A.1 and A.3 because it is now increased on every 4th row. A.4 shows a repeat of the pattern, make sure it matches the established pattern. REMEMBER THE KNITTING GAUGE! After the last increase there are 218-230-238-242-254-258 stitches; you have increased 19-21-23-22-24-25 times on the front and back pieces and 14-15-15-15-16-16 times on the sleeves. Continue with stockinette stitch on the front and back pieces and lace pattern on the sleeves, without further increases, until the yoke measures 15-16-17-17-18-19 cm = 6"-6¼"-6¾"-6¾"-7"-7½", after the neck mid-front. Now divide for the body and sleeves as follows: Knit 32-34-36-35-37-38 (approx. half back piece), place the next 47-49-49-49-51-51 stitches on 1 thread for the sleeve, cast on 6-6-6-8-8-10 stitches (in side under sleeve), knit 62-66-70-72-76-78 (front piece), place the next 47-49-49-49-51-51 stitches on 1 thread for the sleeve, cast on 6-6-6-8-8-10 stitches (in side under sleeve), knit the last 30-32-34-37-39-40 stitches (approx. half back piece). The body and sleeves are finished separately. The piece is now measured from here. BODY: = 136-144-152-160-168-176 stitches. Continue stockinette stitch in the round for a further 11-13-16-20-23-24 cm = 4⅜"-5⅛"-6¼"-8"-9"-9½". Knit 1 round and increase 16-16-16-16-16-20 stitches evenly spaced = 152-160-168-176-184-196 stitches. Change to circular needle size 3 MM = US 2.5. Work rib (knit 2, purl 2) for 3 cm = 1⅛". Bind off with rib. The sweater measures approx. 33-36-40-44-48-50 cm = 13"-14¼"-15¾"-17¼"-19"-19¾" from the shoulder. SLEEVES: Place the 47-49-49-49-51-51 stitches from the thread on the one side of the piece on double pointed needles size 4 MM = US 6 and knit up 1 stitch in each of the 6-6-6-8-8-10 stitches cast on under the sleeve = 53-55-55-57-59-61 stitches. Insert a marker-thread in the middle of the new stitches under the sleeve and allow it to follow your work onwards; it is used when decreasing under the sleeve. Start at the marker-thread and work pattern in the round according to A.4 – the stitches which do not fit into the pattern on each side under the sleeve are knitted. Make sure A.4 matches the established pattern from A.1-A.3. When the sleeve measures 2 cm =¾", decrease 1 stitch on each side of the marker-thread – read DECREASE TIP. Decrease like this every 3-3-5-6-7-8 cm = 1⅛"-1⅛"-2"-2⅜"-2¾"-3⅛" a total of 6-6-5-5-5-5 times = 41-43-45-47-49-51 stitches. Continue working until the sleeve measures 19-24-28-32-36-40 cm = 16" from the division (or to desired length. There is 3 cm = 1⅛" left). Knit 1 round and increase 7-5-7-5-7-5 stitches evenly spaced = 48-48-52-52-56-56 stitches. Change to double pointed needles size 3 MM = US 2.5 and work rib (knit 2, purl 2) for 3 cm = 1⅛". Bind off with rib. The sleeve measures approx. 22-27-31-35-37-43 cm = 8¾"-10⅝"-12¼"-13¾"-14½"-17" from the division. Work the other sleeve in the same way. |
|||||||||||||
Diagram explanations |
|||||||||||||
|
|||||||||||||
 |
|||||||||||||
 |
|||||||||||||
 |
|||||||||||||
Have you finished this pattern?Tag your pictures with #dropspattern #daisyfieldssweater or submit them to the #dropsfan gallery. Do you need help with this pattern?You'll find 26 tutorial videos, a Comments/Questions area and more by visiting the pattern on garnstudio.com. © 1982-2026 DROPS Design A/S. We reserve all rights. This document, including all its sub-sections, has copyrights. Read more about what you can do with our patterns at the bottom of each pattern on our site. |
|||||||||||||


With over 40 years in knitting and crochet design, DROPS Design offers one of the most extensive collections of free patterns on the internet - translated to 17 languages. As of today we count 324 catalogs and 12291 patterns - 12281 of which are translated into English (US/in).
We work hard to bring you the best knitting and crochet have to offer, inspiration and advice as well as great quality yarns at incredible prices! Would you like to use our patterns for other than personal use? You can read what you are allowed to do in the Copyright text at the bottom of all our patterns. Happy crafting!
Post a comment to pattern DROPS Children 48-1
We would love to hear what you have to say about this pattern!
If you want to leave a question, please make sure you select the correct category in the form below, to speed up the answering process. Required fields are marked *.