
Popular categories
Looking for a yarn?


Comments / Questions (118)
![]() Eva Albinsson wrote:
Eva Albinsson wrote:
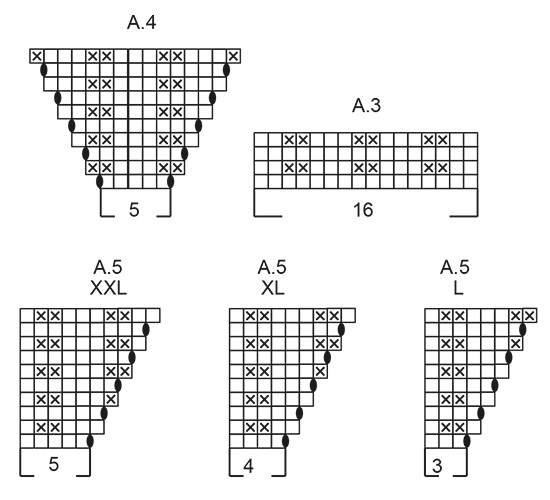
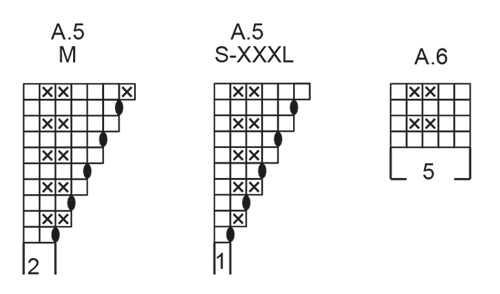
Mönster 243-1 Jag förstår inte mönstret. Är på OK: varv 1 på mönsterstickning stl XL Har följt mönstret fram till första styckets slut och har då 7 maskor kvar av de 112. A1A2 =9m, A4A3A4=37m, A5A6A2 =13 m, A3A4A3 =37m, A5A6 =9m alltså 105m. På ett ställe står det A.6 över 11m på ett annat A.6 över 6m ??? Fullkomligt obegripligt A6, har 5 maskor! Mvh Eva
09.07.2024 - 18:37DROPS Design answered:
Hei Eva. Selv om A.6 består av 5 masker, står det i oppskriften at du skal strikke A.6 OVER 11 masker og OVER 6 masker. Da vil A.6 starte med 2 rettmasker og slutte med 2 rettmasker (når du strikker 2. og 4. pinne av diagrammet = det vil bli likt i begge sider). I str XL har du 112 masker og det strikkes slik: A.1 over 5 masker + A.2 (4 masker) + A.3 (16 masker) + A.4 (5 masker) + A.3 (16 masker) + A.5 (4 masker) + A.6 over 11 masker + A.2 (4 masker) + A.3 (16 masker) + A.4 (5 masker) + A.3 (16 masker)+ A.5 (4 masker)+ A.6 over 6 masker = 112 masker. mvh DROPS Design
10.07.2024 - 10:48
![]() Charlotte Larsen wrote:
Charlotte Larsen wrote:
Jeg tror jeg må finde en anden opskrift aldrig har jeg været så frustreret er der overhovedet nogen som bare har løst gåden
29.06.2024 - 07:23DROPS Design answered:
Hei Charlotte. Ta en titt på svarer vi ga deg tidligere idag om du fremdeles vil prøve deg. mvh DROPS Design
01.07.2024 - 13:33
![]() Lone Nielsen wrote:
Lone Nielsen wrote:
Er igang med at strikke Winther Owl sweather i str L og er lige som mange andre gået i stå efter halskant, udt og vrangpind. I diagrammet A2 str L skal der strikkes 3 r inden udtagn. I forklaringen står der 2 m. Hvordan skal det gøres?
28.06.2024 - 22:47DROPS Design answered:
Hei Lone. I str. L har du 108 masker etter halskanten og mønstret strikkes slik: A.1 over 5 masker + A.2 (3 m) + A.3 (16 m) + A.4 (5 m) + A.3 (16 m) + A.5 (3 m) + A.6 over 11 masker + A.2 (3 m) + A.3 (16 m) + A.4 (5 m) + A.3 (16 m) + A.5 (3 m) + A.6 over 6 masker = 108 m. 1. pinne i A.2 (i str. L) strikkes det 3 rett + 1 kast. Usikker på hva du mener med: I forklaringen står der 2 m. Hvor i oppskriften leser du det? mvh DROPS Design
01.07.2024 - 13:58
![]() Charlotte Larsen wrote:
Charlotte Larsen wrote:
Str. XL - 112 masker
28.06.2024 - 14:43DROPS Design answered:
Hei Charlotte. Ja, 19 masker (9+10) til bakstykket, 37 masker til hvert erme og 19 masker til forstykket. Strikk A.1 over 5 masker + A.2 (4 m) + A.3 (16 m) + A.4 (5 m), + A.3 (16 m) + A.5 (4 m) + A.6 over 11 masker + A.2 (4 m) + A.3 (16) + A.4 (5 m) + A.3 (16 m) + A.5 (4 m) + A.6 over 6 masker =112 masker. Du starter midt bak, de 9 første maskene er halve bakstykket (A.1 over 5 masker + A.2), så strikker du 1. erme (A.3+A.4+A.3), deretter forstykket (A.5 + A.6 over 6 masker + A.2), så 2.erme (A.3+A.4+A.3) og til slutt den andre delen av bakstykket: A.5 + A.6 over 6 masker). mvh DROPS Design
01.07.2024 - 11:45
![]() Charlotte Larsen wrote:
Charlotte Larsen wrote:
Jeg er startet på Winter Owl sweater og forstår ikke en lyd - har lavet hals en ret omgang hvor der er taget ud en vrang omgang og pindeskift. og nu til mønster A1 over 5 mask - det er som der står en gang og mønster A2 halvt bagstykke - men hvor mange gang - det giver ingen mening og har nu haft flere til at kikke på opskriften - please hjælp - er masker til ryg 19 ? og 37 til ærmer og 19 til forstykke og så 37 til ærme
28.06.2024 - 09:13DROPS Design answered:
Hej Charlotte, hvilke størrelse strikker du, så skal vi prøve at forklare 1.omgang
28.06.2024 - 14:23
![]() Ana Maria Alvez wrote:
Ana Maria Alvez wrote:
Me gustaria conseguir este patron,hay que comprar? Me puedes asesorar?
11.06.2024 - 19:10
![]() Diny wrote:
Diny wrote:
Hoe vaak wordt het patroon in de hoogte herhaald? Wanneer ga ik over naar tricotsteek? Ik brei het vest, maar in de beschrijving van vest en trui zie ik hetzelfde. Kan ik ook langer doorgaan met het patroon dan op de foto's is te zien?
03.06.2024 - 15:32DROPS Design answered:
Dag Diny,
Het patroon brei je op de pas, zodra je verder gaat met het lijf, brei je tricotsteek. Je mag natuurlijk langer door gaan met het patroon.
03.06.2024 - 20:24
![]() Elke wrote:
Elke wrote:
Wie teile ich die 104 Maschen der Passe für Rücken, Vorderteil und Ärmel auf. Diese Angabe fehlt. Danke
22.04.2024 - 23:53DROPS Design answered:
Liebe Elke, so stricken Sie die 104 Maschen: A.1 über 5 Maschen, A.2 (2 Maschen) (= ca. halbes Rückenteil) A.3 (16 Maschen), A.4 (5 Maschen), A.3 (16 Maschen) (= Ärmel), A.5 (2 Maschen), A.6 über 11 Maschen, A.2 (2 Maschen) (= Vorderteil), A.3 (16 Maschen), A.4 (5 Maschen), A.3 (16 Maschen) (= Ärmel), A.5 (2 Maschen), A.6 über 6 Maschen (restliches Rückenteil) = 5+2+16+5+16+2+11+2+16+5+16+2+6=104 Maschen. Viel Spaß beim Stricken!
23.04.2024 - 08:37
![]() Fracinel wrote:
Fracinel wrote:
Bonjour,je ne comprend pas A5,A6 au dessus des 11 mailles ( X L ) A 5=4 MAILLES A 6=5 MAILLES = 9 mailles et non 11 mailles
14.04.2024 - 12:27DROPS Design answered:
Bonjour Mme Fracinel, quand on tricote A.6 au-dessus des 11 mailles suivantes, vous tricotez 2 fois les 5 mailles de A.6 et vous terminez par la 1ère maille de A.6 (ainsi le motif commence et se termine de la même façon. Effectivement, A.5 = 4 mailles en taille XL mais A.5 n'est pas à répéter en largeur, c'est A.6 que l'on va répéter pour avoir 11 mailles. Bon tricot!
15.04.2024 - 08:38
![]() Francinel wrote:
Francinel wrote:
Magnifique nais incompréhensible dommage j'ai essayé plusieurs fois, Je ne comprend pas ça ne correspond pas
14.04.2024 - 11:50
|
||||||||||
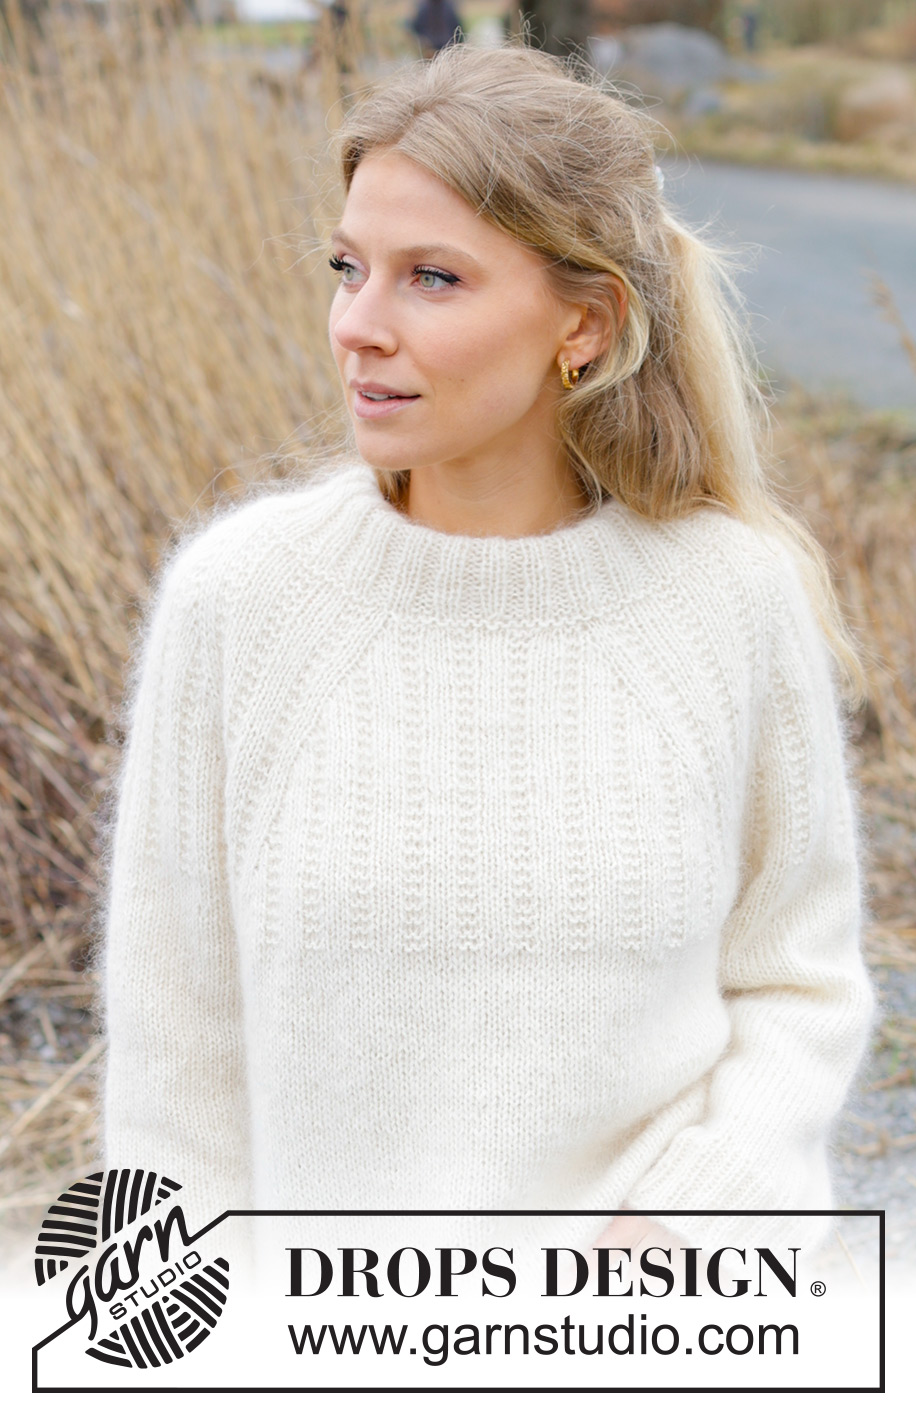
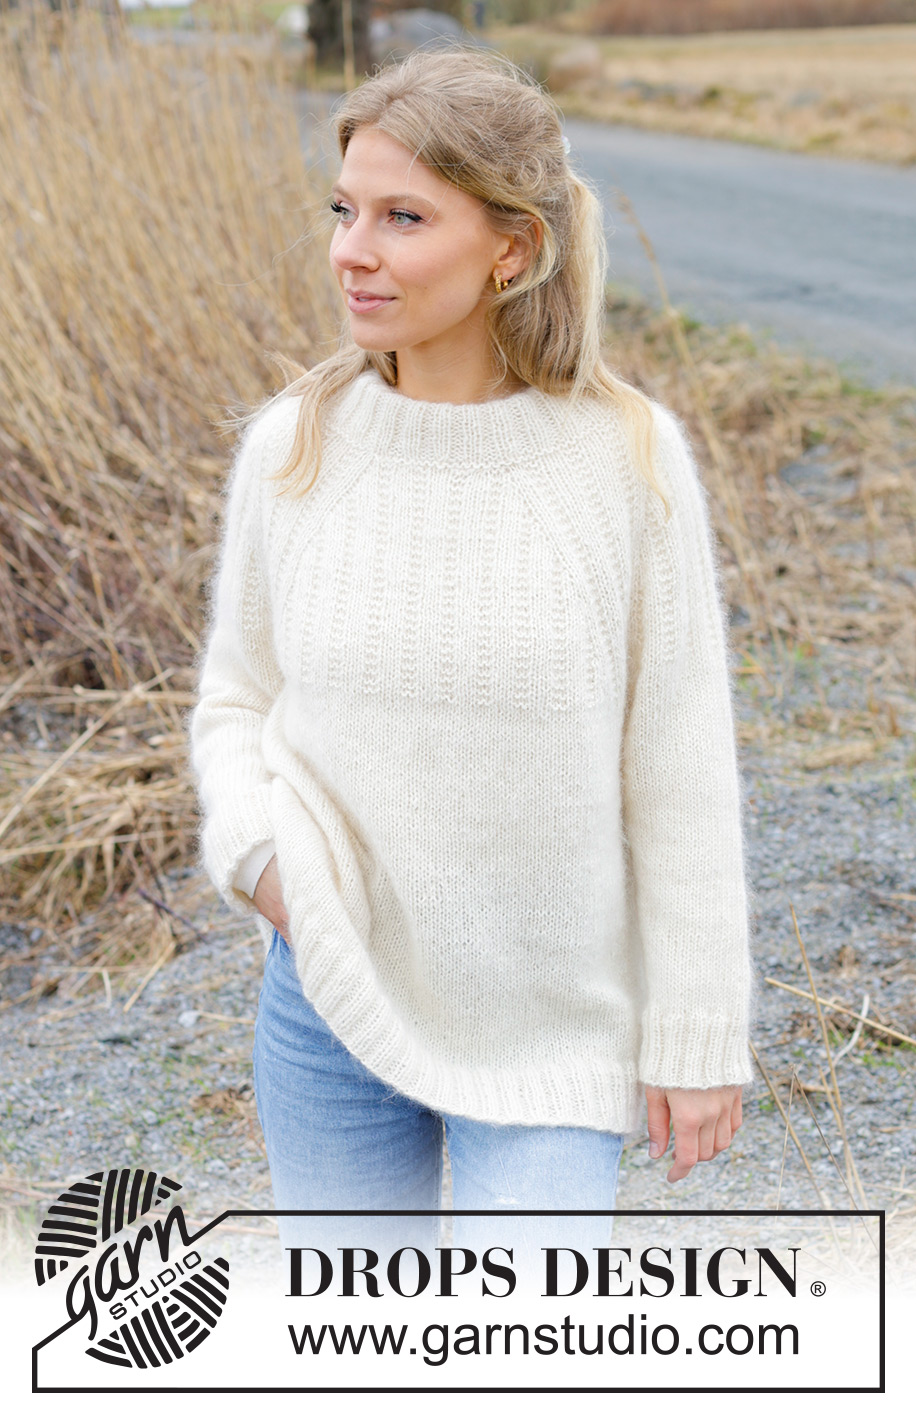
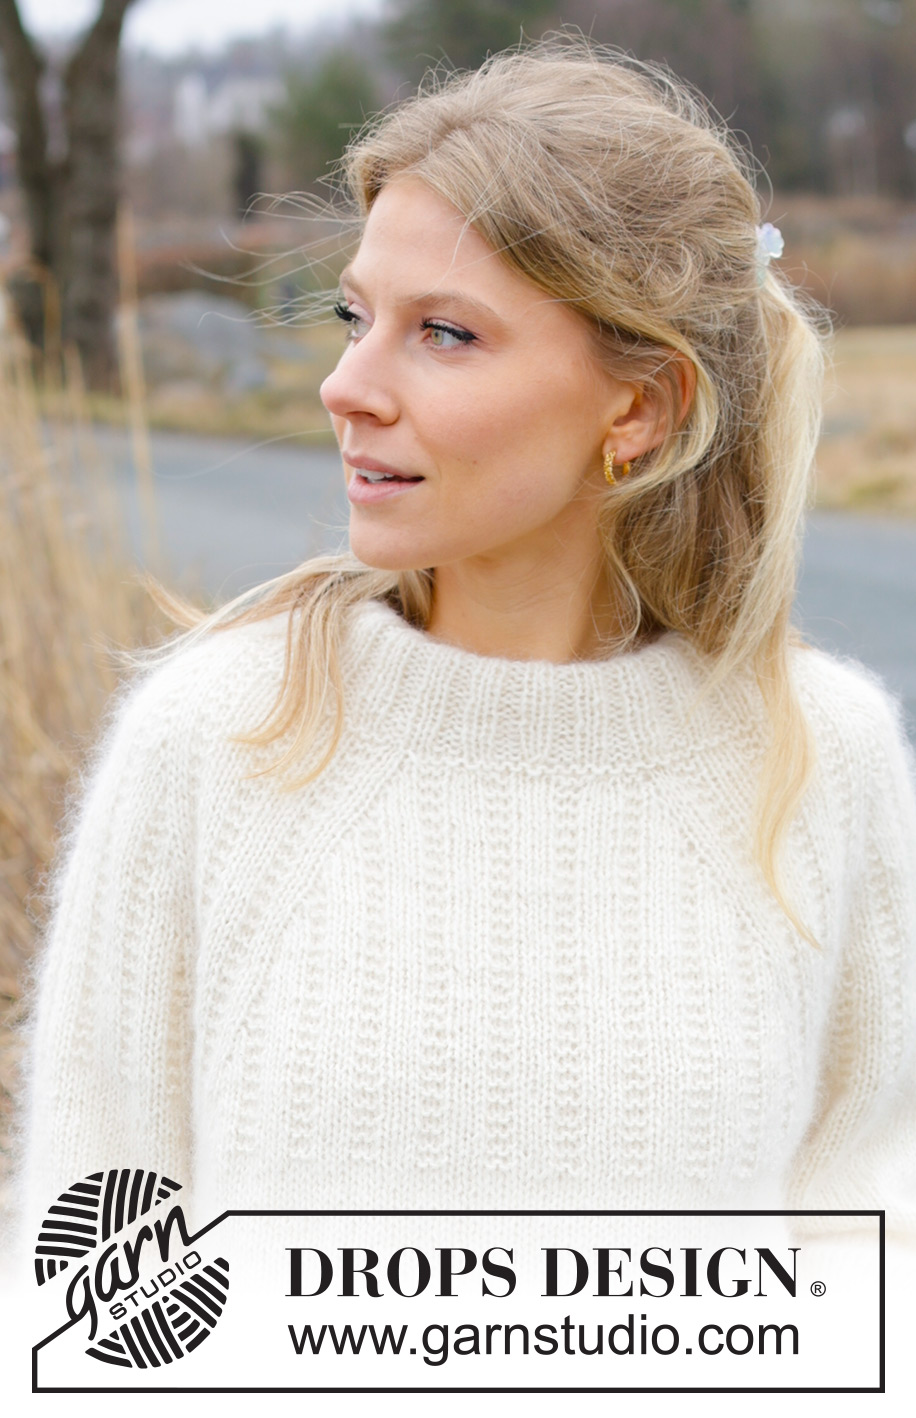
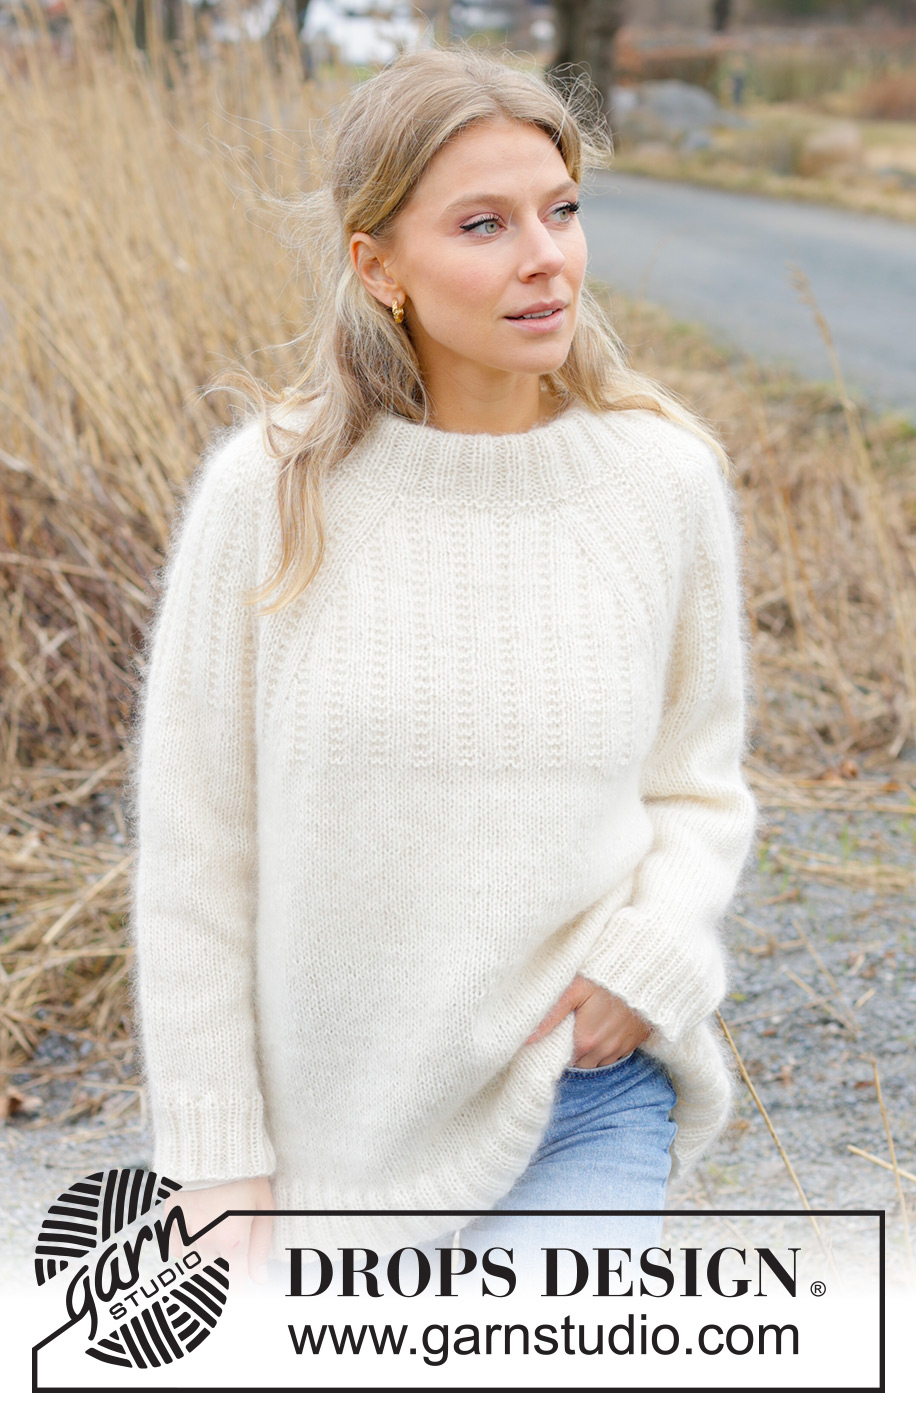
Winter Owl Sweater#winterowlsweater |
||||||||||
 |
 |
|||||||||
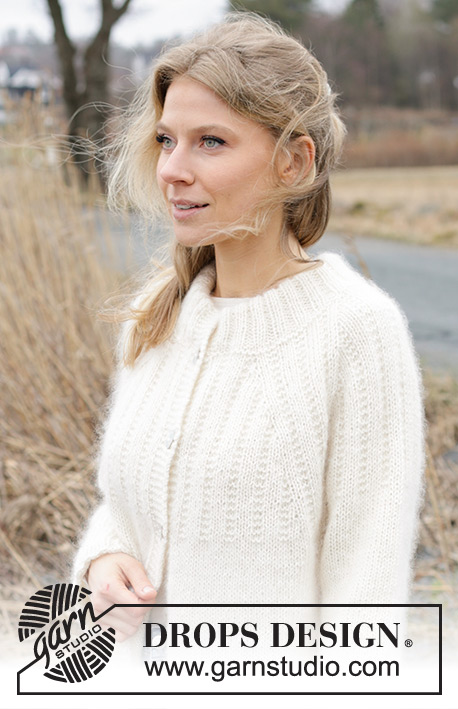
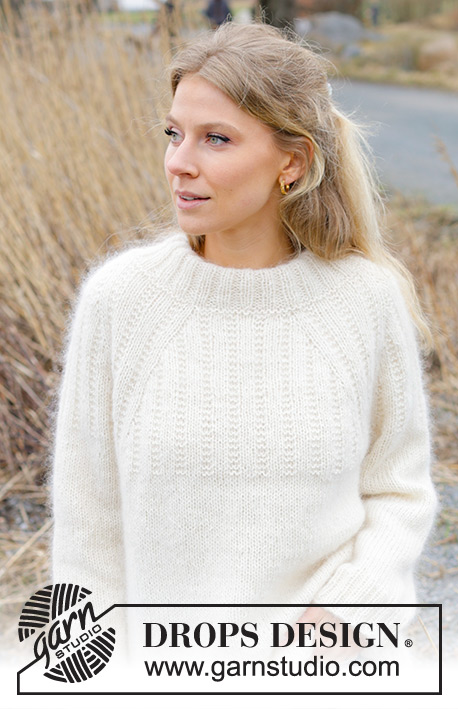
Knitted sweater in DROPS Nord and DROPS Kid-Silk. The piece is worked top down with double neck, raglan and relief-pattern. Sizes S - XXXL.
DROPS 243-1 |
||||||||||
|
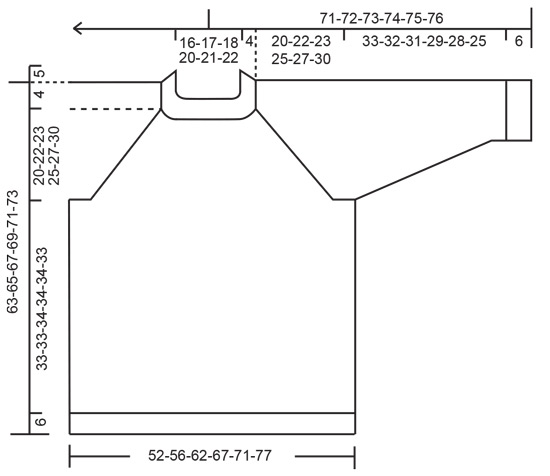
------------------------------------------------------- EXPLANATIONS FOR THE PATTERN: ------------------------------------------------------- PATTERN: See diagrams A.1 to A.6. Choose diagram for your size (applies to A.2 and A.5). DECREASE TIP (for sleeves): Decrease 1 stitch on either side of the marker-thread as follows: Work until there are 3 stitches left before the marker-thread, knit 2 together, knit 2 (marker-thread sits between these 2 stitches), slip 1 stitch knit-wise, knit 1 and pass the slipped stitch over the knitted stitch (2 stitches decreased). ------------------------------------------------------- START THE PIECE HERE: ------------------------------------------------------- SWEATER – SHORT OVERVIEW OF THE PIECE: The neck and yoke are worked in the round with circular needle, from mid back and top down. The yoke is divided for body and sleeves and the body is continued in the round with circular needle. The sleeves are worked in the round with short circular needle/double pointed needles. DOUBLE NECK: Cast on 76-80-84-88-92-96 stitches with 1 strand DROPS Nord and 2 strands DROPS Kid-Silk using short circular needles size 4.5 and 5.5 MM = US 9 held together. Remove the needle size 5.5 MM = US 9 keeping stitches on the needle size 4.5 MM = US 7 (this gives you an elastic cast-on edge). Work rib in the round (knit 2, purl 2) for 10 cm = 4". Fold the neck double to the inside and work 1 more round of rib, working every 4th stitch together with its corresponding stitch on the cast-on edge. Knit 1 round and increase 24 stitches evenly spaced = 100-104-108-112-116-120 stitches. Purl 1 round. Insert 1 marker; the yoke is measured from here. YOKE: Change to short circular needle size 5.5 MM = US 9 and work pattern as follows (the start of the round is on the back piece): Work A.1 over 5-5-5-5-5-10 stitches, A.2 (approx. half the back piece) A.3, A.4, A.3 (sleeve), A.5, A.6 over 11-11-11-11-11-21 stitches, A.2 (front piece), A.3, A.4, A.3 (sleeve), A.5, A.6 over 6-6-6-6-6-11 stitches (rest of back piece). Continue this pattern and increase as shown in A.2, A.4 and A.5 (i.e., increase towards each repeat of A.3 and 8 increases every 2nd round). The increased stitches are worked twisted into the pattern – no hole. REMEMBER THE KNITTING GAUGE! Diagrams A.1, A.3 and A.6 are repeated in height. When diagrams A.2, A.4 and A.5 are finished 1 time in height, continue the increases as before and work the stitches twisted as before until you have increased a total of 17-19-23-25-27-30 times (including the increases in A.2, A.4 and A.5) = 236-256-292-312-332-360 stitches. Continue the pattern without further increases until the yoke measures 20-22-23-25-27-30 cm = 8"-8¾"-9"-9¾"-10⅝"-11¾" from the marker. Now divide for the body and sleeves as follows: Knit 37-39-44-48-51-57 (approx. half back piece), place the next 43-49-57-59-63-65 stitches on a thread), cast on 8-10-10-10-10-8 stitches in side under the sleeve, knit 75-79-89-97-103-115 (front piece), place the next 43-49-57-59-63-65 stitches on a thread), cast on 8-10-10-10-10-8 stitches in side under the sleeve, knit the last 38-40-45-49-52-58 stitches (rest of back piece). Finish the body and sleeves separately. BODY: = 166-178-198-214-226-246 stitches. Continue with stockinette stitch in the round for a further 33-33-34-34-34-33 cm = 13"-13"-13⅜"-13⅜"-13⅜"-13". Knit 1 round and increase 26-26-30-30-34-34 stitches evenly spaced = 192-204-228-244-260-280 stitches. Change to circular needle size 4.5 MM = US 7. Work rib (knit 2, purl 2) for 6 cm = 2⅜". Bind off with knit over knit and purl over purl. The piece measures approx. 63-65-67-69-71-73 cm = 24¾"-25½"-26⅜"-27⅛"-28"-28¾" from the shoulder. SLEEVES: Place the 43-49-57-59-63-65 stitches from the thread on the one side of the piece on short circular needle/double pointed needles size 5.5 MM = US 9 and knit up 1 stitch in each of the new stitches cast on under the sleeve = 51-59-67-69-73-73 stitches. Insert a marker-thread in the middle of the new stitches under the sleeve. Continue stockinette stitch in the round. When the sleeve measures 3-3-3-2-2-2 cm = 1⅛"-1⅛"-1⅛"-¾"-¾"-¾", decrease 1 stitch on each side of the marker-thread – read DECREASE TIP. Decrease like this every 6-4-2½-2½-2-1½ cm = 2⅜"-1½"-1"-1"-¾"-½" a total of 5-7-11-11-13-12 times = 41-45-45-47-47-49 stitches. When the sleeve measures 33-32-31-29-28-25 cm = 13"-12½"-12¼"-11⅜"-11"-9¾", knit 1 round and increase 7-7-7-9-9-11 stitches evenly spaced = 48-52-52-56-56-60 stitches. Change to double pointed needles size 4.5 MM = US 7 and work rib (knit 2, purl 2) for 6 cm = 2⅜". Bind off. Sleeve measures approx. 39-38-37-35-34-33 cm = 15¼"-15"-14½"-13¾"-13⅜"-13" from the division. Work the other sleeve in the same way. |
||||||||||
Diagram explanations |
||||||||||
|
||||||||||
 |
||||||||||
 |
||||||||||
 |
||||||||||
 |
||||||||||
Have you finished this pattern?Tag your pictures with #dropspattern #winterowlsweater or submit them to the #dropsfan gallery. Do you need help with this pattern?You'll find 26 tutorial videos, a Comments/Questions area and more by visiting the pattern on garnstudio.com. © 1982-2026 DROPS Design A/S. We reserve all rights. This document, including all its sub-sections, has copyrights. Read more about what you can do with our patterns at the bottom of each pattern on our site. |
||||||||||


With over 40 years in knitting and crochet design, DROPS Design offers one of the most extensive collections of free patterns on the internet - translated to 17 languages. As of today we count 325 catalogs and 12298 patterns - 12288 of which are translated into English (US/in).
We work hard to bring you the best knitting and crochet have to offer, inspiration and advice as well as great quality yarns at incredible prices! Would you like to use our patterns for other than personal use? You can read what you are allowed to do in the Copyright text at the bottom of all our patterns. Happy crafting!
Post a comment to pattern DROPS 243-1
We would love to hear what you have to say about this pattern!
If you want to leave a question, please make sure you select the correct category in the form below, to speed up the answering process. Required fields are marked *.