
Popular categories
Looking for a yarn?


Comments / Questions (31)
![]() Ewa wrote:
Ewa wrote:
Thank you very much for the reply! It helps a lot.
13.01.2026 - 18:10
![]() Ewa wrote:
Ewa wrote:
Do you happen to know how much wool is needed if the cardigan is made from one colour (uni-colour)? I need this information regarding all sizes. Thank you!
12.01.2026 - 19:35DROPS Design answered:
Hi Ewa, you will need about 175-200-225-250-275-300 g of yarn if you are going to make this cardigan in one colour in 2 strands DROPS Kid-Silk. Happy knitting!
13.01.2026 - 07:49
![]() Barbara wrote:
Barbara wrote:
Beim Halsausschnitt die Raglanzunahmen, muss ich die in jeder Reihe, also Hin und Rückreihe zunehmen? Und warum steht in der Anleitung, das man auf der Rückreihe die Maschen rechts strickt. Müsste es nicht links heissen? Da das Muster auf der rechten Seite doch gerade ist?
29.12.2025 - 16:48DROPS Design answered:
Liebe Barbara, beim Halsausschnitt wird man bei den Hin- sowie bei den Rückreihen für den Raglan zunehmen; diese Zunahmen werden Glattrechts gestrickt, dh links verschränkt bei den Rückreihen und rechts verschränkt bei den Hinreihen. Viel Spaß beim Stricken!
02.01.2026 - 13:17
![]() Helene wrote:
Helene wrote:
Besten Dank.
16.05.2025 - 08:13
![]() Helene wrote:
Helene wrote:
Danke für die prompte Antwort. Nur für mein Verständnis: Bei den Raglanzunahmen werden in jeder 4. Reihe nur 1 Umschlag vor der 1. Markierung und 1 U. nach der2. Markierung sowie 1 U. vor der 3. Markierung und 1 U. nach der 4. Markierung gemacht?
15.05.2025 - 18:53DROPS Design answered:
Liebe Helene, ja genau so wird man 4 Maschen für den Raglan zunehmen, dh nur für beide Vorderteile + für Rückenteil. Viel Spaß beim Stricken!
16.05.2025 - 08:06
![]() Helene wrote:
Helene wrote:
Welche Markierungsfäden (1 - 4) gelten für dir Ärmel wegen den Raglanzunahmen beim Passe stricken?
14.05.2025 - 15:32DROPS Design answered:
Liebe Helene, von der Vorderseite gesehen wird das linke Vorderteil bis 1. Markierer, dann ist der linke Ärmel zwischen 1. und 2. Markierer, Rückenteil zwischen 2. und 3. Markierer, der rechte Ärmel zwischen 3. und 4. Markierer und das rechte Vorderteil nach 4. Markierer bis Ende der Hinreihe. Viel Spaß beim Stricken!
14.05.2025 - 16:42
![]() Ulrike wrote:
Ulrike wrote:
In dem oberen Bereich, in dem die Raglanzunahme mit verkürzen Reihen gestrickt wird. Ich nehme jeweils in der (rechten) Hinreihe UND den der ( linken) Rückreihe zu. Wie die Umschläge in der (links zu strickenden) Rückreihe gestrickt werden, konnte ich im Video sehen. Werden die Umschläge der Rückreihe (dann auf der rechts zu strickenden Reihe) immer „einfach“ verschränkt gestrickt? Haben die Umschläge in beiden Reihen die gleiche Richtung?
23.03.2024 - 11:23DROPS Design answered:
Liebe Ulrike, ja genau, die Umschläge werden immer verschränkt gestrickt, dh links verschränkt bei den Rück-Reihen und rechts verschränkt bei den Hin-Reihen. Viel Spaß beim Stricken!
02.04.2024 - 08:25
![]() Elly wrote:
Elly wrote:
Ik heb ook een vraag over het meerderen. Betekent ‘op het lijf’, dat je dan maar aan 1 kant van iedere markeerdraad meerdert?
11.03.2024 - 17:43DROPS Design answered:
Dag Elly,
Klopt, je meerdert dan alleen aan de kant van de markeerdraad waar het lijf zit, dus het voorpand of het achterpand.
11.03.2024 - 20:37
![]() Anja Wiedeman-Toninga wrote:
Anja Wiedeman-Toninga wrote:
Meerder iedere 2e naald (elke naald aan de goede kant), maar iedere 2e meerdering is alleen op de voor- en achterpanden (dus iedere 2e naald op het lijf en iedere 4e naald op de mouwen, met afwisselend 4 en 8 gemeerderde steken). Meerder 18-22-26-26-30-30 keer op het lijf (9-11-13-13-15-15 keer op de mouwen). Ik snap dit niet, kunt u me helpen?
23.02.2024 - 20:58DROPS Design answered:
Dag Anja,
Je breit heen en weer en je maakt iedere 2e naald meerderingen op het lijf en iedere 4e naald maak je meerderingen op het lijf en ook op de mouwen. Dit herhaal je steeds in de hoogte totdat je het aantal aangegeven meerderingen hebt gemaakt. Je meerdert dus 2x zo vaak op het lijf dan op de mouwen.
25.02.2024 - 10:38
![]() Elodie wrote:
Elodie wrote:
I would love to know what's the circumference for each size. How large is size XL ? And XXL ? It's quite difficult to know which size to knit, and i would hate to end up with the wrong size of garment after spending so many hours on it... :/
11.12.2023 - 20:49DROPS Design answered:
Hi Elodie, The circumference will be double the width of the body, which is found in the size chart at the bottom of the pattern. Happy knitting!
12.12.2023 - 07:25
|
|
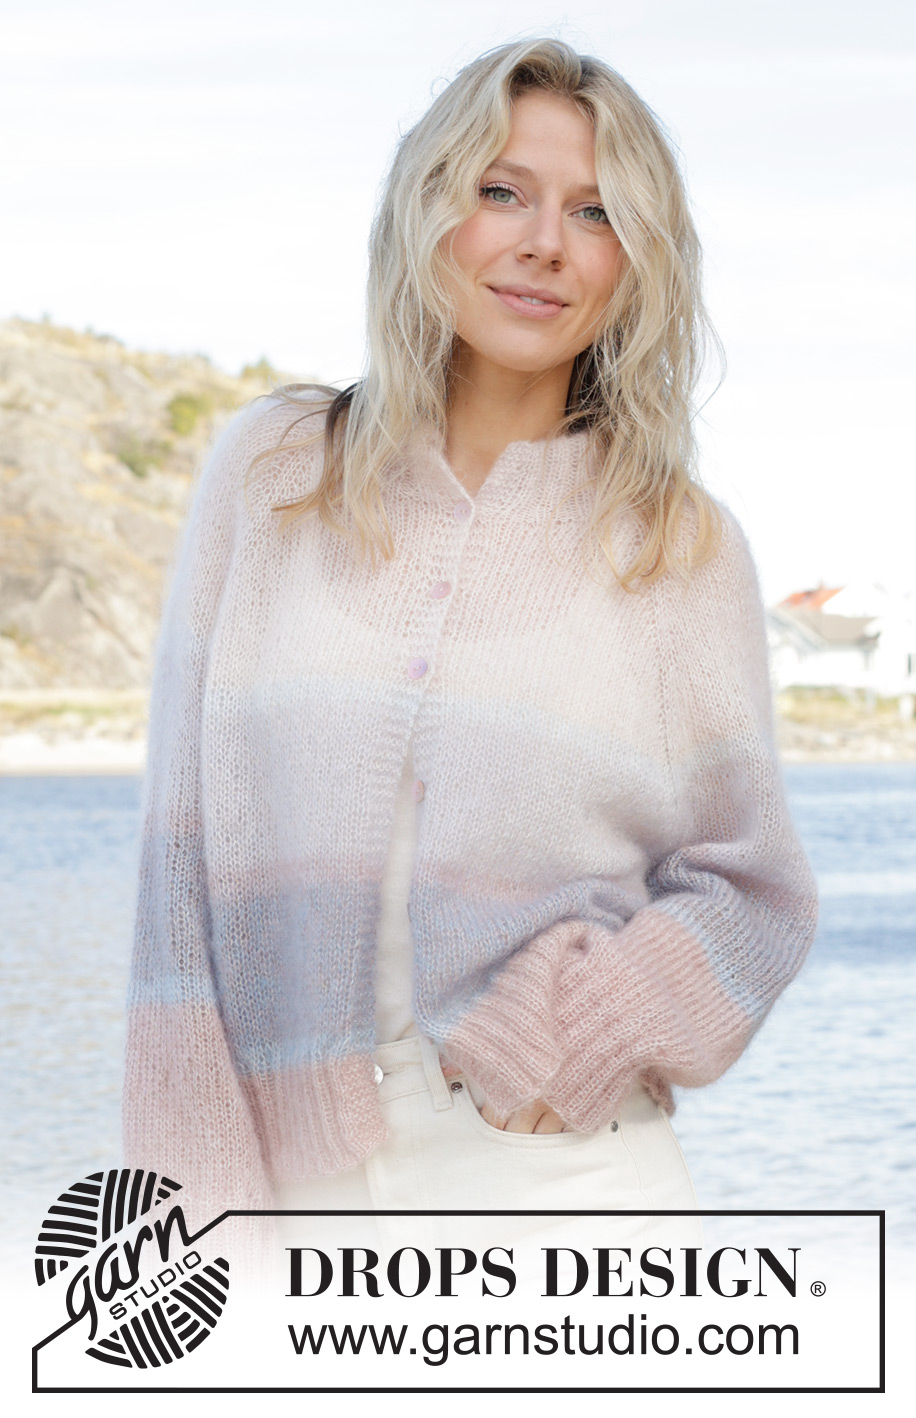
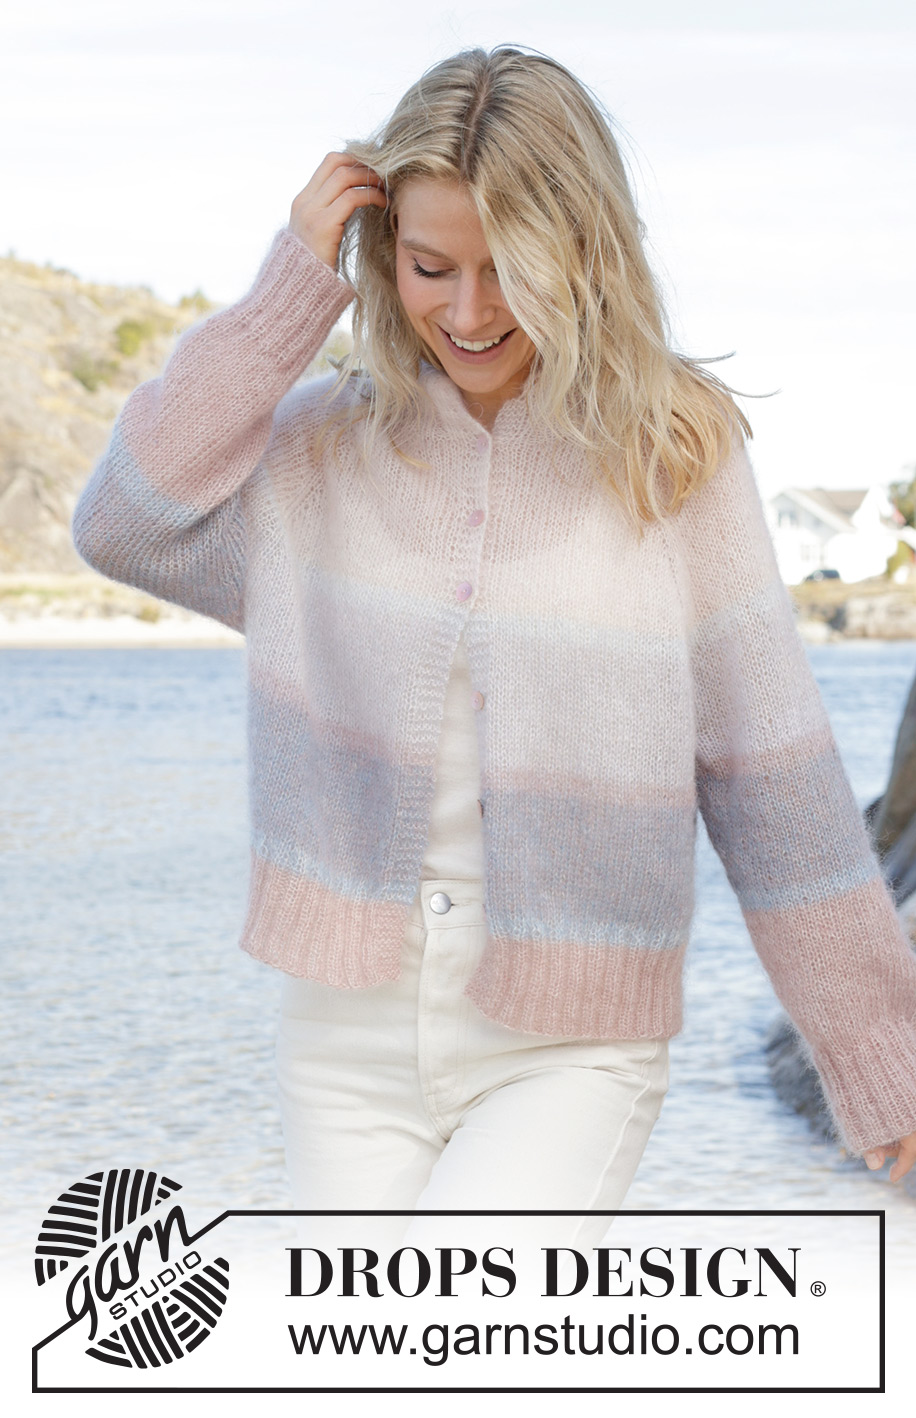
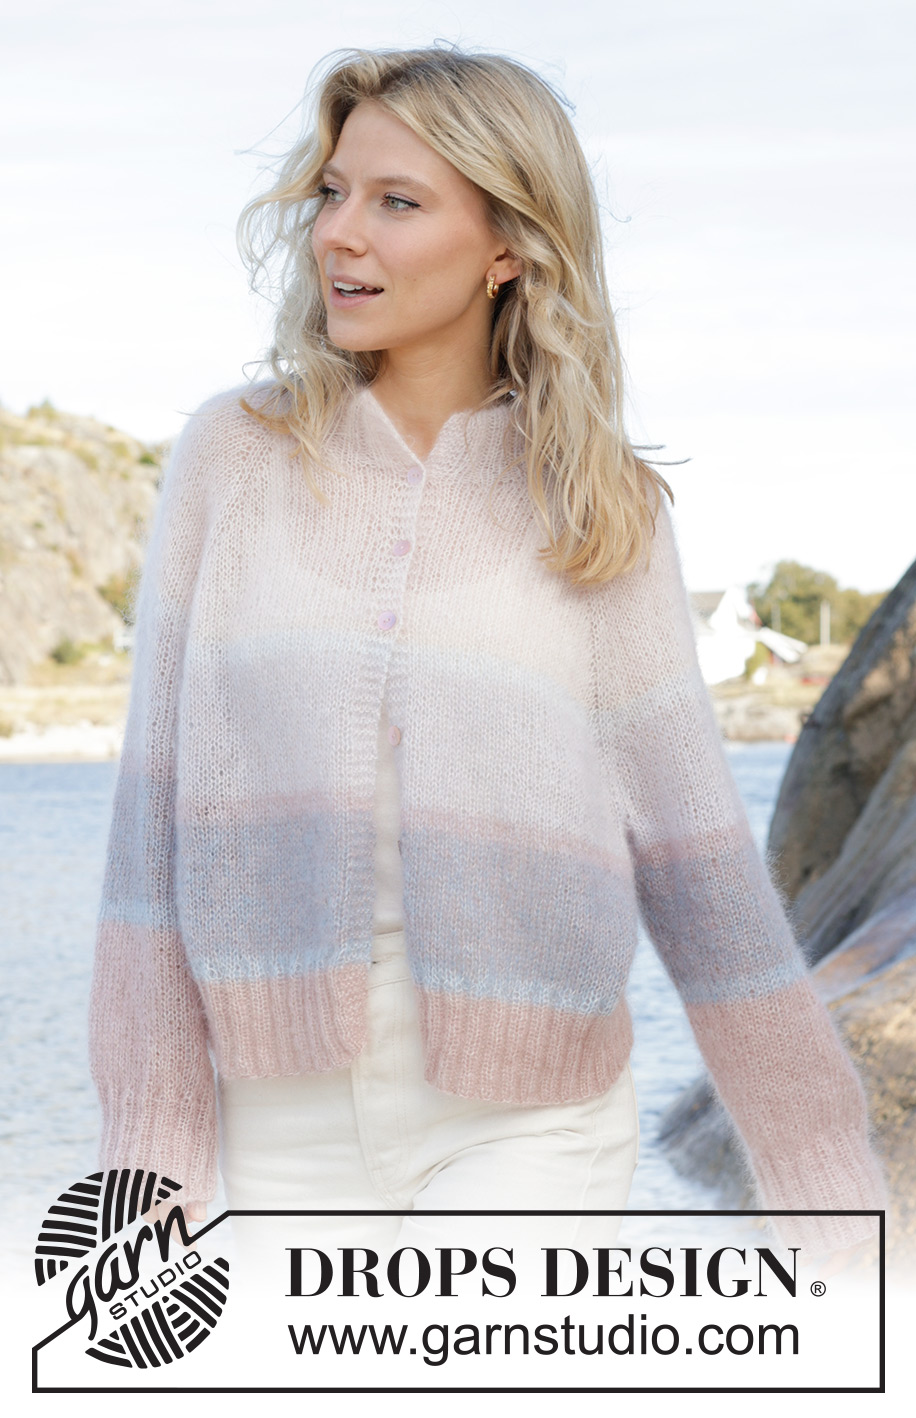
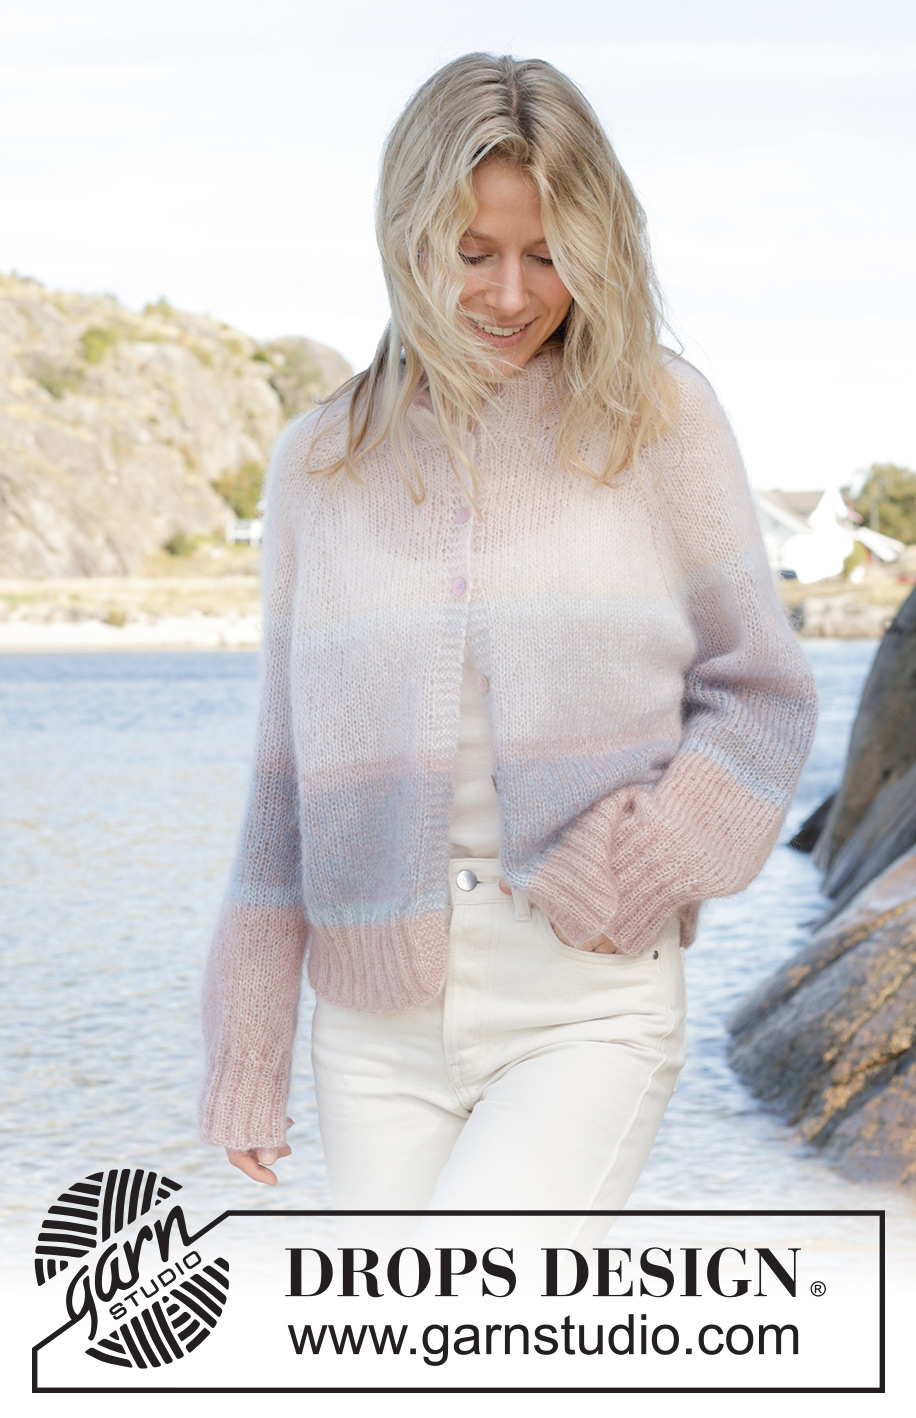
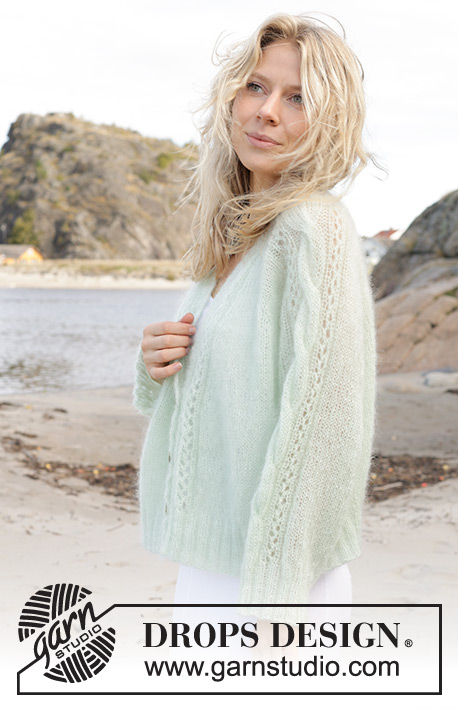
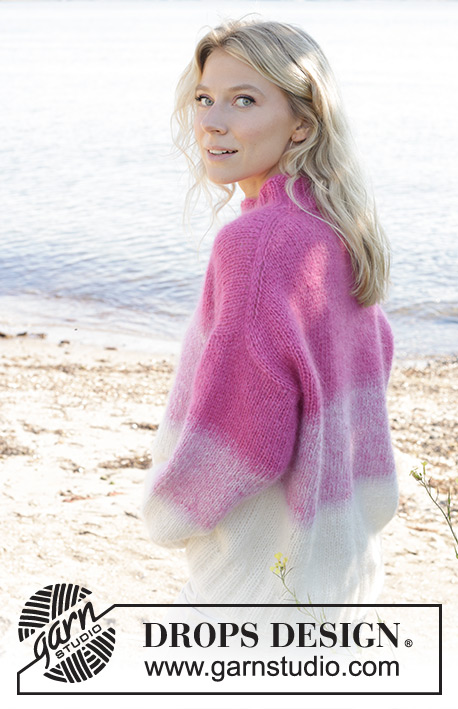
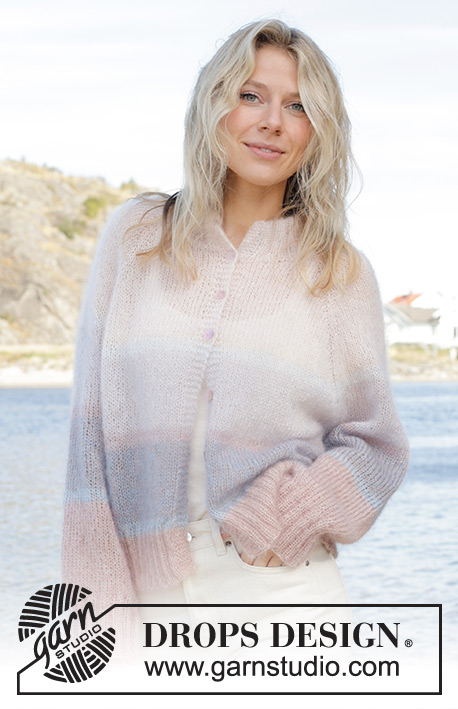
Watercolour Horizons Cardigan#watercolourhorizonscardigan |
|
 |
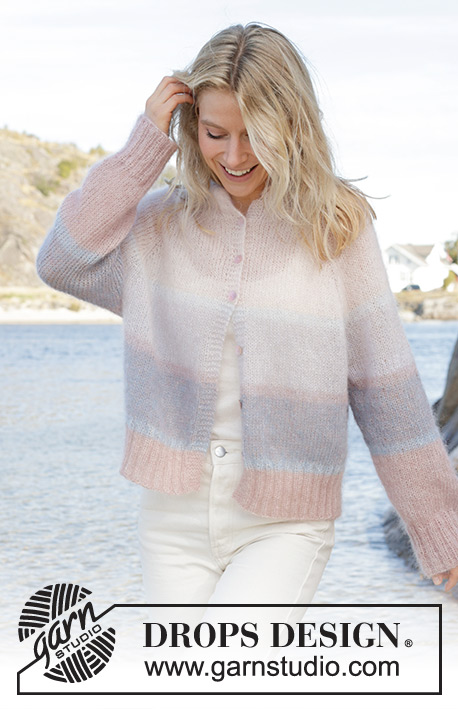 |
Knitted jacket in 2 strands DROPS Kid-Silk. The piece is worked top down with raglan, stripes and double neck. Sizes S - XXXL.
DROPS 241-4 |
|
|
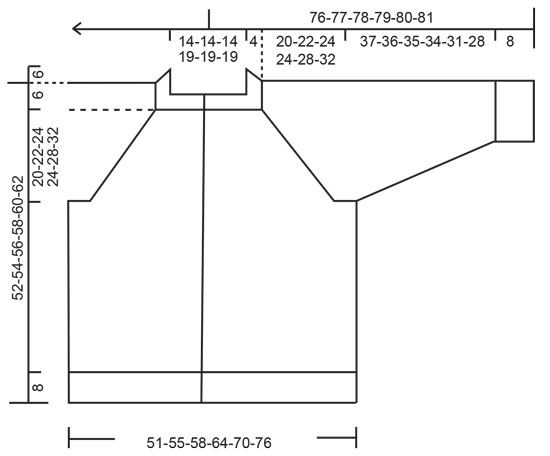
------------------------------------------------------- EXPLANATIONS FOR THE PATTERN: ------------------------------------------------------- RIDGE/GARTER STITCH (worked back and forth): Knit all rows. 1 ridge = knit 2 rows. RAGLAN: Increase 1 stitch before/after 2 stitches in each transition between body and sleeves, the marker-thread sits between these 2 stitches. Increase 1 stitch by making 1 yarn over which is worked twisted on the next row to avoid holes. Then work the new stitches in stockinette stitch. DECREASE TIP (for sleeves): Start 3 stitches before the marker-thread, knit 2 together, knit 2 (marker-thread sits between these 2 stitches), slip 1 stitch as if to knit, knit 1 and pass the slipped stitch over the knitted stitch. STRIPES: The jacket is worked with 2 strands. Work stripes as follows: Cast on + neck + 15 cm = 6" yoke: color 01 + color 40 2 cm = ¾" color 01 + 07 10 cm = 4" color 07 + color 40 2 cm = ¾" color 07 + color 41 10 cm = 4" color 08 + color 41 2 cm = ¾" color 08 + color 40 Finish with color 41 + color 40 BUTTONHOLES: Work buttonholes on the right band (when the garment is worn). Work from the right side when there are 4 stitches left on the row as follows: Make 1 yarn over, knit 2 together and knit 2. On the next row knit the yarn over to leave a hole. The first buttonhole is worked when the rib on the neck is finished. Then work the other 5-5-5-6-6-6 buttonholes with approx. 8-8½-9-7½ -8-8½ cm = 3⅛"-3¼"-3½"-2⅞" -3⅛"-3¼" between each one. ------------------------------------------------------- START THE PIECE HERE: ------------------------------------------------------- JACKET – SHORT OVERVIEW OF THE PIECE. The neck and yoke are worked back and forth with circular needle, from mid front and top down. The yoke is divided for body and sleeves and the body continued back and forth with circular needle. The sleeves are worked in the round with double pointed needles/short circular needle. DOUBLE NECK: Cast on 92-92-92-108-108-108 stitches with 1 strand color 01 and 1 strand color 40 DROPS Kid-Silk (2 strands), using circular needles size 5 and 4 MM = US 6 held together. Remove the needle size 5 MM = US 8 and keep the stitches on the needle size 4 MM = US 6 (this gives you an elastic cast-on edge). Purl 1 row from the wrong side. Then work as follows from the right side: 1 edge stitch in GARTER STITCH – read description above, * knit 2, purl 2 *, work from *-* until there are 3 stitches left, knit 2 and 1 edge stitch in garter stitch. When the rib measures 6 cm = 2⅜", cast on 4 stitches on each side = 100-100-100-116-116-116 stitches. Now work as follows: 5 band stitches in garter stitch, * knit 2, purl 2*, work from *-* until there are 7 stitches left, knit 2 and 5 band stitches in garter stitch. Work until the neck measures 12 cm = 4¾". Now fold the neck double to the inside. Work the band stitches, then the rib, working every 2nd stitch together with its corresponding stitch on the cast-on edge, 5 band stitches in garter stitch. You now have a double neck. Measure now piece from here. The jacket is worked with STRIPES – see explanation above. Insert now 4 marker-threads in the piece as described below, without working the stitches; the threads are used when increasing for raglan. Each marker-thread is inserted between 2 stitches. Count 18-18-18-22-22-22 stitches (left front piece), insert 1 marker-thread, count 20 stitches (sleeve), insert 1 marker-thread, count 24-24-24-32-32-32 stitches (back piece), insert 1 marker-thread, count 20 stitches (sleeve), insert 1 marker-thread, there are 18-18-18-22-22-22 stitches left (right front piece). NECK-LINE: Now work short rows. Change to circular needle size 5 MM = US 8. Cut the yarn and start mid-back (in the middle on the row): ROW 1 (right side): Knit and increase for RAGLAN – read description above, on each side of the first 2 marker-threads (4 stitches increased), turn after working 3 stitches past the 2nd marker-thread. ROW 2 (wrong side): Purl and increase to raglan on each side of all marker-threads (8 stitches increased), turn after working 3 stitches past the last marker-thread. ROW 3: Knit and increase for raglan on each side of all marker-threads (8 stitches increased), turn after working 2 stitches past where you last turned. ROW 4: Purl and increase to raglan on each side of all marker-threads (8 stitches increased), turn after working 2 stitches past where you last turned. ROW 5: Knit and increase for raglan on each side of all marker-threads (8 stitches increased), turn after working 2 stitches past where you last turned. ROW 6: Purl and increase to raglan on each side of all marker-threads (8 stitches increased), turn after working 2 stitches past where you last turned. ROW 7 (right side): Knit and increase for raglan on each side of the first 2 marker-threads (4 stitches increased), work to mid-back. Cut the strand. The short rows are now finished and you have increased 6 times for raglan = 148-148-148-164-164-164 stitches. Continue back and forth over all stitches, from mid-front. Work the first BUTTONHOLE – read description above. YOKE: Work stockinette stitch with the bands in garter stitch and continue to increase for raglan as follows: Increase every 2nd row (each row from the right side), but every 2nd increase is only on the front and back pieces (i.e. every 2nd round on the body and every 4th round on the sleeves, with alternately 4 and 8 increased stitches). Increase 18-22-26-26-30-30 times on the body (9-11-13-13-15-15 times on the sleeves). SIZES S, M and XXXL: Continue to increase for raglan, but only on the body; the increases on the sleeves are finished. Increase every 2nd row 2-1-4 times. ALL SIZES: You have increased a total of 26-29-32-32-36-40 times on the body and 15-17-19-19-21-21 times on the sleeves (including increases on the short rows). There are 264-284-304-320-344-360 stitches. Continue with stockinette stitch (the bands in garter stitch garter) until the yoke measures 20-22-24-24-28-32 cm = 8"-8¾"-9½"-9½"-11"-12½", measured after the neck. Divide for the body and sleeves as follows: Work the first 44-47-50-54-58-62 stitches (front piece), place the next 50-54-58-58-62-62 stitches on a thread for the sleeve, cast on 10-10-10-12-14-16 stitches (in side under sleeve), work the next 76-82-88-96-104-112 stitches (back piece), place the next 50-54-58-58-62-62 stitches on a thread for the sleeve, cast on 10-10-10-12-14-16 stitches (in side under sleeve), work the last 44-47-50-54-58-62 stitches (front piece). BODY: = 184-196-208-228-248-268 stitches. Continue with stockinette stitch and stripes (the bands in garter stitch garter) for a further 18-18-18-20-18-16 cm = 7"-7"-7"-8"-7"-6¼". Knit 1 row from the right side and increase 36-40-44-48-52-56 stitches evenly spaced (do not increase over the bands) = 220-236-252-276-300-324 stitches. Change to circular needles size 4 mm = US 6. Work the next row as follows from the wrong side: 5 band stitches in garter stitch, * purl 2, knit 2 *, work from *-* until there are 7 stitches left, purl 2, 5 band stitches in garter stitch. Continue this rib for 8 cm = 3⅛". Bind off. The jacket measures approx. 52-54-56-58-60-62 cm = 20½"-21¼"-22"-22¾"-23⅝"-24⅜" from the shoulder. SLEEVES: Place the 50-54-58-58-62-62 stitches from the thread on the one side of the piece on short circular needle/double pointed needles size 5 MM = US 8 and knit up 1 stitch in each of the 10-10-10-12-14-16 stitches cast on under the sleeve = 60-64-68-70-76-78 stitches. Insert a marker thread in the middle of the 10-10-10-12-14-16 stitches under the sleeve. Continue with stockinette stitch and stripes in the round. When the sleeve measures 4 cm = 1½" decrease 2 mid under sleeve – read DECREASE TIP. Decrease like this every 5-3½-2½-2½-2-1½ cm = 2"-1¼"-1"-1"-¾"-½" a total of 6-8-9-10-11-11 times = 48-48-50-50-54-56 stitches. Continue working until the sleeve measures 37-36-35-34-31-28 cm = 14½"-14¼"-13¾"-13⅜"-12¼"-11" from the division. Knit 1 round and increase 8-8-10-10-10-12 stitches evenly spaced = 56-56-60-60-64-68 stitches. Change to double pointed needles size 4 MM = US 6 and work rib (knit 2, purl 2) for 8 cm = 3⅛". Bind off. The sleeve measures approx. 45-44-43-42-39-36 cm = 17¾"-17¼"-17"-16½"-15¼"-14¼" from the division. Work the other sleeve in the same way. ASSEMBLY: Sew the buttons onto the left band. |
|
 |
|
Have you finished this pattern?Tag your pictures with #dropspattern #watercolourhorizonscardigan or submit them to the #dropsfan gallery. Do you need help with this pattern?You'll find 34 tutorial videos, a Comments/Questions area and more by visiting the pattern on garnstudio.com. © 1982-2026 DROPS Design A/S. We reserve all rights. This document, including all its sub-sections, has copyrights. Read more about what you can do with our patterns at the bottom of each pattern on our site. |
|


With over 40 years in knitting and crochet design, DROPS Design offers one of the most extensive collections of free patterns on the internet - translated to 17 languages. As of today we count 325 catalogs and 12298 patterns - 12288 of which are translated into English (US/in).
We work hard to bring you the best knitting and crochet have to offer, inspiration and advice as well as great quality yarns at incredible prices! Would you like to use our patterns for other than personal use? You can read what you are allowed to do in the Copyright text at the bottom of all our patterns. Happy crafting!
Post a comment to pattern DROPS 241-4
We would love to hear what you have to say about this pattern!
If you want to leave a question, please make sure you select the correct category in the form below, to speed up the answering process. Required fields are marked *.