
Popular categories
Looking for a yarn?


|
||||||||||
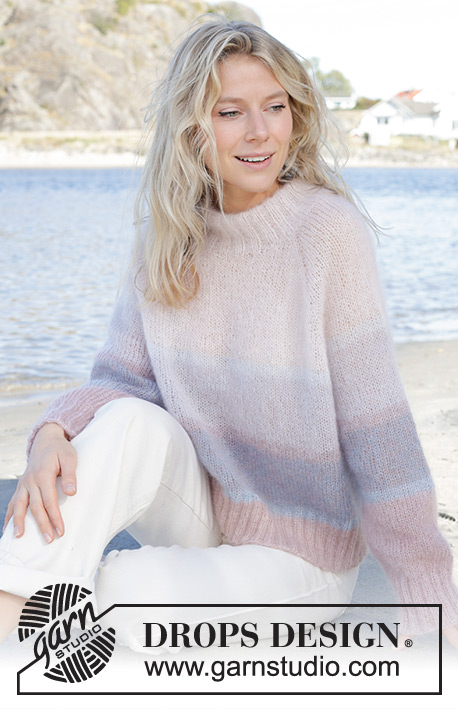
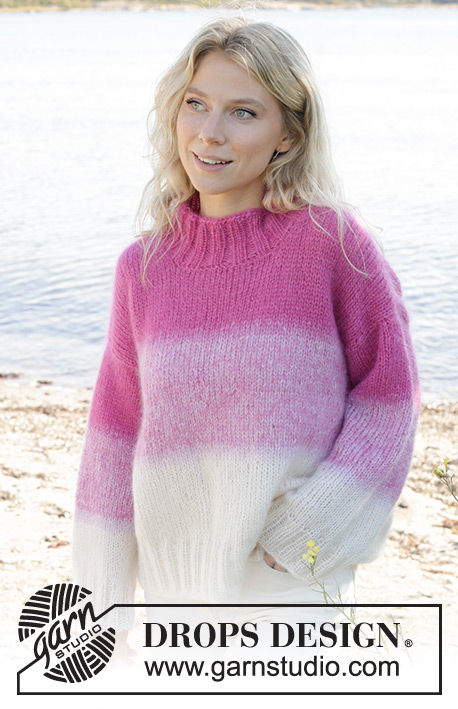
Pink Infusion |
||||||||||
 |
 |
|||||||||
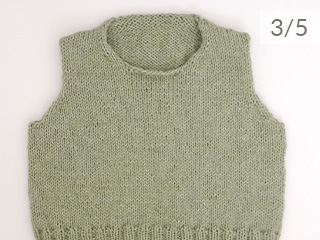
Knitted sweater in 4 strands DROPS Kid-Silk. The piece is worked top down with diagonal/European shoulders and stripes. Sizes XS - XXL.
DROPS 240-1 |
||||||||||
|
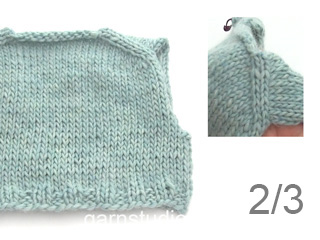
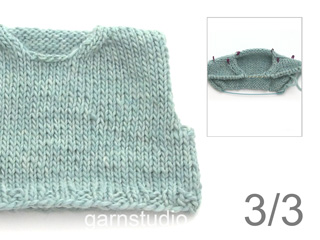
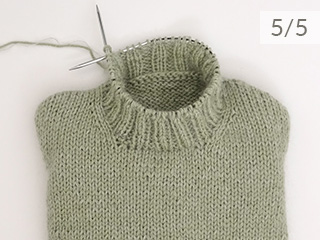
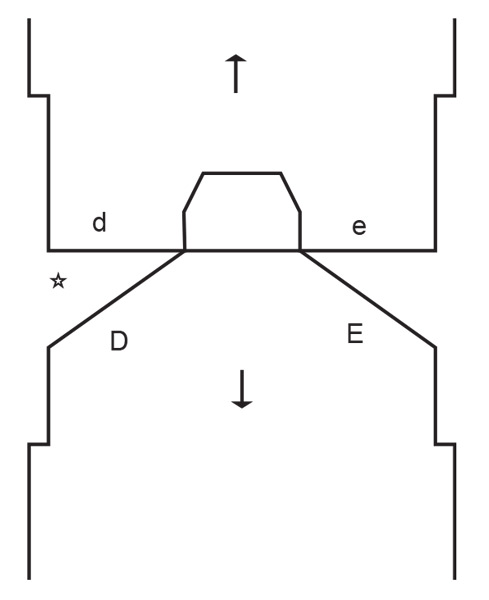
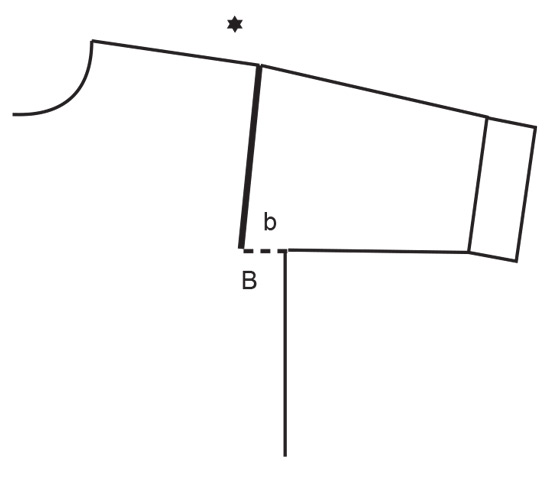
------------------------------------------------------- EXPLANATIONS FOR THE PATTERN: ------------------------------------------------------- RIDGE/GARTER STITCH (worked back and forth): Knit all rows. 1 ridge = knit 2 rows. INCREASE TIP FROM RIGHT SIDE: Increase AFTER marker: Use the left needle to pick up the front strand between 2 stitches from the previous round, knit the back loop. Increase BEFORE marker: Use the left needle to pick up the back strand between 2 stitches from the previous round, knit the front loop. INCREASE TIP FROM WRONG SIDE: Increase AFTER marker: Use the left needle to pick up the back strand between 2 stitches from the previous round, purl the front loop. Increase BEFORE marker: Use the left needle to pick up the front strand between 2 stitches from the previous round, purl the back loop. DECREASE TIP (for sleeves): Decrease 1 stitch on either side of the marker-thread as follows: Work until there are 3 stitches left before the marker-thread, knit 2 together, knit 2 (marker-thread sits between these 2 stitches), slip 1 stitch as if to knit, knit 1 and pass the slipped stitch over the knitted stitch. STRIPES: 2 rows with 1 strand color light pink + 3 strands color pink. 2 rows with 2 strands color light pink + 2 strands color pink. Work 14-15-16-17-18-19 cm = 5½"-6"-6¼"-6¾"-7"-7½" with 1 strand color off white + 2 strands color light pink + 1 strand color pink. 2 rows with 3 strands color light pink + 1 strand color off white 2 rows with 3 strands color off white + 1 strand color light pink 4 strands with color off white to finished length. ------------------------------------------------------- START THE PIECE HERE: ------------------------------------------------------- SWEATER – SHORT OVERVIEW OF THE PIECE: The top of the back piece is worked back and forth, top down as far as the armholes. Stitches are knitted up along each shoulder, then stitches are cast on for the neck and the front piece is worked back and forth, top down as far as the armholes. The front and back pieces are joined and the body worked in the round. Stitches are knitted up around the armholes and the sleeves worked in the round with short circular needle/double pointed needles. The neck is worked to finish. BACK PIECE: Cast on 26-26-28-30-30-30 stitches with circular needle size 7 MM = US 10.75 and 4 strands color pink. Purl 1 row from the wrong side. Insert 1 marker inside 3 stitches on each side. Allow them to follow your work onwards, always inside the outermost 3 stitches. Work stockinette stitch back and forth. AT THE SAME TIME increase AFTER the marker at the beginning of the row (seen from the right side) and BEFORE the marker at the end of the row – read INCREASE TIP FROM RIGHT SIDE. On the next row (wrong side) increase in the same way – read INCREASE TIP FROM WRONG SIDE. Increase both from the right and wrong side a total of 18-20-22-22-24-28 times. After the last increase there are 62-66-72-74-78-86 stitches. The piece is now measured from here! REMEMBER THE KNITTING GAUGE! Continue with stockinette stitch for 12-13-14-14-15-15 cm = 4¾"-5⅛"-5½"-5½"-6"-6" along the armhole. Now start to work STRIPES – read description above until the piece measures 14-15-15-16-17-17 cm = 5½"-6"-6"-6¼"-6¾"-6¾" along the armhole. Put piece aside and work the front piece. FRONT PIECE: Start with the left shoulder (when the garment is worn). Knit up 18-20-22-22-24-28 stitches inside 1 edge stitch along the left shoulder on back piece (i.e. knit up 1 stitch in each row on the top edge of the back piece) with 4 strands color pink. Work stockinette stitch back and forth for 7 cm = 2¾". Now increase at the beginning of each row from the right side after the 3 stitches - remember INCREASE TIP FROM RIGHT SIDE. Increase 1 stitch 4 times = 22-24-26-26-28-32 stitches. Put aside after the last row from the wrong side. Now work the right shoulder as follows Knit up 18-20-22-22-24-28 stitches inside 1 edge stitch along the right shoulder on the back piece. Work stockinette stitch back and forth for 7 cm = 2¾". Now increase at the end of each row from the right side before the 3 stitches - remember INCREASE TIP FROM RIGHT SIDE. Increase 1 stitch 4 times = 22-24-26-26-28-32 stitches. After the last increase, work the last row from the wrong side. On the next row from the right side work as follows: Stockinette stitch over the 22-24-26-26-28-32 stitches from the right shoulder, cast on 18-18-20-22-22-22 stitches for the neck at the end of the row and work stockinette stitch over the 22-24-26-26-28-32 stitches from the left shoulder = 62-66-72-74-78-86 stitches. When the piece measures 22-23-24-26-27-29 cm = 8¾"-9"-9½"-10¼"-10⅝"-11⅜", start to work stripes. Work until the piece measures 24-25-27-28-29-31 cm = 9½"-9¾"-10⅝"-11"-11⅜"-12¼" along the armhole. Now join the front and back pieces for the body as follows: BODY: Work the 62-66-72-74-78-86 stitches from the front piece on the needle, cast on 4-4-4-8-12-12 stitches at the end of the row (side), work stockinette stitch over the 62-66-72-74-78-86 stitches from the back piece, cast on 4-4-4-8-12-12 stitches at the end of the row = 132-140-152-164-180-196 stitches. Work stockinette stitch in the round and continue stripes until the piece measures 48-50-52-54-56-58 cm = 19"-19¾"-20½"-21¼"-22"-22¾" – measured from the top of the shoulder on the front piece. Knit 1 round and increase 24-24-24-28-32-36 stitches evenly spaced = 156-164-176-192-212-232 stitches. Change to circular needle size 6 MM = US 10. Work rib (knit 2, purl 2) for 8 cm = 3⅛". Bind off with knit. LEFT SLEEVE: Use circular needle size 7 MM = US 10.75 and 4 strands color pink, knit up from the right side 32-34-36-38-40-40 stitches from the bottom of the armhole and to the top of the shoulder (along the front piece) and 18-18-18-20-20-22 stitches from the shoulder down to the bottom of the armhole (along the back piece) = 50-52-54-58-60-62 stitches. Work stockinette stitch back and forth for 2-2-2-3-5-5 cm = ¾"-¾"-¾"-1⅛"-2"-2". Now join the sleeve using short circular needle/double pointed needles size 7 MM = US 10.75 and continue in the round. Insert 1 marker-thread at the beginning of the round (mid-under sleeve). Allow the thread to follow your work onwards. Start at the marker thread and work stockinette stitch in the round for 4-4-4-4-5-7 cm = 1½"-1½"-1½"-1½"-2"-2¾". Now decrease 2 stitches under the sleeve – read DECREASE TIP. Decrease like this every 10-10-10-7-7-6 cm = 4"-4"-4"-2¾"-2¾"-2⅜" a total of 4-4-4-5-5-5 times = 42-44-46-48-50-52 stitches. AT THE SAME TIME, when the sleeve measures 11 cm = 4⅜" work stripes in the same way as on the body. Continue working until the sleeve measures 40-40-40-39-38-36 cm = 15¾"-15¾"-15¾"-15¼"-15"-14¼". There is 8 cm = 3⅛" left; try the sweater on and work to desired length before the rib. Knit 1 round and increase 6-4-6-4-6-4 stitches evenly spaced = 48-48-52-52-56-56 stitches. Change to double pointed needles size 6 MM = US 10. Work rib (knit 2, purl 2) for 8 cm = 3⅛". Bind off a little loosely. The sleeve measures approx. 48-48-48-47-46-44 cm = 19"-19"-19"-18½"-18"-17¼". Work the other sleeve in the same way, but first knitting up 18-18-18-20-20-22 stitches from the bottom of the armhole to the shoulder along the back piece, then 32-34-36-38-40-40 stitches from the shoulder and down the front piece. Sew the bottom of the armholes together – see sketch. NECK: Start on one shoulder and knit up from the right side, inside 1 edge stitch, 64 to 76 stitches around the neck, using short circular needle size 6 MM = US 10 and 4 strands color pink. Work rib in the round (knit 2, purl 2) for 8 cm = 3⅛". Bind off loosely. |
||||||||||
Diagram explanations |
||||||||||
|
||||||||||
|
||||||||||
|
||||||||||

|
||||||||||
|
Have you made this or any other of our designs? Tag your pictures in social media with #dropsdesign so we can see them! Do you need help with this pattern?You'll find tutorial videos, a Comments/Questions area and more by visiting the pattern on garnstudio.com. © 1982-2024 DROPS Design A/S. We reserve all rights. This document, including all its sub-sections, has copyrights. Read more about what you can do with our patterns at the bottom of each pattern on our site. |
||||||||||


With over 40 years in knitting and crochet design, DROPS Design offers one of the most extensive collections of free patterns on the internet - translated to 17 languages. As of today we count 304 catalogs and 11422 patterns - 11417 of which are translated into English (US/in).
We work hard to bring you the best knitting and crochet have to offer, inspiration and advice as well as great quality yarns at incredible prices! Would you like to use our patterns for other than personal use? You can read what you are allowed to do in the Copyright text at the bottom of all our patterns. Happy crafting!
Comments / Questions (53)
Danke liebes Drops Design für die superschnelle Antwort. Hat mir sehr geholfen. Liebe Grüße Ute Hof
20.03.2024 - 16:11Hallo ihr Lieben, stricke Pink Infusion, Drops 240-1, einfarbig , Größe xl. Warum hat der Armausschnitt des Rückenteils eine Länge von 17 cm und der Armausschnitt des Vorderteils eine Länge von 29 cm (einfarbig). Bin etwas verunsichert. Habe ich einen Denkfehler? Würde mich über euere schnelle Hilfe Freuen. Liebe Grüße Ute Hof der Armausschnitt Rückenteil 17 cm Länge und das Vorderteil ein Armausschnitt
20.03.2024 - 13:47DROPS Design answered:
Liebe Frau Hof, bei solchen Modellen mit europäischen Schultern wird man so stricken, daß der Armausschnitt beim Rückenteil kürzer ist, so sind die Schulter etwas schräg hinten - siehe Tab Videos (oben am Kopfteil) für das Rückenteil und Vorderteil. In XXL ist der Armausschnitt 17 cm beim Rückenteil + 29 cm beim Vorderteil = (46/2)=23 cm hoch, siehe Maßskizze. Viel Spaß beim Stricken!
20.03.2024 - 15:23Bonjour, je voudrais être sûre d'avoir bien compris : (taille M) le dos fait 15cm de haut lorsqu'on le met en attente, mais le devant fait 25cm lorsqu'on rejoint le dos ? On a donc bien 10cm de plus... Merci pour votre réponse
18.03.2024 - 16:27DROPS Design answered:
Bonjour Mme Dolfin, tout à fait, vous avez ainsi bien (15+25)/2=20 cm de hauteur d'emmanchure, dans ce type de modèle, les épaules sont légèrement inclinées dans le dos. Retrouvez sous l'onglet "Vidéos" comment tricoter le dos et les devants de ce type de modèles. Bon tricot!
19.03.2024 - 10:59Bonjour, Je ne comprends pas, j'ai fait mes 20 augmentations sur l'endroit et sur l'envers et j'obtiens 106m pour 25cm le long de l'emmanchure. Il est dit : "augmenter 20 fois au total à la fois sur l'endroit et sur l'envers" J'ai donc fait 20 x 4 mailles (puisque 2 sur l'endroit et 2 sur l'envers). Cela signifie-t-il que j'aurais du faire que 10 x les 4 mailles ? Ce qui donnerait le bon nombre de mailles, mais alors pourquoi dire d'augmenter 20 fois ? Merci
18.03.2024 - 12:14DROPS Design answered:
Bonjour Mme Dolfin, on augmente pour les épaules du dos 20 fois au total, ces augmentations sont faites aussi bien sur l'endroit que sur l'envers, autrement dit, vous tricotez 20 rangs et avec ainsi 26 + (2x20= 66 mailles. Bon tricot!
18.03.2024 - 15:16Hallo, ist das besser, wenn man die Ärmel mit verkürzten Reihen stricken? Danke im Voraus. VG, Linh
20.02.2024 - 11:47DROPS Design answered:
Liebe Linh, die verkürzten Reihen geben eine bessere Form für das Ermetopp, so können Sie einige stricken, oder genauso wie bei diesem Modell stricken. Viel Spaß beim stricken!
20.02.2024 - 15:42Not sure about the height of the stripes at the bottom of the bodice (before the front and back are placed on the circular needle). It would appear that for size M, on the back of the pullover the stripe will be 1 cm high, and on the front 4cm. Is this correct?
04.02.2024 - 11:35DROPS Design answered:
Dear Michele, the position of the stripes is approximate, it may vary depending on the knitting gauge. In the instructions it specifies how many rows or cm you need to work with each colour but it may vary from the one in the photo due to each person's individual gauge. The photo is only a visual guide for the overall result; you should follow the written instructions first in regards to rows and cm to be worked. Happy knitting!
05.02.2024 - 00:01Love the sweater. Will have to figure out how to knit this left handed. The instructions look petty good. Wish I could click a translate button lol.
18.07.2023 - 00:29It would be really helpful if the model height and what general clothes size they are, and also what size the garment is they are modelling.
21.06.2023 - 11:18Dzień dobry. Nigdzie nie mogę znaleźć takiej informacji. Czy mam prawo zrobić sweter z darmowego wzoru i potem go sprzedać(sweter nie wzór)? Jeśli tak to są jakie specjalne warunki? Dziękuję za odpowiedź. Aurelia Gabrysiak
08.03.2023 - 22:55DROPS Design answered:
Witaj Aurelio, sprzedaż gotowej odzieży wykonanej na bazie wzorów DROPS jest dozwolona, o ile są one wytwarzane jednostkowo lub na zlecenie. Po więcej informacji patrz Copyright, który znajduje się na końcu każdego wzoru. Pozdrawiamy!
09.03.2023 - 08:21Kan man strikke denne opskrift i Brushed Alpaka Silk istedet for Kid Silk? Hvor mange tråde?
28.02.2023 - 07:58DROPS Design answered:
Hej Melissa, ja det kan du og da skal du strikke med 2 tråde DROPS Brushed Alpaca Silk. Prøv vores garn-omregner - vælg DROPS Kid-Silk, vælg antal gram i din størrelse og vælg 4 tråde, så får du resultatet i Brushed :)
28.02.2023 - 14:37