
Popular categories
Looking for a yarn?


Comments / Questions (100)
![]() Merete Stounbjerg wrote:
Merete Stounbjerg wrote:
Kan det passe, at man skal tage ud til raglan på både ret- og vrangpinde, mens der strikkes vendepinde? Men kun på retpindene på resten af bærestykket? Vh Merete
10.06.2024 - 08:25DROPS Design answered:
Hej Merete, ja det stemmer :)
11.06.2024 - 13:56
![]() Stephanie wrote:
Stephanie wrote:
Leider verstehe ich nicht wie ich nur am rumpfteil/Vorderteil zunehmen soll? Bitte hilfe🤔
04.06.2024 - 13:35DROPS Design answered:
Liebe Stephanie, bei den verkürzten Reihen haben Sie insgesamt 6 Mal für den Raglan zugenommen, dann stricken Sie in der Runde und nehmen Sie noch in jeder 2. Runde 7 bis 12 Mal (siehe Größe) zu = jeweils 8 Maschen, dh für Rumpf sowie für Ärmel, dann nehmen Sie abwechslungsweise 4 Maschen (nur Rumpf) und 8 Maschen (Rumpf + Ärmel) insgesamt 16-30 Mal fürs Rumpf bzw 8-15 Mal für die Ärmel, so haben Sie insgesamt 29-46 Mal fürs Rumpf und 21-31 Mal für die Ärmel zugenommen. Viel Spaß beim Stricken!
04.06.2024 - 15:57
![]() Christine G wrote:
Christine G wrote:
Ich mache die Pullover immer länger. Mag keinen kalten Rücken haben…
21.04.2024 - 08:28
![]() Martina Hegert wrote:
Martina Hegert wrote:
Hallo 🙋♀️, warum strickt man bei den verkürzten Reihen die Zunahme in Hin- und rückreihe, und den restlichen Raglanreihen nur in jeder 2. Reihe? Gruß Martina
18.04.2024 - 12:38DROPS Design answered:
Liebe Frau Hegert, die ersten Raglanzunahmen werden in jeder Reihe gestrickt, dann in jeder 2. Runde und endlich immer noch in jeder 2. Runde beim Rumpfteil und gleichzeitig in jeder 4. Runde bei den Ärmeln, so bekommt man das gewünschte Form. Viel Spaß beim Stricken!
18.04.2024 - 15:50
![]() Martina Hegert wrote:
Martina Hegert wrote:
Hallöchen, mir ist aufgefallen, das bei den verkürzten Reihen in der Rückrunde auch glatt rechts gestrickt werden soll. Das ist aber meiner Meinung nach nicht richtig. Es muss doch in der Rückrunde links gestrickt werden. Gruß Martina Hegert
17.04.2024 - 13:16
![]() Rosario wrote:
Rosario wrote:
Cuántas madejas se necesita para hacer jersey de la talla L? Es muy bonito
28.03.2024 - 16:13DROPS Design answered:
Hola Rosario, para la talla L necesitas 350gr del color 02 y 150g del color 10 de DROPS Soft Tweed. Cada ovillo son 50g así que necesitas 7 ovillos del color 02 y 3 del color 10.
31.03.2024 - 23:36
![]() Zisa wrote:
Zisa wrote:
J’ai craqué sur le modèle mais la laine Soft Tweed n’était pas en quantité suffisante, je l’ai réalisé en Sky et c’est un pur bonheur !
25.02.2024 - 21:12
![]() Beate wrote:
Beate wrote:
Ich finde die Beschreibung sehr schlecht und komme damit nicht zurecht. Kann ich den Pullover nicht auch von unten nach oben stricken, so habe ich früher auch Pullover gestrickt. Schon bei der Raglanzunahme scheitere ich an Ihrer Beschreibung, wenn dann bräuchte ich einen Film der genau diese Anleitung beschreibt und nicht nur allgemein gehalten ist. Damit kann ich dann auch nichts anfangen, Leider kann ich ja die Wolle nicht mehr zurückschicken da ich sie bereits bezahlt habe
13.02.2024 - 22:26DROPS Design answered:
Liebe Beate, unter Videos sowie Lektion finden Sie 1 Video und 1 Lektion, wo man zeigt, wie man einen Pullover von oben nach unten strickt, sicher kann das Ihnen helfen; hier finden Sie sonnst Anleitungen von unten nach oben. Viel Spaß beim stricken!
14.02.2024 - 08:15
![]() Pia wrote:
Pia wrote:
Hej, vill sticka denna tröja i garnet Drops snow garn grupp E. Stickar ganska hårt? Tänkte sticka i st.L/XL .Hur skall jag göra? Lägga upp flera maskor ? Stickar med stickor 8 och 9 mm. Tacksam för svar.
10.02.2024 - 23:14DROPS Design answered:
Hej Pia. Du kan söka på tröjor till dam i garngrupp E, då får du upp många fina mönster som liknar detta som du kan sticka med DROPS Snow. Mvh DROPS Design
15.02.2024 - 13:41
![]() Karolina wrote:
Karolina wrote:
Hej! Mam 2 pytania. 1: linię reglanu mają tworzyć 2 czy 4 oczka? Nie wiem czy mam dodawać oczko na reglan dwa oczka przed/za markerem czy jedno oczko przed/za. 2: w 1. rzędzie skróconym- te trzy oczka, za którymi mam obrócić na drugą stronę liczyć razem z nowo dodanym oczkiem na reglan? Z góry dziękuję za odpowiedź!
07.02.2024 - 10:54DROPS Design answered:
Witaj Karolino, 1. linię reglanu tworzą 2 oczka. Dodajesz oczka na reglany przed/za tymi 2 oczkami. 2. kolejny rząd skrócony jest liczony razem z poprzednio dodanym oczkiem na reglan. Pozdrawiamy i życzymy miłej pracy!
07.02.2024 - 11:36
|
|
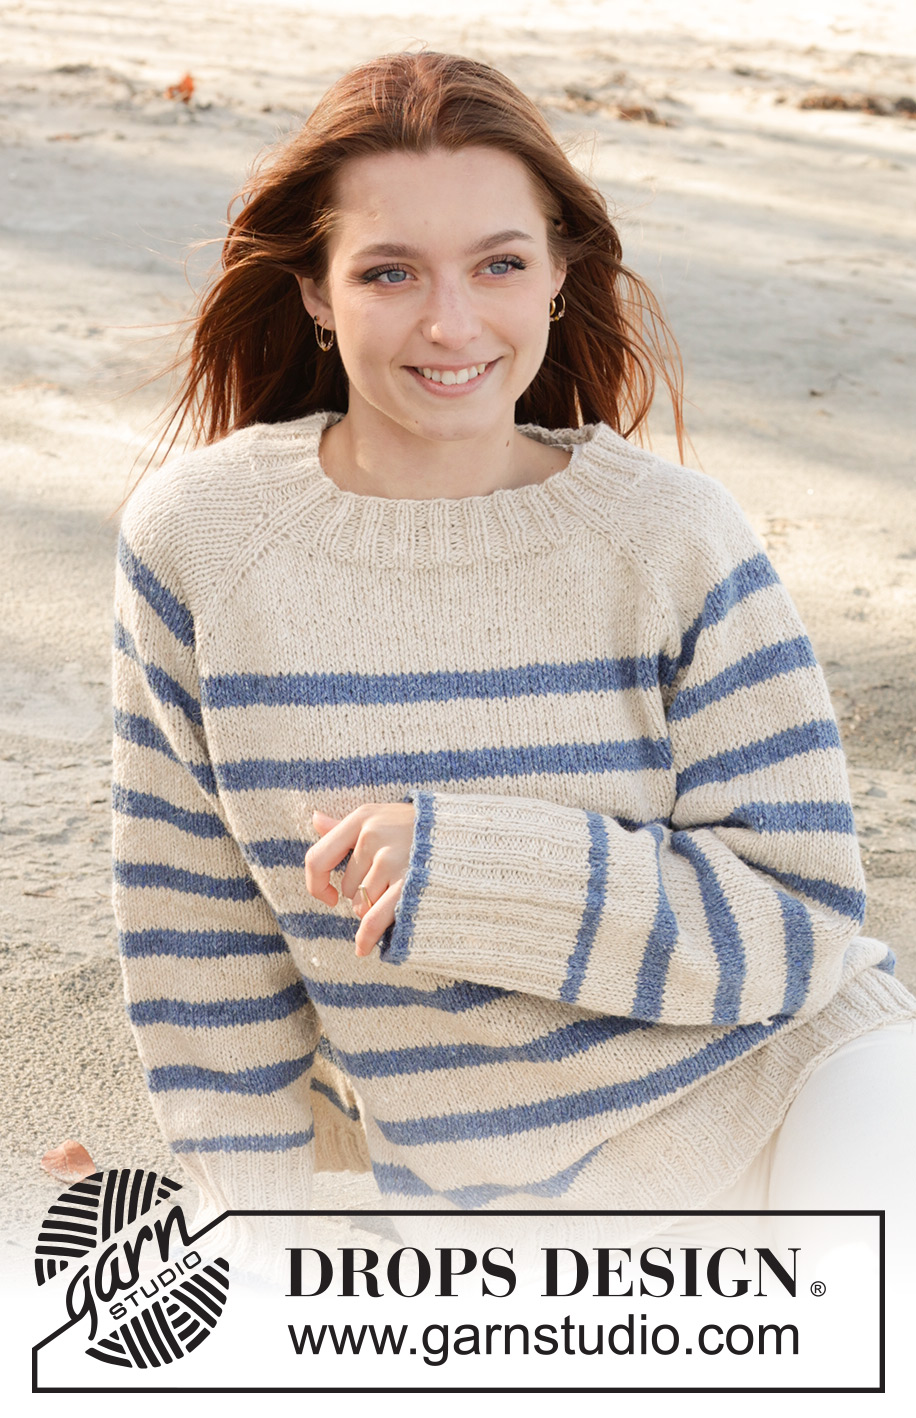
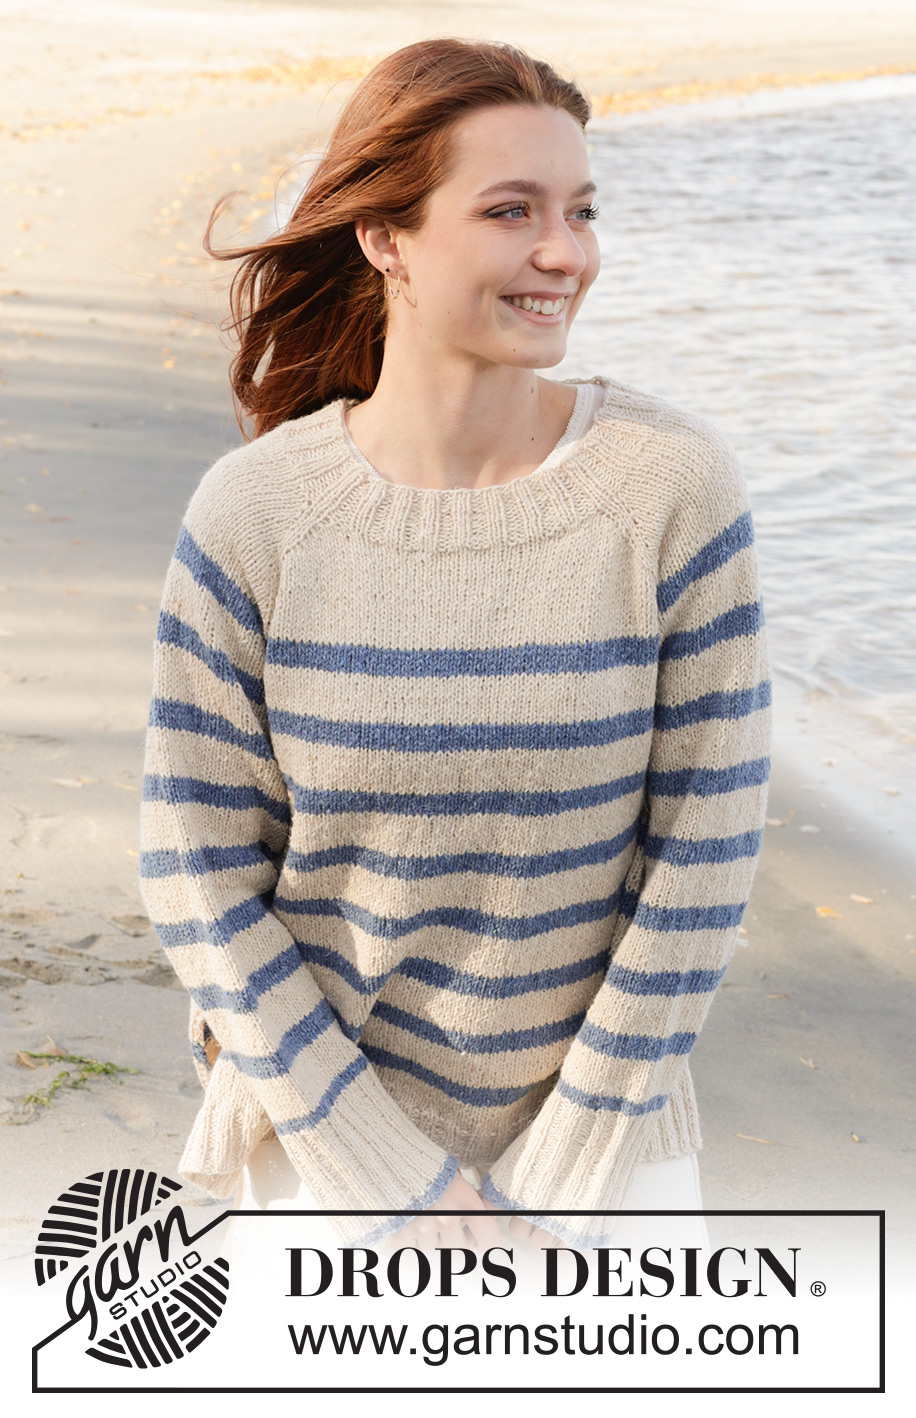
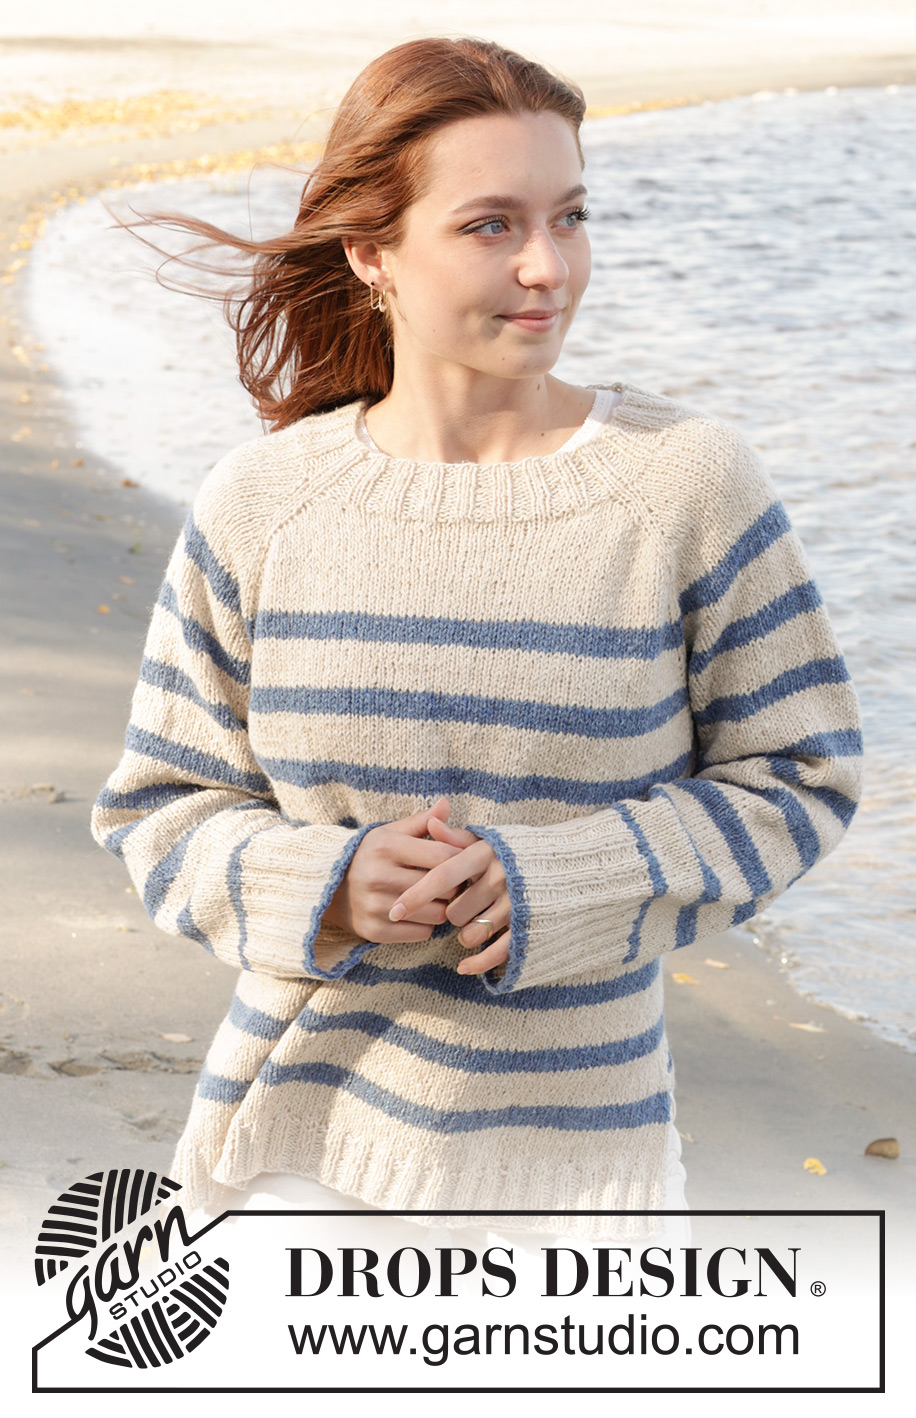
Marina Del Rey#marinadelreysweater |
|
 |
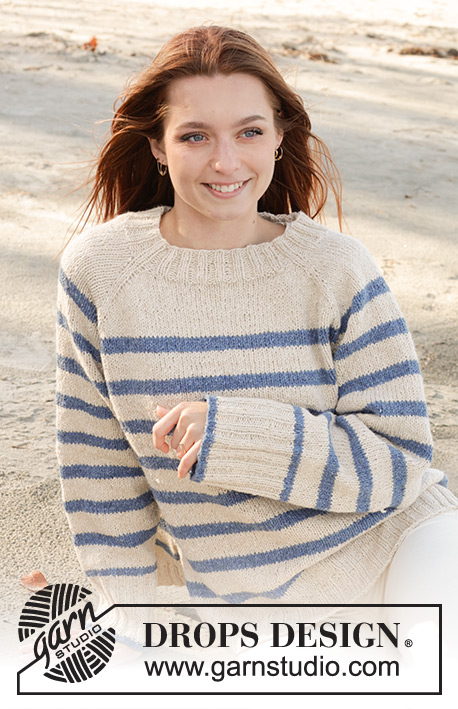 |
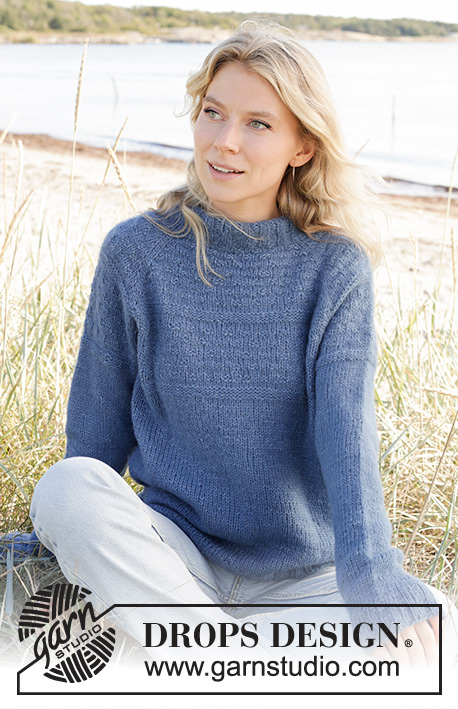
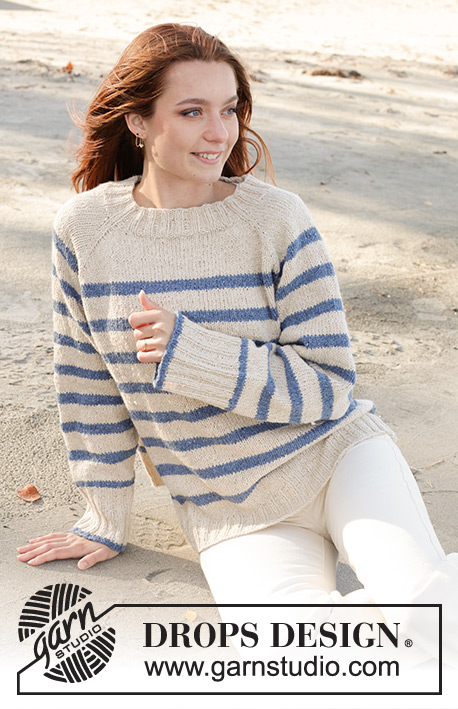
Knitted sweater in DROPS Soft Tweed. The piece is worked top down with raglan, stripes and split in sides. Sizes S - XXXL.
DROPS 239-5 |
|
|
------------------------------------------------------- EXPLANATIONS FOR THE PATTERN: ------------------------------------------------------- RAGLAN: Increase 1 stitch before/after 2 stitches in each transition between body and sleeves, marker-thread sits between these 2 stitches. From right side: INCREASE 1 STITCH BEFORE MARKER-THREAD: Use the left needle to pick up the strand between 2 stitches from the previous round, pick up the strand from behind and knit the front loop. INCREASE 1 STITCH AFTER MARKER-THREAD: Use the left needle to pick up the strand between 2 stitches from the previous round, pick up the strand from the front and knit the back loop. From wrong side: INCREASE 1 STITCH BEFORE MARKER-THREAD: Use the left needle to pick up the strand between 2 stitches from the previous round, pick up the strand from the front and purl the back loop. INCREASE 1 STITCH AFTER MARKER-THREAD: Use the left needle to pick up the strand between 2 stitches from the previous round, pick up the strand from behind and purl the front loop. STRIPES: When the piece measures 7-8-8-8-8-9 cm = 2¾"-3⅛"-3⅛"-3⅛"-3⅛"-3½" from the ribbing (measured mid-front), work stripes as follows: * 2 cm = ¾" with color denim jeans, 3½ cm = 1¼" with color marzipan *, work from *-* until you have worked 8-8-8-9-9-9 stripes with color denim jeans on the body/sleeves. Then continue as described in the text. GARTER STITCH (worked back and forth): Knit all rows. 1 ridge = knit 2 rows. DECREASE TIP (for sleeves): Decrease 1 stitch on either side of the marker-thread as follows: Work until there are 3 stitches left before the marker-thread, knit 2 together, knit 2 (marker-thread sits between these 2 stitches), slip 1 stitch as if to knit, knit 1 and pass the slipped stitch over the knitted stitch. ------------------------------------------------------- START THE PIECE HERE: ------------------------------------------------------- SWEATER – SHORT OVERVIEW OF THE PIECE: The neck and yoke are worked in the round with circular needle, top down. The yoke is divided for body and sleeves and the body is continued in the round as far as the split, then the front/back piece s are finished separately, back and forth. The sleeves are worked with short circular needle/double pointed needles. NECK: Cast on 104-104-112-112-120-128 stitches with short circular needle size 3.5 MM = US 4 and color marzipan DROPS Soft Tweed. Work rib in the round (knit 2, purl 2) for 5 cm = 2". Insert 4 marker-threads, without working the stitches and inserting them between 2 stitches as follows. Count 1 stitch and insert marker-thread-1 here, count 20 stitches and insert marker-thread-2 here, count 32-32-36-36-40-44 stitches and insert marker-thread-3 here, count 20 stitches and insert marker-thread-4 here, there are 32-32-36-36-40-44 stitches between marker-thread-4 and marker-thread-1. NECKLINE: Change to circular needle size 4.5 MM = US 7 and work a neckline with short rows as follows: ROW 1 (right side): Knit and increase for RAGLAN – read description above, on each side of the first 2 marker-threads (4 stitches increased), turn when you have worked 3 stitches past marker-thread-2. ROW 2 (wrong side): Purl and increase for raglan on each side of all 4 marker-threads (8 increased stitches), turn when you have worked 3 stitches past the last marker-thread. ROW 3: Knit and increase for raglan on each side of all marker threads (8 increased stitches) turn when you have worked 2 stitches past the previous turn. ROW 4: Purl and increase for raglan on each side of all marker threads (8 increased stitches) turn when you have worked 2 stitches past the previous turn. ROW 5: Knit and increase for raglan on each side of all marker threads (8 increased stitches) turn when you have worked 2 stitches past the previous turn. ROW 6: Purl and increase for raglan on each side of all marker threads (8 increased stitches) turn when you have worked 2 stitches past the previous turn. ROW 7: Knit and increase for raglan on each side of the first 2 marker-threads (4 stitches increased), work back to 1 stitch before marker-thread-1 (beginning of round). The short rows are finished and you have increased 6 times for raglan at each marker-thread = 152-152-160-160-168-176 stitches. Continue in the round over all stitches. YOKE: REMEMBER THE KNITTING GAUGE and read STRIPES! Continue with stockinette stitch and increase for raglan as follows: Increase every 2nd round until you have increased 7-11-12-12-10-10 more times on the body and sleeves = 208-240-256-256-248-256 stitches. Continue increasing every 2nd round but every second increase is only on the body; i.e. every 2nd round on the body and every 4th round on the sleeves, alternately 4 and 8 stitches increased. Increase like this 16-16-16-20-26-30 times on the body (8-8-8-10-13-15 times on the sleeves). You have increased a total of 29-33-34-38-42-46 times on the body and 21-25-26-28-29-31 times on the sleeves (including the increases on the short rows). After the last increase there are 304-336-352-376-404-436 stitches (90-98-104-112-124-136 stitches between the marker threads on the front/back piece and 62-70-72-76-78-82 stitches between the marker-threads on the sleeves). Continue working without further increases until the piece measures 21-23-24-25-28-31 cm = 8¼"-9"-9½"-9¾"-11"-12¼", measured mid-front after the ribbing on the neck. Divide for the body and sleeves as follows: Work to marker-thread-1 and begin the round here, place the first 62-70-72-76-78-82 stitches on a thread without working them (sleeve), cast on 10-10-12-12-14-14 stitches (in side under sleeve), work 90-98-104-112-124-136 stitches (front piece), place the next 62-70-72-76-78-82 stitches on a thread without working them (sleeve), cast on 10-10-12-12-14-14 stitches (in side under sleeve), work 90-98-104-112-124-136 stitches (back piece). The body and sleeves are finished separately. The piece is now measured from here! BODY: = 200-216-232-248-276-300 stitches. Work the 5-5-6-6-7-7 first cast-on stitches under the sleeve; the round starts here. Continue the stripes and stockinette stitch. When the stripes are finished continue with color marzipan. When the body measures 17-17-18-19-18-17 cm = 6¾"-6¾"-7"-7½"-7"-6¾" divide for the split in each side. Place the last 100-108-116-124-138-150 stitches on a thread (back piece). FRONT PIECE: Work stockinette stitch back and forth with 2 edge stitches in GARTER STITCH on each side – read description above. When the split measures 10 cm = 4", knit 1 row from the right side and increase 10-10-14-14-16-16 stitches evenly spaced (do not increase the edge stitches) = 110-118-130-138-154-166 stitches. Change to circular needle size 3.5 MM = US 4 and work rib as follows (starting from the wrong side): 2 edge stitches in garter stitch, * purl 2, knit 2 *, work from *-* until there are 4 stitches left, purl 2 and 2 edge stitches in garter stitch. Continue this rib back and forth for 5 cm = 2". Bind off with knit over knit and purl over purl. The sweater measures approx. 58-60-62-64-66-68 cm = 22¾"-23⅝"-24⅜"-25¼"-26"-26¾" from the shoulder. BACK PIECE: Place the 100-108-116-124-138-150 stitches from the thread back on circular needle size 4.5 MM = US 7 and work in the same way as the front piece – remember to change to needle size 3.5 MM = US 4 before working the rib. SLEEVES: Place the 62-70-72-76-78-82 stitches from the thread on the one side of the piece on short circular needle/double pointed needles size 4.5 MM = US 7 and knit up 1 stitch in each of the new stitches cast on under the sleeve = 72-80-84-88-92-96 stitches. Insert a marker in the middle of the new stitches under the sleeve. Start at the marker-thread and continue the stripes and stockinette stitch in the round. When the stripes are finished continue with color marzipan. AT THE SAME TIME, when the sleeve measures 4 cm = 1½" decrease 2 stitches under the sleeve – read DECREASE TIP. Decrease like this every 3-2-2-1½-1-1 cm = 1⅛"-¾"-¾"-½"-⅜"-⅜" a total of 8-11-12-13-14-15 times = 56-58-60-62-64-66 stitches. Continue working until the sleeve measures 31-30-29-29-26-23 cm = 12¼"-11¾"-11⅜"-11⅜"-10¼"-9" from the division (there is approx. 11 cm = 4⅜" left). Change to color denim jeans and work 3 rounds of stockinette stitch, increasing 20-22-20-22-24-26 stitches evenly on the last round = 76-80-80-84-88-92 stitches. Change to double pointed needles size 3.5 MM = US 4 and color marzipan. Work rib (knit 2, purl 2) for 10 cm = 4". Change to color denim jeans and work 1 cm = ⅜" more of the rib. Bind off with knit over knit and purl over purl. The sleeve measures approx. 42-41-40-40-37-34 cm = 16½"-16⅛"-15¾"-15¾"-14½"-13⅜" from the division. Work the other sleeve in the same way. |
|
 |
|
Have you finished this pattern?Tag your pictures with #dropspattern #marinadelreysweater or submit them to the #dropsfan gallery. Do you need help with this pattern?You'll find 30 tutorial videos, a Comments/Questions area and more by visiting the pattern on garnstudio.com. © 1982-2026 DROPS Design A/S. We reserve all rights. This document, including all its sub-sections, has copyrights. Read more about what you can do with our patterns at the bottom of each pattern on our site. |
|


With over 40 years in knitting and crochet design, DROPS Design offers one of the most extensive collections of free patterns on the internet - translated to 17 languages. As of today we count 324 catalogs and 12290 patterns - 12280 of which are translated into English (US/in).
We work hard to bring you the best knitting and crochet have to offer, inspiration and advice as well as great quality yarns at incredible prices! Would you like to use our patterns for other than personal use? You can read what you are allowed to do in the Copyright text at the bottom of all our patterns. Happy crafting!
Post a comment to pattern DROPS 239-5
We would love to hear what you have to say about this pattern!
If you want to leave a question, please make sure you select the correct category in the form below, to speed up the answering process. Required fields are marked *.