
Popular categories
Looking for a yarn?


Comments / Questions (48)
![]() Minna wrote:
Minna wrote:
Etukpl: siirrä keskiedun ensimmäiset 9-10-11-12-13-14 silmukkaa apulangalle (eli neulo silmukat ja siirrä ne sitten apulangalle). Missä vaiheessa nämä silmukat otetaan mukaan? Vai mitä niille tapahtuu?
23.03.2026 - 21:08DROPS Design answered:
Nämä silmukat otetaan takaisin työhön, kun neulotaan pääntien reunus.
24.03.2026 - 19:33
![]() Minna wrote:
Minna wrote:
Takakappale: Päätä 2 seuraavan kerroksen alusta 5-7-9-10-12-17 silmukkaa = 76-80-84-90-96-100 silmukkaa. Päätetäänkö kummastakin reunasta 2 silmukkaa yhteensä esim. 9 kertaa? Vai miten?
16.03.2026 - 06:57DROPS Design answered:
Hei, kummastakin reunasta päätetään 9 silmukkaa kerran (koossa L), eli työstä päätetään yhteensä 18 silmukkaa ja jäljelle jää 84 silmukkaa.
16.03.2026 - 17:54
![]() Mari Lennerö wrote:
Mari Lennerö wrote:
Hej När man stickade framstyckena så satte man 10 maskor på en tråd. Ska dom tas med när man plockar upp maskor på halskanten eller när man plockar upp maskor på framstyckena? M v h Mari
15.02.2026 - 14:00DROPS Design answered:
Hei Mari . Ja, over stolpene, maskene på tråden og videre rundt til den andre siden. mvh DROPS Design
16.02.2026 - 14:19
![]() Heike Weller wrote:
Heike Weller wrote:
Vorderteil Maschen für den Halsausschnitt stilllegen. Wie wird ab hier weitergestrickt? Ich verstehe die weiteren Schritte aus der Beschreibung nicht.
10.02.2026 - 15:28DROPS Design answered:
Liebe Heike, Sie stricken die Hin-Reihe, bis noch 4 M vor den stillgelegten Maschen übrig sind. Dann 2 M re zusammenstricken, 1 M glatt re, 1 M kraus re. Dann folgen die stillgelegten M, die ja aber fürs Stricken nun erst mal keine Rolle spielen. Sie wenden dann, stricken zurück, wenden wieder und stricken wieder bis noch 4 M vor den stillgelegten M übrig sind. Dann wieder wie zuvor abnehmen usw, bis Sie 6 x abgenommen haben. Viel Spaß beim Weiterstricken!
18.02.2026 - 20:36
![]() Anna wrote:
Anna wrote:
Kohdassa ”VASEN ETUKAPPALE” pyydetään siirtämään silmukoita apulangalle. Mitä näille apulangalla oleville silmukoille tehdään? En löydä ohjeesta mainintaa, ettå apulangalla olevat silmukat neulottaisiin missään vaiheessa.
26.11.2025 - 19:33DROPS Design answered:
Hei, nämä apulangalla odottavat silmukat otetaan takaisin työhön, kun neulotaan pääntien reunus.
28.11.2025 - 17:50
![]() Valerie wrote:
Valerie wrote:
Bonsoir le dos taille L devrait faire 59cm de largeur à sa base. Vous suggerez de monter 123 mailles L'echantillon que vous annoncez est de 17mailles pour obtenir 10 cm. Pour obtenir 59cm je devrais monter 100 mailles et non 126. Je fais un erreur de raisonnement? Merci pour votre aide! Valérie
18.11.2025 - 22:10DROPS Design answered:
Bonjour Valérie, notez qu'il faut davantage de mailles pour la même largeur en côtes avec les aiguilles 4 qu'en jersey avec les aiguilles 5, ainsi, après les côtes, vous diminuez à 102 mailles, vous aurez donc bien 102 - 2 m lis (pour les coutures) = 100/1,7 de tension = 59 cm de largeur. Bon tricot!
19.11.2025 - 08:30
![]() Heike wrote:
Heike wrote:
Bei dem Modell ai-392 wurde kurz angezeigt, dass in der Anleitung etwas berichtigt wurde. Kann ich nochmal eine Info bekommen, um welche Änderung es sich handelt? Danke
13.11.2025 - 18:56DROPS Design answered:
Liebe Heike, die deutsche Anleitung ist von der Korrektur nicht betroffen, es wurde nichts geändert. Viel Spaß beim Stricken!
17.11.2025 - 22:04
![]() Gioia Maria wrote:
Gioia Maria wrote:
Come si fa lavorare "l’arrotondamento della manica in piano dal centro sotto la manica per 3-4-5-6-7-10 cm. " come dice la SPIEGAZIONE
01.11.2025 - 20:49DROPS Design answered:
Buonasera Gioia Maria, deve lavorare in piano, in ferri di andata e ritorno per i cm indicati per la sua taglia. Buon lavoro!
02.11.2025 - 17:17
![]() Anna wrote:
Anna wrote:
Kiitos vastauksesta, mutta en vieläkään ymmärrä miten joustinneule menee :) Neuloin ensimmäisen joustinneulekerroksen neuvojenne mukaan, mutta kun käännän työn ja alan neulomaan seuraavaa kerrosta niin en saa aikaan joustinneuletta. Ensimmäisen joustinneulekerroksen kolme viimeistä silmukkaa ovat nurja, oikea, oikea. Seuraavan joustinneulekerroksen kolme ensimmäistä silmukkaa ovat oikea, oikea, nurin. Eli silmukat menevät juuri väärinpäin. Neulon tasona työtä.
28.10.2025 - 12:47DROPS Design answered:
Kyllä, ensimmäisen kerroksen viimeiset 3 silmukkaa ovat nurja silmukka, oikea silmukka ja ainaoikeinneulottu silmukka. Neulot seuraavan kerroksen ensimmäiset 3 silmukkaa näin: 1 silmukka ainaoikeaa, 1 silmukka nurin ja 1 silmukka oikein. Eli neulo kummassakin reunassa 1 silmukka ainaoikeaa, ja neulo muut silmukat siten miltä ne näyttävät (oikeat silmukat oikein ja nurjat silmukat nurin).
28.10.2025 - 18:13
![]() Anna wrote:
Anna wrote:
Hei Hei! Aloitin neulomaan tätä neuletakkia ja jäin jumiin heti alussa. Mitä tarkoittaa: Neulo 1 kerros oikein nurjalta puolelta? Entä miten saan silmukkamäärän (103) parilliseksi ja joustinneuleen onnistumaan jos neulon: 1 reunasilmukka AINAOIKEAA, 1 silmukka oikein, 1 silmukka nurin, toista kunnes jäljellä on 2 silmukkaa, neulo lopuksi 1 silmukka oikein ja 1 reunasilmukka ainaoikeaa. Eli resorissa ensimmäinen ja kaksi viimeistä silmukkaa neulotaan oikein?
27.10.2025 - 11:09DROPS Design answered:
Hei, ensimmäinen kerros neulotaan työn nurjalta puolelta ja tämän kerroksen kaikki silmukat neulotaan oikein. Tämän jälkeen neulotaan joustinneuletta näin: 1 silmukka ainaoikeaa, *1 silmukka oikein, 1 silmukka nurin*, toista *-* 50 kertaa (jäljellä on nyt 2 silmukkaa), neulo 1 silmukka oikein ja 1 reunasilmukka ainaoikeaa. Tällä tavoin joustinneule alkaa ja loppuu samalla tavalla.
27.10.2025 - 16:14
|
||||
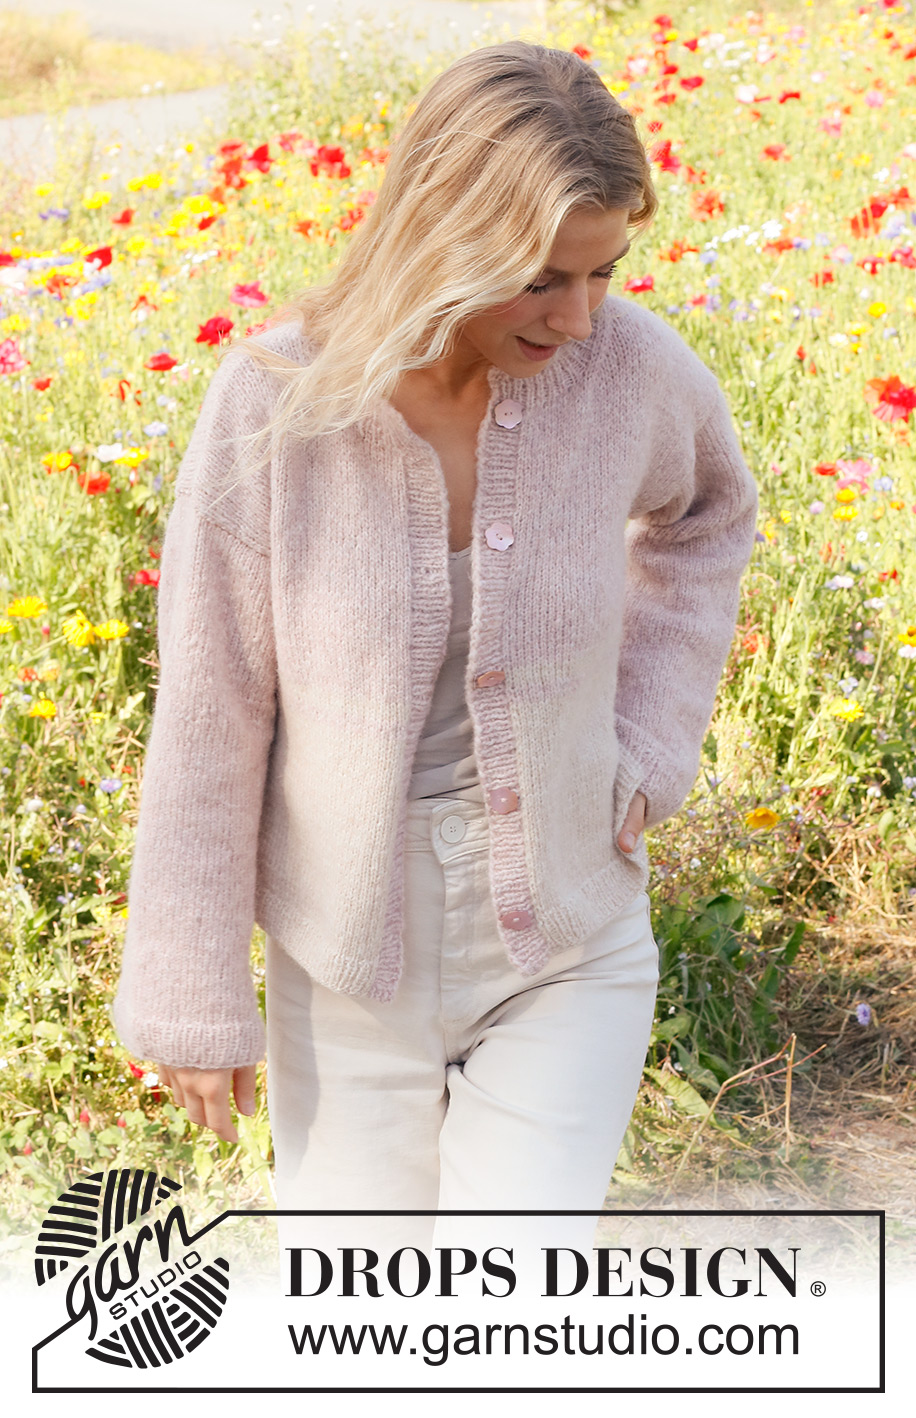
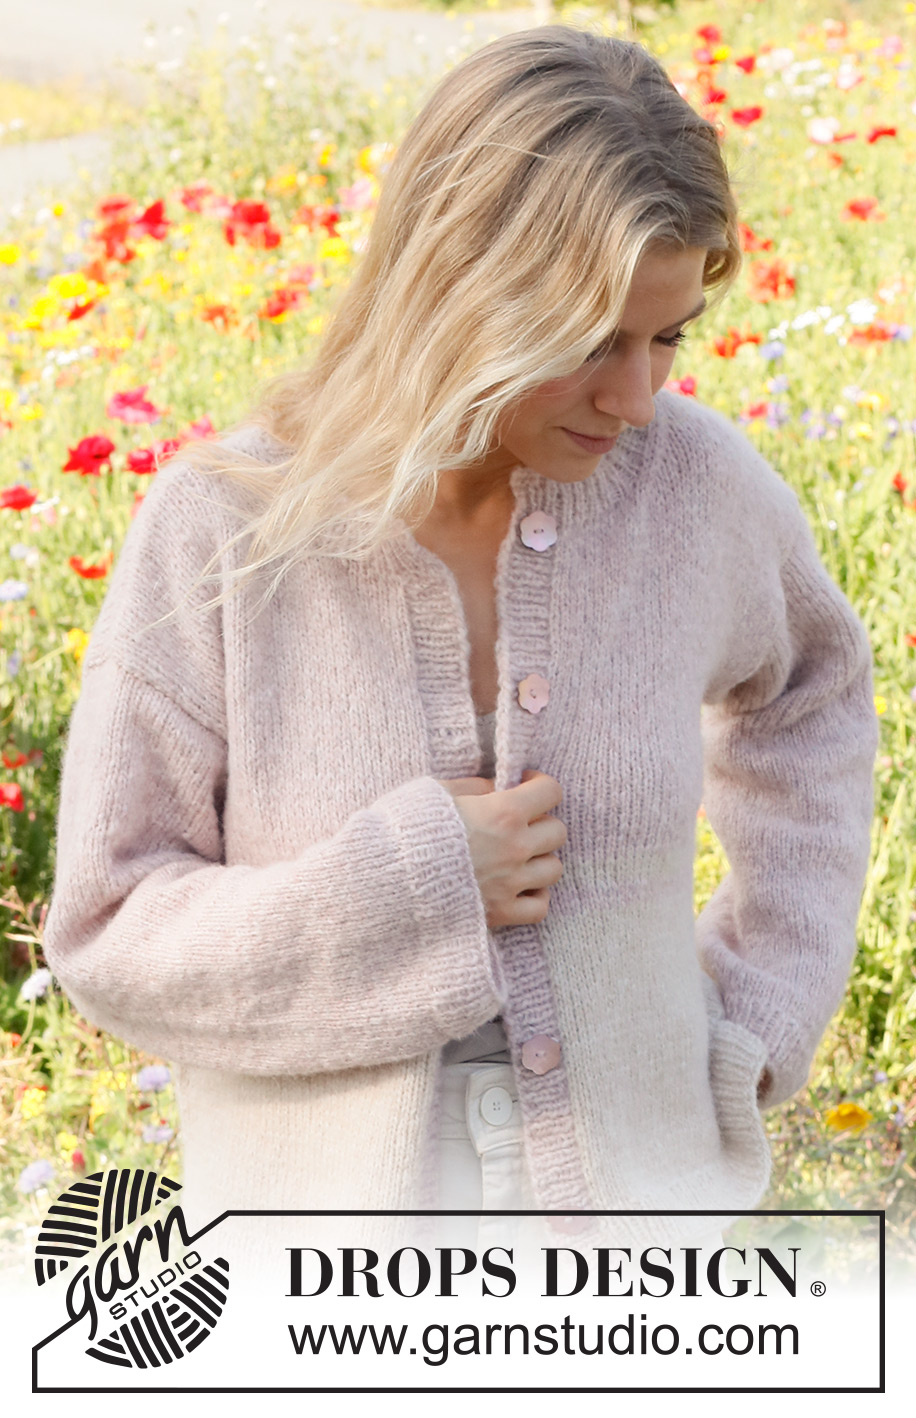
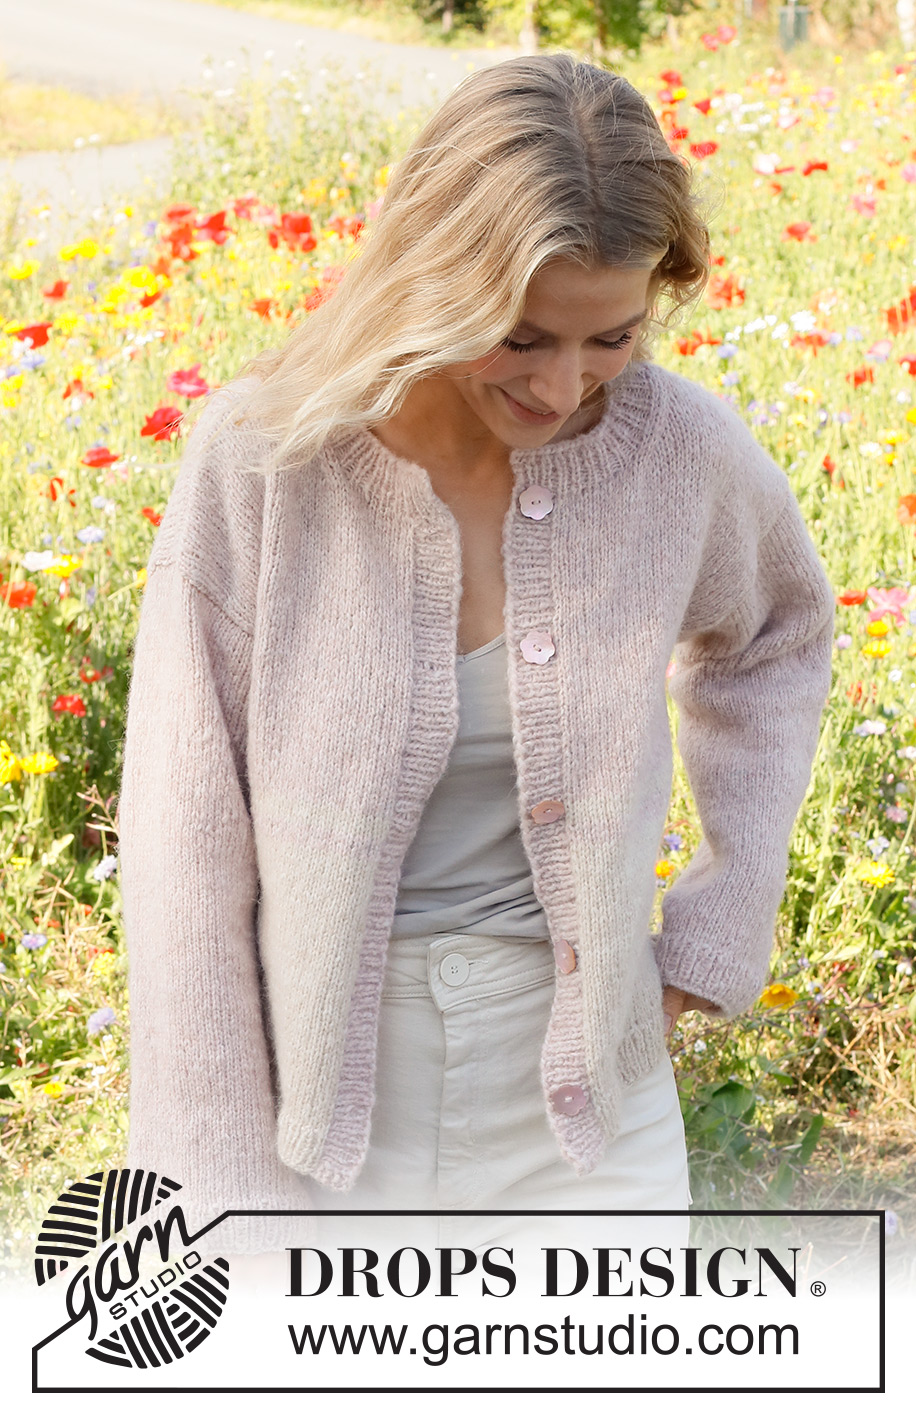
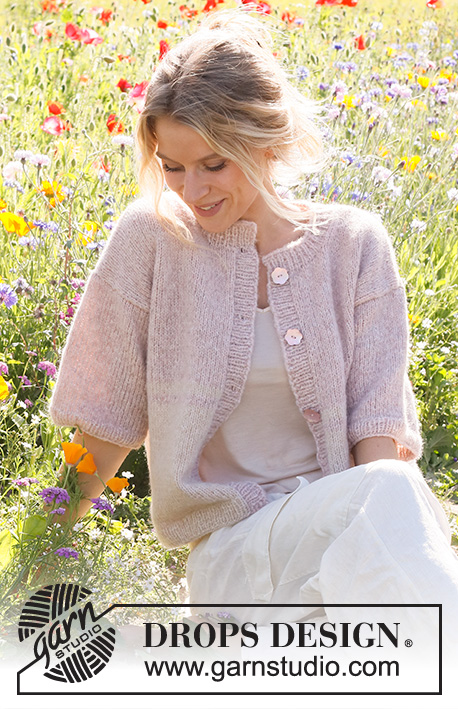
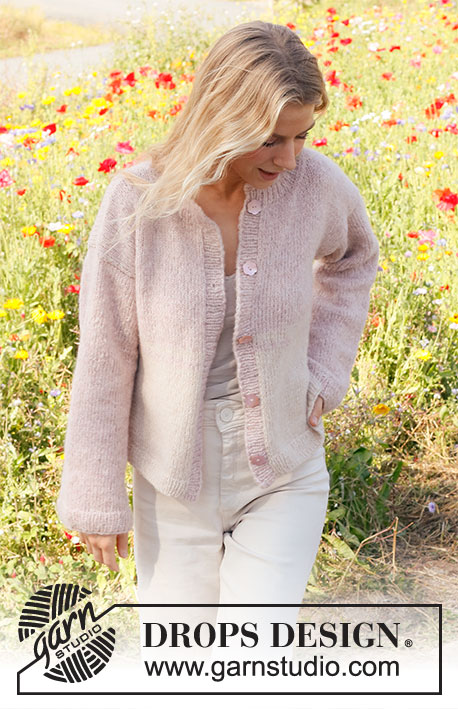
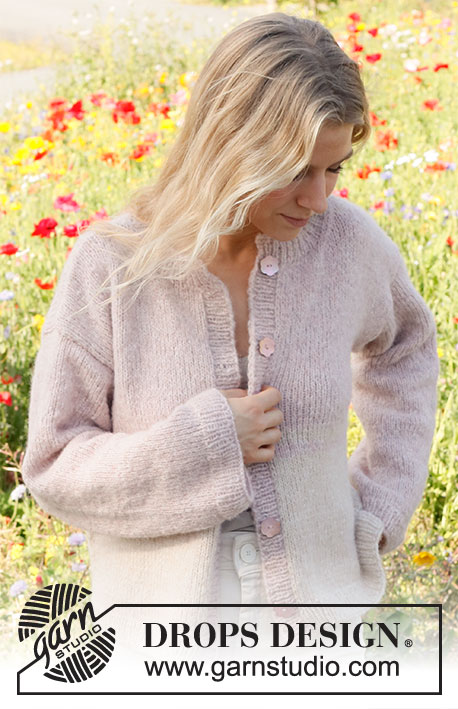
Dusky Rose Cardigan#duskyrosecardigan |
||||
 |
 |
|||
Knitted jacket in DROPS Air. The piece is worked bottom up with stripes. Sizes S - XXXL.
DROPS 232-33 |
||||
|
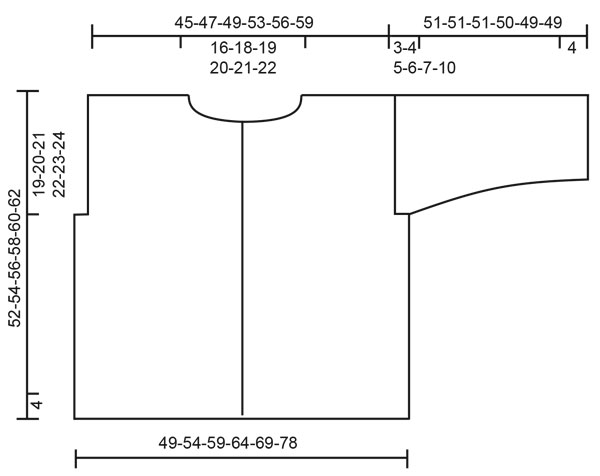
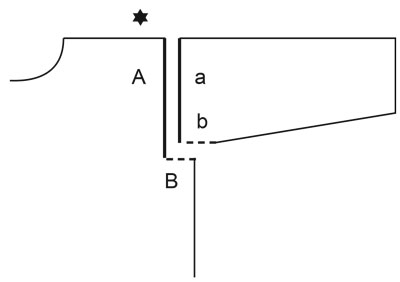
------------------------------------------------------- EXPLANATIONS FOR THE PATTERN: ------------------------------------------------------- RIDGE/GARTER STITCH (worked back and forth): Knit all rows. 1 ridge = knit 2 rows. INCREASE TIP (sleeves): Work until there are 2 stitches left before the marker, make 1 yarn over, knit 4 (the marker sits in the middle of these 4 stitches), 1 yarn over. On the next round knit the yarn overs twisted to avoid holes. Then work the new stitches in stockinette stitch. ------------------------------------------------------- START THE PIECE HERE: ------------------------------------------------------- JACKET - SHORT OVERVIEW OF THE PIECE: The back and front pieces are worked separately, back and forth and bottom up. The bands are worked on the front pieces. The sleeves are worked in the round with double pointed needles/short circular needle. The neck is worked to finish. BACK PIECE: Cast on 103-113-123-133-145-161 stitches with circular needle size 4 MM = US 6 and DROPS Air in color wheat. Knit 1 row from the wrong side. Then work rib from the right side as follows: 1 edge stitch in GARTER STITCH – read description above, * knit 1, purl 1 *, work from *-* until there are 2 stitches left, knit 1 and 1 edge stitch in garter stitch. When the rib measures 4 cm = 1½", change to circular needle size 5 MM = US 8. Work 1 row of stockinette stitch where you decrease 17-19-21-23-25-27 stitches evenly spaced = 86-94-102-110-120-134 stitches. Continue with stockinette stitch and 1 edge stitch in garter stitch on each side REMEMBER THE KNITTING GAUGE! When the piece measures 20-21-22-23-24-25 cm = 8"-8¼"-8¾"-9"-9½"-9¾", work 4 rows with color pink sand, 4 rows with color wheat, then finish the piece with color pink sand. When the piece measures 33-34-35-36-37-38 cm = 13"-13⅜"-13¾"-14¼"-14½"-15" bind off 5-7-9-10-12-17 stitches at the beginning of the next 2 rows for the armholes = 76-80-84-90-96-100 stitches. When the piece measures 48-50-52-54-56-58 cm = 19"-19¾"-20½"-21¼"-22"-22¾", bind off the middle 26-28-30-32-34-36 stitches for the neck and finish each shoulder separately. Bind off 1 stitch on the next row from the neck = 24-25-26-28-30-31 stitches on the shoulder. Bind off when the piece measures 52-54-56-58-60-62 cm = 20½"-21¼"-22"-22¾"-23⅝"-24⅜". Work the other shoulder in the same way. LEFT FRONT PIECE: Cast on 54-58-62-68-74-82 stitches with circular needle size 4 MM = US 6 and DROPS Air in color wheat. Knit 1 row from the wrong side. Then work rib from the right side as follows: 1 edge stitch in garter stitch, * purl 1, knit 1 *, work from *-* until there is 1 stitch left and 1 edge stitch in garter stitch. When the rib measures 4 cm = 1½", change to circular needle size 5 MM = US 8. Work 1 row of stockinette stitch where you decrease 10-10-10-12-13-14 stitches evenly spaced = 44-48-52-56-61-68 stitches. Continue with stockinette stitch and 1 edge stitch in garter stitch on each side. When the piece measures 20-21-22-23-24-25 cm = 8"-8¼"-8¾"-9"-9½"-9¾", work 4 rows with color pink sand, 4 rows with color wheat, then finish the piece with color pink sand. When the piece measures 33-34-35-36-37-38 cm = 13"-13⅜"-13¾"-14¼"-14½"-15" bind off 5-7-9-10-12-17 stitches at the beginning of the next row from the right side for the armhole = 39-41-43-46-49-51 stitches. When the piece measures 46-48-49-51-52-54 cm = 18"-19"-19¼"-20"-20½"-21¼", place the first 9-10-11-12-13-14 stitches towards mid-front on a thread for the neck (work them first). On each row from the right side decrease as follows for the neck: Work until there are 4 stitches left, knit 2 together, knit 1 and 1 edge stitch in garter stitch. Decrease like this a total of 6 times = 24-25-26-28-30-31 stitches on the shoulder. Bind off when the piece measures 52-54-56-58-60-62 cm = 20½"-21¼"-22"-22¾"-23⅝"-24⅜". LEFT BAND: Knit up from the right side 94 to 110 stitches with color pink sand and circular needle size 4 MM = US 6, inside the 1 edge stitch and down the left front piece (number of stitches should be divisible by 2). Work as follows from the bottom and wrong side: 2 edge stitches in garter stitch, * purl 1, knit 1 *, work from *-* until there are 2 stitches left, purl 1 and 1 edge stitch in garter stitch. Continue this rib back and forth for 4 cm = 1½". Bind off. RIGHT FRONT PIECE: Cast on 54-58-62-68-74-82 stitches with circular needle size 4 MM = US 6 and color wheat. Knit 1 row from the wrong side. Then work rib from the right side as follows: 1 edge stitch in garter stitch, * knit 1, purl 1 *, work from *-* until there is 1 stitch left and 1 edge stitch in garter stitch. When the rib measures 4 cm = 1½", change to circular needle size 5 MM = US 8. Work 1 row of stockinette stitch where you decrease 10-10-10-12-13-14 stitches evenly spaced = 44-48-52-56-61-68 stitches. Continue with stockinette stitch and 1 edge stitch in garter stitch on each side. When the piece measures 20-21-22-23-24-25 cm = 8"-8¼"-8¾"-9"-9½"-9¾", work 4 rows with color pink sand, 4 rows with color wheat, then finish the piece with color pink sand. When the piece measures 33-34-35-36-37-38 cm = 13"-13⅜"-13¾"-14¼"-14½"-15" bind off 5-7-9-10-12-17 stitches at the beginning of the next row from the wrong side for the armhole = 39-41-43-46-49-51 stitches. When the piece measures 46-48-49-51-52-54 cm = 18"-19"-19¼"-20"-20½"-21¼", place the first 9-10-11-12-13-14 stitches towards mid-front on a thread for the neck (work them first). On each row from the right side decrease as follows for the neck: Work 1 edge stitch in garter stitch, slip 1 stitch as if to knit, knit 1 and pass the slipped stitch over the knitted stitch, work to the end of the row. Decrease like this a total of 6 times = 24-25-26-28-30-31 stitches on the shoulder. Bind off when the piece measures 52-54-56-58-60-62 cm = 20½"-21¼"-22"-22¾"-23⅝"-24⅜". RIGHT BAND: Knit up from the right side 94 to 110 stitches with color pink sand and circular needle size 4 MM = US 6, inside the 1 edge stitch and up the right front piece (number of stitches should be divisible by 2). Work as follows from the top and wrong side: 1 edge stitch in garter stitch, * purl 1, knit 1 *, work from *-* until there are 3 stitches left, purl 1 and 2 edge stitches in garter stitch. Continue this rib back and forth for 2 cm = ¾". Now work 5-5-5-6-6-6 buttonholes evenly along the band. The bottom buttonhole is positioned 6 cm = 2⅜" up from the bottom edge and the top buttonhole just below the top edge. Work the buttonholes by making 1 yarn over and working 2 stitches together. Continue the rib for another 2 cm = ¾", then bind off. SLEEVES: Cast on 64-66-68-70-72-74 stitches with double pointed needles/short circular needle size 4 MM = US 6 and color pink sand. Knit 1 round then work rib in the round (knit 1, purl 1) for 4 cm = 1½". Change to double pointed needles/short circular needle size 5 MM = US 8 and continue with stockinette stitch. Work 1 round where you decrease 6 stitches evenly spaced = 58-60-62-64-66-68 stitches. Insert 1 marker at the beginning of the round = mid-under sleeve. When the sleeve measures 32-30-28-26-24-22 cm = 12½"-11¾"-11"-10¼"-9½"-8¾", increase 1 stitch on each side of the marker – read INCREASE TIP. Increase like this every 4-3½-3-3-2½-2 cm = 1½"-1¼"-1⅛"-1⅛"-1"-¾" a total of 4-5-6-6-7-8 times = 66-70-74-76-80-84 stitches. When the sleeve measures 48-47-46-44-42-39 cm = 19"-18½"-18"-17¼"-16½"-15¼", work the sleeve cap back and forth from mid-under the sleeve for 3-4-5-6-7-10 cm = 1⅛"-1½"-2"-2⅜"-2¾"-4". Bind off. Work the other sleeve in the same way. ASSEMBLY: Sew the shoulder seams. Sew the sleeve cap to the armhole, then the split to the bottom of the armhole – see sketch. Sew the side seams. NECK: Knit up 77 to 99 stitches around the neck, with circular needle size 4 MM = US 6 and color pink sand (including over the bands and the stitches from the threads); the number of stitches should be divisible by 2 + 1. Work as follows from the wrong side: 1 edge stitch in garter stitch, purl 1, * knit 1, purl 1 *, work from *-* until there is 1 stitch left, work 1 edge stitch in garter stitch. Work this rib back and forth for 4 cm = 1½". Loosely bind off with knit. ASSEMBLY-2: Sew the buttons onto the left band. |
||||
Diagram explanations |
||||
|
||||
 |
||||
 |
||||
Have you finished this pattern?Tag your pictures with #dropspattern #duskyrosecardigan or submit them to the #dropsfan gallery. Do you need help with this pattern?You'll find 32 tutorial videos, a Comments/Questions area and more by visiting the pattern on garnstudio.com. © 1982-2026 DROPS Design A/S. We reserve all rights. This document, including all its sub-sections, has copyrights. Read more about what you can do with our patterns at the bottom of each pattern on our site. |
||||


With over 40 years in knitting and crochet design, DROPS Design offers one of the most extensive collections of free patterns on the internet - translated to 17 languages. As of today we count 324 catalogs and 12290 patterns - 12280 of which are translated into English (US/in).
We work hard to bring you the best knitting and crochet have to offer, inspiration and advice as well as great quality yarns at incredible prices! Would you like to use our patterns for other than personal use? You can read what you are allowed to do in the Copyright text at the bottom of all our patterns. Happy crafting!
Post a comment to pattern DROPS 232-33
We would love to hear what you have to say about this pattern!
If you want to leave a question, please make sure you select the correct category in the form below, to speed up the answering process. Required fields are marked *.