
Popular categories
Looking for a yarn?


Comments / Questions (81)
![]() Malin wrote:
Malin wrote:
Hej, Hur ska man göra om man vill sticka med endast rundsticka? Börjar man med magic loop? Hur gör man när mönstret går över till strumpstickor?
01.09.2025 - 10:03DROPS Design answered:
Hej Malin. Om du vill sticka med magic loop så behöver du bara en lång rundsticka, se gärna denna video. Mvh DROPS Design
03.09.2025 - 07:06
![]() Birgitte wrote:
Birgitte wrote:
Der er IKKE et print-symbol, når jeg åbner opskriften på computeren. Men på telefonen er der. På computeren kan man trykke "ctrl p" - så kan man udskrive opskriften :-)
27.08.2025 - 09:01
![]() Birgitte wrote:
Birgitte wrote:
Print - der er altså ikke noget billede af en printer ved denne opskrift
26.08.2025 - 15:56DROPS Design answered:
Hej. Jo rett vid sidan av där det står "Chilly Day Balaclava". Mvh DROPS Design
27.08.2025 - 08:44
![]() Birgitte wrote:
Birgitte wrote:
Er der ingen knap til "udskriv opskrift"??
24.08.2025 - 09:16DROPS Design answered:
Hej Birgitte. Øverst til højre på opskriften er der et billede af en lille printer, tryk på den for at udskriv opskrift. Mvh DROPS Design
26.08.2025 - 12:07
![]() Birgitte wrote:
Birgitte wrote:
Jeg kan ikke finde "download" knappen til denne opskrift???
19.08.2025 - 12:26
![]() Tina wrote:
Tina wrote:
Afslutning af huen. Når alle masker fra strømpepinde er brugt , er mit midterstykke længere end siderne på toppen af huen? Prøvet flere gange , er det mig der fejler?
16.08.2025 - 23:30DROPS Design answered:
Hei Tina. Hvilken str. strikker du? Når du er ferdig å strikke alle maskene i sidene, skal du ha det samme maskeantallet i midt partiet som du startet med og nå skal det strikkes opp masker rundt luens åpning. Altså, kun maskene i hver side som "forsvinner". mvh DROPS Design
15.09.2025 - 12:43
![]() Prodache wrote:
Prodache wrote:
Prodache
24.05.2025 - 23:16
![]() Suzan Kornelisse wrote:
Suzan Kornelisse wrote:
Is the mentioned tension done on 5mm or 4mm needles?
24.05.2025 - 20:09DROPS Design answered:
Dear Suzan, the 4mm needles are only used for the rib sections, so you calculate the gauge for the main pattern, which is worked with the 5mm needles. That is, to make the swatch, you need to use the 5mm needles. Happy knitting!
25.05.2025 - 13:16
![]() Annette wrote:
Annette wrote:
Bonjour, je ne sais pas par où commencer, quand je coupe mon fil. Par quelle aiguille commencer. Comment faire si je n ai plus de fil? Merci pour vos explications
12.02.2025 - 15:34DROPS Design answered:
Bonjour Annette, vous avez placé les mailles de chaque côté de la cagoule en attente et il vous reste sur l'aiguille les 12-18 mailles centrales? Le rang commence sur l'endroit par la 1ère de ces 12-18 mailles que vous tricotez comme avant jusqu'à ce qu'il reste 1 maille, vous tricotez cette maille ensuite avec la 1ère des mailles en attente de ce côté, tournez et tricotez le rang sur l'envers jusqu'à ce qu'il reste 1 m puis tricotez cette maille avec la 1ère des mailles en attente de l'autre côté. Continuez ainsi jusqu'à ce que toutes les mailles en attente de chaque côté ont été tricotées avec celles du milieu. Bon tricot!
12.02.2025 - 16:23
![]() Bente Hansen wrote:
Bente Hansen wrote:
Kan jeg få opskriften på mail
10.02.2025 - 12:19DROPS Design answered:
Hej Bente, den ligger helt gratis her på vores hjemmeside og du er velkommen til at skrive den ud eller sende den videre pr mail :)
12.02.2025 - 11:37
|
|
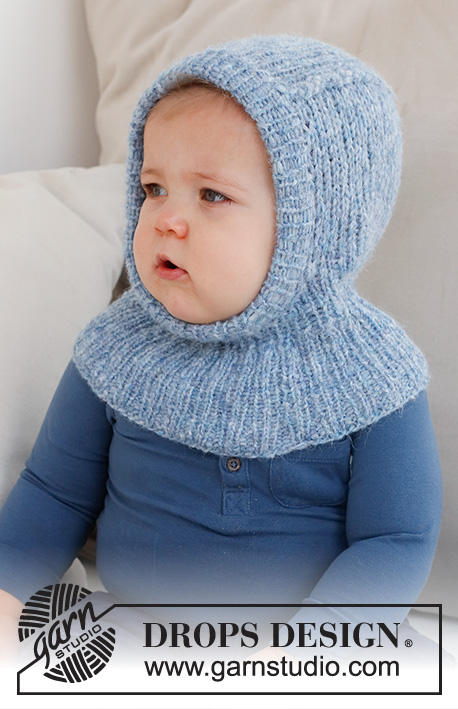
Chilly Day Balaclava#chillydaybalaclava |
|
 |
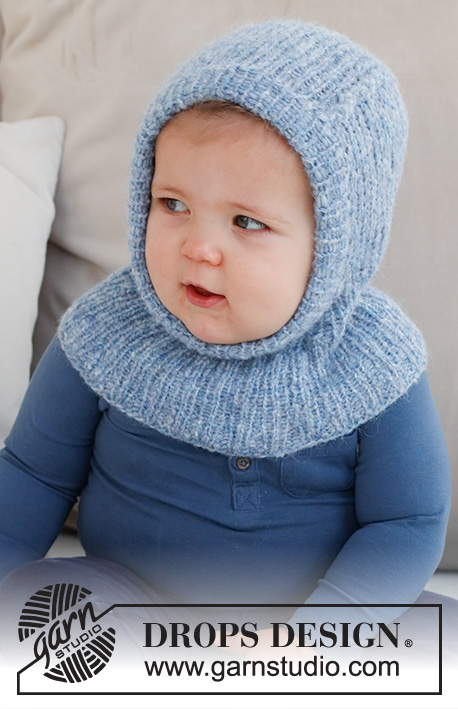 |
Knitted hat / balaclava for baby and children in DROPS Air. Piece is knitted in rib. Size 0 - 4 years
DROPS Baby 42-20 |
|
|
---------------------------------------------------------- EXPLANATION FOR THE PATTERN: ---------------------------------------------------------- GARTER STITCH (back and forth): Knit all rows. 1 ridge vertically = knit 2 rows. INCREASE TIP: All increases are done from the right side. Increase 1 stitch by making a yarn over. On next row purl yarn over twisted to avoid hole. DECREASE TIP: All decreases are done from the right side! WORK 2 STITCHES TOGETHER AT THE BEGINNING OF ROW AS FOLLOWS: Slip 1 stitch knitwise, knit 1, pass slipped stitch over stitch worked (= 1 stitch decreased). WORK 2 STITCHES TOGETHER AT THE END OF ROW AS FOLLOWS: Knit 2 together. ---------------------------------------------------------- START THE PIECE HERE: ---------------------------------------------------------- HAT - SHORT SUMMARY OF GARMENT: Worked in the round on circular needle, bottom up. Decrease stitches mid front and continue piece back and forth. Finish with a double edge around the opening for face. HAT: Cast on 88-96-104-108 (124-128) stitches on circular needle size 4 MM = US 6 with DROPS Air. Knit 1 round. Then work rib (purl 2/knit 2) for 2-2-3-3 (4-4) cm = ¾"-¾"-1⅛"-1⅛" (1½"-1½"). On next round work all 2 purl together into 1 purl stitch = 66-72-78-81 (93-96) stitches. Continue rib with purl 1/knit 2. When piece measures 6-6-7-8 (10-12) cm = 2⅜"-2⅜"-2¾"-3⅛" (4"-4¾") from cast-on edge, work all 2 knit together into 1 knit stitch = 44-48-52-54 (62-64) stitches. Switch to double pointed needles size 4 MM = US 6. Continue rib with purl 1/knit 1. When piece measures 8-8-9-10 (12-14) cm = 3⅛"-3⅛"-3½"-4" (4¾"-5½") from cast-on edge, switch to circular needle size 5 MM = US 8 and work back and forth as follows: Bind off the first 6-6-6-8 (10-10) stitches, work 1 edge stitch in GARTER STITCH – read explanation above, knit 17-19-21-21 (24-25), make 1 yarn over, knit 1, insert 1 marker around needle (mid back), knit 1, make a yarn over, knit 17-19-21-21 (24-25) and 1 edge stitch in garter stitch = 40-44-48-48 (54-56) stitches. Continue piece in stockinette stitch back and forth with 1 edge stitch in garter stitch in each side (on next row work yarn overs twisted). AT THE SAME TIME on next row from right side decrease stitches on each side of opening mid front and increase stitches mid back as follows: Work 1 edge stitch in garter stitch, work 2 stitches together (= 1 stitch decreased) - read DECREASE TIP, work until 1 stitch remains before marker mid back, increase 1 stitch - read INCREASE TIP, knit 2, increase 1 stitch, work until 3 stitches remain on needle, work 2 stitches together (= 1 stitch decreased) and finish with 1 edge stitch in garter stitch. Decrease like this in each side mid front on every row from right side 3 times in total. Increase like this on each side of marker on every row from right side 7-7-7-7 (7-8) times in total (in addition to increase done when binding off stitches mid front). REMEMBER THE KNITTING GAUGE! When all increases and decreases are done, there are 48-52-56-56 (62-66) stitches on row. Continue in stockinette stitch with 1 edge stitch in garter stitch in each side. When piece measures 10-10-11-11 (11-12) cm = 4"-4"-4⅜"-4⅜" (4⅜"-4¾") from where stitches were bind off mid front, slip the outermost 18-19-21-20 (22-24) stitches in each side on separate double pointed needle size 5 MM = US 8, i.e. 12-14-14-16 (18-18) stitches on circular needle. Cut the yarn. Stitches from double pointed needle in each side should be worked together with the outermost stitch in each side on circular needle at the end of every row as follows: FROM RIGHT SIDE: Knit until 1 stitch remains on needle, slip last stitch knitwise, knit 1 from pointed needle and pass slipped stitch from circular needle on to stitch worked (= 1 stitch decreased double pointed needle). Turn piece. FROM WRONG SIDE: Purl 1 twisted (i.e. work in back loop of stitch), purl until 1 stitch remain on circular needle, slip 1 stitch purlwise, purl 1 from double pointed needle and pass the slipped stitch over stitch worked. Turn piece. Work and decrease like this until all stitches from double pointed needles in each side have been decreased. There are 12-14-14-16 (18-18) stitches on circular piece and no stitches on double pointed needles in the side. Now work an edge around the opening as follows: DOUBLE EDGE: Pick up approx. 52 to 68 stitches (including stitches from circular needle) inside 1 edge stitch on double pointed needles size 4 MM = US 6. Adjust so that number of stitches is divisible by 2 and to avoid a tight/loose edge. Work rib (knit 1/purl 1) for 5 cm = 2". Bind off with circular needle size 5 MM = US 8. Fold the edge double towards inside of hat and fasten bind-off edge to where stitches were picked up around the opening for face. To avoid a tight edge that sticks out it is important to keep the seam elastic. |
|
Have you finished this pattern?Tag your pictures with #dropspattern #chillydaybalaclava or submit them to the #dropsfan gallery. Do you need help with this pattern?You'll find 21 tutorial videos, a Comments/Questions area and more by visiting the pattern on garnstudio.com. © 1982-2026 DROPS Design A/S. We reserve all rights. This document, including all its sub-sections, has copyrights. Read more about what you can do with our patterns at the bottom of each pattern on our site. |
|


With over 40 years in knitting and crochet design, DROPS Design offers one of the most extensive collections of free patterns on the internet - translated to 17 languages. As of today we count 324 catalogs and 12290 patterns - 12280 of which are translated into English (US/in).
We work hard to bring you the best knitting and crochet have to offer, inspiration and advice as well as great quality yarns at incredible prices! Would you like to use our patterns for other than personal use? You can read what you are allowed to do in the Copyright text at the bottom of all our patterns. Happy crafting!
Post a comment to pattern DROPS Baby 42-20
We would love to hear what you have to say about this pattern!
If you want to leave a question, please make sure you select the correct category in the form below, to speed up the answering process. Required fields are marked *.