
Popular categories
Looking for a yarn?


Comments / Questions (34)
![]() Marithe wrote:
Marithe wrote:
Jag stickar mönster nr 40-21 en barnkofta. Får inte det att stämma med mönstret på varv 1. 1. Skall det vara mönster mitt bak? 2. Skall det vara mönster uppe på sadelärmen? Det ser inte ut så på bilden, men verkar vara så på mönsterbeskrivningen.
08.09.2022 - 22:56DROPS Design answered:
Hei Marithe. Ja, det er mønster bak (der strikkes det A.1, A.2 og A.3), og nei, ingen mønster på sadelskulderene (kun glattstrikk som det står i oppskriften). mvh DROPS Design
12.09.2022 - 08:10
![]() Christine wrote:
Christine wrote:
Hi, regarding yoke increases, could you please explain further where the 4 markers are moved to? I am thinking markers are already in the outermost stitch after finishing sleeve increases?
13.08.2022 - 10:40DROPS Design answered:
Dear Christine, this video shows you how to move the markers as you work: https://www.garnstudio.com/video.php?id=1581&lang=en. Happy knitting!
14.08.2022 - 21:02
![]() Julie wrote:
Julie wrote:
I am dividing for the body and sleeves for size 7/8, and am surprised that the sleeve stitches contain the stitches increased for the yoke. I thought these stitches belonged to the front and back sections. Thank you for your patterns. I really enjoy them!
11.08.2022 - 17:35DROPS Design answered:
Dear Julie, that's right, some of the stitches increased on front and back pieces will then belong to the sleeves when dividing piece. Happy knitting!
12.08.2022 - 09:41
![]() Barbara Wien wrote:
Barbara Wien wrote:
Nachtrag: ich meine damit, dass, wenn ich mehr Reihen für die angegebenen Reihen für die Sattelschulter benötige, soll ich dann die Zunahmen in jeder 3. oder 4. Reihe machen, damit ich auf die Länge (Gr. 158 9 cm) komme? LG Barbara Wien
28.05.2022 - 15:36DROPS Design answered:
Liebe Frau Wien, je nach dem Unterschied mit der Maschenprobe, können Sie auch auch versuchen, einfach nur die Passe bis zur gewünschten Länge (ohne weitere Zunahmen) zu stricken. Viel Spaß beim stricken!
30.05.2022 - 08:02
![]() Barbara Wien wrote:
Barbara Wien wrote:
Liebes Garnstudio-Team, ein großes Kompliment an Euch! ich stricke seit mehr als 60(!) Jahren und habe mich nie an ein Modell mit Sattelschulter gewagt. Jetzt habe ich meine erste Jacke für meine Enkeltochter nach Eurer Anleitung gestrickt, es ging ganz einfach, Vielen Dank dafür. Meine Frage ist: wie ist es wenn die Wolle dünner ist und man laut meiner Maschenprobe mehr Reihen in der Höhe benötigt? Könnt Ihr mir einen Tipp geben? Danke aus Wien.
28.05.2022 - 15:33DROPS Design answered:
Liebe Frau Wien, herzlichen Dank für Ihren Kommentar. Am besten versuchen Sie die Maschenprobe auch in der Höhe zu haben, sonnst sollen Sie so anpassen, daß Sie ab und zu extra Reihen dazu stricken, um diesen Unterschied auszugleichen. Diese Reihenanzahl hängt von Ihrer Maschenprobe ab.
30.05.2022 - 08:01
![]() Paulette wrote:
Paulette wrote:
I am beginning the sleeves of this pattern. Directions say to place stitches on needles then pick up the under the sleeve stitches. What confuses me is that the knitting is then supposed to start in the middle of the under the sleeve stitches. My yarn is at the end of these picked up stitches. How do I get back to the middle of them to follow the pattern directions?
28.04.2022 - 00:57DROPS Design answered:
Dear Paulette, just continue working in the round and add the marker thread in the middle of the new stitches knitted up mid under sleeve to mark the beginning of the rounds. Happy knitting!
28.04.2022 - 11:45
![]() CHATELAIN wrote:
CHATELAIN wrote:
Bonjour je souhaite réaliser le gilet Butterfly in Fall par le coton LOVE YOU 7. Est-ce possible ? Dans l'affirmatif, les explications sont-elles les mêmes ? Merci pour votre aide. Bonne journée
08.04.2022 - 12:06DROPS Design answered:
Bonjour Mme Chatelain, non car DROPS Loves You 7 est du groupe A, alors que ce modèle se tricote en DROPS Sky, groupe de fils B - utilisez notre convertisseur pour voir les alternatives possibles pour Sky - ou retrouvez tous les modèles de gilets à tricoter dans un fil du groupe A ici. Bon tricot!
08.04.2022 - 13:50
![]() COUDOR wrote:
COUDOR wrote:
Bonjour, OK jusqu aux augmentations manches incluses, par contre 1 fois les marqueurs déplacés j ai 44 m pour les manches et non 38 ? Que veut dire (+ entre 2m)? Merci pour votre réponse
24.02.2022 - 17:50DROPS Design answered:
Bonjour Mme Coudor, ce n'est pas "+" mais "plus" (négation) autrement dit les marqueurs doivent se trouver dans une mailles (avant ils étaient entre 2 mailles). En 9/10 ans, vous aviez 18 mailles pour l'épaule et vous avez augmenté pour les manches 10 fois 2 mailles = 18+20=38 mailles pour la manche (pas 44); déplacez vos marqueurs pour qu'ils soient maintenant dans la dernière maille du devant gauche et du dos et dans la 1ère maille du dos et du devant droit. Bon tricot!
24.02.2022 - 17:52
![]() Paulette Jones wrote:
Paulette Jones wrote:
Are the tutorial videos supposed to have sound? There is no sound.
01.02.2022 - 02:16DROPS Design answered:
Dear Mrs Jones, our videos do not have sound, we are an international company and not every one can understand every language of our website. Remember to read and follow the text/pattern which goes together with the video and feel free to ask any question here. Happy knitting!
01.02.2022 - 09:06
![]() Annette Almind Pedersen wrote:
Annette Almind Pedersen wrote:
Når man deler arbejdet til ryg og forstykker og ærmer skal det sættes 54 m på en tråd, men når jeg følger opskriften er der kun 40. Skal man bruge de overskydende m fra forstykkerne til ærmer?
25.01.2022 - 14:36DROPS Design answered:
Hej Annette, strikker du den største størrelse skal du have 281 masker på pinden, når du deler arbejdet op. De 54 masker du sætter på tråd i hver side af arbejdet er dem du strikker ærme af bagefter, de øvrige masker + de 8 i hver side bruger du til ryg & fortykke. God fornøjelse!
27.01.2022 - 10:43
|
||||||||||||||||||||||
Butterfly in Fall#butterflyinfallcardigan |
||||||||||||||||||||||
 |
 |
|||||||||||||||||||||
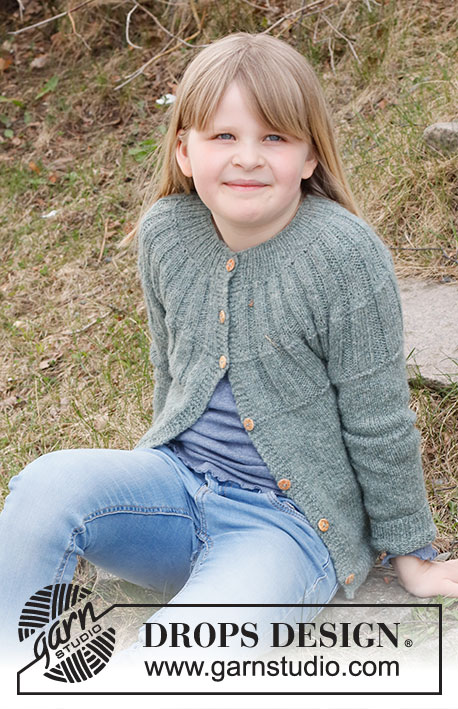
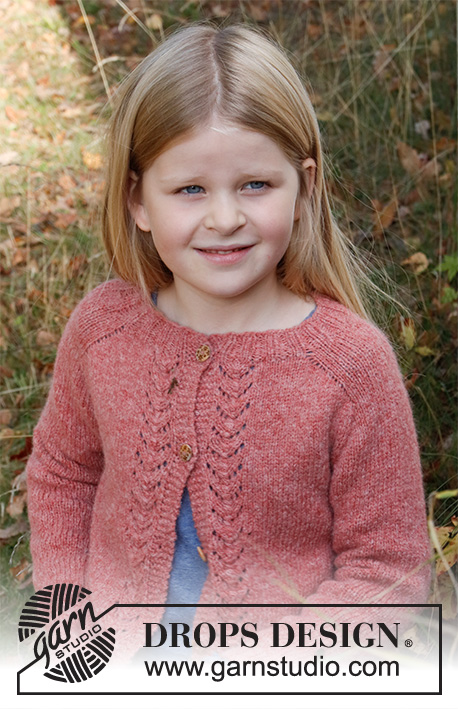
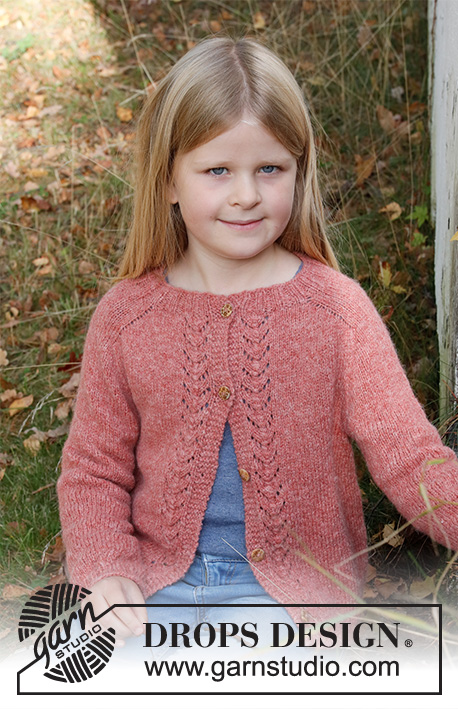
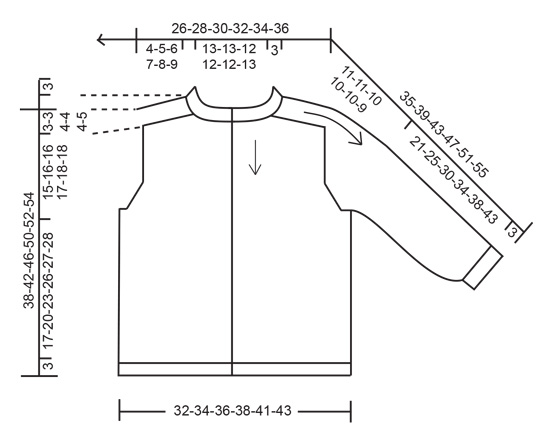
Knitted jacket for children in DROPS Sky. The piece is worked top down with lace pattern and saddle shoulders. Sizes 3 – 14 years.
DROPS Children 40-21 |
||||||||||||||||||||||
|
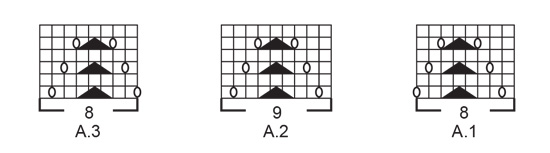
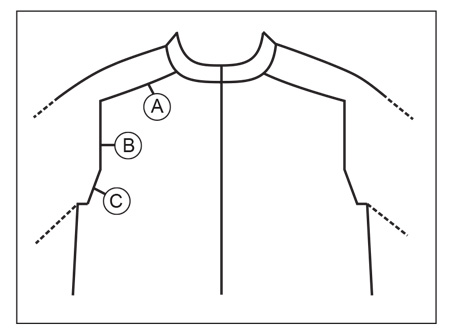
------------------------------------------------------- EXPLANATIONS FOR THE PATTERN: ------------------------------------------------------- RIDGE/GARTER STITCH (worked back and forth): Knit all rows. 1 ridge in height = Knit 2 rows. PATTERN: See diagrams A.1 to A.3. The diagrams show all rows in the pattern from the right side. INCREASE TIP-1 (evenly spaced): To work out how to increase evenly, count the total number of stitches on the needle (e.g. 88 stitches) minus bands (e.g. 10 stitches) and divide the remaining stitches by the number of increases to be made (e.g. 17) = 4.6. In this example, increase by making 1 yarn over after alternately each 4th and 5th stitch. Do not increase on the bands. On the next row work the yarn overs twisted to avoid holes. INCREASE TIP-2 (for saddle shoulders, sleeves and yoke from the RIGHT SIDE): BEFORE MARKER: The new stitch twists to the right. Use the left needle to pick up the strand between 2 stitches from the previous row, pick up the back strand and knit in the front loop. AFTER MARKER: The new stitch twists to the left. Use the left needle to pick up the strand between 2 stitches from the previous row, pick up the front strand and knit in the back loop. INCREASE TIP-3 (for saddle shoulders from the WRONG SIDE): BEFORE MARKER: The new stitch twists to the right. Use the left needle to pick up the strand between 2 stitches from the previous row, pick up the front strand and purl in the back loop. AFTER MARKER: The new stitch twists to the left. Use the left needle to pick up the strand between 2 stitches from the previous row, pick up the back strand and purl in the front loop. DECREASE TIP (for sleeves): Start 3 stitches before the marker thread, knit 2 together, knit 2 (marker thread sits between these 2 stitches), slip 1 stitch as if to knit, knit 1 and pass the slipped stitch over the knitted stitch (2 stitches decreased). BUTTONHOLES: Work buttonholes on the right band (when the garment is worn). Work from the right side when there are 3 stitches left on the row as follows: Make 1 yarn over, knit 2 together and knit 1. On the next row (wrong side), knit the yarn over to leave a hole. The first buttonhole is worked when the neck measures approx. 1½-2 cm = ½"-¾". Then work the other 4-5-5-6-6-6 buttonholes with approx. 7½-7-7½-7-7½-8 cm = 2⅞"-2¾"-2⅞"-2¾"-2⅞"-3⅛" between each one. BINDING-OFF TIP: To avoid the bind-off edge being tight you can bind off with a larger size needle. If the edge is still tight, make 1 yarn over after approx. each 6th stitch at the same time as binding off; the yarn overs are bind off as normal stitches. ------------------------------------------------------- START THE PIECE HERE: ------------------------------------------------------- JACKET – SHORT OVERVIEW OF THE PIECE: The neck and yoke are worked with circular needle, back and forth from mid front and top down. Stitches are increased for the saddle shoulders, then for the sleeves and finally for the yoke. The yoke is divided for the body and sleeves and the body continued back and forth with circular needle. The sleeves are worked in the round with double pointed needles, top down. NECK: Cast on 88-88-92-92-96-100 stitches (including 5 band stitches on each side towards mid front) with circular needle size 3 MM = US 2.5 and Sky. Purl 1 row (= wrong side). The next row is worked as follows from the right side: 5 band stitches in GARTER STITCH – read description above, * knit 2, purl 2 *, work from *-* until there are 7 stitches left, knit 2 and finish with 5 band stitches in garter stitch. Continue this rib for 3 cm = 1⅛" – remember the BUTTONHOLES on the right band – read description above. When the rib is finished, knit 1 row from the right side where you increase 17-21-21-25-21-21 stitches evenly spaced – read INCREASE TIP-1 = 105-109-113-117-117-121 stitches. Purl 1 row from the wrong side (yarn overs purled twisted and the 5 band stitches on each side are knitted). Now work the yoke as described below. YOKE: Change to circular needle size 4 MM = US 6. Insert 1 marker after the band at the beginning of the row; the yoke is measured from this marker! In addition insert 4 other markers, without working the stitches, as follows – each marker is inserted between 2 stitches, will be used when increasing for the saddle shoulders and should have a different color to the marker on the neck. Marker 1: Start mid-front, count 22-23-23-23-23-23 stitches (= front piece), insert the marker before the next stitch. Marker 2: Count 14-14-16-18-18-20 stitches from marker 1 (= shoulder), insert the marker before the next stitch. Marker 3: Count 33-35-35-35-35-35 stitches from marker 2 (= back piece), insert the marker before the next stitch. Marker 4: Count 14-14-16-18-18-20 stitches from marker 3 (= shoulder), insert the marker before the next stitch. There are 22-23-23-23-23-23 stitches left after marker 4 (= front piece). Allow these 4 markers to follow your work onwards. SADDLE-SHOULDER INCREASES: Read the whole section before continuing – on the first row you begin to work the pattern at the same time as starting to increase for the shoulders! PATTERN: The first row is worked as follows: 5 band stitches in garter stitch, work A.1 (= 8 stitches), work stockinette stitch until you have reached 4-5-5-5-5-5 stitches past marker 2, work A.1 (= 8 stitches), A.2 (= 9 stitches), A.3 (= 8 stitches), work stockinette stitch until there are 13 stitches left on the row, work A.3 (= 8 stitches) and finish with 5 band stitches in garter stitch. Continue this pattern – A.1, A.2 and A.3 are repeated in height. AT THE SAME TIME on the first row from the right side increase 4 stitches for the shoulders as follows: Increase BEFORE markers 1 and 3 and AFTER markers 2 and 4 – read INCREASE TIP-2. You are only increasing on the front and back pieces, the number of shoulder stitches remains the same. On the next row (wrong side) increase as follows: Increase BEFORE markers 4 and 2 and AFTER markers 3 and 1 – read INCREASE TIP-3. You increase on EVERY row, working differently on the right and wrong sides, so the stitches lie neatly. Continue the pattern and increase on every row (both on the right and wrong sides) a total of 12-14-16-20-22-26 times = 153-165-177-197-205-225 stitches. REMEMBER THE KNITTING GAUGE! After the last increase the piece measures approx. 4-5-6-7-8-9 cm = 1½"-2"-2⅜"-2¾"-3⅛"-3½" from the marker on the neck. Now increase for the sleeves as follows. SLEEVE INCREASES: Continue the lace pattern, stockinette stitch and 5 band stitches in garter stitch on each side. AT THE SAME TIME on the next row from the right side increase 4 stitches for the sleeves as follows: Increase AFTER markers 1 and 3 and BEFORE markers 2 and 4 – remember INCREASE TIP-2. You increase only on the sleeves and the number of stitches on the front and back pieces remains the same. Increase like this every 2nd row (each row from the right side) a total of 10-10-8-10-8-6 times = 193-205-209-237-237-249 stitches. The piece measures approx. 11-12-12-14-14-13 cm = 4⅜"-4¾"-4¾"-5½"-5½"-5⅛" from the marker on the neck. Now increase for the yoke as described below. YOKE INCREASES: Move the 4 markers so each marker sits in the outermost stitch on the front pieces and back piece. There are now 34-34-32-38-34-32 stitches between the marker-stitches on each sleeve. On the next row from the right side increase 8 stitches, by increasing both before and after all 4 marker-stitches – remember INCREASE TIP-2. You are now increasing on the front/back pieces and on the sleeves. Increase like this every 2nd row (each row from the right side) a total of 4-4-5-2-4-4 times = 225-237-249-253-269-281 stitches. When all the increases are finished, the piece measures approx. 14-15-15-16-17-16 cm = 5½"-6"-6"-6¼"-6¾"-6¼" from the marker on the neck. Continue working, without further increases, until the piece measures 15-16-16-17-18-18 cm = 6"-6¼"-6¼"-6¾"-7"-7" from the marker on the neck. Now divide for the body and sleeves as follows: Work the first 36-38-40-41-44-46 stitches as before (= front piece), place the next 46-48-50-50-52-54 stitches on a thread for the sleeve, cast on 6-6-6-8-8-8 stitches (= in side under sleeve), work 61-65-69-71-77-81 stitches (= back piece), place the next 46-48-50-50-52-54 stitches on a thread for the sleeve, cast on 6-6-6-8-8-8 stitches (= in side under sleeve), work the last 36-38-40-41-44-46 stitches (= front piece). The body and sleeves are finished separately. THE PIECE IS NOW MEASURED FROM HERE. BODY: = 145-153-161-169-181-189 stitches. Continue back and forth with lace pattern, stockinette stitch and 5 band stitches in garter stitch on each side until the piece measures 17-20-23-26-27-28 cm = 6¾"-8"-9"-10¼"-10⅝"-11" from the division. There is approx. 3 cm = 1⅛" left to finished length; try the jacket on and work to desired length. To avoid the ribbing being tight, work 1 row from the right side where you increase 31-31-35-35-39-39 stitches evenly spaced – remember INCREASE TIP-1 = 176-184-196-204-220-228 stitches. Change to circular needle size 3 MM = US 2.5. The next row is worked as follows from the wrong side: 5 band stitches in garter stitch, * purl 2, knit 2 *, work from *-* until there are 7 stitches left, purl 2 and 5 band stitches in garter stitch. Continue this rib for 3 cm = 1⅛". Bind off with garter stitch over garter stitch, knit over knit and purl over purl – read BINDING-OFF TIP! The jacket measures approx. 38-42-46-50-52-54 cm = 15"-16½"-18"-19¾"-20½"-21¼" from the shoulder down. SLEEVES: Place the 46-48-50-50-52-54 stitches from the thread on the one side of the piece on double pointed needles size 4 MM = US 6 and knit up 1 stitch in each of the 6-6-6-8-8-8 stitches cast on under the sleeve = 52-54-56-58-60-62 stitches. Insert a marker thread in the middle of the 6-6-6-8-8-8 new stitches under the sleeve. Start at the marker thread and work stockinette stitch in the round. When the sleeve measures 3 cm = 1⅛" from the division, decrease 2 stitches mid-under the sleeve – read DECREASE TIP. Decrease like this every 2½-3-3-3½-4-4 cm = 1"-1⅛"-1⅛"-1¼"-1½"-1½" a total of 4 times in all sizes = 44-46-48-50-52-54 stitches. Continue working without further decreases until the piece measures 21-25-30-34-38-43 cm = 8¼"-9¾"-11¾"-13⅜"-15"-17" from the division. There is approx. 3 cm = 1⅛" left to finished length; try the jacket on and work to desired length. Knit 1 round where you decrease 4-6-4-6-4-6 stitches evenly spaced = 40-40-44-44-48-48 stitches. Change to double pointed needles size 3 MM = US 2.5 and work rib (knit 2, purl 2) for 3 cm = 1⅛". Bind off with knit over knit and purl over purl – remember BINDING-OFF TIP! The sleeve measures approx. 24-28-33-37-41-46 cm = 9½"-11"-13"-14½"-16⅛"-18" from the division. Work the other sleeve in the same way. ASSEMBLY: Sew the buttons onto the left band. |
||||||||||||||||||||||
Diagram explanations |
||||||||||||||||||||||
|
||||||||||||||||||||||
 |
||||||||||||||||||||||
 |
||||||||||||||||||||||
 |
||||||||||||||||||||||
Have you finished this pattern?Tag your pictures with #dropspattern #butterflyinfallcardigan or submit them to the #dropsfan gallery. Do you need help with this pattern?You'll find 32 tutorial videos, a Comments/Questions area and more by visiting the pattern on garnstudio.com. © 1982-2026 DROPS Design A/S. We reserve all rights. This document, including all its sub-sections, has copyrights. Read more about what you can do with our patterns at the bottom of each pattern on our site. |
||||||||||||||||||||||


With over 40 years in knitting and crochet design, DROPS Design offers one of the most extensive collections of free patterns on the internet - translated to 17 languages. As of today we count 324 catalogs and 12290 patterns - 12280 of which are translated into English (US/in).
We work hard to bring you the best knitting and crochet have to offer, inspiration and advice as well as great quality yarns at incredible prices! Would you like to use our patterns for other than personal use? You can read what you are allowed to do in the Copyright text at the bottom of all our patterns. Happy crafting!
Post a comment to pattern DROPS Children 40-21
We would love to hear what you have to say about this pattern!
If you want to leave a question, please make sure you select the correct category in the form below, to speed up the answering process. Required fields are marked *.