
Popular categories
Looking for a yarn?


Comments / Questions (60)
![]() Gry Tone wrote:
Gry Tone wrote:
Er bredden på største størrelse 71 cm??
16.01.2025 - 14:38DROPS Design answered:
Hej Gry, ja det stemmer, så brystvidden/omkredsen er ca 142 cm i den største størrelse :)
16.01.2025 - 14:56
![]() Reidun Bakken Skodje wrote:
Reidun Bakken Skodje wrote:
Hei, på rad 11 i mønsteret får jeg for lite masker igjen på slutten av pinnen. Jeg skal ifølge mønsteret ha 9 masker igjen etter midterste vr-r-vr, men jeg har bare 5 . Hvorfor eller hva kan jeg gjøre her ?
15.12.2024 - 21:59DROPS Design answered:
Hej, sæt 1 mærke imellem hver rapport, så er du sikker på at du har fået alle indtagninger og omslag med og at du har samme antal masker i hver rapport :)
17.12.2024 - 13:56
![]() Loup wrote:
Loup wrote:
Comment proceder a l'assemblage des manches
23.11.2024 - 08:45DROPS Design answered:
Bonjour Mme Loup, placez les mailles des manches sur la même aiguille circulaire que le dos et les devants, au-dessus des 8 à 12 mailles rabattues pour les emmanchures à la fin du dos/des devants (cf aussi cette vidéoet tricotez l'empiècement, à la fin, fermez le trou sous les manches par une couture - cf cette vidéo. Bon tricot!
25.11.2024 - 07:59
![]() Marie-Hélène wrote:
Marie-Hélène wrote:
J'ai fait ce gilet couleur ZINC et j'ai pris beaucoup de plaisir à le faire. Le fil BELLE est très agréable a tricoter. Le motif rend très bien et je suis très contente car c'est mon premier gilet !
07.08.2024 - 12:07
![]() Reidun Bakken wrote:
Reidun Bakken wrote:
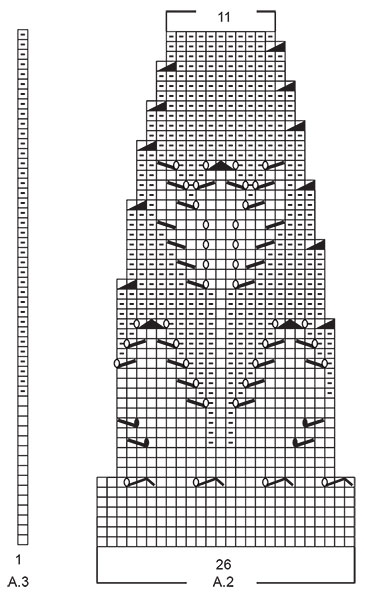
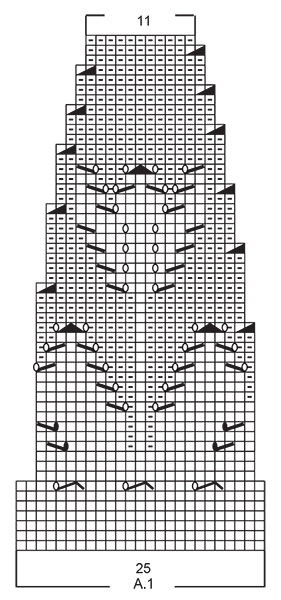
Hei, jeg har lest gjennom oppskriften, men skjønner ikke om jeg skal strikke alle 3 mønster rapportene eller om det A1 og A2 er ifht. størrelse ? "Når arbeidet måler 3-5-7-9-11-13 cm, strikkes det mønster i alle størrelser slik: 4 stolpemasker rille, A.1 (= 25 masker), A.2 til det gjenstår 5 masker på pinnen (= 10-11-12-13-14-15 rapporter à 26 masker), strikk A.3 (= 1 maske), 4 stolpemasker rille."
30.07.2024 - 10:00DROPS Design answered:
Hei Reidun, Du strikker alle 3 mønstrene. Først stolpen, A.1, deretter gjenta A.2 til det gjenstår 5 masker på pinnen, A.3 og stolpen. God fornøyelse!
31.07.2024 - 09:06
![]() DUVAL Marie-Thérèse wrote:
DUVAL Marie-Thérèse wrote:
Je voudrais faire ce modèle sur des aiguilles droites (je déteste les circulaires) en plusieurs parties, pour le dos et le devant, je compte 354 m/2 + 1 maille lisière pour les coutures, mais avec des poignets ajustés en commençant par les côtes, comment calculer le nombre de mailles à monter
25.07.2024 - 11:27DROPS Design answered:
Bonjour Marie-Thérèse, regardez la lecon DROPS sur ce sujet ICI. Bon tricot!
25.07.2024 - 13:11
![]() Karin wrote:
Karin wrote:
Guten Tag - Ich möchte gerne die Ärmel lang und nicht 3/4 machen in Grösse M - wie viele Maschen soll ich etwa anschlagen resp. nach dem Rippenmuster zunehmen? Die Zunahmen kann ich anschliessend schon selber berechnen, ich benötige nur eine Indikation! Dann hat es vermutlich einen kleinen Fehler: Beim Abschnitt „Passe“ steht im letzten Satz „zu“nehmen - aber es wird anschliessend abgenommen… Danke!
27.03.2024 - 12:22DROPS Design answered:
Liebe Karin, am besten helfen Sie sich von einem ähnlichen Modell mit der gewünschten Länge für die Ärmel. Viel Spaß beim stricken!
02.04.2024 - 11:35
![]() Maria wrote:
Maria wrote:
Já entendi, obrigada.
08.03.2023 - 23:05
![]() Maria wrote:
Maria wrote:
Ola, gostava de saber quando se começa a tricotar o diagrama. Não encontro o começo do mesmo nas instruções . Obrigada
08.03.2023 - 16:37DROPS Design answered:
Bom dia, O diagrama começa a tricotar-se no encaixe, depois de se tricotar o corpo e as mangas. (Este parágrafo está ao fundo da página). Quando a peça medir 3-5-7-9-11-13 cm, tricotar da seguinte maneira: 4 malhas de orla da frente em ponto jarreteira, A.1 (= 25 malhas), repetir A.2 até restarem 5 malhas (= 10-11-12-13-14-15 motivos de 26 malhas), A.3 (= 1 malha), 4 malhas de orla da frente em ponto jarreteira. Bons tricôs!
10.03.2023 - 10:42
![]() Katia Mendonça wrote:
Katia Mendonça wrote:
Estou fazendo o modelo 222-3 e estou na dúvida de quantos pontos tenho que colocar 278 malhas ou 338 tamanho M
15.02.2023 - 01:27DROPS Design answered:
Bom dia, Deve colocar 278 malhas. Bons tricôs!
17.02.2023 - 10:03
|
||||||||||||||||||||||||||||
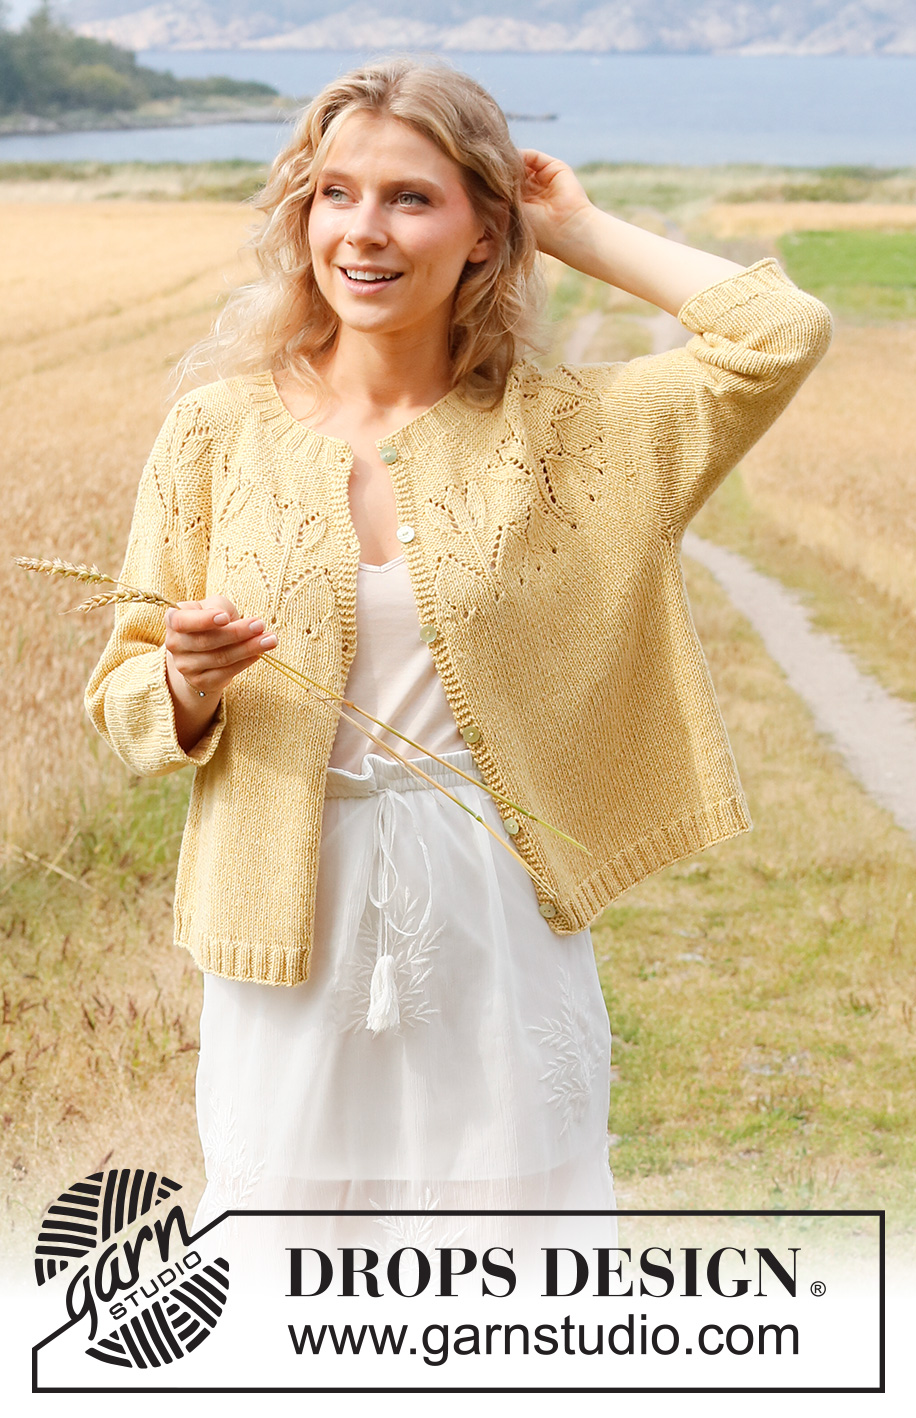
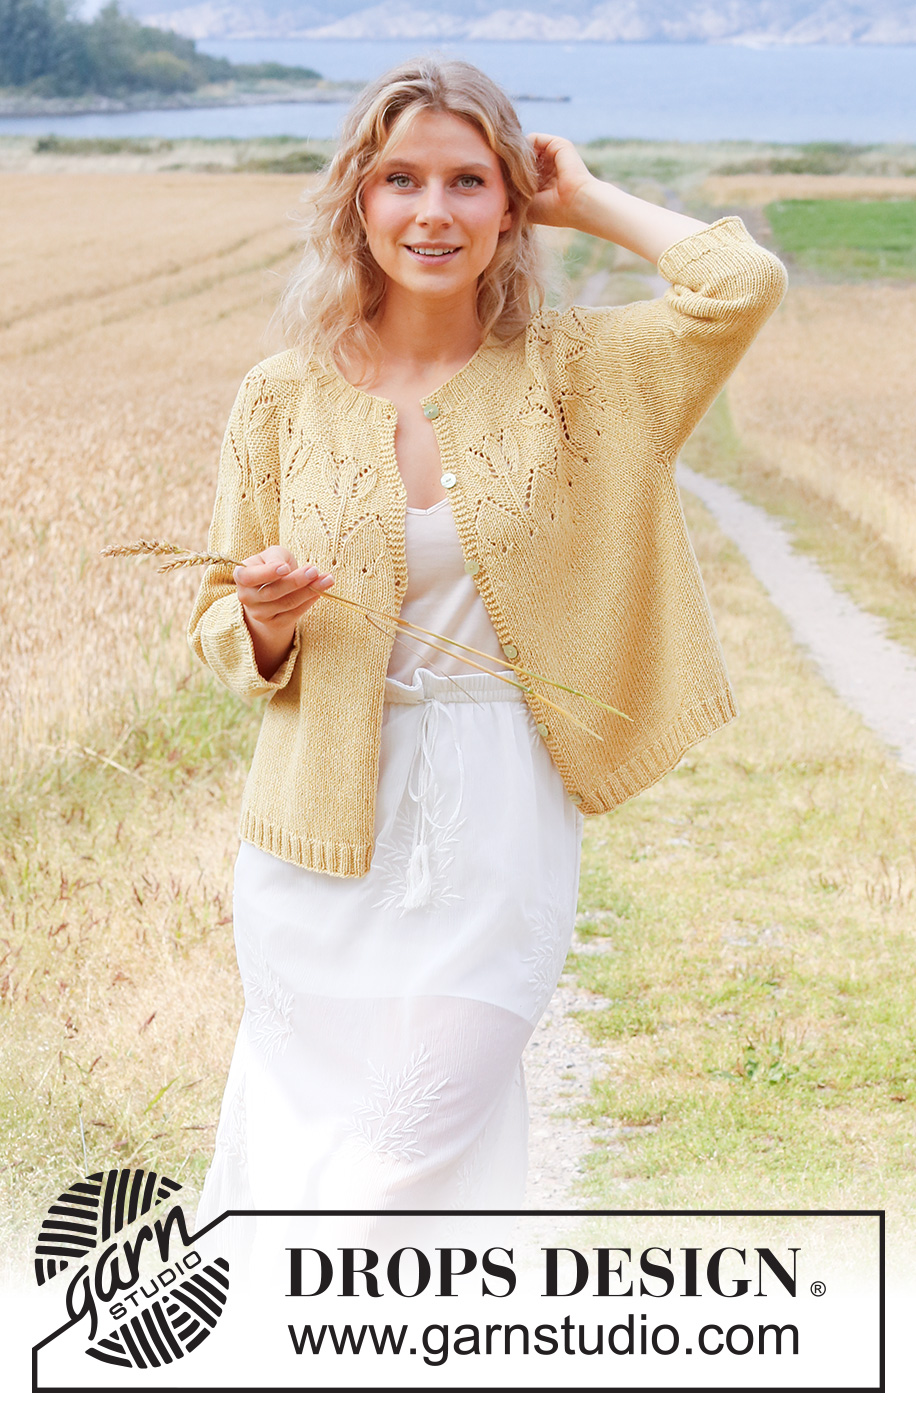
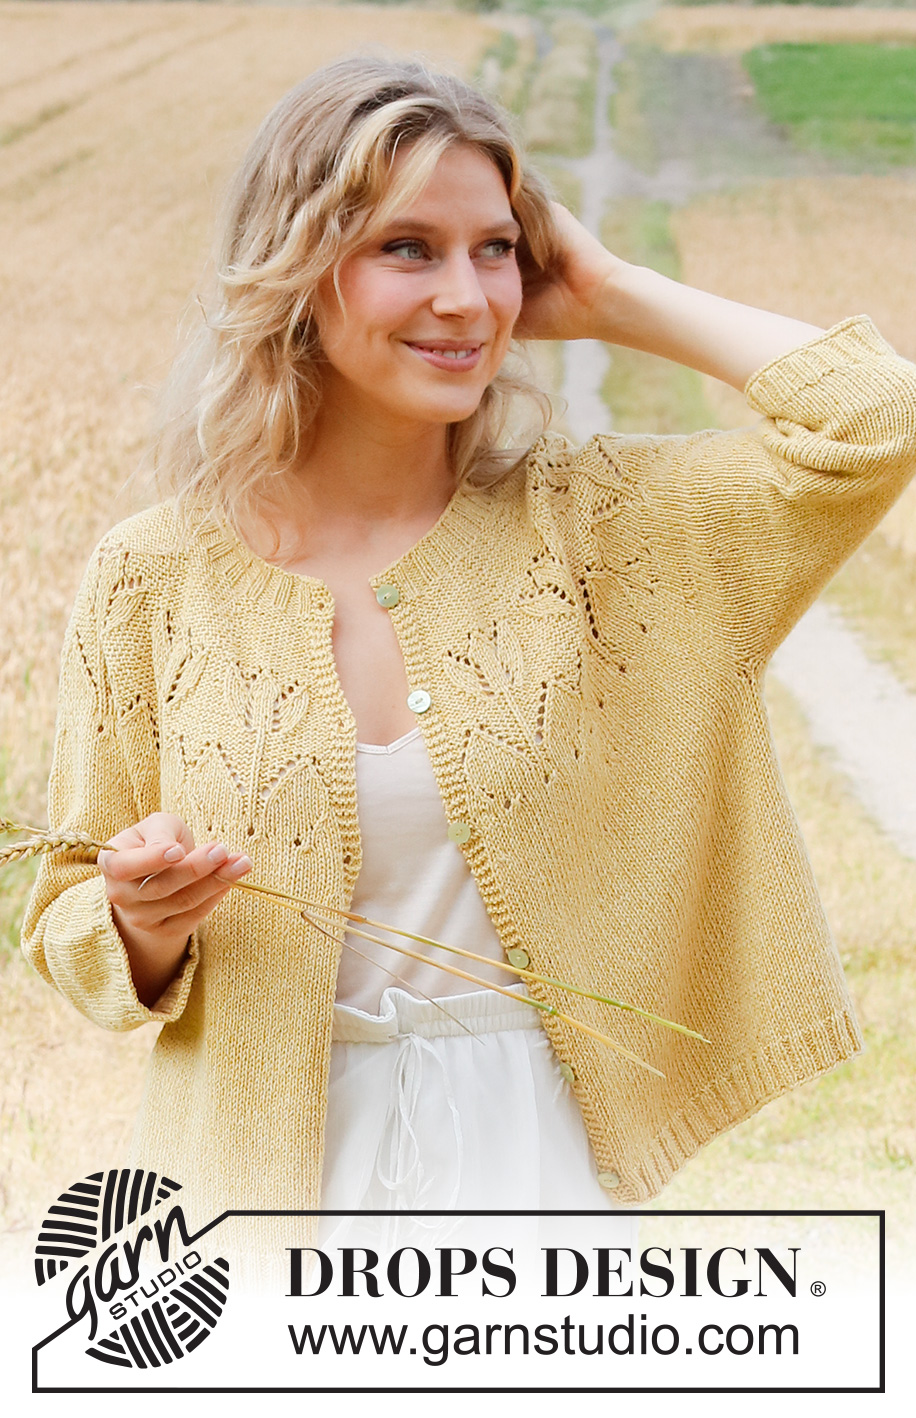
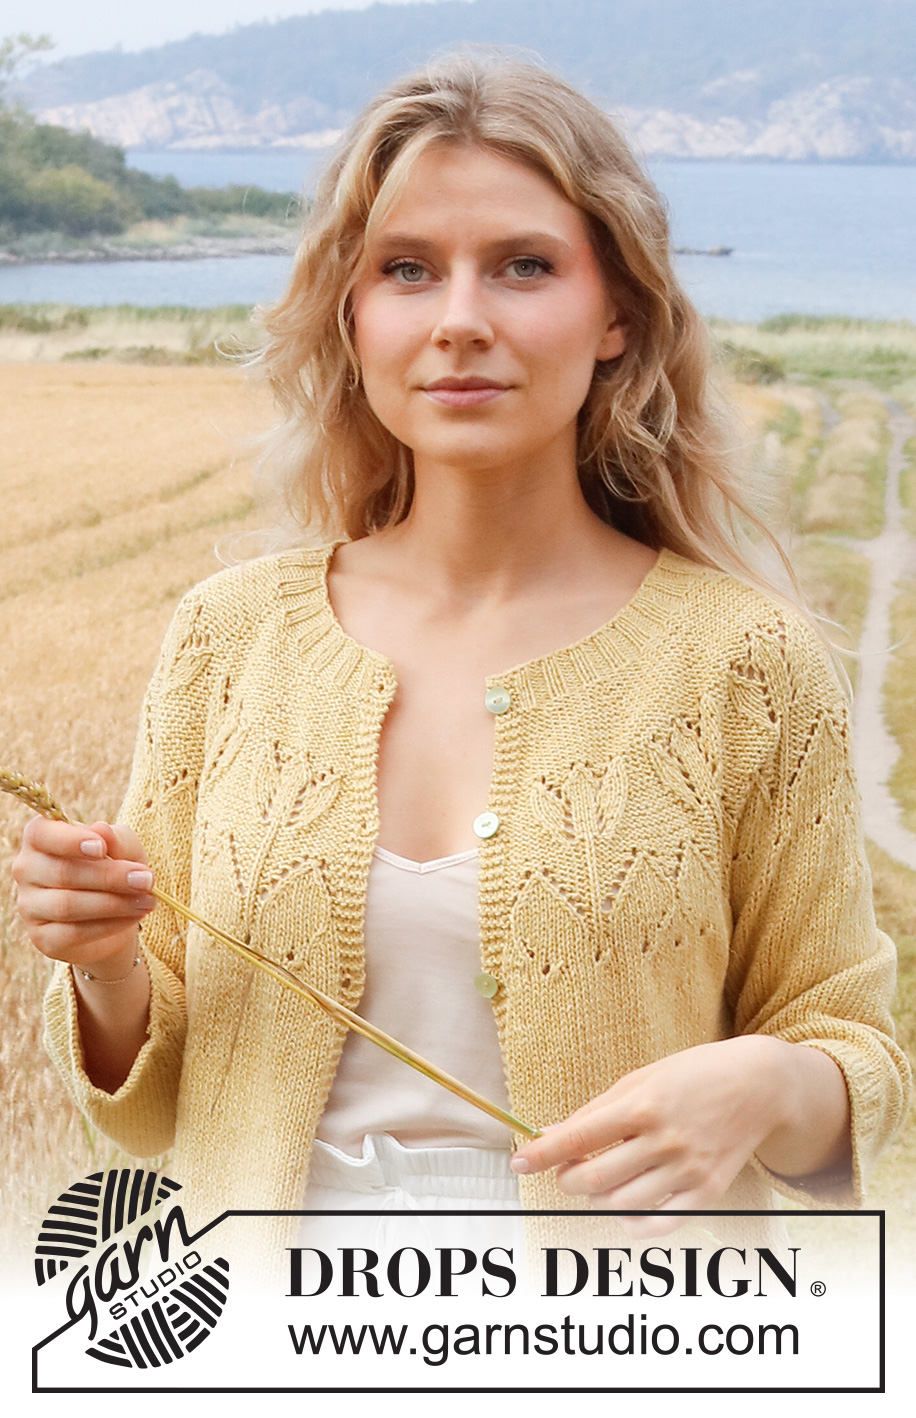
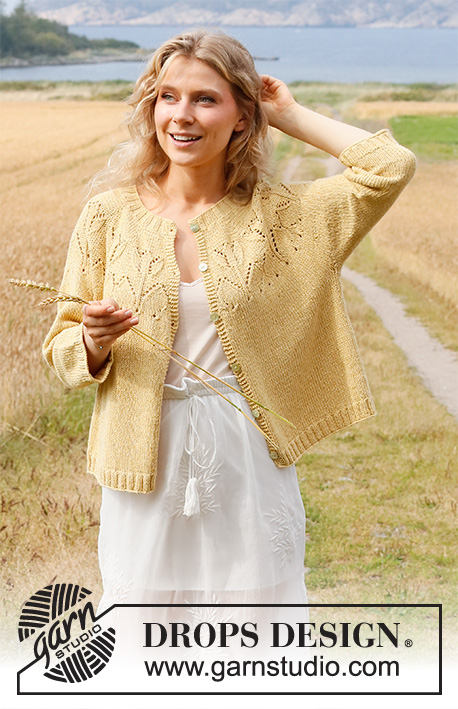
Yellow Tulip Jacket#yellowtulipjacket |
||||||||||||||||||||||||||||
 |
 |
|||||||||||||||||||||||||||
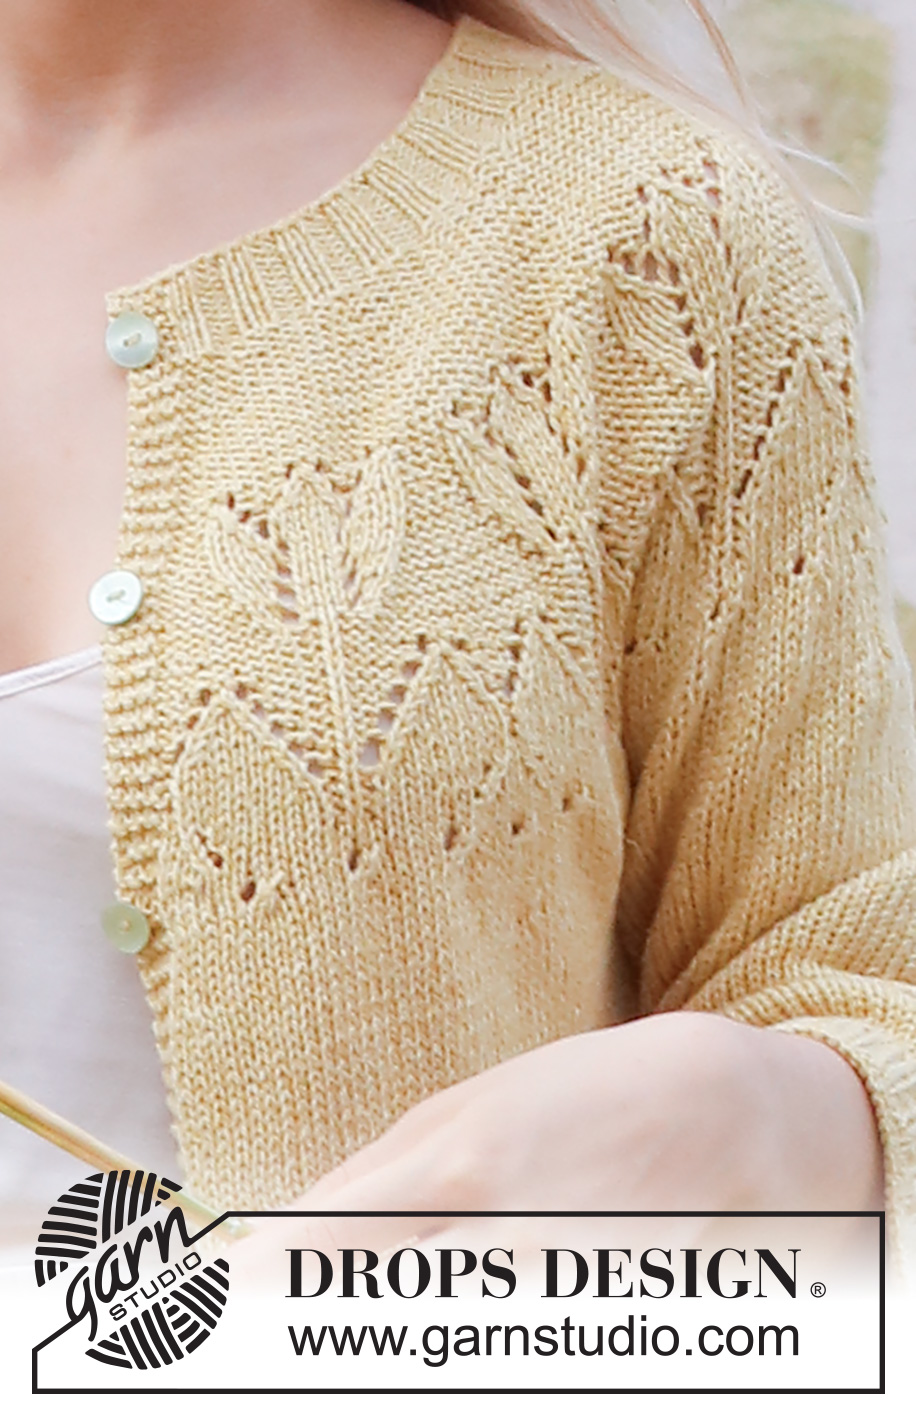
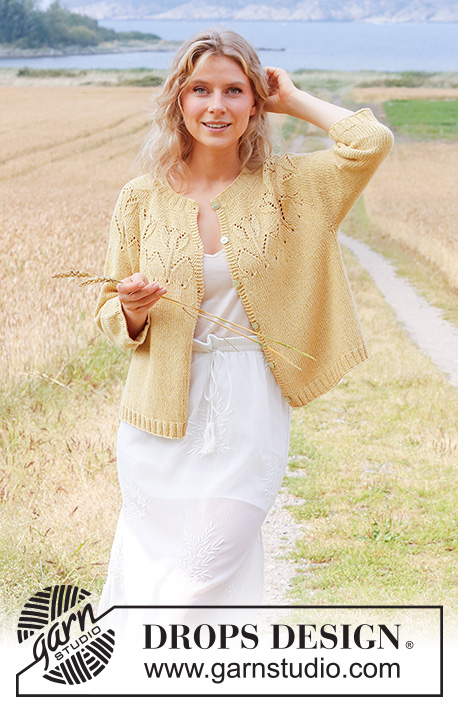
Knitted jacket in DROPS Belle or DROPS Merino Extra Fine. The piece is worked with round yoke, lace pattern and ¾-length sleeves. Sizes S - XXXL.
DROPS 222-3 |
||||||||||||||||||||||||||||
|
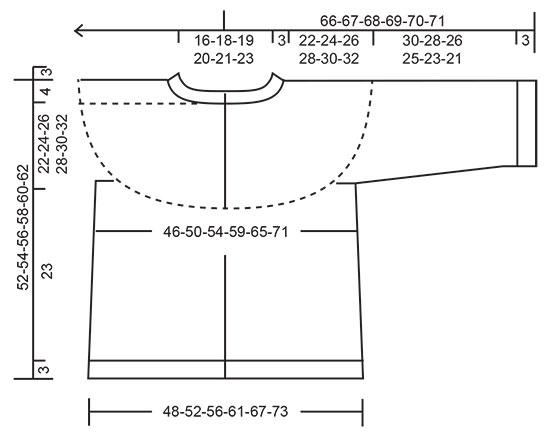
------------------------------------------------------- EXPLANATIONS FOR THE PATTERN: ------------------------------------------------------- RIDGE/GARTER STITCH (worked back and forth): Knit all rows. 1 ridge in height = Knit 2 rows. PATTERN: See diagrams A.1 to A.3. The diagrams show all rows in the pattern from the right side. DECREASE/INCREASE TIP (evenly spaced): To work out how to decrease/increase evenly, count the total number of stitches on needle (e.g. 258 stitches), minus the bands (e.g. 8 stitches) and divide by the number of decreases/increases to be made (e.g. 48) = 5.2. In this example, decrease by knitting together approx. each 4th and 5th stitch. When increasing, make 1 yarn over after approx. each 5th stitch. On the next row work the yarn overs twisted to avoid holes. DECREASE TIP-1 (for sides of body): All decreases are worked from the right side! Decrease 1 stitch on each side of the marker thread as follows: Work until there are 3 stitches left before the marker thread, knit 2 together, knit 2 (marker thread sits between these 2 stitches) slip 1 stitch as if to knit, knit 1 and pass the slipped stitch over the knitted stitch (= 2 stitches decreased and a total of 4 stitches decreased on the row). DECREASE TIP-2 (for yoke): Decrease evenly spaced in the same way as described under DECREASE/INCREASE TIP, but now decrease by purling 2 together. INCREASE TIP (for sleeves): Work until there are 2 stitches left before the marker thread, 1 yarn over, knit 4 (marker thread sits between these 4 stitches), 1 yarn over. On the next round knit the yarn overs twisted to avoid holes. Then work the new stitches in stockinette stitch. BUTTONHOLES: Work buttonholes on the right band. 1 BUTTONHOLE = knit together the third and fourth stitch from the edge and make 1 yarn over. On the next row knit the yarn over = hole. Work buttonholes when the piece measures: S: 4, 12, 21, 29, 38 and 46 cm = 1½", 4¾", 8¼", 11⅜", 15" and 18" M: 5, 14, 22, 31, 39 and 48 cm = 2", 5½", 8¾", 12¼", 15¼" and 19" L: 5, 14, 23, 32, 41 and 50 cm = 2", 5½", 9", 12½", 16⅛" and 19¾" XL: 2, 12, 22, 32, 42 and 52 cm = ¾", 4¾", 8¾", 12½", 16½" and 20½" XXL: 3, 12, 20, 29, 37, 46 and 54 cm = 1⅛", 4¾", 8", 11⅜", 14½", 18" and 21¼" XXXL: 5, 14, 22, 31, 39, 48 and 56 cm = 2", 5½", 8¾", 12¼", 15¼", 19" and 22" ------------------------------------------------------- START THE PIECE HERE: ------------------------------------------------------- JACKET – SHORT OVERVIEW OF THE PIECE. The body is worked back and forth with circular needle, bottom up as far as the armholes. The sleeves are worked in the round with double pointed needles/short circular needle. The sleeves are placed on the same circular needle as the body and the yoke is worked back and forth to finish. BODY: Cast on 258-278-298-322-354-386 stitches with circular needle size 3 MM = US 2.5 and Belle or Merino Extra Fine. Purl 1 row from the wrong side. Then work rib as follows: 4 band stitches in GARTER STITCH – read description above, * knit 2, purl 2 *, work from *-* until there are 6 stitches left, knit 2 and 4 band stitches in garter stitch. Continue this rib back and forth for 3 cm = 1⅛". Knit 1 row from the right side where you decrease 48-52-56-58-64-72 stitches evenly spaced – read DECREASE/INCREASE TIP = 210-226-242-264-290-314 stitches. Remember BUTTONHOLES on the right band – read description above. Purl 1 row back from the wrong side (the 4 band stitches on each side are knitted). Change to circular needle size 4 MM = US 6 and work stockinette stitch, with 4 band stitches in garter stitch on each side. REMEMBER THE KNITTING GAUGE! When the piece measures 11 cm = 4⅜", insert 1 marker thread in each side, i.e. 55-59-63-68-74-81 stitches in from each side (= 100-108-116-128-142-152 stitches on the back piece). Allow the threads to follow your work onwards. On the next row from the right side decrease 1 stitch on each side of both marker threads – read DECREASE TIP-1. Repeat this decrease when the piece measures 20 cm = 8" = 202-218-234-256-282-306 stitches. When the piece measures 26 cm = 10¼", bind off for the armholes on the next row as follows: Work the first 49-53-56-61-66-73 stitches (= front piece), bind off 8-8-10-10-12-12 stitches (=4-4-5-5-6-6 stitches on each side of the marker thread), work the next 88-96-102-114-126-136 stitches (= back piece), bind off 8-8-10-10-12-12 stitches (=4-4-5-5-6-6 stitches on each side of the marker thread), work the remaining 49-53-56-61-66-73 stitches (= front piece). Lay the piece to one side and work the sleeves. SLEEVES: Cast on 60-64-68-68-72-76 stitches with double pointed needles size 3 MM = US 2.5 and Belle or Merino Extra Fine. Knit 1 round. Then work rib (knit 2, purl 2) in the round for 3 cm = 1⅛". Knit 1 round where you decrease 9-12-13-12-14-15 stitches evenly spaced = 51-52-55-56-58-61 stitches. Change to double pointed needles size 4 MM = US 6. Insert a marker thread at the beginning of the round; allow the thread to follow your work onwards. Work stockinette stitch. When the piece measures 8 cm = 3⅛" increase 2 stitches under the sleeve – read INCREASE TIP. Increase as follows in the different sizes: S: Increase every 9th round a total of 8 times. M: Increase every 5th round a total of 12 times. L: Increase alternately every 4th and 3rd round a total of 15 times. XL: Increase every 3rd round a total of 16 times. XXL: Increase alternately every 3rd and 2nd round a total of 17 times. XXXL: Increase every 2nd round a total of 18 times. When all the increases are finished there are 67-76-85-88-92-97 stitches on the round. Continue working until the sleeve measures 33-31-29-28-26-24 cm = 13"-12¼"-11⅜"-11"-10¼"-9½". Now bind off 8-8-10-10-12-12 stitches under the sleeve for the armhole (=4-4-5-5-6-6 stitches on each side of the marker thread) = 59-68-75-78-80-85 stitches. Lay the piece to one side and work the other sleeve in the same way. YOKE: Place the sleeves on the same circular needle as the body, where stitches were bind off for the armholes = 304-338-364-392-418-452 stitches. THE PIECE IS NOW MEASURED FROM HERE! Work stockinette stitch back and forth, with 4 band stitches in garter stitch on each side. AT THE SAME TIME decrease in the different sizes as follows: Sizes S, M and L: When the piece measures 1-3-5 cm = ⅜"-1⅛"-2" decrease 10-18-18 stitches evenly spaced = 294-320-346 stitches. Sizes XL, XXL and XXXL: When the piece measures 3-4-5 cm = 1⅛"-1½"-2" decrease 10-10-14 stitches evenly spaced. Repeat when the piece measures 6-7-8 cm = 2⅜"-2¾"-3⅛" = 372-398-424 stitches. When the piece measures 3-5-7-9-11-13 cm = 1⅛"-2"-2¾"-3½"-4⅜"-5⅛", work pattern as follows: 4 band stitches in garter stitch, A.1 (= 25 stitches), A.2 until there are 5 stitches left (= 10-11-12-13-14-15 repeats of 26 stitches), A.1 (= 1 stitch), 4 band stitches in garter stitch. Continue back and forth like this until the diagrams have been completed in height = 130-141-152-163-174-185 stitches. Purl 1 row from the right side (4 band stitches on each side are knitted) and decrease at the same time, 20-23-30-37-44-47 stitches evenly spaced – read DECREASE TIP-2 = 110-118-122-126-130-138 stitches. Purl 1 row back from the wrong side (band stitches knitted). Change to circular needle size 3 MM = US 2.5 and work rib as follows: 4 band stitches in garter stitch, * knit 2, purl 2 *, work from *-* until there are 6 stitches left, knit 2 and 4 band stitches in garter stitch. Continue like this for 3 cm = 1⅛". Bind off with knit over knit and purl over purl. The jacket measures approx. 52-54-56-58-60-62 cm = 20½"-21¼"-22"-22¾"-23⅝"-24⅜" from the shoulder down. ASSEMBLY: Sew the openings under each sleeve. Sew the buttons onto the left band. |
||||||||||||||||||||||||||||
Diagram explanations |
||||||||||||||||||||||||||||
|
||||||||||||||||||||||||||||
 |
||||||||||||||||||||||||||||
 |
||||||||||||||||||||||||||||
 |
||||||||||||||||||||||||||||
Have you finished this pattern?Tag your pictures with #dropspattern #yellowtulipjacket or submit them to the #dropsfan gallery. Do you need help with this pattern?You'll find 30 tutorial videos, a Comments/Questions area and more by visiting the pattern on garnstudio.com. © 1982-2026 DROPS Design A/S. We reserve all rights. This document, including all its sub-sections, has copyrights. Read more about what you can do with our patterns at the bottom of each pattern on our site. |
||||||||||||||||||||||||||||


With over 40 years in knitting and crochet design, DROPS Design offers one of the most extensive collections of free patterns on the internet - translated to 17 languages. As of today we count 324 catalogs and 12290 patterns - 12280 of which are translated into English (US/in).
We work hard to bring you the best knitting and crochet have to offer, inspiration and advice as well as great quality yarns at incredible prices! Would you like to use our patterns for other than personal use? You can read what you are allowed to do in the Copyright text at the bottom of all our patterns. Happy crafting!
Post a comment to pattern DROPS 222-3
We would love to hear what you have to say about this pattern!
If you want to leave a question, please make sure you select the correct category in the form below, to speed up the answering process. Required fields are marked *.